Page 9 of 72
 in radio mode, tune to the selection. Press and
hold the desired memory preset button (")
Refer to the System Overview
graphics on the previous page.
1. Memory presets: To save a
station (AM/FM1/FM2) in radio mode, tune to the selection. Press and
hold the desired memory preset button (1–6). Press the memory preset
buttons (1-6) to access your preset stations. In CD mode, press the
memory preset buttons (1-6) to play the disc in the corresponding slot
location.
2. CD slot: To load a CD: Press LOAD and a specific memory preset to
load a CD to a specific slot. Once LOAD CD# appears in the display, the
CD door will open. Insert the CD label side up.
3.
(Eject): Press the eject
button to eject a single disc. Press
and hold the button to eject all discs
present in the system. To eject a specific disc, EJECT and then press the
corresponding memory preset button. If you do not select a specific disc,
the system will automatically eject the disc that is currently playing.
4. LOAD: Press the load button to
load a single disc. Press and hold
the button to load discs in all empty
slot locations.
5. MAP: Press to access the
navigation map. Press while the map
display is active to re-center the
map on the current vehicle position. Press the button while the map
display is active and a route is active to step through the different map
guidance views.
6. DEST (Destination): Press to
access the navigation destination
entry menu. Press while in the
navigation destination entry menu to show additional destination entry
techniques.
7. NAV (Navigation): Press to
access the navigation menu. Press
while in the navigation menu to step
through the navigation menu tabs.
2007 (nv2)
Supplement
USA (fus)
System overview
9
Page 10 of 72

8.REPEAT: Press the repeat button
while navigation guidance is active
to repeat the last spoken navigation
guidance prompt.
9. TUNE: In radio mode, press
TUNEto manually advance
down or up the frequency band. In
MP3 mode, press
TUNEto
advance to the previous/next folder.
Note: This feature requires a disc containing MP3 files organized in
multiple folders.
10. SEEK: In radio mode, press
SEEK
/to seek to the
next/previous available station. In
CDX6 / DVD mode (if equipped),
press SEEK
/to change the next/previous track.
11. MENU: Press to access the
system menu. Press while the
system menu is active to step
through the system menu tabs.
12. MUTE: Press to mute the
playing media. Press again to return
to the playing media.
13. SOUND: Press to access the
Sound menu. Press while in the
sound menu to step through the
sound menu tabs.
14. MEDIA: Press to access the
media menu. Press while in the
media menu to step through the
media menu tabs consisting of various sources.
2007 (nv2)
Supplement
USA (fus)
System overview
10
Page 11 of 72
15.On/Off/Volume: Press to turn
the audio system on/off. Press and
hold to turn the navigation radio
completely off. Turn to adjust the
volume of the audio system or the
navigation voice prompts as they are
being given.
Note: If a route is active when the navigation radio is turned off, the
route is resumed when the system is turned on again.
After the system initializes, the screen will be divided in two sections:
• Status bar: This is the top portion of screen that displays the clock
or date and useful information, depending on current mode.
• Display area: The interactive screen that is activated by finger touch
and changes depending on current system operation. Graphical
buttons are displayed in this area depending on the current screen for
the user to make choices.
2007 (nv2)
Supplement
USA (fus)
System overview
11
Page 12 of 72

Your vehicle is equipped with the
THX �certified premium audio
system. This system creates optimal
acoustic quality for all seating
positions and road condi")
THX AUDIO SYSTEM (LINCOLN VEHICLES ONLY)
Your vehicle is equipped with the
THX �certified premium audio
system. This system creates optimal
acoustic quality for all seating
positions and road conditions.
The system offers an advanced
speaker system, amplifier, subwoofer
and equalizer.
AM
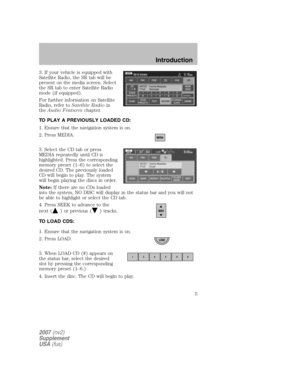
1. Ensure that the navigation system is on.
2. Press MEDIA.
3. Select AM. Once in AM mode,
you may select between SHOW
OPTIONS and SHOW PRESETS.
4. Press SHOW OPTIONS to select
from:
• SCAN: Press for a brief sampling
of all listenable stations. Press
again to disable and remain on
the current selection.
• SCAN PRESETS: Press for a
brief sampling of all the stations
held in the memory presets.
• AUTOSET PRESETS: The autoset feature allows you to set strong
radio stations without losing your original preset stations. This feature
is helpful on trips when traveling between cities with different radio
stations.
To enable, select AUTOSET PRESETS and the six strongest stations
in your current area will be set as presets. To return to your original
presets, press AUTOSET PRESETS again and the feature will disable.
2007 (nv2)
Supplement
USA (fus)
Audio features
12
Page 13 of 72
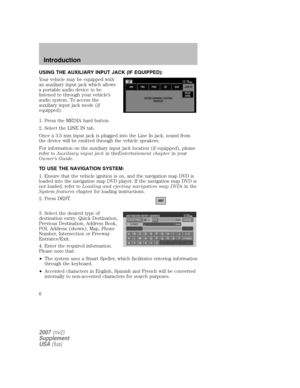
5. Press SHOW PRESETS to view
the preset stations. To set or change
a preset station, press and hold any
of the memory presets buttons
(1–6) or any of the soft key memory
preset buttons on the screen while
on the desired station. The new
station will replace the previous one
recorded.
FM
1. Ensure that the navigation system is on.
2. Press MEDIA.
3. Select FM1 or FM2. Once in FM
mode, you may select between
SHOW OPTIONS and SHOW PRESETS.
2007 (nv2)
Supplement
USA (fus)
Audio features
13
Page 14 of 72

4. Press SHOW OPTIONS to select
from:
• SCAN: Press for a brief sampling
of all listenable stations. Press
again to disable and remain on
the current selection.
• SCAN PRESETS: Press for a
brief sampling of all the stations
held in the memory presets.
• AUTOSET PRESETS: The autoset feature allows you to set strong
radio stations without losing your original preset stations. This feature
is helpful on trips when traveling between cities with different radio
stations.
To enable, select AUTOSET PRESETS and the six strongest stations
in your current area will be set as presets. To return to your original
presets, press AUTOSET PRESETS again and the feature will disable.
• RDS: This feature allows the radio system to receive text information
from RDS-equipped FM radio stations. In FM mode, press RDS to
activate/deactivate. RDS must be activated in order to access PTY and
SET PTY.
• PTY: This feature allows the user to search for Radio Data System
(RDS) stations selectively by their program type. To be able to select
this feature, RDS must be enabled. PTY and station call letters will be
displayed on the Status Bar.
• SET PTY: Press to select a program type, which, once selected, will
be displayed above the SET PTY button. Once PTY has been
programmed, press SEEK or SCAN to initiate a search up or down the
frequency. The search will stop when the desired program type has
been reached.
Note: The system will scan the frequency band three times for the
chosen program type. If the program type is unavailable in your
reception range, the system will return to the previous station.
2007 (nv2)
Supplement
USA (fus)
Audio features
14
Page 15 of 72

5. Press SHOW PRESETS to view
the preset stations. To set or change
a preset station, press and hold any
of the presets while on the desired
station. The new station will replace
the previous one recorded.
CD
To load a CD:
1. Press LOAD.
Note: CD units are designed to play commercially pressed 4.75 in
(12 cm) audio compact discs only. Due to technical
incompatibility, certain recordable and re-recordable compact
discs may not function correctly when used in Ford CD players.
Irregular shaped CDs, CDs with a scratch protection film
attached, and CDs with homemade paper (adhesive) labels should
not be inserted into the CD player. The label may peel and cause
the CD to become jammed. It is recommended that homemade
CDs be identified with permanent felt tip marker rather than
adhesive labels. Ballpoint pens may damage CDs. Please contact
your authorized dealer for further information.
2. Select the desired slot by
pressing the corresponding memory
preset button (1–6).
3. Insert the disc, label side up,
when LOAD CD# appears in the
status bar. The CD will begin to
play.
The following functions are available
in CD mode:
• SEEK: In CD or MP3 mode, press to listen to the next (
)or
previous (
) track. In MP3 mode with FOLDER MODE selected,
press SEEK to advance to the first track in the same folder.
2007 (nv2)
Supplement
USA (fus)
Audio features
15
Page 16 of 72
 or previous
(
) folder.
•
(Reverse): Press to step back through current track.
•
/(Play/Pause): Press to play or pause the current track.
�")
•TUNE: In MP3 mode, press to advance to the next () or previous
(
) folder.
•
(Reverse): Press to step back through current track.
•
/(Play/Pause): Press to play or pause the current track.
•
(Fast forward): Press to advance through the current track.
• SCAN: In CD mode, press to hear a brief sampling of all tracks on the
current CD. In MP3 mode, press for a brief sampling of all tracks in all
folders.
For an MP3 disc with multiple folders, pressing FOLDER MODE when
running a scan will result in brief sampling of all songs in the current
folder.
• COMP (Compression): Press to engage the compression feature.
COMPRESSION boosts more quiet music and lowers louder music to
minimize the need for volume adjustments. Press again to disengage.
• REPEAT: Press to repeat the current track. REPEAT will appear in
the Status Bar when selected. Press again to disengage.
• SHUFFLE: Press to engage the shuffle feature. When playing MP3
files, if FOLDER MODE is engaged, the system will shuffle the songs
within the current folder only; otherwise, it will shuffle all the tracks
in the disc. Press again to disengage.
• FOLDER MODE: Press to play only the tracks in the current folder,
when playing MP3 files arranged in separate folders.
• TEXT: When available, displays information from the CD.
SOUND FEATURES
The sound menu allows you to access settings such as Bass, Treble,
Fade, Balance, Digital Signal Processing (DSP) and Speed Compensated
Volume (SCV).
2007 (nv2)
Supplement
USA (fus)
Audio features
16


 or any of the soft key memory
preset buttons on the scre")