2007 KIA CARNIVAL turn signal
[x] Cancel search: turn signalPage 1211 of 1575
2007 > 2.7L V6 GASOLINE >
DESCRIPTION
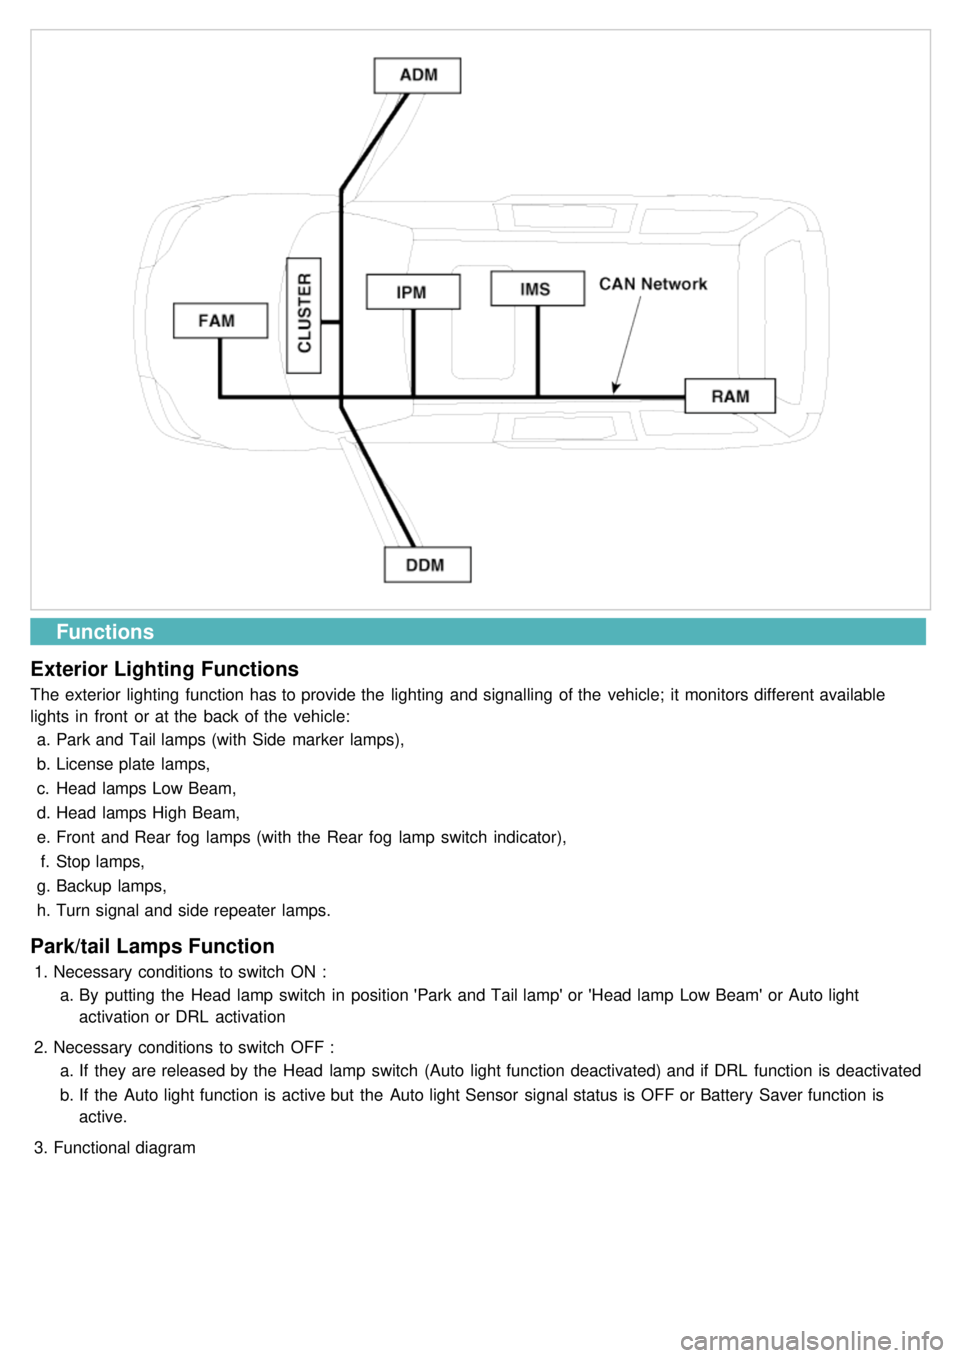
All modules are linked a low speed CAN network.
The input information for the modules is coming from both the CAN network and the hardware components
(actuatorsand sensors).
a. FAM (Front Area Module)
a. Headlamp low/high beam control (with DRL)
b. Park lamp control
c. Front fog lamp control
d. Front turn signal lamp control
e. Windshield wiper control
f. Windshield deicer
g. Diagnostics
b. IPM (In - Panel Module)
a. RKE (Remote Keyless Control)
b. VAS (Voice Alarm System)
c. Ignition key hole illumination
d. Switch indicators control
e. Panel light control
f. Seat belt warning
g. Auto light/DRL control (Logic)
h. Windshield/Rear wiper control (Logic)
i. Turn and Hazard lamp control (Logic)
j. Central door lock (Logic)
k. Windshield deicer timer
l. Rear glass defog timer
m. Gateway for ISO- 9141 (K- Line)
c. RAM (Rear Area Module)
a. Tail lamp control
b. Turn and Hazard lamp control
c. Back up lamp control
d. Rea fog lamp control
e. Stop lamp outage detection
f. Sliding door power window/Quarter glass control
g. Room lamp control
h. Rear wiper control
i. Rear glass defog
j. Fuel filler door open solenoid control
d. ADM (Assist Drive Module)
e. DDM (Driver Drive Module)
MODULE INTRODUCTION
FAM/IPM/RAM consists of a power board and an electronic board. The power board contains circuit protection devices
and switching devices. The electronic board uses Intelligent Power Switching (IPS) for HS/LS load control, logic
functions and CAN/K- Line communication. The power board and electronic board are connected with pin blocks for
the Front Area Module (FAM) and VCD (Variable Connection Displacement) for the In- Panel Module (IPM) and the
Rear Area Module (RAM).
Page 1212 of 1575
Functions
Exterior Lighting Functions
The exterior lighting function has to provide the lighting and signalling of the vehicle; it monitors different available
lights in front or at the back of the vehicle: a. Park and Tail lamps (with Side marker lamps),
b. License plate lamps,
c. Head lamps Low Beam,
d. Head lamps High Beam,
e. Front and Rear fog lamps (with the Rear fog lamp switch indicator),
f. Stop lamps,
g. Backup lamps,
h. Turn signal and side repeater lamps.
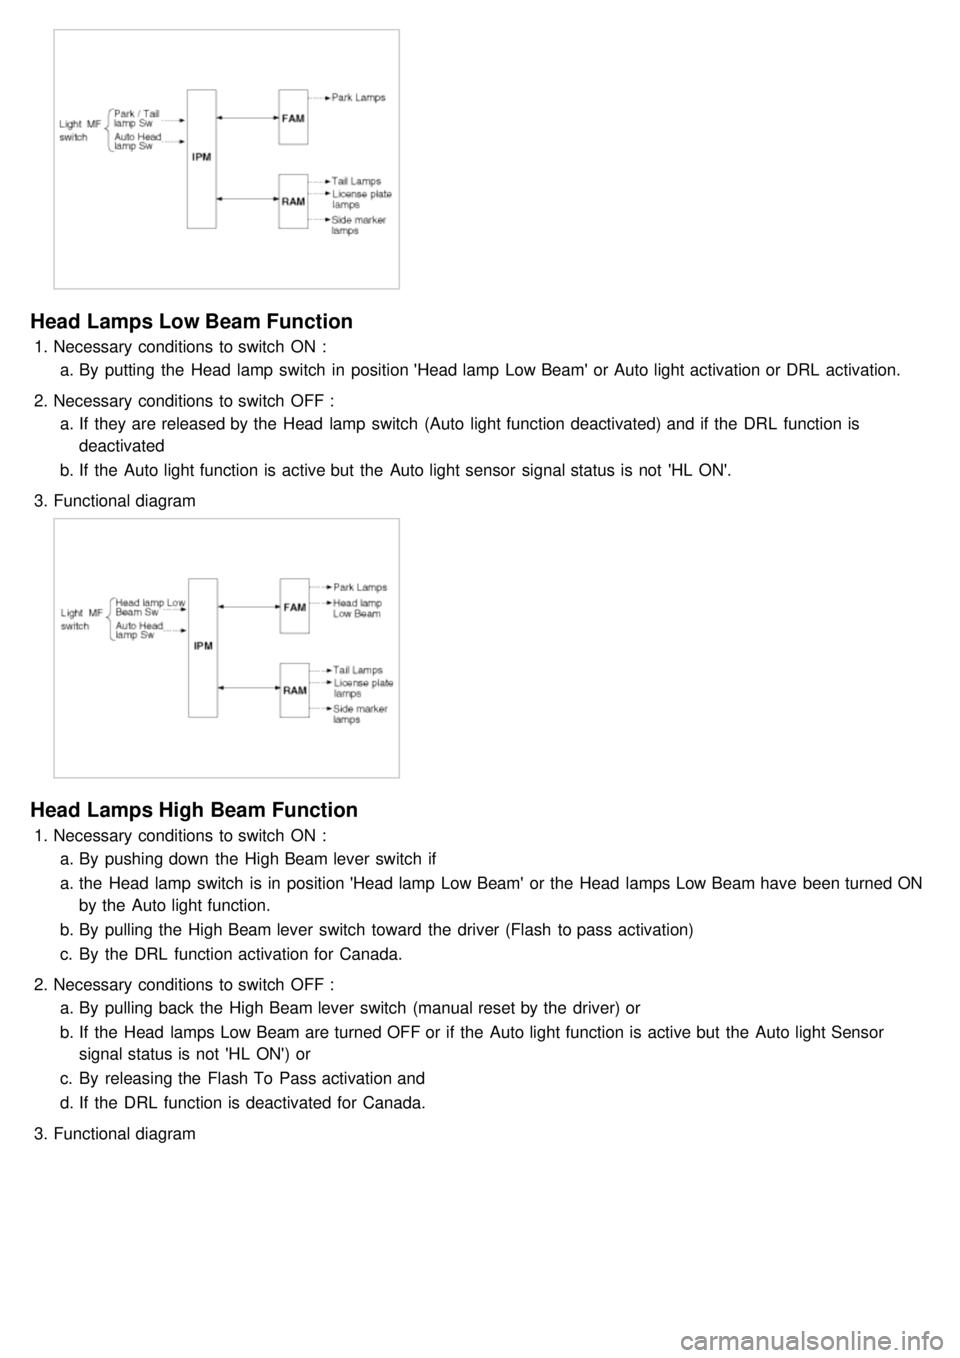
Park/tail Lamps Function
1.Necessary conditions to switch ON :
a. By putting the Head lamp switch in position 'Park and Tail lamp' or 'Head lamp Low Beam' or Auto light
activation or DRL activation
2. Necessary conditions to switch OFF :
a. If they are released by the Head lamp switch (Auto light function deactivated) and if DRL function is deactivated
b. If the Auto light function is active but the Auto light Sensor signal status is OFF or Battery Saver function is
active.
3. Functional diagram
Page 1213 of 1575
Head Lamps Low Beam Function
1.Necessary conditions to switch ON :
a. By putting the Head lamp switch in position 'Head lamp Low Beam' or Auto light activation or DRL activation.
2. Necessary conditions to switch OFF :
a. If they are released by the Head lamp switch (Auto light function deactivated) and if the DRL function is
deactivated
b. If the Auto light function is active but the Auto light sensor signal status is not 'HL ON'.
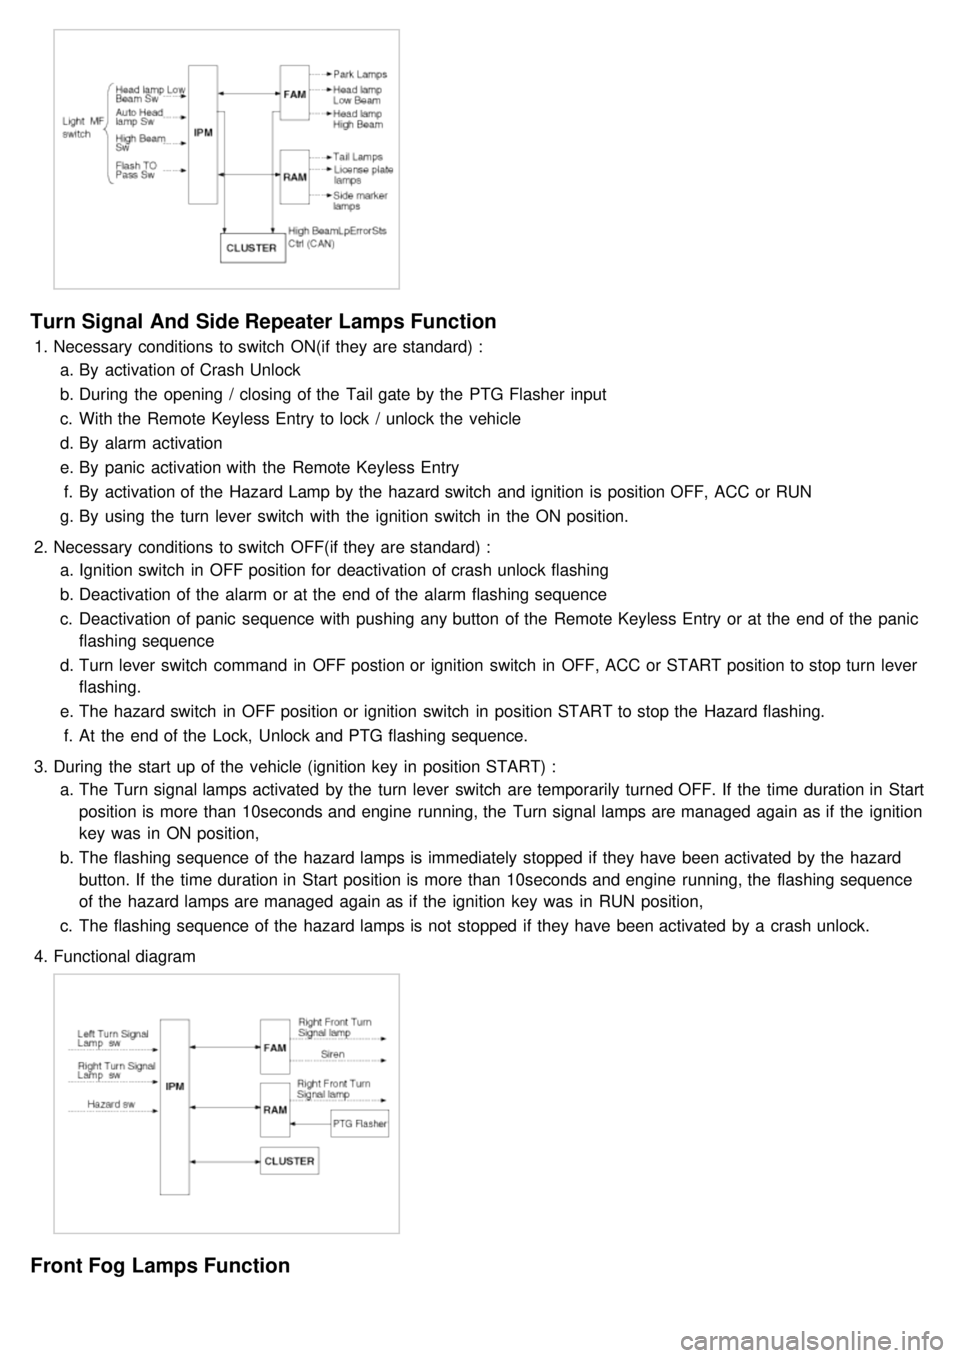
3. Functional diagram
Head Lamps High Beam Function
1.Necessary conditions to switch ON :
a. By pushing down the High Beam lever switch if
a. the Head lamp switch is in position 'Head lamp Low Beam' or the Head lamps Low Beam have been turned ON
by the Auto light function.
b. By pulling the High Beam lever switch toward the driver (Flash to pass activation)
c. By the DRL function activation for Canada.
2. Necessary conditions to switch OFF :
a. By pulling back the High Beam lever switch (manual reset by the driver) or
b. If the Head lamps Low Beam are turned OFF or if the Auto light function is active but the Auto light Sensor
signal status is not 'HL ON') or
c. By releasing the Flash To Pass activation and
d. If the DRL function is deactivated for Canada.
3. Functional diagram
Page 1214 of 1575
Turn Signal And Side Repeater Lamps Function
1.Necessary conditions to switch ON(if they are standard) :
a. By activation of Crash Unlock
b. During the opening / closing of the Tail gate by the PTG Flasher input
c. With the Remote Keyless Entry to lock / unlock the vehicle
d. By alarm activation
e. By panic activation with the Remote Keyless Entry
f. By activation of the Hazard Lamp by the hazard switch and ignition is position OFF, ACC or RUN
g. By using the turn lever switch with the ignition switch in the ON position.
2. Necessary conditions to switch OFF(if they are standard) :
a. Ignition switch in OFF position for deactivation of crash unlock flashing
b. Deactivation of the alarm or at the end of the alarm flashing sequence
c. Deactivation of panic sequence with pushing any button of the Remote Keyless Entry or at the end of the panic
flashing sequence
d. Turn lever switch command in OFF postion or ignition switch in OFF, ACC or START position to stop turn lever
flashing.
e. The hazard switch in OFF position or ignition switch in position START to stop the Hazard flashing.
f. At the end of the Lock, Unlock and PTG flashing sequence.
3. During the start up of the vehicle (ignition key in position START) :
a. The Turn signal lamps activated by the turn lever switch are temporarily turned OFF. If the time duration in Start
position is more than 10seconds and engine running, the Turn signal lamps are managed again as if the ignition
key was in ON position,
b. The flashing sequence of the hazard lamps is immediately stopped if they have been activated by the hazard
button. If the time duration in Start position is more than 10seconds and engine running, the flashing sequence
of the hazard lamps are managed again as if the ignition key was in RUN position,
c. The flashing sequence of the hazard lamps is not stopped if they have been activated by a crash unlock.
4. Functional diagram
Front Fog Lamps Function
Page 1218 of 1575
b.When the multifunction switch is not in postion headlamps turned on or autolight
c. 20 mn after the driver door is open
d. 20mn after IGN leaves the positions RUN to ACC or OFF
e. If IPM receives RKE "LOCK" command two times
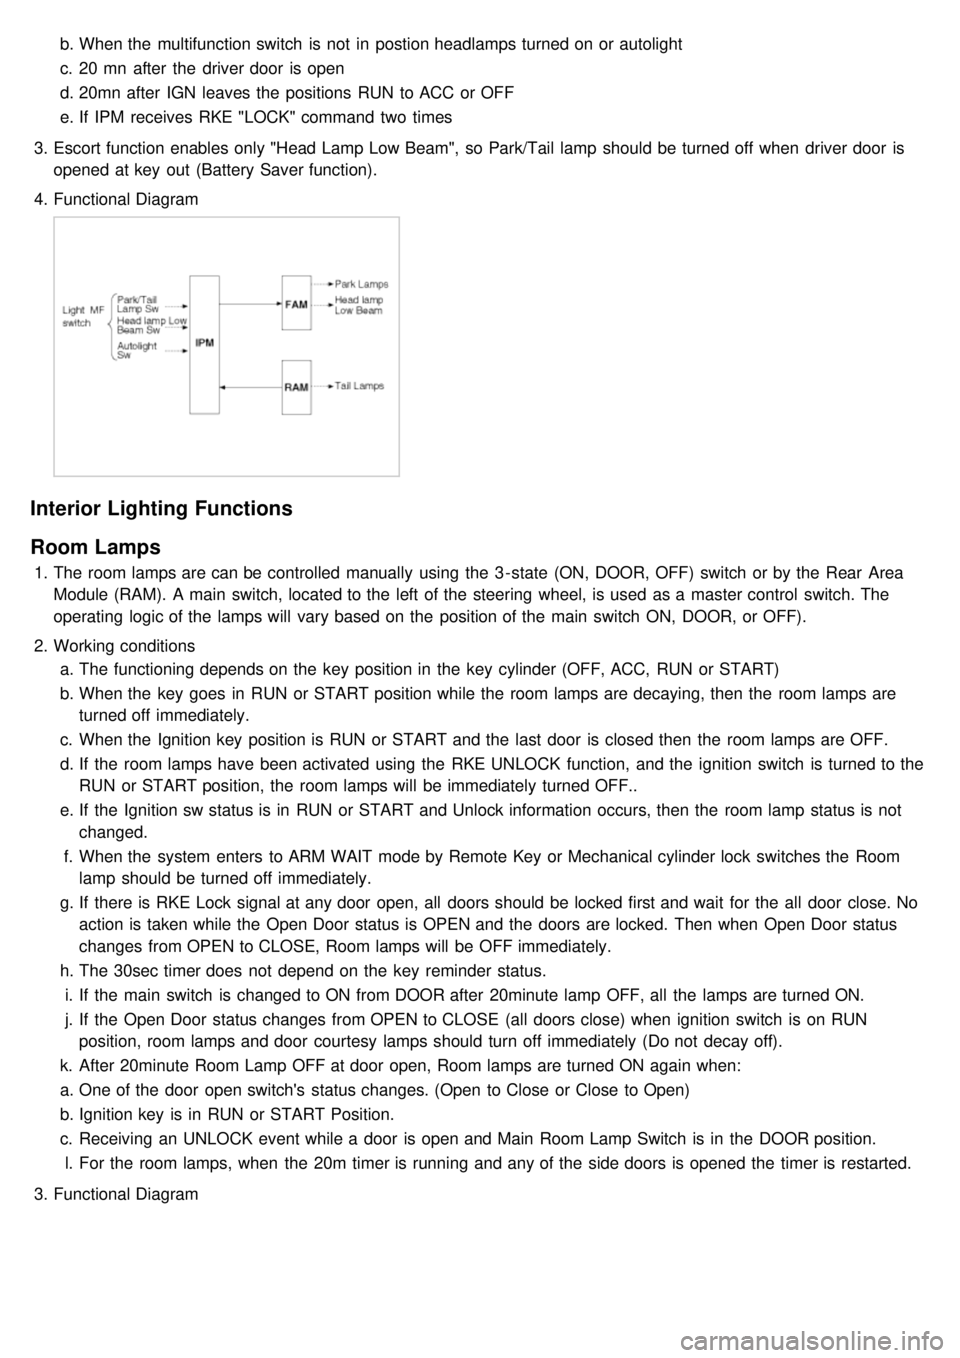
3. Escort function enables only "Head Lamp Low Beam", so Park/Tail lamp should be turned off when driver door is
opened at key out (Battery Saver function).
4. Functional Diagram
Interior Lighting Functions
Room Lamps
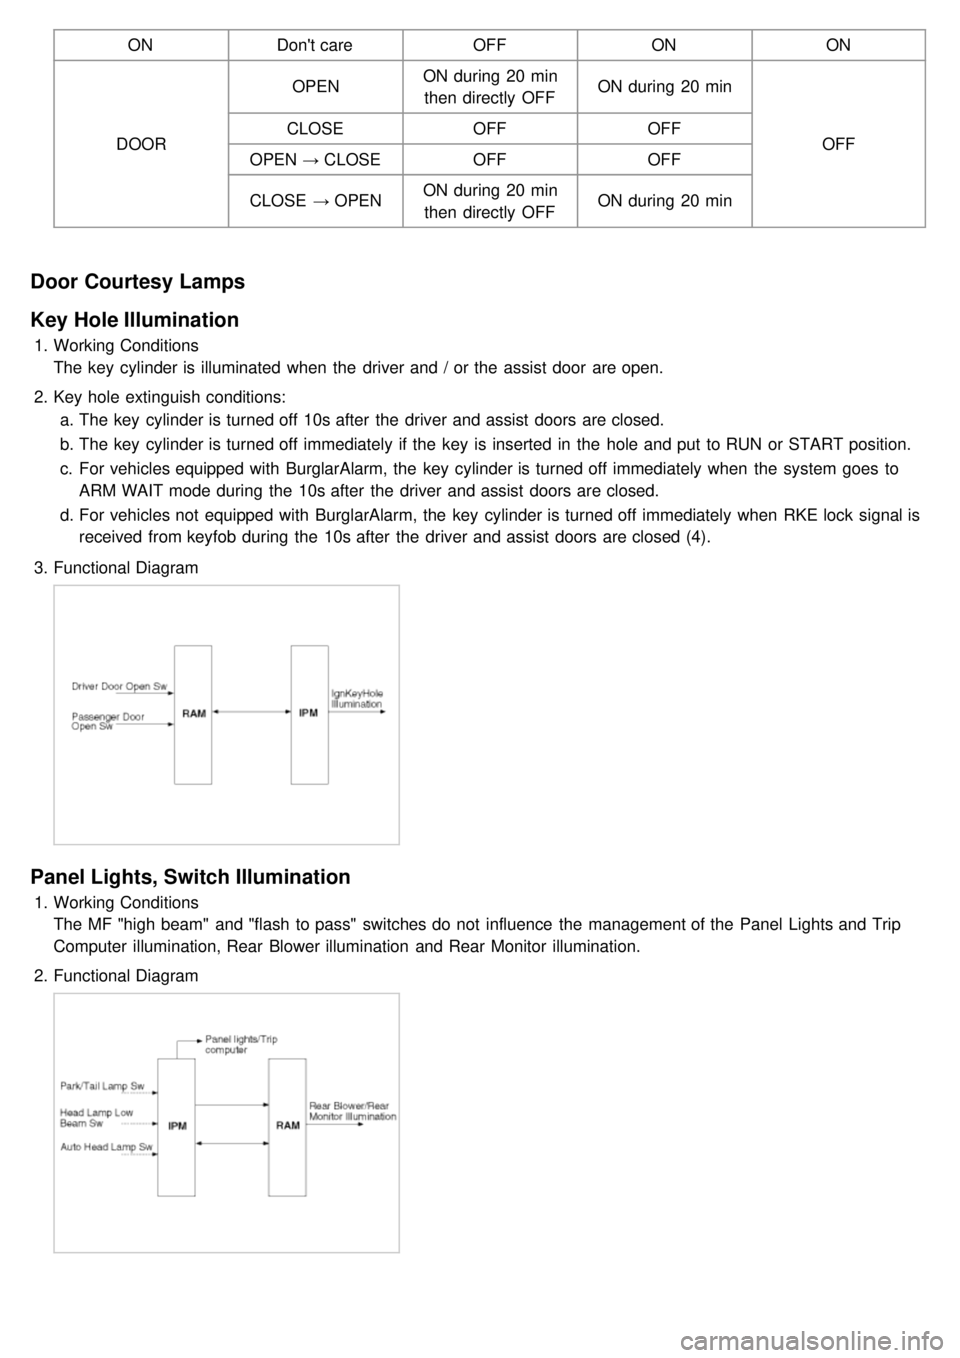
1.The room lamps are can be controlled manually using the 3 - state (ON, DOOR, OFF) switch or by the Rear Area
Module (RAM). A main switch, located to the left of the steering wheel, is used as a master control switch. The
operating logic of the lamps will vary based on the position of the main switch ON, DOOR, or OFF).
2. Working conditions
a. The functioning depends on the key position in the key cylinder (OFF, ACC, RUN or START)
b. When the key goes in RUN or START position while the room lamps are decaying, then the room lamps are
turned off immediately.
c. When the Ignition key position is RUN or START and the last door is closed then the room lamps are OFF.
d. If the room lamps have been activated using the RKE UNLOCK function, and the ignition switch is turned to the
RUN or START position, the room lamps will be immediately turned OFF..
e. If the Ignition sw status is in RUN or START and Unlock information occurs, then the room lamp status is not
changed.
f. When the system enters to ARM WAIT mode by Remote Key or Mechanical cylinder lock switches the Room
lamp should be turned off immediately.
g. If there is RKE Lock signal at any door open, all doors should be locked first and wait for the all door close. No
action is taken while the Open Door status is OPEN and the doors are locked. Then when Open Door status
changes from OPEN to CLOSE, Room lamps will be OFF immediately.
h. The 30sec timer does not depend on the key reminder status.
i. If the main switch is changed to ON from DOOR after 20minute lamp OFF, all the lamps are turned ON.
j. If the Open Door status changes from OPEN to CLOSE (all doors close) when ignition switch is on RUN
position, room lamps and door courtesy lamps should turn off immediately (Do not decay off).
k. After 20minute Room Lamp OFF at door open, Room lamps are turned ON again when:
a. One of the door open switch's status changes. (Open to Close or Close to Open)
b. Ignition key is in RUN or START Position.
c. Receiving an UNLOCK event while a door is open and Main Room Lamp Switch is in the DOOR position.
l. For the room lamps, when the 20m timer is running and any of the side doors is opened the timer is restarted.
3. Functional Diagram
Page 1221 of 1575
ONDon't care OFFONON
DOOR OPEN
ON during 20 min
then directly OFF ON during 20 min
OFF
CLOSE
OFFOFF
OPEN → CLOSE OFF OFF
CLOSE → OPEN ON during 20 min
then directly OFF ON during 20 min
Door Courtesy Lamps
Key Hole Illumination
1.
Working Conditions
The key cylinder is illuminated when the driver and / or the assist door are open.
2. Key hole extinguish conditions:
a. The key cylinder is turned off 10s after the driver and assist doors are closed.
b. The key cylinder is turned off immediately if the key is inserted in the hole and put to RUN or START position.
c. For vehicles equipped with BurglarAlarm, the key cylinder is turned off immediately when the system goes to
ARM WAIT mode during the 10s after the driver and assist doors are closed.
d. For vehicles not equipped with BurglarAlarm, the key cylinder is turned off immediately when RKE lock signal is
received from keyfob during the 10s after the driver and assist doors are closed (4).
3. Functional Diagram
Panel Lights, Switch Illumination
1.Working Conditions
The MF "high beam" and "flash to pass" switches do not influence the management of the Panel Lights and Trip
Computer illumination, Rear Blower illumination and Rear Monitor illumination.
2. Functional Diagram
Page 1222 of 1575
Dimmable Backlighting
1.Working Conditions
The Dimmable backlighting is directly managed by the rheostat.
Power Seat Switch Illumination
1.Working Conditions
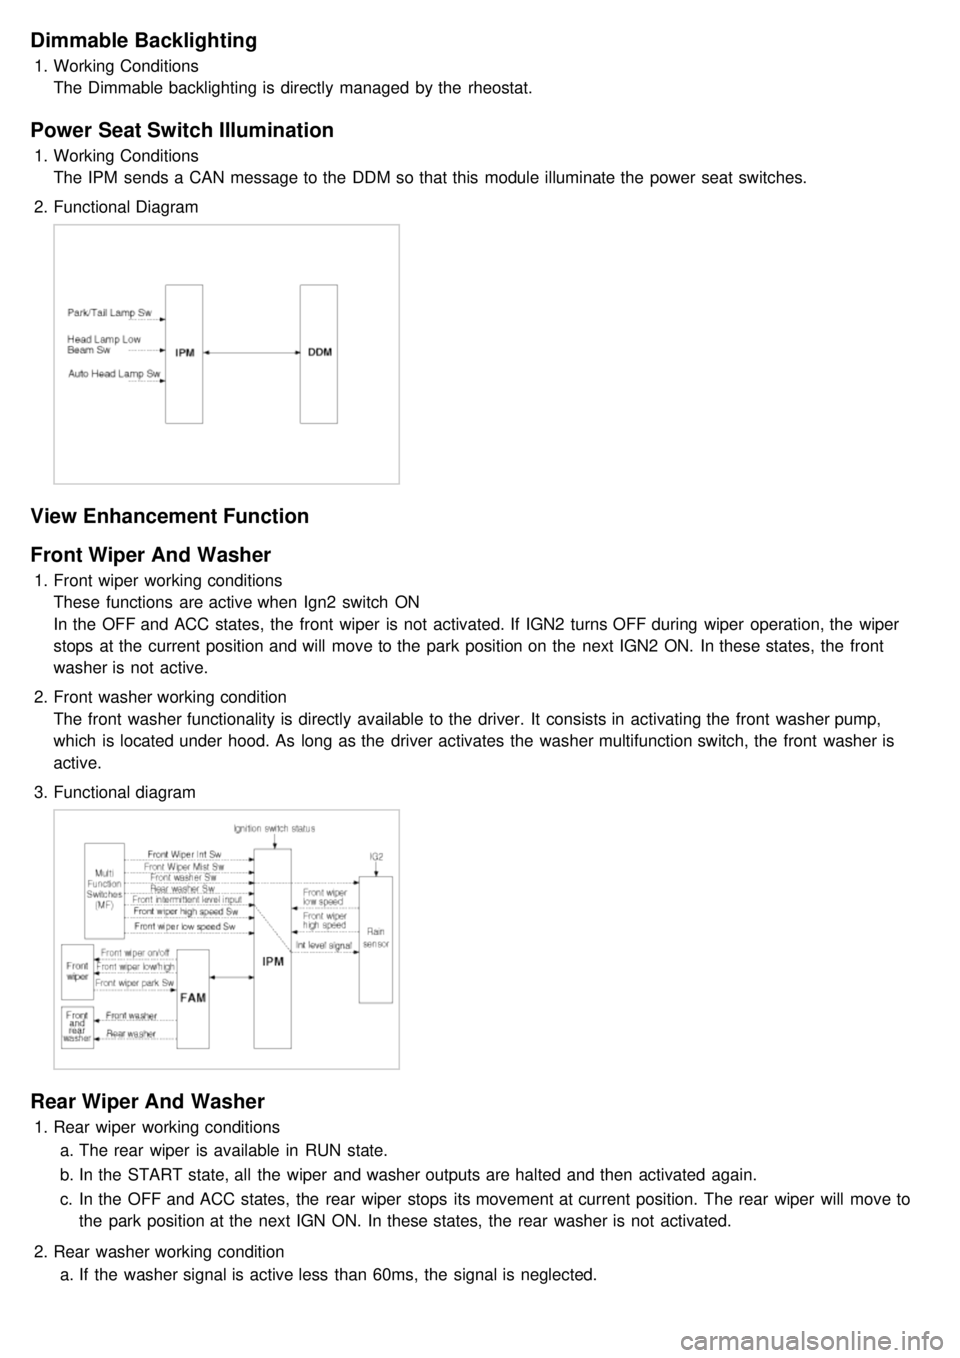
The IPM sends a CAN message to the DDM so that this module illuminate the power seat switches.
2. Functional Diagram
View Enhancement Function
Front Wiper And Washer
1.Front wiper working conditions
These functions are active when Ign2 switch ON
In the OFF and ACC states, the front wiper is not activated. If IGN2 turns OFF during wiper operation, the wiper
stops at the current position and will move to the park position on the next IGN2 ON. In these states, the front
washer is not active.
2. Front washer working condition
The front washer functionality is directly available to the driver. It consists in activating the front washer pump,
which is located under hood. As long as the driver activates the washer multifunction switch, the front washer is
active.
3. Functional diagram
Rear Wiper And Washer
1.Rear wiper working conditions
a. The rear wiper is available in RUN state.
b. In the START state, all the wiper and washer outputs are halted and then activated again.
c. In the OFF and ACC states, the rear wiper stops its movement at current position. The rear wiper will move to
the park position at the next IGN ON. In these states, the rear washer is not activated.
2. Rear washer working condition
a. If the washer signal is active less than 60ms, the signal is neglected.
Page 1223 of 1575
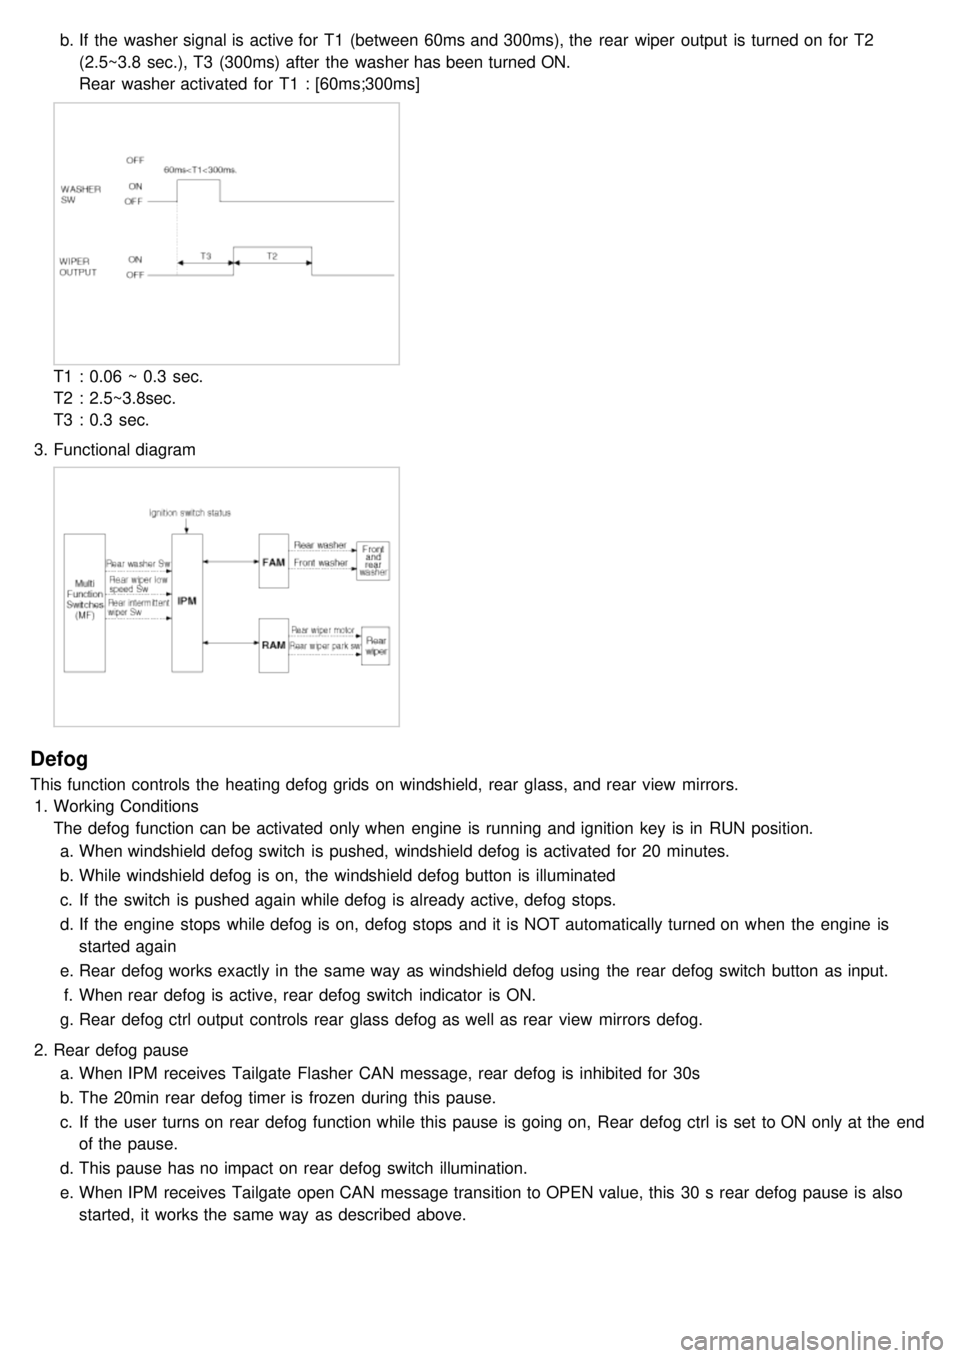
b.If the washer signal is active for T1 (between 60ms and 300ms), the rear wiper output is turned on for T2
(2.5~3.8 sec.), T3 (300ms) after the washer has been turned ON.
Rear washer activated for T1 : [60ms;300ms]
T1 : 0.06 ~ 0.3 sec.
T2 : 2.5~3.8sec.
T3 : 0.3 sec.
3. Functional diagram
Defog
This function controls the heating defog grids on windshield, rear glass, and rear view mirrors.
1. Working Conditions
The defog function can be activated only when engine is running and ignition key is in RUN position.
a. When windshield defog switch is pushed, windshield defog is activated for 20 minutes.
b. While windshield defog is on, the windshield defog button is illuminated
c. If the switch is pushed again while defog is already active, defog stops.
d. If the engine stops while defog is on, defog stops and it is NOT automatically turned on when the engine is
started again
e. Rear defog works exactly in the same way as windshield defog using the rear defog switch button as input.
f. When rear defog is active, rear defog switch indicator is ON.
g. Rear defog ctrl output controls rear glass defog as well as rear view mirrors defog.
2. Rear defog pause
a. When IPM receives Tailgate Flasher CAN message, rear defog is inhibited for 30s
b. The 20min rear defog timer is frozen during this pause.
c. If the user turns on rear defog function while this pause is going on, Rear defog ctrl is set to ON only at the end
of the pause.
d. This pause has no impact on rear defog switch illumination.
e. When IPM receives Tailgate open CAN message transition to OPEN value, this 30 s rear defog pause is also
started, it works the same way as described above.