Page 882 of 1575
5.Remove the brake fluid from the master cylinder reservoir (C) with a syringe.
6. Disconnect the brake lines (A) from the master cylinder. To prevent spills, cover the hose joints with rags or shop
towels.
7. Remove the master cylinder mounting nuts (B) and washers.
[LHD]
[RHD]
8.Remove the master cylinder(C) from the brake booster. Be careful not to bend or damage the brake lines when
removing the master cylinder.
INSTALLATION
1.Install the master cylinder on the brake booster with 2 nuts.
2. Connect the two brake tubes and the brake fluid level sensor connector.
[LHD]
Page 1032 of 1575
b.Loosen the hinge mounting bolts (C) slightly, and move the door BACKWARD or FORWARD, UP or DOWN as
necessary to equalize the gaps.
c. Place a shop towel (D) on the jack (E) to prevent damage to the door when adjusting the door.
3.Check that the door and body edges are parallel.
4.Grease the pivot portions of the hinges indicated by the arrows.
5.Check for water leaks.
DOOR STRIKER ADJUSTMENT
Make sure the door latches securely without slamming It.
If necessary, adjust the striker (A): The striker nuts Are fixed. The strike can be fine adjusted up or down, and in or
out. striker ceater to be adjusted max ± 1.5mm
1. Loosen the screws (B), then insert a shop towel between the body and striker(A).
Page 1033 of 1575
2.Lightly tighten the screws.
3. Wrap the striker with a shop towel, then adjust the striker by tapping it with a plastic hammer.
Do not tap the striker too hard.
4. Loosen the screws and remove the shop towel.
5. Lightly tighten the screws.
6. Hold the outer handle out, and push the door against the body to be sure the striker allows a flush fit. If the door
latches properly, tighten the screws and recheck.
Page 1045 of 1575
DOOR STRIKER ADJUSTMENT
Make sure the door latches securely without slamming It.
If necessary, adjust the striker (A): The strike nuts Are fixed. The strike can be fine adjusted up or down, and in or out.
striker ceater to be adjusted max ± 1.5mm1. Loosen the screws (B), then insert a shop towel between the body and striker(A).
2.Lightly tighten the screws.
3. Wrap the striker with a shop towel, then adjust the striker by tapping it with a plastic hammer.
Do not tap the striker too hard.
4. Loosen the screws and remove the shop towel.
5. Lightly tighten the screws.
6. Hold the outer handle out, and push the door against the body to be sure the striker allows a flush fit. If the door
latches properly, tighten the screws and recheck.
Page 1100 of 1575

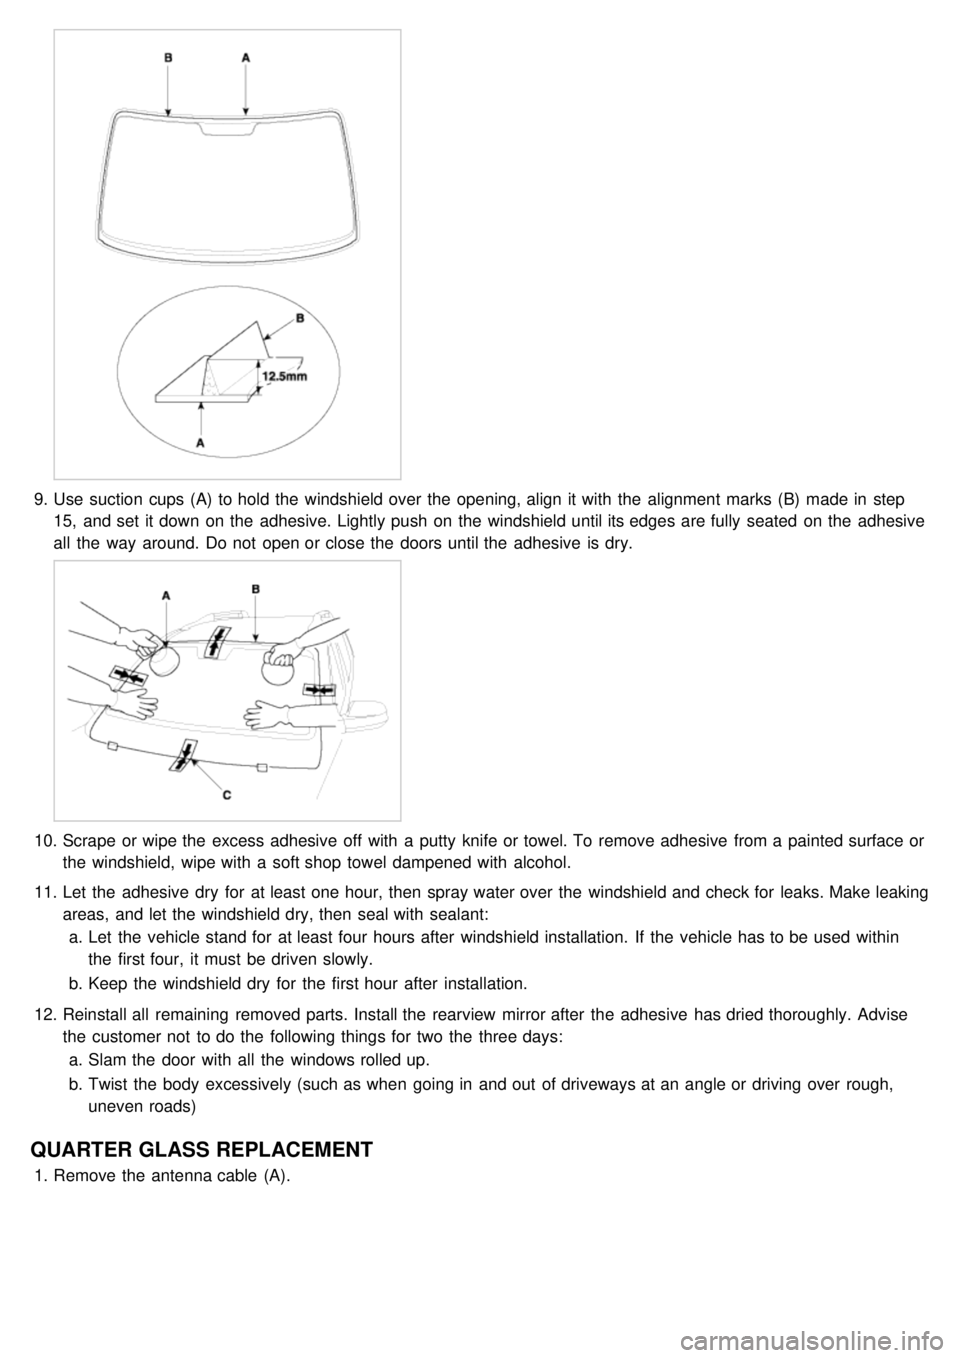
9.Use suction cups (A) to hold the windshield over the opening, align it with the alignment marks (B) made in step
15, and set it down on the adhesive. Lightly push on the windshield until its edges are fully seated on the adhesive
all the way around. Do not open or close the doors until the adhesive is dry.
10. Scrape or wipe the excess adhesive off with a putty knife or towel. To remove adhesive from a painted surface or
the windshield, wipe with a soft shop towel dampened with alcohol.
11. Let the adhesive dry for at least one hour, then spray water over the windshield and check for leaks. Make leaking
areas, and let the windshield dry, then seal with sealant:
a. Let the vehicle stand for at least four hours after windshield installation. If the vehicle has to be used within
the first four, it must be driven slowly.
b. Keep the windshield dry for the first hour after installation.
12. Reinstall all remaining removed parts. Install the rearview mirror after the adhesive has dried thoroughly. Advise
the customer not to do the following things for two the three days:
a. Slam the door with all the windows rolled up.
b. Twist the body excessively (such as when going in and out of driveways at an angle or driving over rough,
uneven roads)
QUARTER GLASS REPLACEMENT
1.Remove the antenna cable (A).
Page 1213 of 1575

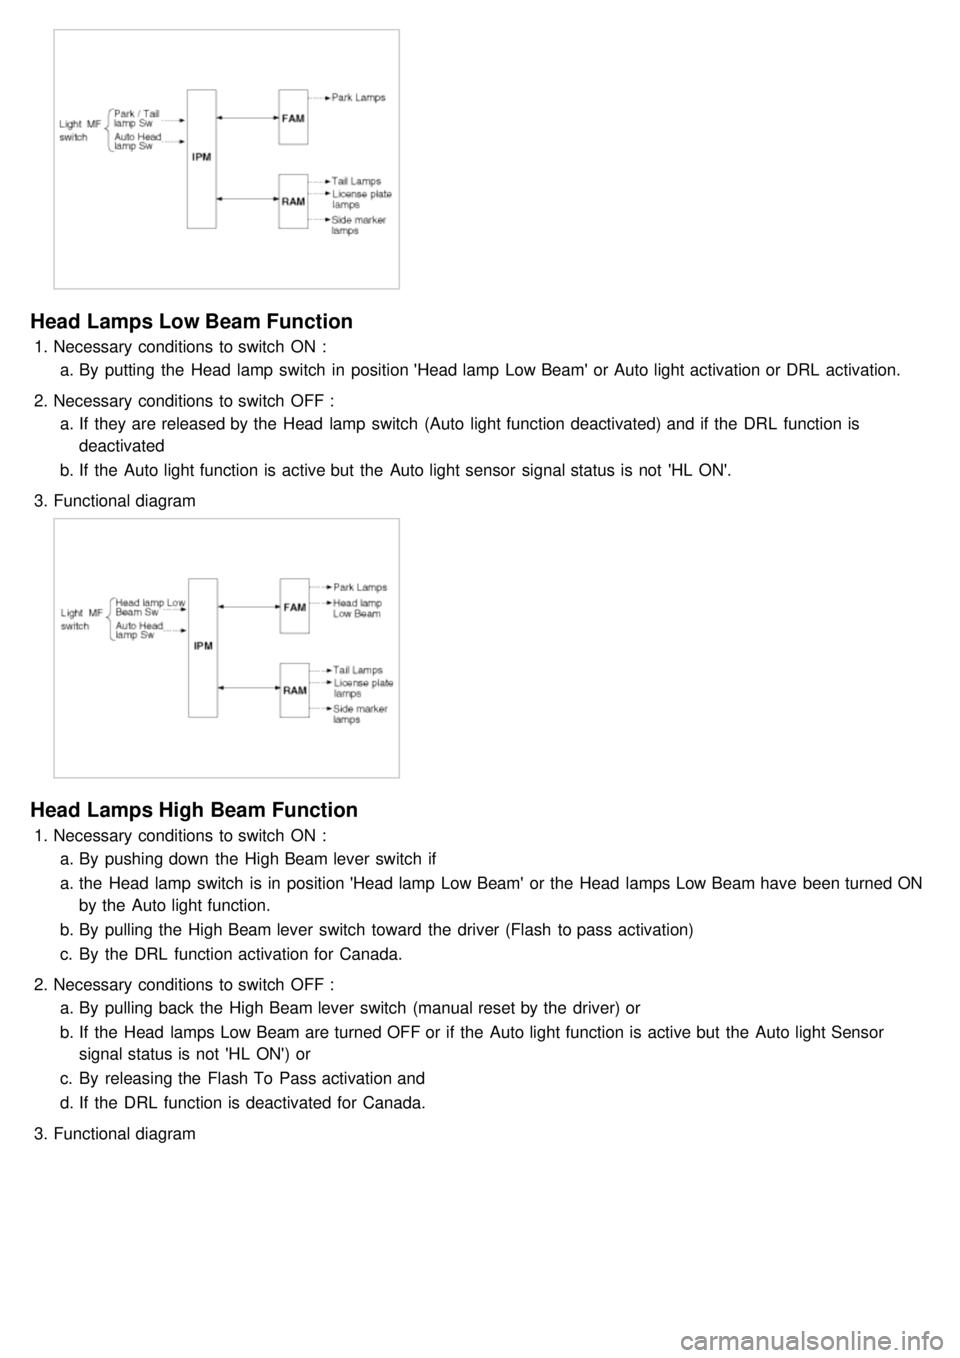
Head Lamps Low Beam Function
1.Necessary conditions to switch ON :
a. By putting the Head lamp switch in position 'Head lamp Low Beam' or Auto light activation or DRL activation.
2. Necessary conditions to switch OFF :
a. If they are released by the Head lamp switch (Auto light function deactivated) and if the DRL function is
deactivated
b. If the Auto light function is active but the Auto light sensor signal status is not 'HL ON'.
3. Functional diagram
Head Lamps High Beam Function
1.Necessary conditions to switch ON :
a. By pushing down the High Beam lever switch if
a. the Head lamp switch is in position 'Head lamp Low Beam' or the Head lamps Low Beam have been turned ON
by the Auto light function.
b. By pulling the High Beam lever switch toward the driver (Flash to pass activation)
c. By the DRL function activation for Canada.
2. Necessary conditions to switch OFF :
a. By pulling back the High Beam lever switch (manual reset by the driver) or
b. If the Head lamps Low Beam are turned OFF or if the Auto light function is active but the Auto light Sensor
signal status is not 'HL ON') or
c. By releasing the Flash To Pass activation and
d. If the DRL function is deactivated for Canada.
3. Functional diagram
Page 1259 of 1575

2007 > 2.7L V6 GASOLINE >
DESCRIPTION
An optimal seat position set by a driver can be memorized in P/seat unit by memory SW and position SW, which
enables restoration of seat position set by the driver despite seat adjustments.
Furthermore, data is transmitted between P/seat and IPM, DDM, ADM, RAM, FAM, CLUSTER through CAN BUS.
Seat position presets cannot be recalled while driving. An emergency stop function is provided; additional functions are
described below.
1. It conducts manual operation of seat by CAN BUS data transmitted by DDM as well as that of adjustable pedal by
CAN BUS data transmitted by IPM received when operating SW manually.
2. Manual SW behavior when communication stops (back- up behavior)
a. Slide front/rear
b. Recline front/rear
c. Position control of slide motor is possible by manual SW even in case of congestion in CPU or removal of a
fuse for P/seat unit B.
3. 2 memory locations are provided for storing seat, outside mirror, and adjustable pedal presets.
4. The driver seat can be set to slide rearward when the ignition key is removed, and forward when the key is
inserted.
5. 2 additional presets for seat, mirror, and adjustable pedal position can be stored with the RKE transmitter.
OPERATION
MANUAL OPERATION
Manual operation of the driver seat and adjustable pedals is possible provided the transaxle is in 'P' range and the
vehicle speed is 0 MPH. Operation of the manual controls overrides any automatic operation commanded via CAN.
MEMORY OPERATION
1. Pressing the 'M' button on the control panel will place the system into memory storage mode and will result in a
single pulse from the output buzzer.
2. If one of the memory location buttons is pressed and held within 5 seconds of pressing the 'M' button, the output
buzzer will pulse twice to indicate successful storage of seat, mirror, and adjustable pedal positions.
3. The ignition switch must be in the RUN or START position, the vehicle speed must be 0 MPH, and the transaxle
must be in 'P' range to store memory presets.
4. Pressing the 'M' button while recalling a stored preset will halt the preset recall operation.
5. Memory will be cleared if battery is removed.
MEMORY REPLAY OPERATION
1.Pressing one of the memory location buttons will result in the driver seat, outside mirrors, and adjustable pedals
being positioned based on the stored preset data.
2. The ignition switch must be in the RUN position, the transaxle must be in 'P' range, the vehicle speed must be 0
MPH, and the manual functions must not be in operation to recall stored presets.
3. Others
a. Play operation not recorded in the position switch will not be conducted and there will be no buzzer output.
b. If other data is received during preset recall operation, the most recent preset recall signal will take
precedence.
c. If engine is started during preset recall operation, halt preset recall operation, and resume it toward target
position 100ms after Ignition switch is returned to "RUN". However, if the START state lasts over 5 sec., it will
not resume even after returning to RUN.
d. If preset recall order is received during engine start, preset recall operation is inhibited.
e. If input from manual switch for seat and adjust pedal occurs during preset recall operation of seat and adjust
pedal, halt all their preset recall operations.
f. If an error occurs during manual operation of seat and adjust pedal, delete Memory.
Page 1533 of 1575

2007 > 2.7L V6 GASOLINE >
DESCRIPTION
When reversing, the driver is not easy to find objects in the blind spots and to determine the distance from the object.
In order to provide the driver safety and convenience, back warning system will operate upon shifting to "R" Ultrasonic
sensor will emit ultrasonic wave rearward and detect the reflected wave. Control unit will calculate distance to the
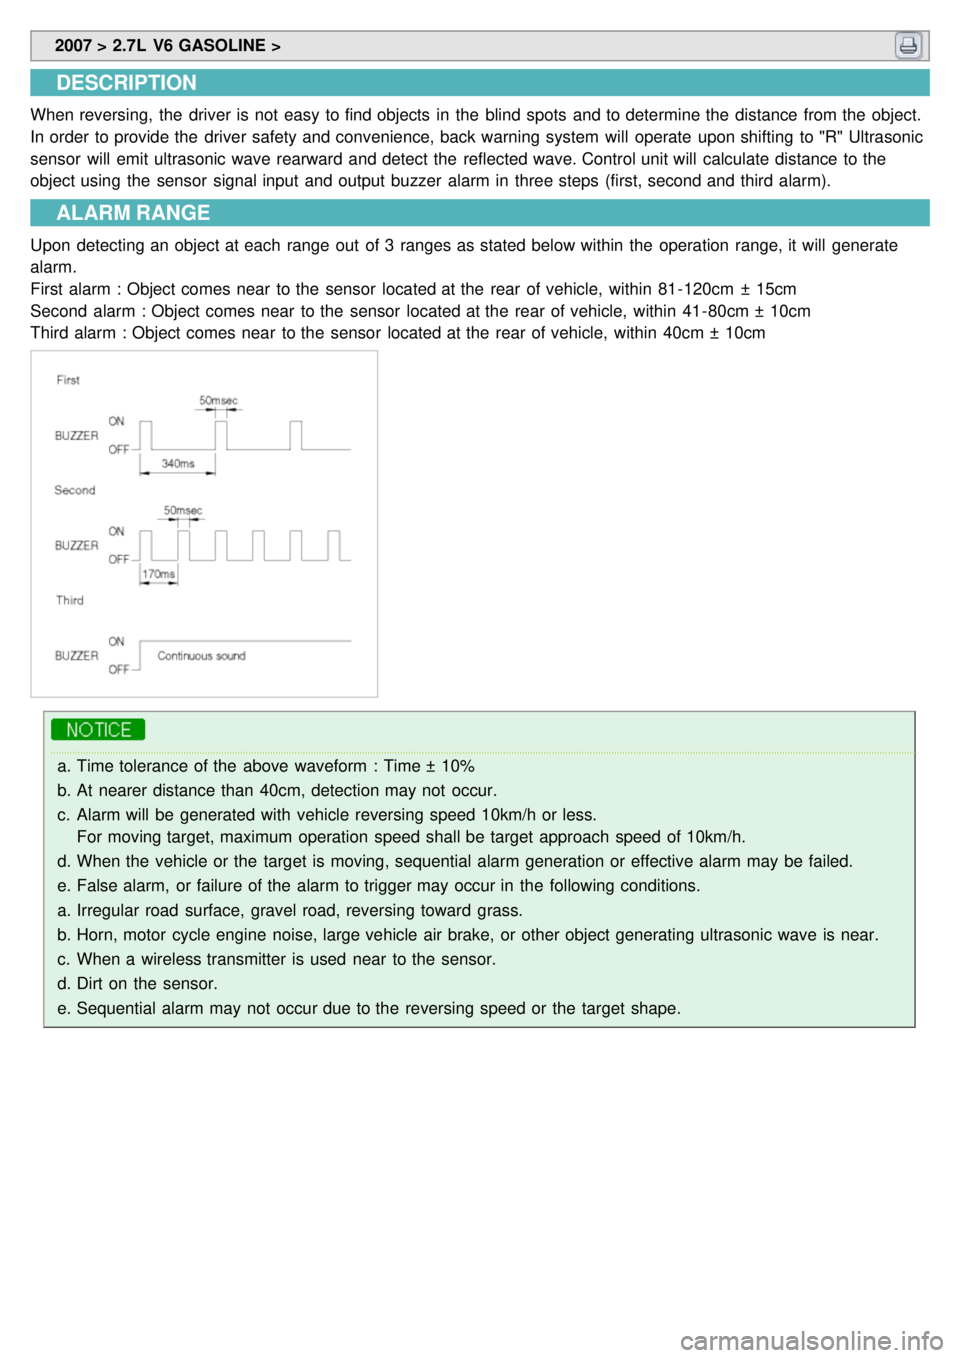
object using the sensor signal input and output buzzer alarm in three steps (first, second and third alarm).
ALARM RANGE
Upon detecting an object at each range out of 3 ranges as stated below within the operation range, it will generate
alarm.
First alarm : Object comes near to the sensor located at the rear of vehicle, within 81- 120cm ± 15cm
Second alarm : Object comes near to the sensor located at the rear of vehicle, within 41- 80cm ± 10cm
Third alarm : Object comes near to the sensor located at the rear of vehicle, within 40cm ± 10cm
a.Time tolerance of the above waveform : Time ± 10%
b. At nearer distance than 40cm, detection may not occur.
c. Alarm will be generated with vehicle reversing speed 10km/h or less.
For moving target, maximum operation speed shall be target approach speed of 10km/h.
d. When the vehicle or the target is moving, sequential alarm generation or effective alarm may be failed.
e. False alarm, or failure of the alarm to trigger may occur in the following conditions.
a. Irregular road surface, gravel road, reversing toward grass.
b. Horn, motor cycle engine noise, large vehicle air brake, or other object generating ultrasonic wave is near.
c. When a wireless transmitter is used near to the sensor.
d. Dirt on the sensor.
e. Sequential alarm may not occur due to the reversing speed or the target shape.