2007 ISUZU KB P190 Fuel line
[x] Cancel search: Fuel linePage 1580 of 6020
FUEL SYSTEM (4JK1/4JJ1) 6C-39
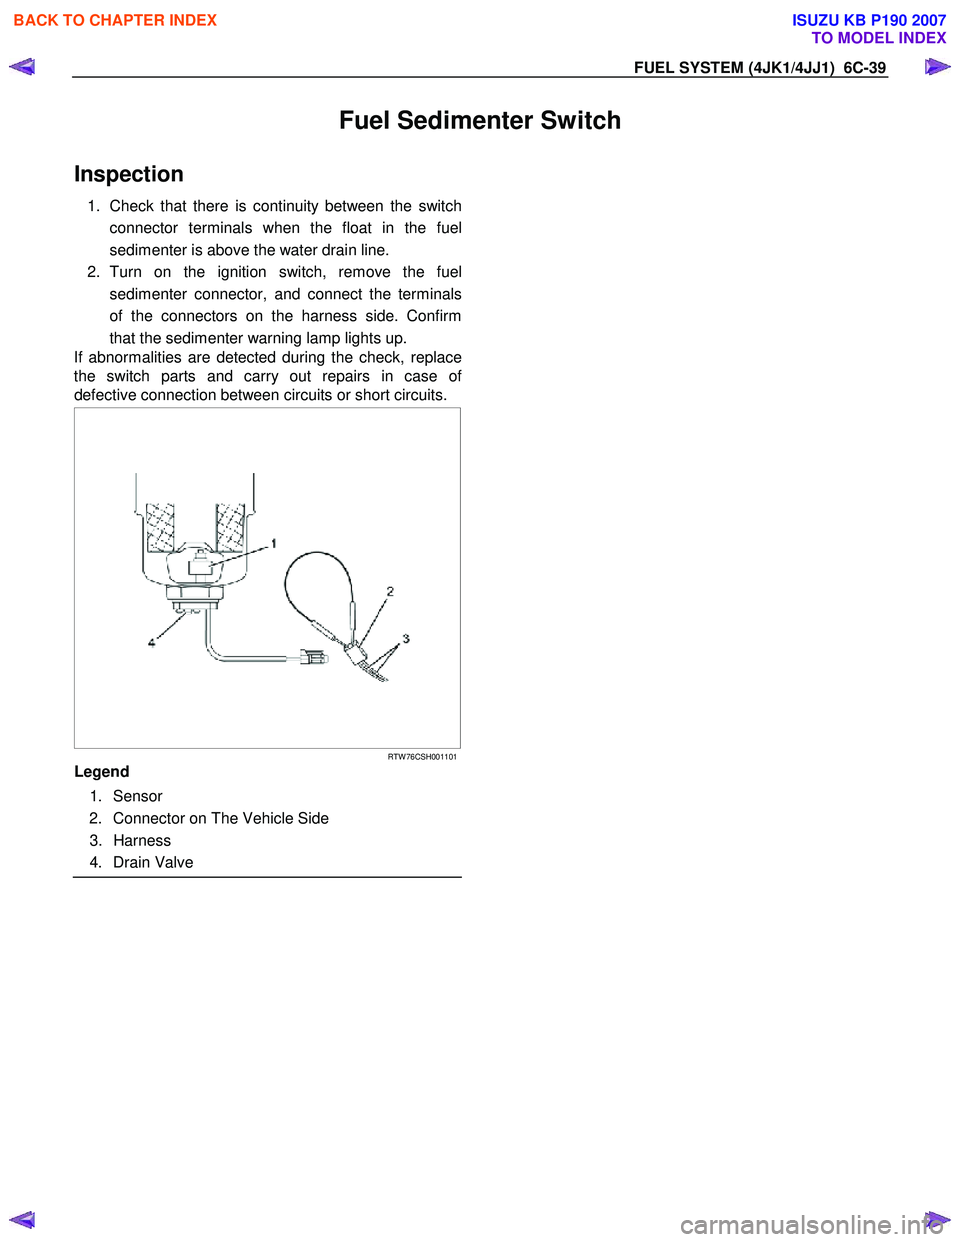
Fuel Sedimenter Switch
Inspection
1. Check that there is continuity between the switch
connector terminals when the float in the fuel
sedimenter is above the water drain line.
2. Turn on the ignition switch, remove the fuel sedimenter connector, and connect the terminals
of the connectors on the harness side. Confirm
that the sedimenter warning lamp lights up.
If abnormalities are detected during the check, replace
the switch parts and carry out repairs in case o
f
defective connection between circuits or short circuits.
RTW 76CSH001101
Legend
1. Sensor
2. Connector on The Vehicle Side
3. Harness
4. Drain Valve
BACK TO CHAPTER INDEX
TO MODEL INDEX
ISUZU KB P190 2007
Page 1582 of 6020
FUEL SYSTEM (4JK1/4JJ1) 6C-41
Removal
Note: W hen repairs to the fuel system have been
completed, start the engine and check the fuel system
for loose connections or leakage. For the fuel system
diagnosis, see Section "Drivability and Emission".
1. Disconnect the battery ground cable.
2. Slowly loosen the fuel filler cap.
Note: Be careful that fuel does not spout out because o
f
change of pressure in the fuel tank.
Note: Cover opening of the filler neck to prevent an
y
dust entering. 3. Jack up the vehicle.
4. Disconnect the quick connector (5) of the fuel tube at the fuel cooler way.
5. Remove fuel return hose (8) from the pipe.
6. Remove fixing bolt (7) of the bracket fuel coole
r
and remove bracket fuel cooler (6).
Note: Cover the opening of the pipe to prevent any dust
and fuel leakage.
Note: For remove fuel cooler, Remove bolts (10) of the
fuel cooler and remove fuel cooler.
7. Support underneath of the fuel tank with a lifter.
8. Remove the inner liner of the wheel house at rea
r
left side.
9. Remove fixing bolt of the filler neck from the body.
10. Disconnect the quick connector (5) of the fuel tube from the fuel pipe and the evapo tube from evapo
joint connector.
Note: Cover the quick connector to prevent any dust
entering and prevent fuel leakage.
Note: Refer to "Fuel Tube/Quick Connector Fittings" in
this section when performing any repairs.
11. Remove fixing bolt (1) of the tank band and remove the tank band (2).
12. Disconnect the pump and sender connector on the fuel pump and remove the harness from the weld
clip on the fuel tank.
13. Lower the fuel tank (3).
Note: W hen lowering the fuel tank from the vehicle, do
not scratch the hoses and tubes by contact with othe
r
parts.
Installation
1. Raise the fuel tank.
Note: W hen raising the fuel tank to the vehicle, do not
scratch the hoses and tubes by contact with other parts.
2. Connect the pump and sender connector to the fuel pump and install the harness to the weld clip
on the tank.
Note: The connector must be securely connected
against the stopper.
3. Install the tank band and fasten bolt.
Torque: 68 N ⋅
⋅⋅
⋅
m (6.9 kg ⋅
⋅⋅
⋅
m /50 lb ft)
Note: The anchor of the tank band must be securely
installed to the guide hole on the frame.
4. Connect the quick connector of the fuel tube to the fuel pipe and the evapo tube from evapo joint
connector.
Note: Pull off the left checker on the fuel pipe.
Note: Refer to "Fuel Tube/Quick Connector Fittings" in
this section when performing any repairs.
5. Install the filler neck to the body with bolt.
Note: For install the fuel cooler to the bracket with bolt.
Torque: 6.5 N ⋅
⋅⋅
⋅
m (0.7 kg ⋅
⋅⋅
⋅
m /61 lb in)
6. Install the bracket to Frame with bolt. Torque: 48 N ⋅
⋅⋅
⋅
m (4.9 kg ⋅
⋅⋅
⋅
m /35 lb ft)
7. Install the fuel return hose at the fuel cooler way.
8. Install the quick connector at the fuel cooler way.
9. Install the inner liner of the wheel house at rear left side.
10. Remove lifter from the fuel tank.
11. Lower the vehicle.
12. Tighten the filler cap until at least three clicks.
13. Connect the battery ground cable.
BACK TO CHAPTER INDEX
TO MODEL INDEX
ISUZU KB P190 2007
Page 1668 of 6020
ENGINE CONTROL SYSTEM (4JK1/4JJ1) 6E-51
Turbocharger Solenoid Command
This parameter displays the turbocharger nozzle
control solenoid valve control duty ratio based on inputs
to the ECM from various engine sensors. The scan
tool will display a lower percentage when the nozzle is
controlled to open (vacuum pressure supply to the
actuator is reduced). The scan tool will display a higher
percentage when the nozzle is controlled to close
(vacuum pressure supply to the actuator is increased).
Desired Boost Pressure
This parameter displays boost pressure desired by the
ECM based on current driving conditions. This can be
compared to the actual boost pressure to determine
sensor accuracy or turbocharger control problems.
Boost Pressure
This parameter displays the boost pressure in the
intake duct as calculated by the ECM using the signal
from the boost pressure sensor. The scan tool will
display a low boost pressure when the low engine load,
and a high boost pressure when the high engine load.
Note that the true boost pressure is determined by
subtracting barometric pressure from the actual
reading.
Boost Pressure Sensor
This parameter displays the voltage signal sent to the
ECM from the boost pressure sensor. Boost pressure
sensor is a range of value indicating a low voltage
when the boost pressure is low (idle or lower engine
load) and a high voltage when the boost pressure is
high (higher engine load).
Desired Fuel Rail Pressure
This parameter displays fuel rail pressure desired by
the ECM based on current driving conditions. This can
be compared to the actual fuel rail pressure to
determine sensor accuracy or fuel pressure control
problems.
Fuel Rail Pressure
This parameter displays the fuel rail pressure as
calculated by the ECM using the signal from the fuel
rail pressure (FRP) sensor. The scan tool will display a
low pressure when the low engine load, and a high
pressure when the high engine load.
Fuel Rail Pressure Sensor
This parameter displays the voltage signal sent to the
ECM from the fuel rail pressure (FRP) sensor. FRP
sensor is a range of value indicating a low voltage
when the fuel rail pressure is low, and a high voltage
when the fuel rail pressure is high.
FRP Commanded Fuel Flow (Fuel Rail Pressure)
This parameter displays the commanded fuel flow
quantity of the fuel rail pressure (FRP) regulator to the
fuel rail. FRP Regulator Command (Fuel Rail Pressure)
This parameter displays the fuel rail pressure (FRP)
regulator control duty ratio based on inputs to the ECM
from various engine sensors. The scan tool will display
a lower percentage when the FRP regulator is
controlled to open (fuel supply quantity to the fuel rail is
increased). The scan tool will display higher
percentage when the FRP regulator is controlled to
close (fuel supply quantity to the fuel rail is reduced).
FRP Regulator Feedback (Fuel Rail Pressure)
This parameter displays the fuel rail pressure (FRP)
regulator control feedback current as measured by the
ECM. The scan tool will display a low current when the
FRP regulator is controlled to open (fuel supply
quantity to the fuel rail is increased). The scan tool will
display a high current when the FRP regulator is
controlled to close (fuel supply quantity to the fuel rail is
reduced).
Accelerator Pedal Position
This parameter displays the angle of the accelerator
pedal as calculated by the ECM using the signals from
the accelerator pedal position (APP) sensors. The scan
tool will display linearly from 0 to 100% according to the
pedal operation.
APP Sensor 1 (Accelerator Pedal Position)
This parameter displays the voltage signal sent to the
ECM from the accelerator pedal position (APP) sensor
1 of the APP sensor assembly. APP sensor 1 is a
range of value indicating a low voltage when the
accelerator pedal is not depressed, and a high voltage
when the accelerator pedal is fully depressed.
APP Sensor 2 (Accelerator Pedal Position)
This parameter displays the voltage signal sent to the
ECM from the accelerator pedal position (APP) sensor
2 of the APP sensor assembly. APP sensor 2 is a
range of value indicating a high voltage when the
accelerator pedal is not depressed, and a low voltage
when the accelerator pedal is fully depressed.
APP Sensor 3 (Accelerator Pedal Position)
This parameter displays the voltage signal sent to the
ECM from the accelerator pedal position (APP) sensor
3 of the APP sensor assembly. APP sensor 3 is a
range of value indicating a high voltage when the
accelerator pedal is not depressed, and a middle
voltage when the accelerator pedal is fully depressed.
EGR Solenoid Command
This parameter displays the EGR solenoid valve
control duty ratio based on inputs to the ECM from
various engine sensors. The scan tool will display a
lower percentage when the EGR solenoid valve is
controlled to close (EGR gas supply to the intake is
reduced). The scan tool will display a higher
percentage when the EGR solenoid valve is controlled
to open (EGR gas supply to the intake is increased).
BACK TO CHAPTER INDEX
TO MODEL INDEX
ISUZU KB P190 2007
Page 1670 of 6020
ENGINE CONTROL SYSTEM (4JK1/4JJ1) 6E-53
Cam/ Crank Sensor Signal/ Synchronization Status
This parameter displays the synchronization state of
the crankshaft position (CKP) sensor signal and
camshaft position (CMP) sensor signal. Asynchronous
indicates the CMP sensor signal is not detected or only
CKP sensor signal is detected. No Crank Signal
indicates CMP sensor signal is detected but CKP
sensor signal is not detected. Synchronous indicates
both sensor signals are detected correctly.
Engine Runtime
This parameter displays the time elapsed since the
engine start. The scan tool will display the time in
hours, minutes and seconds. The engine run time will
reset to zero as soon as the ignition switch is OFF.
Vehicle Speed
This parameter indicates the vehicle speed calculated
by the ECM using the signal from the vehicle speed
sensor (VSS). The scan tool will display a low value at
lower vehicle speeds, and a high value at higher
vehicle speeds.
Transmission Gear
This parameter displays the estimated transmission
gear position as calculated by the ECM based on
inputs from the vehicle speed and the engine speed.
Starter Switch
This parameter displays the input status of the starter
switch to the ECM. When the ignition switch is turned at
START position, the scan tool displays On.
Ignition Switch
This parameter displays the input status of the ignition
switch to the ECM. When the ignition switch is turned
ON position, the scan tool displays On.
Ignition Voltage
This parameter displays the ignition voltage measured
at the ignition feed circuit of the ECM. Voltage is
applied to the ECM when the ignition switch is ON
position.
Battery Voltage
This parameter displays the battery voltage measured
at the ECM main relay switched voltage feed circuit of
the ECM. Voltage is applied to the ECM when the ECM
main relay is energized.
Fuel Pump Relay Command
This parameter displays the commanded state of the
fuel pump relay control circuit. On indicates the fuel
pump relay control circuit is being grounded by the
ECM, allowing fuel pumping from the tank.
Swirl Control Solenoid Command
This parameter displays the commanded state of the
swirl control solenoid control circuit. On indicates the
swirl control solenoid control circuit is being grounded
by the ECM, allowing vacuum pressure to the swirl
control
actuator. Fuel Filter Switch
This parameter displays the input state of the fuel
pressure switch to the ECM. When the large vacuum
pressure is generated in the fuel suction line such as
clogged fuel filter, the scan tool displays Off.
A/C Request Signal
This parameter displays the input state of the air
conditioning (A/C) request to the ECM from the
heating, ventilation, and air conditioning (HVAC)
controls. When the HVAC system is requesting to
ground the A/C compressor clutch, the scan tool
displays On.
A/C Relay Command
This parameter displays the commanded state of the A/
C compressor relay control circuit. On indicates the A/C
compressor relay control circuit is being grounded by
the ECM, allowing voltage to the A/C compressor.
Park/ Neutral Switch
This parameter displays the input state of the neutral
switch to the ECM. When the transmission gear is Park
or Neutral, the scan tool displays Neutral.
Glow Relay Command
This parameter displays the commanded state of the
glow relay control circuit. On indicates the glow relay
control circuit is being grounded by the ECM, allowing
voltage to the glow plugs.
Glow Plug Lamp Command
This parameter displays the commanded state of the
glow indicator lamp control circuit. The glow indicator
lamp should be On when the scan tool indicates
command On. The glow indicator lamp should be Off
when the scan tool indicates command Off.
Brake Switch 1
This parameter displays the input state of the brake
pedal switch 1 to the ECM. When the brake pedal is
depressed, scan tool displays Applied.
Brake Switch 2
This parameter displays the input state of the brake
pedal switch 2 to the ECM. When the brake pedal is
depressed, scan tool displays Applied.
Clutch Pedal Switch
This parameter displays the input state of the clutch
pedal switch to the ECM. When the clutch pedal is
depressed, scan tool displays Applied.
Cruise Main Lamp Command
This parameter displays the commanded state of the
cruise main lamp control circuit. The cruise main lamp
should be On when the scan tool indicates command
On. The cruise main lamp should be Off when the scan
tool indicates command Off.
Cruise Main Switch
This parameter displays the input state of the cruise
main switch to the ECM. When the Cruise Main switch
is pushed, the scan tool displays On.
BACK TO CHAPTER INDEX
TO MODEL INDEX
ISUZU KB P190 2007
Page 1672 of 6020

ENGINE CONTROL SYSTEM (4JK1/4JJ1) 6E-55
Scan Tool Output Controls
Scan Tool Output ControlDescriptions
Fuel Supply Pump Learn Resetting The purpose of this test to reset the fuel supply pump adjustment value.
Important: The fuel supply pump relearn procedure must be done when the fuel supply
pump or engine is replaced, or an ECM from another vehicle is installed. Refer to Fuel
Supply Pump Replacement.
Fuel Pressure Control The purpose of this test is for checking whether the fuel rail pressure is changing when
commanded within 30 to 80MPa (4,350 to 11,600psi) when commanded. Faulty fuel supply
pump, fuel rail pressure (FRP) regulator, pressure limiter valve or other fuel lines could be
considered if the differential fuel rail pressure is large.
Pilot Injection Control The purpose of this test is for checking whether the pilot fuel injection is operated when it is
commanded to ON/ OFF. Faulty injector(s) could be considered if engine noise does not
change when commanded OFF.
Injection Timing Control The purpose of this test is for checking whether the main injection timing is changing when
commanded Retard/ Advance within -5 to 5 °CA.
Injector Force Drive The purpose of this test is for checking whether the fuel injector is correctly operating when
commanded ON. Faulty injector(s) could be considered if it does not create a clicking noise
(solenoid operating noise), contains an interrupted noise or has abnormal noise when
commanded ON.
Cylinder Balance Test The purpose of this test is for checking whether the fuel injector is operating when
commanded ON/ OFF. Faulty injector(s) could be considered if engine does not change
speed when commanded OFF.
Intake Throttle Solenoid Control The purpose of this test is for checking whether the intake throttle valve is correctly moved
with command. Restricted valve movement by foreign materials, excessive deposits or a
faulty valve could be considered if the position difference is large.
EGR Solenoid Control The purpose of this test is for checking whether the EGR valve is correctly moved with
command. Restricted valve movement by foreign materials, excessive deposits or a faulty
valve could be considered if the position difference is large.
Swirl Control Solenoid Control The purpose of this test is for checking whether the swirl control solenoid is operating when
commanded ON. Faulty circuit(s) or a faulty solenoid could be considered if not energizing
when commanded ON.
Turbocharger Solenoid Control The purpose of this test is for checking whether the turbocharger nozzle control actuator is
correctly moved with command. Restricted actuator movement by foreign materials,
excessive deposits, misrouted vacuum hoses, a faulty solenoid or a faulty actuator could be
considered if the actuator is not moved correctly.
Glow Relay Control The purpose of this test is for checking whether the glow relay is operating when
commanded ON. Faulty circuit(s) or a faulty glow relay could be considered if not energizing
when commanded ON.
Glow Plug Lamp Control The purpose of this test is for checking whether the glow indicator lamp is operating when
commanded ON. Faulty circuit(s) or an open circuit could be considered when not operating
when commanded ON.
Malfunction Indicator Lamp (MIL) Control The purpose of this test is for checking whether the MIL is operating when commanded ON.
Faulty circuit(s) or an open circuit could be considered when not operating when
commanded ON.
Service Vehicle Soon (SVS) Lamp Control The purpose of this test is for checking whether the SVS lamp is operating when
commanded ON. Faulty circuit(s) or an open circuit could be considered when not operating
when commanded ON.
Cruise Main Lamp Control The purpose of this test is for checking whether the cruise main lamp is operating when
commanded ON. Faulty circuit(s) or an open circuit could be considered when not operating
when commanded ON.
Cruise Set Lamp Control The purpose of this test is for checking whether the cruise set lamp is operating when
commanded ON. Faulty circuit(s) or an open circuit could be considered when not operating
when commanded ON.
BACK TO CHAPTER INDEX
TO MODEL INDEX
ISUZU KB P190 2007
Page 1680 of 6020
ENGINE CONTROL SYSTEM (4JK1/4JJ1) 6E-63
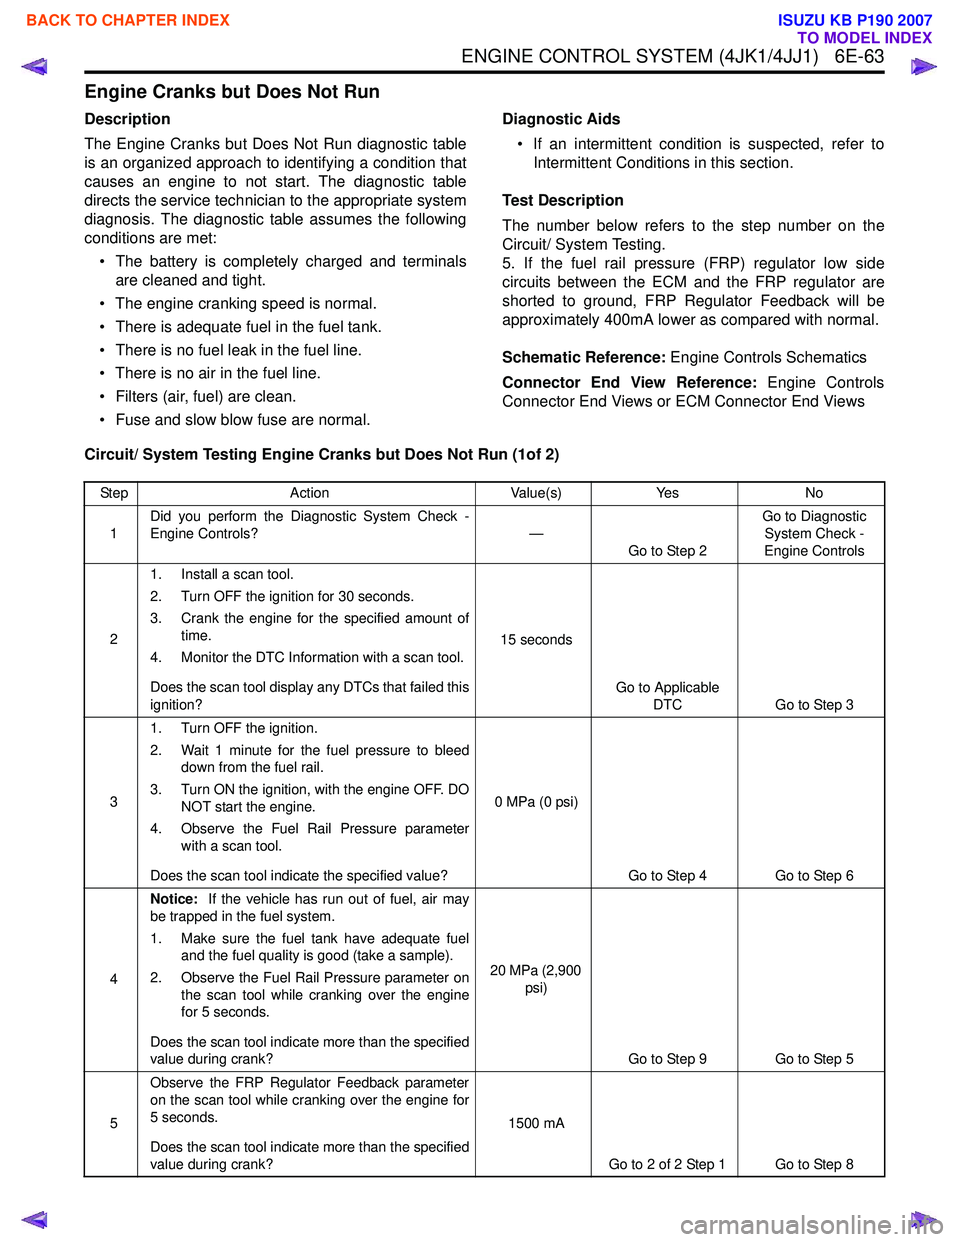
Engine Cranks but Does Not Run
Description
The Engine Cranks but Does Not Run diagnostic table
is an organized approach to identifying a condition that
causes an engine to not start. The diagnostic table
directs the service technician to the appropriate system
diagnosis. The diagnostic table assumes the following
conditions are met:
• The battery is completely charged and terminals are cleaned and tight.
• The engine cranking speed is normal.
• There is adequate fuel in the fuel tank.
• There is no fuel leak in the fuel line.
• There is no air in the fuel line.
• Filters (air, fuel) are clean.
• Fuse and slow blow fuse are normal. Diagnostic Aids
• If an intermittent condition is suspected, refer to Intermittent Conditions in this section.
Test Description
The number below refers to the step number on the
Circuit/ System Testing.
5. If the fuel rail pressure (FRP) regulator low side
circuits between the ECM and the FRP regulator are
shorted to ground, FRP Regulator Feedback will be
approximately 400mA lower as compared with normal.
Schematic Reference: Engine Controls Schematics
Connector End View Reference: Engine Controls
Connector End Views or ECM Connector End Views
Circuit/ System Testing Engine Cranks but Does Not Run (1of 2)
Step Action Value(s)Yes No
1 Did you perform the Diagnostic System Check -
Engine Controls? —
Go to Step 2 Go to Diagnostic
System Check -
Engine Controls
2 1. Install a scan tool.
2. Turn OFF the ignition for 30 seconds.
3. Crank the engine for the specified amount of time.
4. Monitor the DTC Information with a scan tool.
Does the scan tool display any DTCs that failed this
ignition? 15 seconds
Go to Applicable DTC Go to Step 3
3 1. Turn OFF the ignition.
2. Wait 1 minute for the fuel pressure to bleed down from the fuel rail.
3. Turn ON the ignition, with the engine OFF. DO NOT start the engine.
4. Observe the Fuel Rail Pressure parameter with a scan tool.
Does the scan tool indicate the specified value? 0 MPa (0 psi)
Go to Step 4 Go to Step 6
4 Notice:
If the vehicle has run out of fuel, air may
be trapped in the fuel system.
1. Make sure the fuel tank have adequate fuel and the fuel quality is good (take a sample).
2. Observe the Fuel Rail Pressure parameter on the scan tool while cranking over the engine
for 5 seconds.
Does the scan tool indicate more than the specified
value during crank? 20 MPa (2,900
psi)
Go to Step 9 Go to Step 5
5 Observe the FRP Regulator Feedback parameter
on the scan tool while cranking over the engine for
5 seconds.
Does the scan tool indicate more than the specified
value during crank? 1500 mA
Go to 2 of 2 Step 1 Go to Step 8
BACK TO CHAPTER INDEX
TO MODEL INDEX
ISUZU KB P190 2007
Page 1681 of 6020
6E-64 ENGINE CONTROL SYSTEM (4JK1/4JJ1)
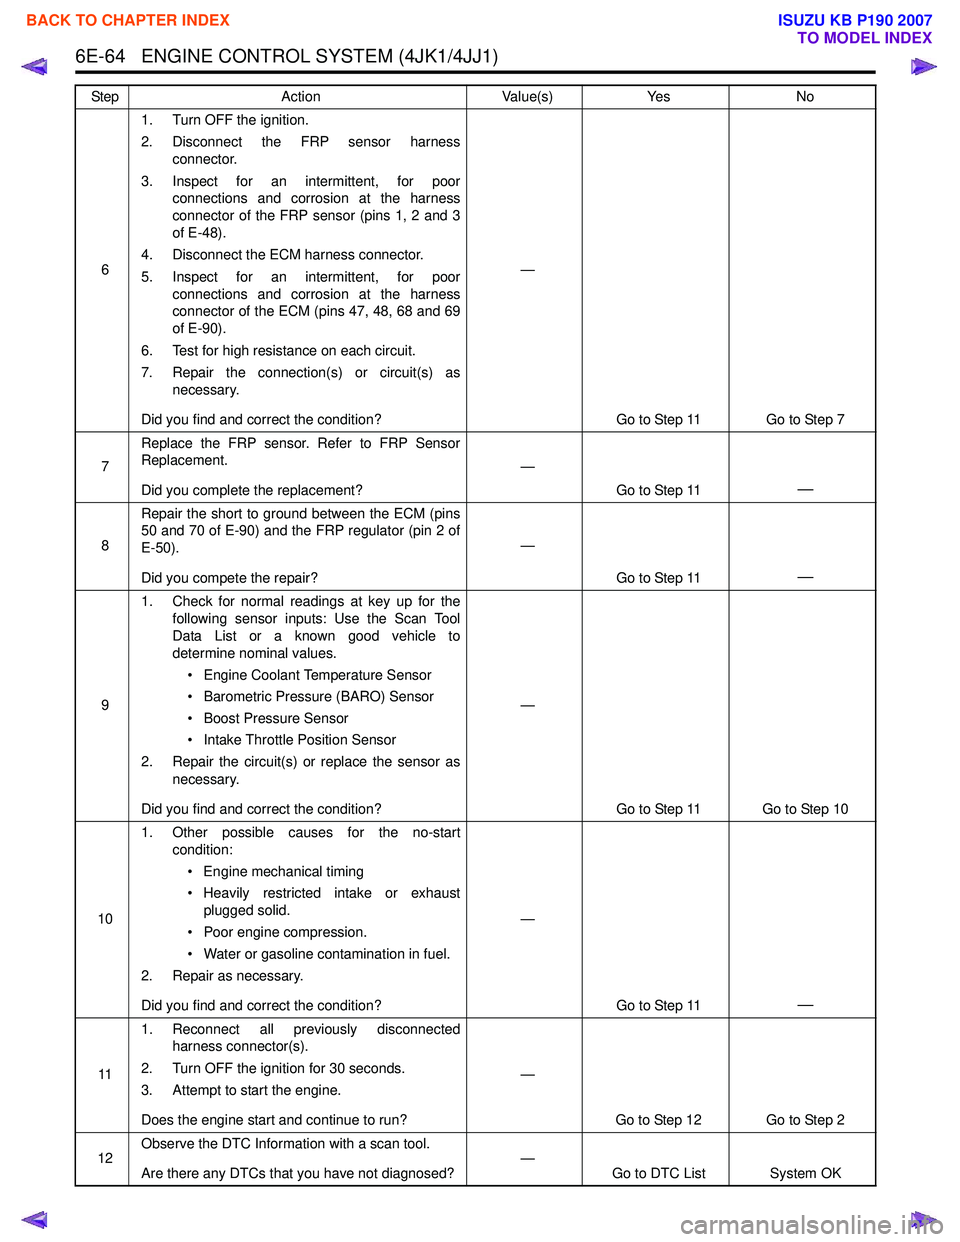
61. Turn OFF the ignition.
2. Disconnect the FRP sensor harness connector.
3. Inspect for an intermittent, for poor connections and corrosion at the harness
connector of the FRP sensor (pins 1, 2 and 3
of E-48).
4. Disconnect the ECM harness connector.
5. Inspect for an intermittent, for poor connections and corrosion at the harness
connector of the ECM (pins 47, 48, 68 and 69
of E-90).
6. Test for high resistance on each circuit.
7. Repair the connection(s) or circuit(s) as necessary.
Did you find and correct the condition? —
Go to Step 11 Go to Step 7
7 Replace the FRP sensor. Refer to FRP Sensor
Replacement.
Did you complete the replacement? —
Go to Step 11
—
8Repair the short to ground between the ECM (pins
50 and 70 of E-90) and the FRP regulator (pin 2 of
E-50).
Did you compete the repair? —
Go to Step 11
—
91. Check for normal readings at key up for the
following sensor inputs: Use the Scan Tool
Data List or a known good vehicle to
determine nominal values.
• Engine Coolant Temperature Sensor
• Barometric Pressure (BARO) Sensor
• Boost Pressure Sensor
• Intake Throttle Position Sensor
2. Repair the circuit(s) or replace the sensor as necessary.
Did you find and correct the condition? —
Go to Step 11 Go to Step 10
10 1. Other possible causes for the no-start
condition:
• Engine mechanical timing
• Heavily restricted intake or exhaust plugged solid.
• Poor engine compression.
• Water or gasoline contamination in fuel.
2. Repair as necessary.
Did you find and correct the condition? —
Go to Step 11
—
111. Reconnect all previously disconnected
harness connector(s).
2. Turn OFF the ignition for 30 seconds.
3. Attempt to start the engine.
Does the engine start and continue to run? —
Go to Step 12 Go to Step 2
12 Observe the DTC Information with a scan tool.
Are there any DTCs that you have not diagnosed? —
Go to DTC List System OK
Step
Action Value(s)Yes No
BACK TO CHAPTER INDEX
TO MODEL INDEX
ISUZU KB P190 2007
Page 1682 of 6020

ENGINE CONTROL SYSTEM (4JK1/4JJ1) 6E-65
Circuit/ System Testing Engine Cranks but Does Not Run (2 of 2)
StepAction Value(s)Yes No
1 1. Remove the engine cover.
2. Perform the Injector Force Drive with a scan tool.
3. Command each injector ON and verify clicking noise (solenoid operating noise).
Is there an injector that does not create a clicking
noise (solenoid operating noise), contains an
interrupted noise or abnormal noise when
commanded ON? —
Go to Step 8 Go to Step 2
2 1. Inspect the high pressure side between the
fuel supply pump and the fuel injectors for fuel
leakage. The following components may
contain an external leak.
• Fuel supply pump
• Fuel rail
•Pressure limiter valve
• Fuel rail pressure (FRP) sensor
• Fuel pipe between the fuel supply pump and fuel rail
• Fuel pipe between the fuel rail and fuel injectors
• Each fuel pipe sleeve nuts
Notice: Fuel may leak under the cylinder head
cover from the inlet high pressure line. In such
case, the engine oil level will rise. Inspect for fuel
leakage into the engine oil.
2. Repair any fuel system leaks as necessary.
Did you find and correct the condition? —
Go to Step 12 Go to Step 3
3 1. Check the fuel system line connections
between the fuel tank and the fuel supply
pump for tightness and all fuel hoses for cuts,
cracks and for the use of proper clamps.
2. Repair or replace as necessary.
Did you find and correct the condition? —
Go to Step 12 Go to Step 4
BACK TO CHAPTER INDEX
TO MODEL INDEX
ISUZU KB P190 2007