2007 ISUZU KB P190 Fuel line
[x] Cancel search: Fuel linePage 985 of 6020

FUEL SYSTEM 6C – 21
RTW 46CSH000201
Installation
1. Injection Pump
1) Install the injection pump gear (W hen gear is removed).
Injection Pump Gear Nut N⋅m (kg ⋅m/lb ft)
64 (6.5 / 47)
2) Bring the piston in the No.1 cylinder to TDC on the
compression stroke by turning the crankshaft until the
crankshaft pulley TDC line aligned with the timing
mark.
020L200017
3) Install the injection pump to the timing gear case with
align the timing mark on the pump gear to the arrow
mark on the timing gear case cover.
4) Check that the setting marks of the injection pump gear and the idler gear B are aligned.
5) Remove the lock bolt (M6 × 30) from the idle gear “B”.
6C-7
6) Tighten the injection pump fixing bolts to the specified
torque.
Injection Pump Bolts Torque N·m (kg·m/lb ft)
19 (1.9 / 14)
BACK TO CHAPTER INDEX
TO MODEL INDEX
ISUZU KB P190 2007
Page 996 of 6020

6C – 32 FUEL SYSTEM
8. Operate the nozzle tester and increase the in-line
pressure to 34.3 - 44.1 MPa (350 - 450 kg/cm2) so that
the nozzle’s needle valve moves through its full lift.
Record full lift ‘L’. (Read dial gauge)
Nozzle Full Lift mm (in)
0.25 ± 0.02 (0.0098 ± 0.00008)
Note:
The above operation is used to determine whether
the nozzle seat is worn and whether the nozzle
assembly is in good condition.
Pre-lift confirmation 1. W ith the needle valve at full lift, release the nozzle tester handle.
Note:
The in-line pressure will decrease and needle
valve lift (as indicated on the dial gauge) will also
decrease a little.
040R300008
040MV007.tif040MV008.tif
BACK TO CHAPTER INDEX
TO MODEL INDEX
ISUZU KB P190 2007
Page 997 of 6020

FUEL SYSTEM 6C – 33
2. Read the needle valve “pre-lift” point from the dial gauge indication (once the needle valve has
descended when the second spring has stopped
operating).
Pre-lift measuring point:
Read the dial gauge at first nozzle opening pressure +approx
1 MPa (10 kg/cm
2).
Pre-lift mm
Pressure Mpa
(psi/ kg/cm
2) Lift mm (in)
4JA1T(L) 20.1 (2,858/205) 0.04 (0.0016)
Note:
This point can be found while the pressure is
decreasing.
3. Confirm that pre-lift is as specified.
4. If pre-lift is not as specified, replace the pins, lift piece, spacer and nozzle assembly as a set with the service
kit.
Service kit
105017-2990 (Bosch AS)
897302-3070 (ISUZU)
Second nozzle opening pressure confirmation
1. After pre-lift confirmation, operate the nozzle tester to increase in-line pressure to 34.3 - 44.1 MPa (350 - 450
kg/cm
2) so that the nozzle’s needle valve moves
through its full lift.
040MV005.tif
040MV031.tif
040MV030.tif 040H100007
BACK TO CHAPTER INDEX
TO MODEL INDEX
ISUZU KB P190 2007
Page 998 of 6020

6C – 34 FUEL SYSTEM
2. Release the nozzle tester handle so that in-line
pressure decreases.
Note:
The in-line pressure will decrease and needle
valve lift (as indicated on the dial gauge) will also
decrease a little.
3. Then, read the pressure gauge indication (second
nozzle opening pressure) the instant that the dial
gauge indicates the specified needle valve lift (usually
pre-lift + 0.05 mm).
Second Nozzle Opening Pressure
Pressure Mpa
(psi/ kg/cm
2) Lift mm (in)
4JA1T(L) 25.5-27.0
(3768-3911/260-275) 0.09 (0.0035)
040MV022.tif
040M100006
BACK TO CHAPTER INDEX
TO MODEL INDEX
ISUZU KB P190 2007
Page 1081 of 6020

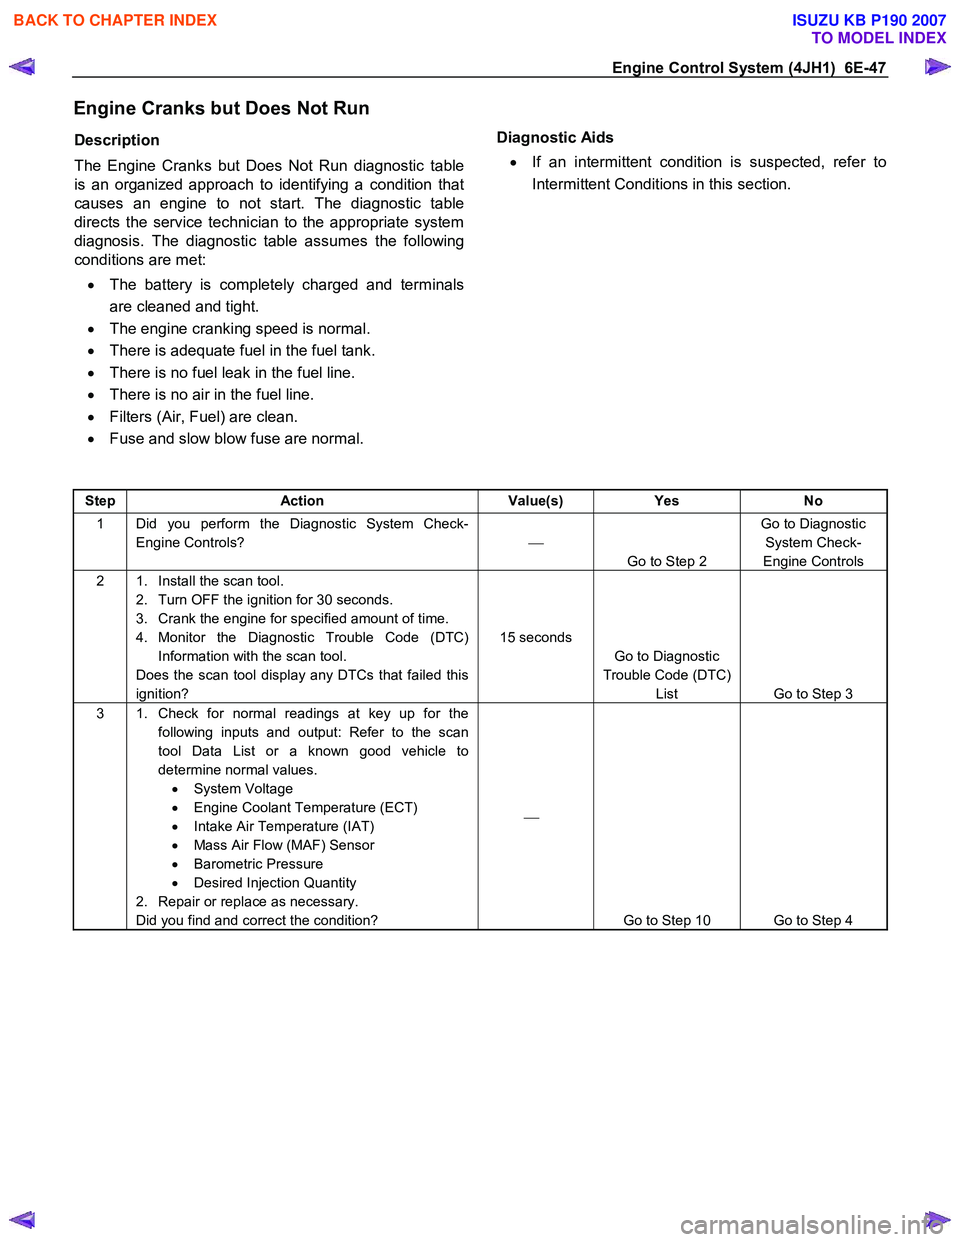
Engine Control System (4JH1) 6E-47
Engine Cranks but Does Not Run
Description
The Engine Cranks but Does Not Run diagnostic table
is an organized approach to identifying a condition that
causes an engine to not start. The diagnostic table
directs the service technician to the appropriate system
diagnosis. The diagnostic table assumes the following
conditions are met:
• The battery is completely charged and terminals
are cleaned and tight.
• The engine cranking speed is normal.
• There is adequate fuel in the fuel tank.
• There is no fuel leak in the fuel line.
• There is no air in the fuel line.
• Filters (Air, Fuel) are clean.
• Fuse and slow blow fuse are normal.
Diagnostic Aids
• If an intermittent condition is suspected, refer to
Intermittent Conditions in this section.
Step Action Value(s) Yes No
1 Did you perform the Diagnostic System Check-
Engine Controls?
Go to Step 2 Go to Diagnostic
System Check-
Engine Controls
2 1. Install the scan tool. 2. Turn OFF the ignition for 30 seconds.
3. Crank the engine for specified amount of time.
4. Monitor the Diagnostic Trouble Code (DTC) Information with the scan tool.
Does the scan tool display any DTCs that failed this
ignition? 15 seconds
Go to Diagnostic
Trouble Code (DTC) List Go to Step 3
3 1. Check for normal readings at key up for the
following inputs and output: Refer to the scan
tool Data List or a known good vehicle to
determine normal values. • System Voltage
• Engine Coolant Temperature (ECT)
• Intake Air Temperature (IAT)
• Mass Air Flow (MAF) Sensor
• Barometric Pressure
• Desired Injection Quantity
2. Repair or replace as necessary.
Did you find and correct the condition?
Go to Step 10 Go to Step 4
BACK TO CHAPTER INDEX
TO MODEL INDEX
ISUZU KB P190 2007
Page 1082 of 6020

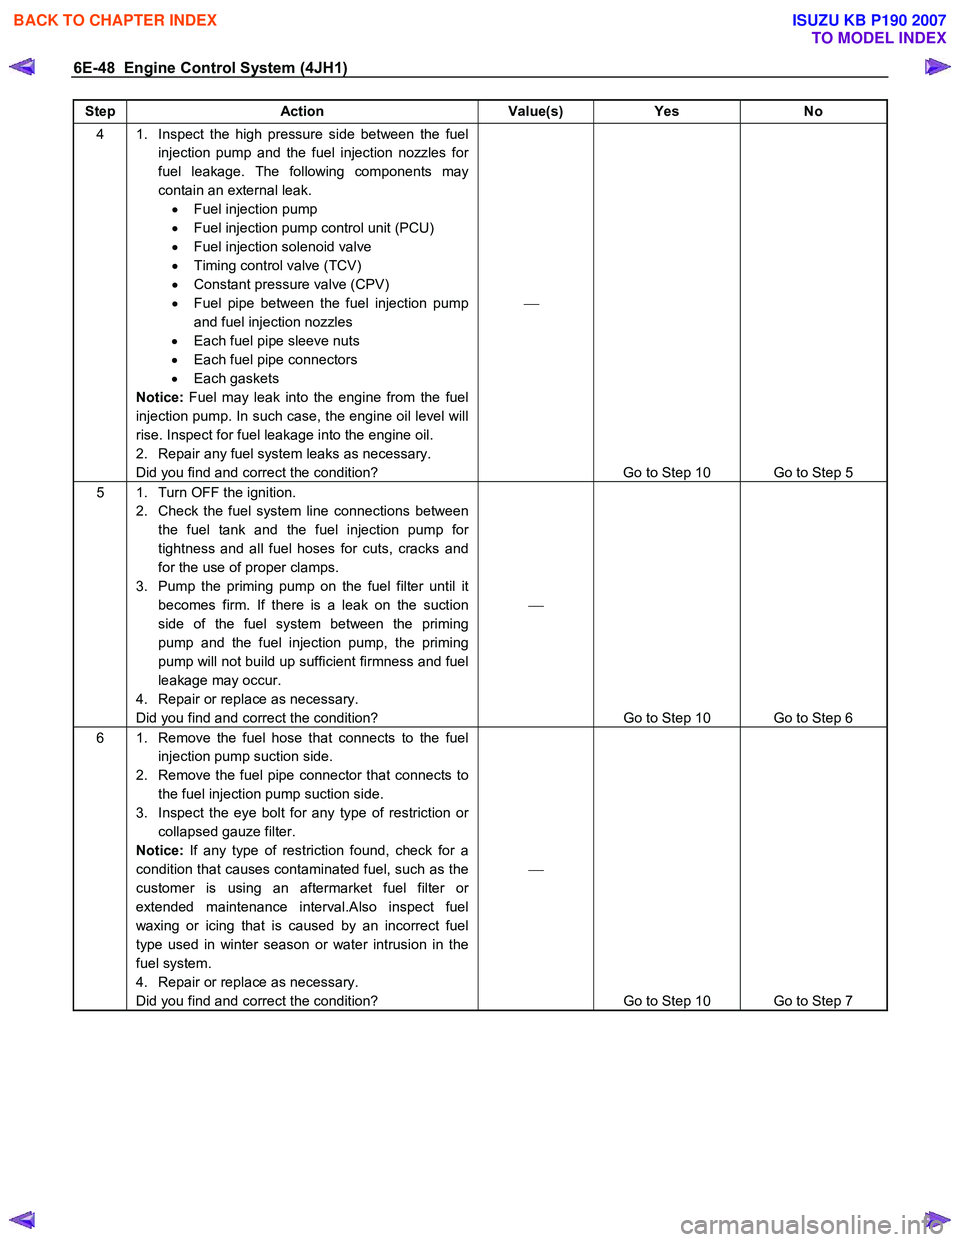
6E-48 Engine Control System (4JH1)
Step Action Value(s) Yes No
4 1. Inspect the high pressure side between the fuel
injection pump and the fuel injection nozzles for
fuel leakage. The following components may
contain an external leak. • Fuel injection pump
• Fuel injection pump control unit (PCU)
• Fuel injection solenoid valve
• Timing control valve (TCV)
• Constant pressure valve (CPV)
• Fuel pipe between the fuel injection pump
and fuel injection nozzles
• Each fuel pipe sleeve nuts
• Each fuel pipe connectors
• Each gaskets
Notice: Fuel may leak into the engine from the fuel
injection pump. In such case, the engine oil level will
rise. Inspect for fuel leakage into the engine oil.
2. Repair any fuel system leaks as necessary.
Did you find and correct the condition?
Go to Step 10 Go to Step 5
5 1. Turn OFF the ignition. 2. Check the fuel system line connections between the fuel tank and the fuel injection pump for
tightness and all fuel hoses for cuts, cracks and
for the use of proper clamps.
3. Pump the priming pump on the fuel filter until it becomes firm. If there is a leak on the suction
side of the fuel system between the priming
pump and the fuel injection pump, the priming
pump will not build up sufficient firmness and fuel
leakage may occur.
4. Repair or replace as necessary.
Did you find and correct the condition?
Go to Step 10 Go to Step 6
6 1. Remove the fuel hose that connects to the fuel injection pump suction side.
2. Remove the fuel pipe connector that connects to the fuel injection pump suction side.
3. Inspect the eye bolt for any type of restriction or collapsed gauze filter.
Notice: If any type of restriction found, check for a
condition that causes contaminated fuel, such as the
customer is using an aftermarket fuel filter or
extended maintenance interval.Also inspect fuel
waxing or icing that is caused by an incorrect fuel
type used in winter season or water intrusion in the
fuel system.
4. Repair or replace as necessary.
Did you find and correct the condition?
Go to Step 10 Go to Step 7
BACK TO CHAPTER INDEX
TO MODEL INDEX
ISUZU KB P190 2007
Page 1083 of 6020

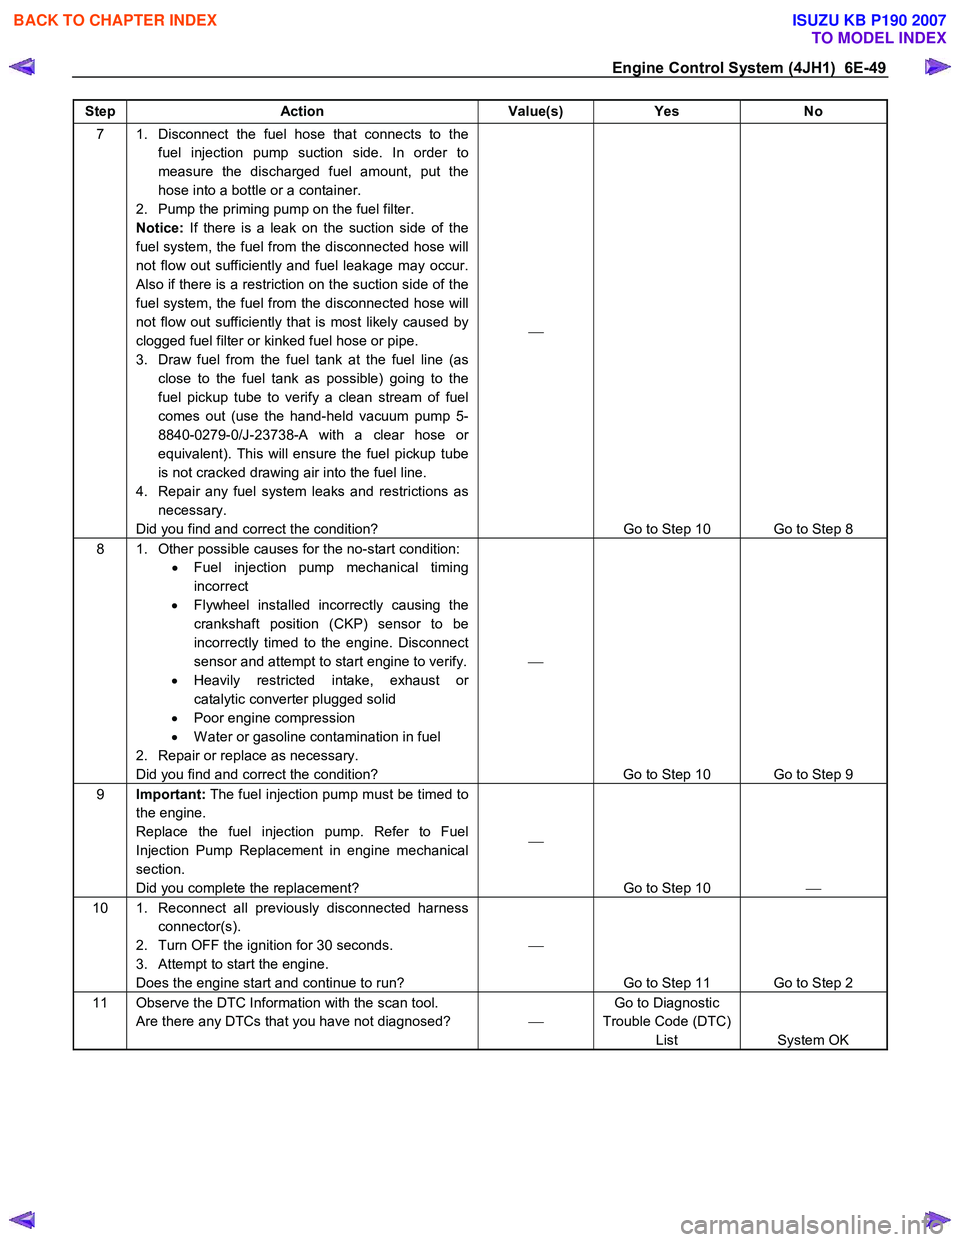
Engine Control System (4JH1) 6E-49
Step Action Value(s) Yes No
7 1. Disconnect the fuel hose that connects to the
fuel injection pump suction side. In order to
measure the discharged fuel amount, put the
hose into a bottle or a container.
2. Pump the priming pump on the fuel filter.
Notice: If there is a leak on the suction side of the
fuel system, the fuel from the disconnected hose will
not flow out sufficiently and fuel leakage may occur.
Also if there is a restriction on the suction side of the
fuel system, the fuel from the disconnected hose will
not flow out sufficiently that is most likely caused by
clogged fuel filter or kinked fuel hose or pipe.
3. Draw fuel from the fuel tank at the fuel line (as close to the fuel tank as possible) going to the
fuel pickup tube to verify a clean stream of fuel
comes out (use the hand-held vacuum pump 5-
8840-0279-0/J-23738-A with a clear hose or
equivalent). This will ensure the fuel pickup tube
is not cracked drawing air into the fuel line.
4. Repair any fuel system leaks and restrictions as necessary.
Did you find and correct the condition?
Go to Step 10 Go to Step 8
8 1. Other possible causes for the no-start condition: • Fuel injection pump mechanical timing
incorrect
• Flywheel installed incorrectly causing the
crankshaft position (CKP) sensor to be
incorrectly timed to the engine. Disconnect
sensor and attempt to start engine to verify.
• Heavily restricted intake, exhaust or
catalytic converter plugged solid
• Poor engine compression
• W ater or gasoline contamination in fuel
2. Repair or replace as necessary.
Did you find and correct the condition?
Go to Step 10 Go to Step 9
9 Important: The fuel injection pump must be timed to
the engine.
Replace the fuel injection pump. Refer to Fuel
Injection Pump Replacement in engine mechanical
section.
Did you complete the replacement?
Go to Step 10
10 1. Reconnect all previously disconnected harness
connector(s).
2. Turn OFF the ignition for 30 seconds.
3. Attempt to start the engine.
Does the engine start and continue to run?
Go to Step 11 Go to Step 2
11 Observe the DTC Information with the scan tool. Are there any DTCs that you have not diagnosed? Go to Diagnostic
Trouble Code (DTC) List System OK
BACK TO CHAPTER INDEX
TO MODEL INDEX
ISUZU KB P190 2007
Page 1098 of 6020

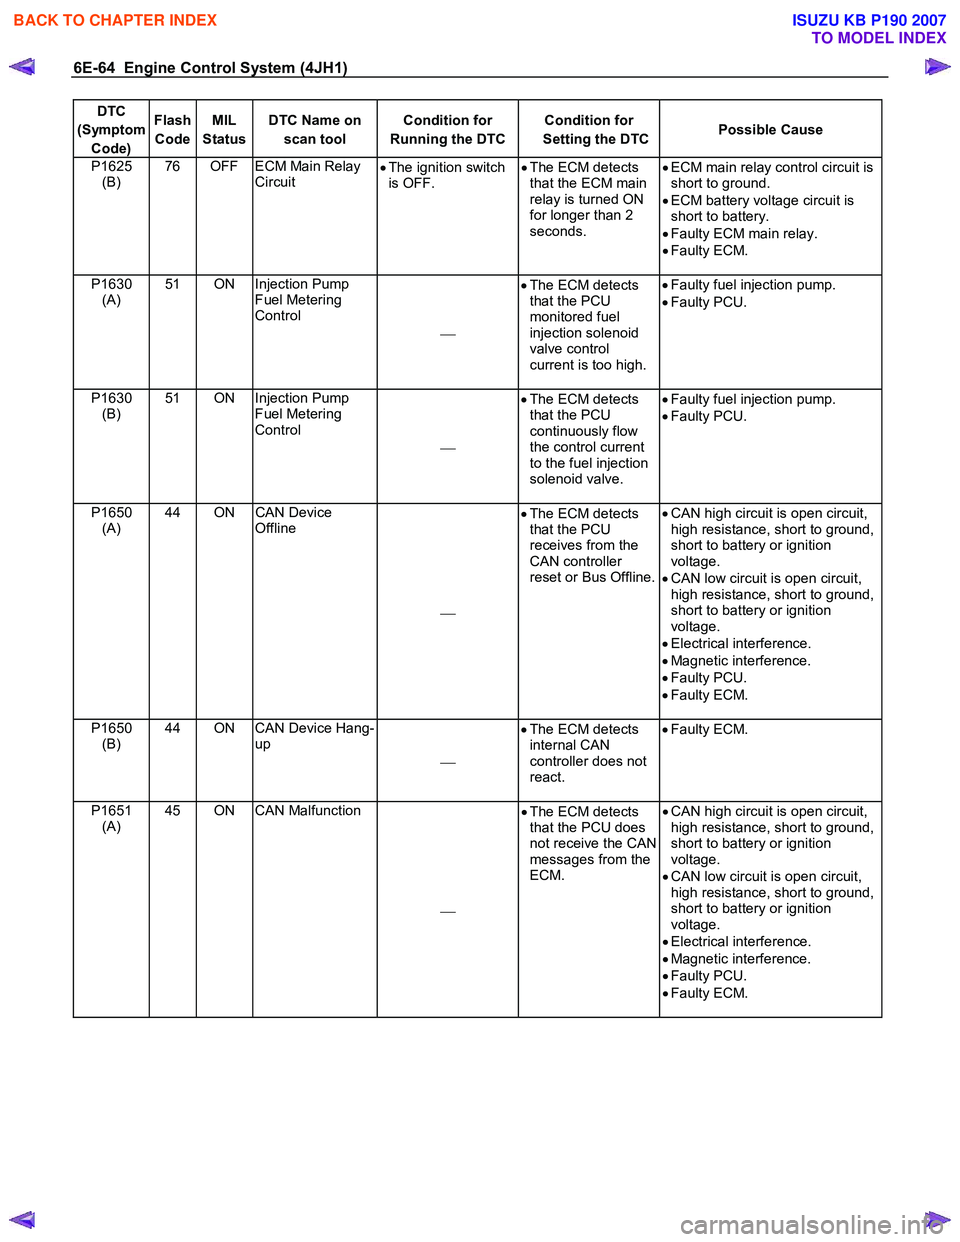
6E-64 Engine Control System (4JH1)
DTC
(Symptom Code) Flash
Code MIL
Status DTC Name on
scan tool Condition for
Running the DTC Condition for
Setting the DTC Possible Cause
P1625
(B) 76 OFF ECM Main Relay
Circuit •
The ignition switch
is OFF. •
The ECM detects
that the ECM main
relay is turned ON
for longer than 2
seconds. •
ECM main relay control circuit is
short to ground.
• ECM battery voltage circuit is
short to battery.
• Faulty ECM main relay.
• Faulty ECM.
P1630 (A) 51 ON Injection Pump
Fuel Metering
Control
•
The ECM detects
that the PCU
monitored fuel
injection solenoid
valve control
current is too high.
•
Faulty fuel injection pump.
• Faulty PCU.
P1630 (B) 51 ON Injection Pump
Fuel Metering
Control
•
The ECM detects
that the PCU
continuously flow
the control current
to the fuel injection
solenoid valve.
•
Faulty fuel injection pump.
• Faulty PCU.
P1650 (A) 44 ON CAN Device
Offline
•
The ECM detects
that the PCU
receives from the
CAN controller
reset or Bus Offline.
•
CAN high circuit is open circuit,
high resistance, short to ground,
short to battery or ignition
voltage.
• CAN low circuit is open circuit,
high resistance, short to ground,
short to battery or ignition
voltage.
• Electrical interference.
• Magnetic interference.
• Faulty PCU.
• Faulty ECM.
P1650 (B) 44 ON CAN Device Hang-
up
•
The ECM detects
internal CAN
controller does not
react.
•
Faulty ECM.
P1651 (A) 45 ON CAN Malfunction
•
The ECM detects
that the PCU does
not receive the CAN
messages from the
ECM.
•
CAN high circuit is open circuit,
high resistance, short to ground,
short to battery or ignition
voltage.
• CAN low circuit is open circuit,
high resistance, short to ground,
short to battery or ignition
voltage.
• Electrical interference.
• Magnetic interference.
• Faulty PCU.
• Faulty ECM.
BACK TO CHAPTER INDEX
TO MODEL INDEX
ISUZU KB P190 2007