2007 ISUZU KB P190 Harness
[x] Cancel search: HarnessPage 1930 of 6020
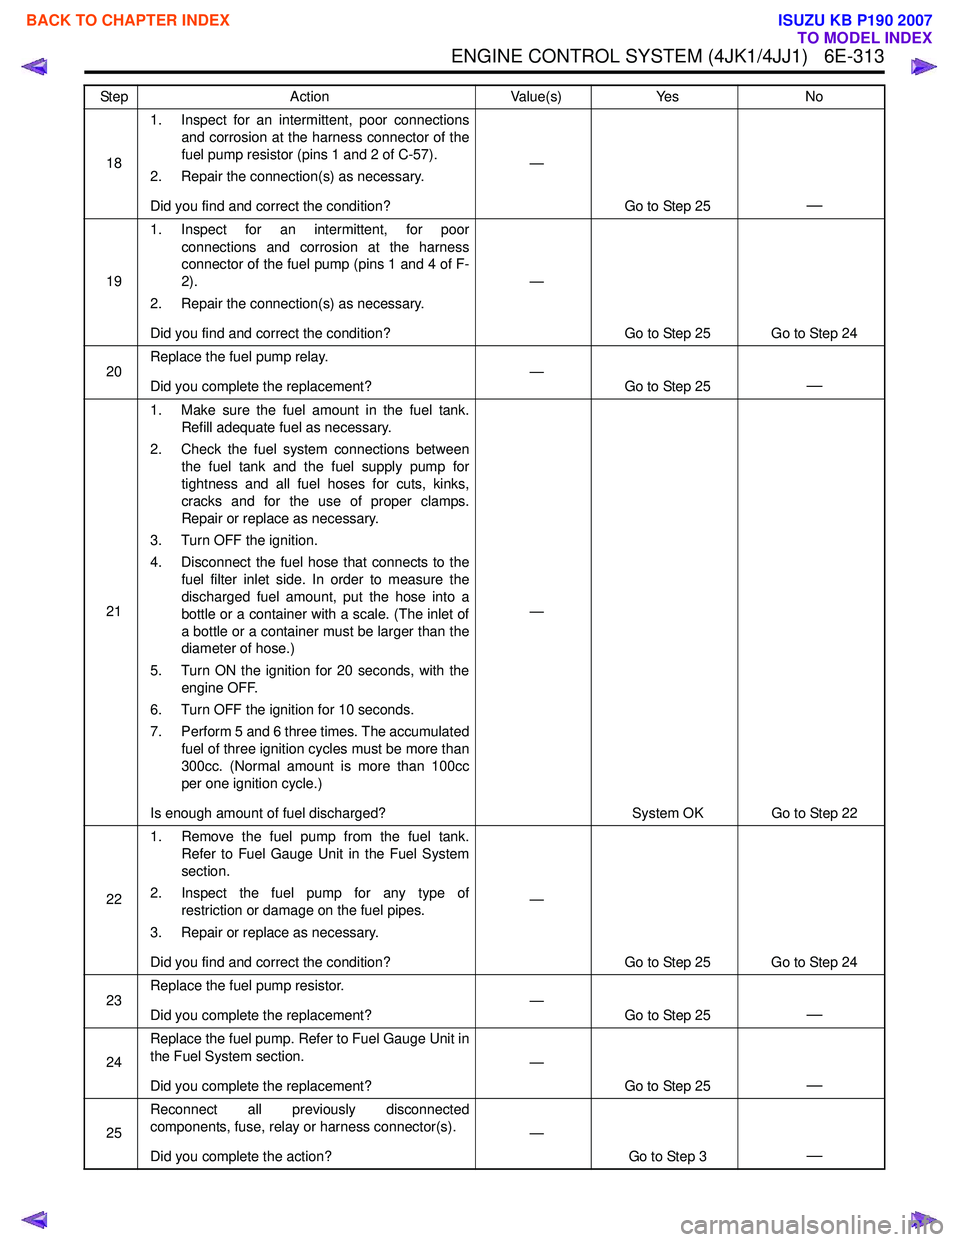
ENGINE CONTROL SYSTEM (4JK1/4JJ1) 6E-313
181. Inspect for an intermittent, poor connections
and corrosion at the harness connector of the
fuel pump resistor (pins 1 and 2 of C-57).
2. Repair the connection(s) as necessary.
Did you find and correct the condition? —
Go to Step 25
—
191. Inspect for an intermittent, for poor
connections and corrosion at the harness
connector of the fuel pump (pins 1 and 4 of F-
2).
2. Repair the connection(s) as necessary.
Did you find and correct the condition? —
Go to Step 25 Go to Step 24
20 Replace the fuel pump relay.
Did you complete the replacement? —
Go to Step 25
—
211. Make sure the fuel amount in the fuel tank.
Refill adequate fuel as necessary.
2. Check the fuel system connections between the fuel tank and the fuel supply pump for
tightness and all fuel hoses for cuts, kinks,
cracks and for the use of proper clamps.
Repair or replace as necessary.
3. Turn OFF the ignition.
4. Disconnect the fuel hose that connects to the fuel filter inlet side. In order to measure the
discharged fuel amount, put the hose into a
bottle or a container with a scale. (The inlet of
a bottle or a container must be larger than the
diameter of hose.)
5. Turn ON the ignition for 20 seconds, with the engine OFF.
6. Turn OFF the ignition for 10 seconds.
7. Perform 5 and 6 three times. The accumulated fuel of three ignition cycles must be more than
300cc. (Normal amount is more than 100cc
per one ignition cycle.)
Is enough amount of fuel discharged? —
System OK Go to Step 22
22 1. Remove the fuel pump from the fuel tank.
Refer to Fuel Gauge Unit in the Fuel System
section.
2. Inspect the fuel pump for any type of restriction or damage on the fuel pipes.
3. Repair or replace as necessary.
Did you find and correct the condition? —
Go to Step 25 Go to Step 24
23 Replace the fuel pump resistor.
Did you complete the replacement? —
Go to Step 25
—
24Replace the fuel pump. Refer to Fuel Gauge Unit in
the Fuel System section.
Did you complete the replacement? —
Go to Step 25
—
25Reconnect all previously disconnected
components, fuse, relay or harness connector(s).
Did you complete the action? —
Go to Step 3
—
Step Action Value(s)Yes No
BACK TO CHAPTER INDEX
TO MODEL INDEX
ISUZU KB P190 2007
Page 1933 of 6020
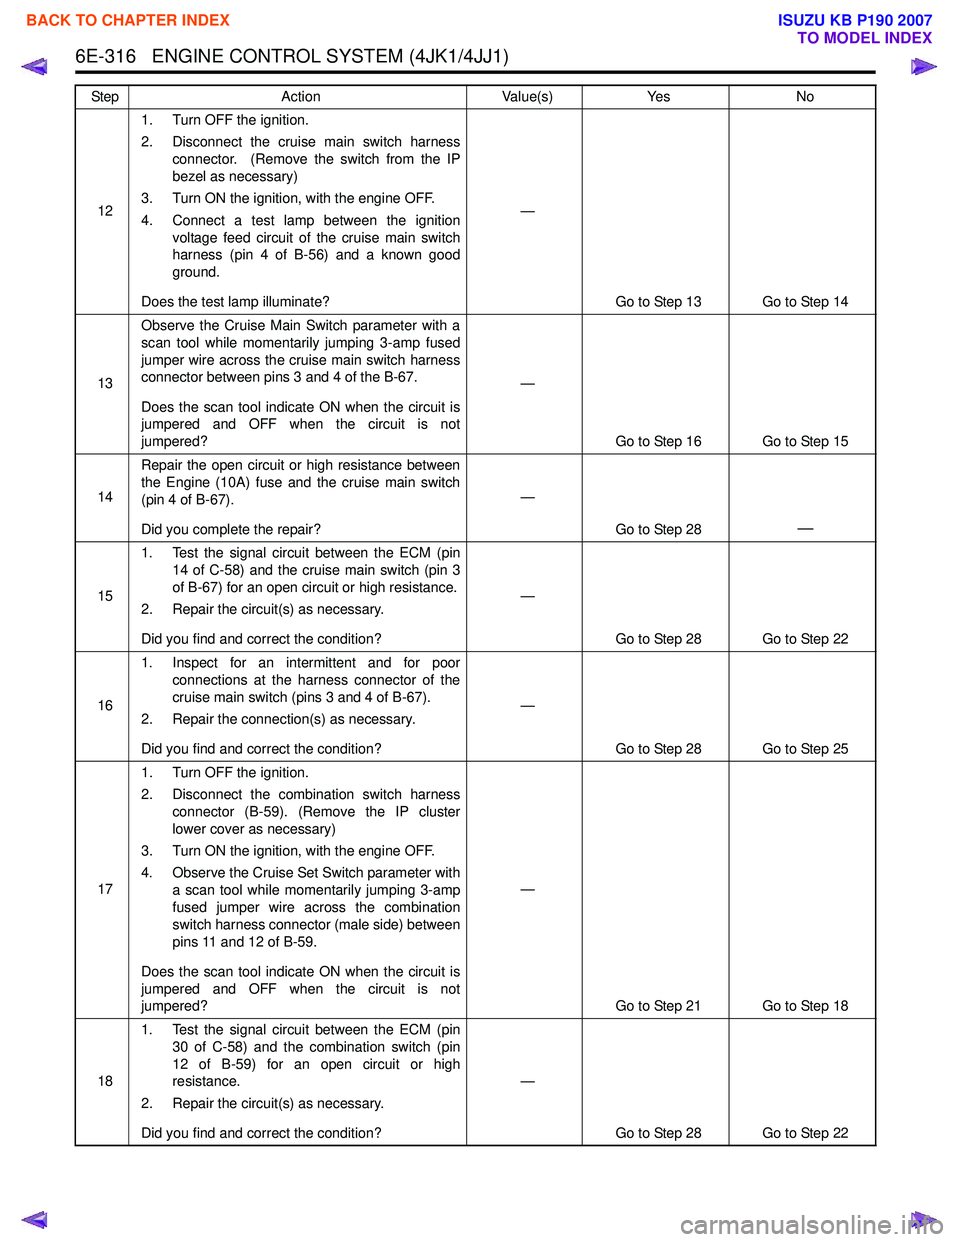
6E-316 ENGINE CONTROL SYSTEM (4JK1/4JJ1)
121. Turn OFF the ignition.
2. Disconnect the cruise main switch harness connector. (Remove the switch from the IP
bezel as necessary)
3. Turn ON the ignition, with the engine OFF.
4. Connect a test lamp between the ignition voltage feed circuit of the cruise main switch
harness (pin 4 of B-56) and a known good
ground.
Does the test lamp illuminate? —
Go to Step 13 Go to Step 14
13 Observe the Cruise Main Switch parameter with a
scan tool while momentarily jumping 3-amp fused
jumper wire across the cruise main switch harness
connector between pins 3 and 4 of the B-67.
Does the scan tool indicate ON when the circuit is
jumpered and OFF when the circuit is not
jumpered? —
Go to Step 16 Go to Step 15
14 Repair the open circuit or high resistance between
the Engine (10A) fuse and the cruise main switch
(pin 4 of B-67).
Did you complete the repair? —
Go to Step 28
—
151. Test the signal circuit between the ECM (pin
14 of C-58) and the cruise main switch (pin 3
of B-67) for an open circuit or high resistance.
2. Repair the circuit(s) as necessary.
Did you find and correct the condition? —
Go to Step 28 Go to Step 22
16 1. Inspect for an intermittent and for poor
connections at the harness connector of the
cruise main switch (pins 3 and 4 of B-67).
2. Repair the connection(s) as necessary.
Did you find and correct the condition? —
Go to Step 28 Go to Step 25
17 1. Turn OFF the ignition.
2. Disconnect the combination switch harness connector (B-59). (Remove the IP cluster
lower cover as necessary)
3. Turn ON the ignition, with the engine OFF.
4. Observe the Cruise Set Switch parameter with a scan tool while momentarily jumping 3-amp
fused jumper wire across the combination
switch harness connector (male side) between
pins 11 and 12 of B-59.
Does the scan tool indicate ON when the circuit is
jumpered and OFF when the circuit is not
jumpered? —
Go to Step 21 Go to Step 18
18 1. Test the signal circuit between the ECM (pin
30 of C-58) and the combination switch (pin
12 of B-59) for an open circuit or high
resistance.
2. Repair the circuit(s) as necessary.
Did you find and correct the condition? —
Go to Step 28 Go to Step 22
Step
Action Value(s)Yes No
BACK TO CHAPTER INDEX
TO MODEL INDEX
ISUZU KB P190 2007
Page 1934 of 6020
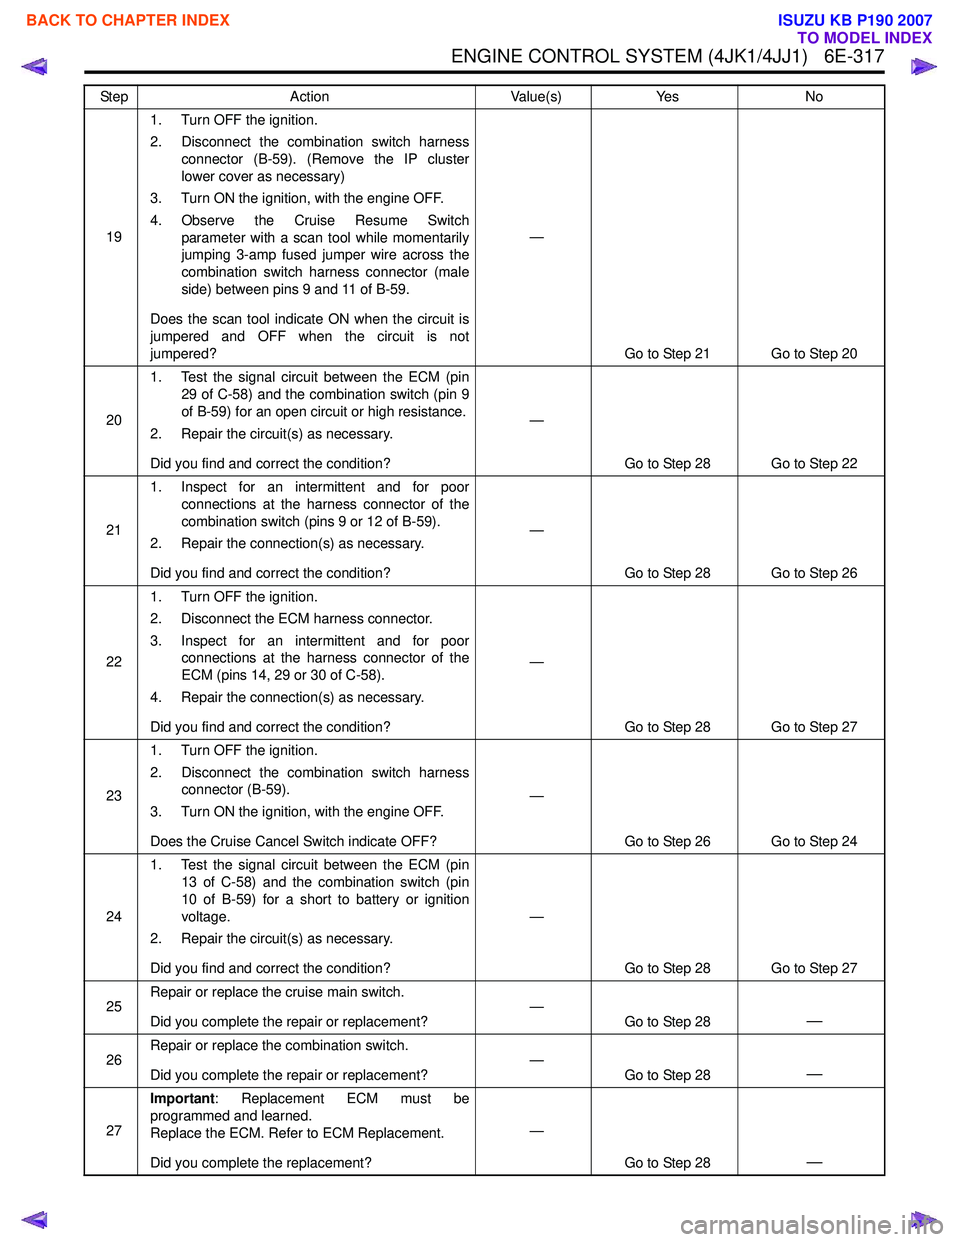
ENGINE CONTROL SYSTEM (4JK1/4JJ1) 6E-317
191. Turn OFF the ignition.
2. Disconnect the combination switch harness connector (B-59). (Remove the IP cluster
lower cover as necessary)
3. Turn ON the ignition, with the engine OFF.
4. Observe the Cruise Resume Switch parameter with a scan tool while momentarily
jumping 3-amp fused jumper wire across the
combination switch harness connector (male
side) between pins 9 and 11 of B-59.
Does the scan tool indicate ON when the circuit is
jumpered and OFF when the circuit is not
jumpered? —
Go to Step 21 Go to Step 20
20 1. Test the signal circuit between the ECM (pin
29 of C-58) and the combination switch (pin 9
of B-59) for an open circuit or high resistance.
2. Repair the circuit(s) as necessary.
Did you find and correct the condition? —
Go to Step 28 Go to Step 22
21 1. Inspect for an intermittent and for poor
connections at the harness connector of the
combination switch (pins 9 or 12 of B-59).
2. Repair the connection(s) as necessary.
Did you find and correct the condition? —
Go to Step 28 Go to Step 26
22 1. Turn OFF the ignition.
2. Disconnect the ECM harness connector.
3. Inspect for an intermittent and for poor connections at the harness connector of the
ECM (pins 14, 29 or 30 of C-58).
4. Repair the connection(s) as necessary.
Did you find and correct the condition? —
Go to Step 28 Go to Step 27
23 1. Turn OFF the ignition.
2. Disconnect the combination switch harness connector (B-59).
3. Turn ON the ignition, with the engine OFF.
Does the Cruise Cancel Switch indicate OFF? —
Go to Step 26 Go to Step 24
24 1. Test the signal circuit between the ECM (pin
13 of C-58) and the combination switch (pin
10 of B-59) for a short to battery or ignition
voltage.
2. Repair the circuit(s) as necessary.
Did you find and correct the condition? —
Go to Step 28 Go to Step 27
25 Repair or replace the cruise main switch.
Did you complete the repair or replacement? —
Go to Step 28
—
26Repair or replace the combination switch.
Did you complete the repair or replacement? —
Go to Step 28—
27Important
: Replacement ECM must be
programmed and learned.
Replace the ECM. Refer to ECM Replacement.
Did you complete the replacement? —
Go to Step 28
—
Step Action Value(s)Yes No
BACK TO CHAPTER INDEX
TO MODEL INDEX
ISUZU KB P190 2007
Page 1935 of 6020
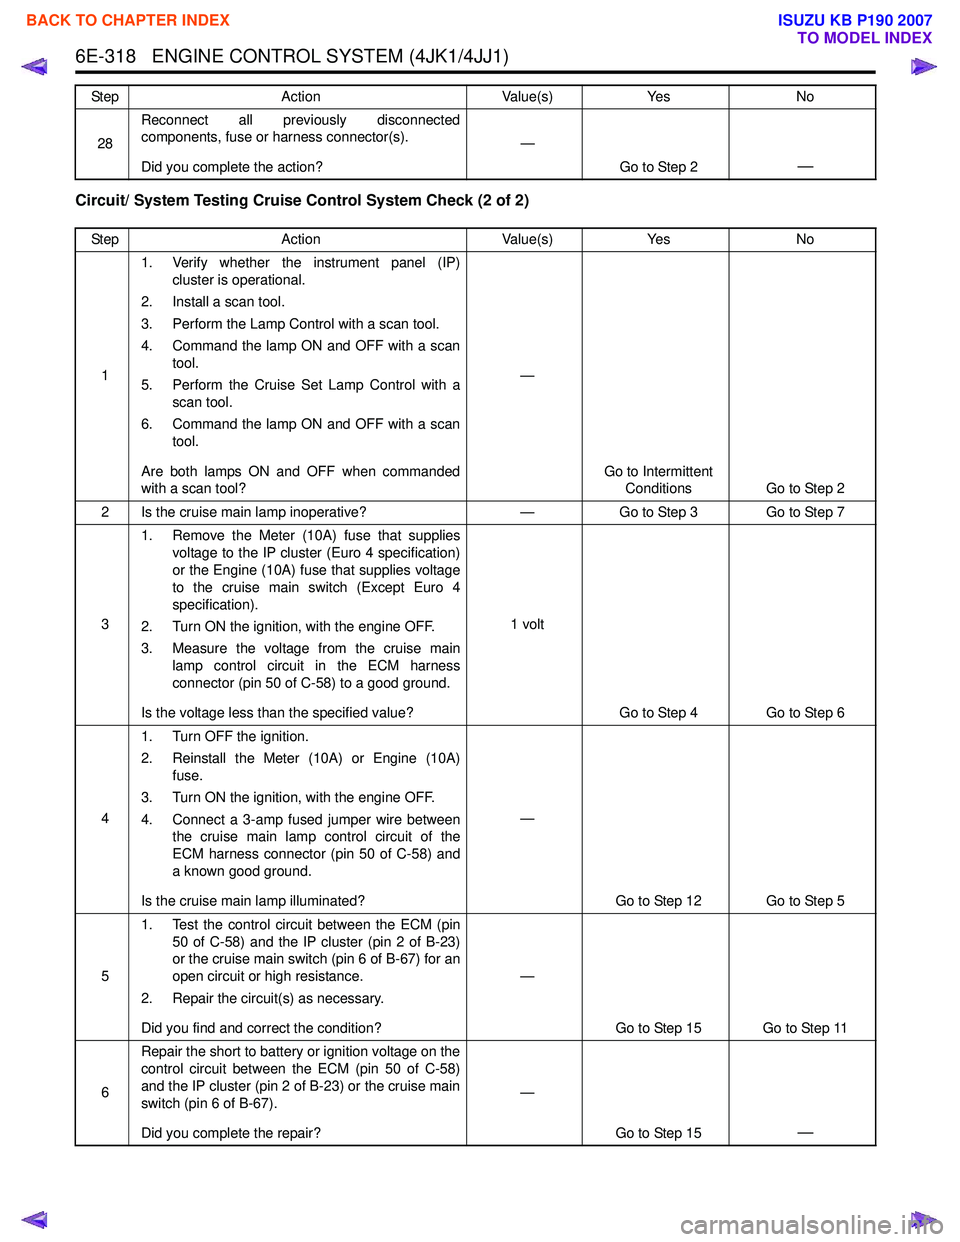
6E-318 ENGINE CONTROL SYSTEM (4JK1/4JJ1)
Circuit/ System Testing Cruise Control System Check (2 of 2)
28Reconnect all previously disconnected
components, fuse or harness connector(s).
Did you complete the action? —
Go to Step 2
—
Step Action Value(s)Yes No
1 1. Verify whether the instrument panel (IP)
cluster is operational.
2. Install a scan tool.
3. Perform the Lamp Control with a scan tool.
4. Command the lamp ON and OFF with a scan tool.
5. Perform the Cruise Set Lamp Control with a scan tool.
6. Command the lamp ON and OFF with a scan tool.
Are both lamps ON and OFF when commanded
with a scan tool? —
Go to Intermittent Conditions Go to Step 2
2 Is the cruise main lamp inoperative? —Go to Step 3 Go to Step 7
3 1. Remove the Meter (10A) fuse that supplies
voltage to the IP cluster (Euro 4 specification)
or the Engine (10A) fuse that supplies voltage
to the cruise main switch (Except Euro 4
specification).
2. Turn ON the ignition, with the engine OFF.
3. Measure the voltage from the cruise main lamp control circuit in the ECM harness
connector (pin 50 of C-58) to a good ground.
Is the voltage less than the specified value? 1 volt
Go to Step 4 Go to Step 6
4 1. Turn OFF the ignition.
2. Reinstall the Meter (10A) or Engine (10A) fuse.
3. Turn ON the ignition, with the engine OFF.
4. Connect a 3-amp fused jumper wire between the cruise main lamp control circuit of the
ECM harness connector (pin 50 of C-58) and
a known good ground.
Is the cruise main lamp illuminated? —
Go to Step 12 Go to Step 5
5 1. Test the control circuit between the ECM (pin
50 of C-58) and the IP cluster (pin 2 of B-23)
or the cruise main switch (pin 6 of B-67) for an
open circuit or high resistance.
2. Repair the circuit(s) as necessary.
Did you find and correct the condition? —
Go to Step 15 Go to Step 11
6 Repair the short to battery or ignition voltage on the
control circuit between the ECM (pin 50 of C-58)
and the IP cluster (pin 2 of B-23) or the cruise main
switch (pin 6 of B-67).
Did you complete the repair? —
Go to Step 15
—
Step Action Value(s)Yes No
BACK TO CHAPTER INDEX
TO MODEL INDEX
ISUZU KB P190 2007
Page 1936 of 6020
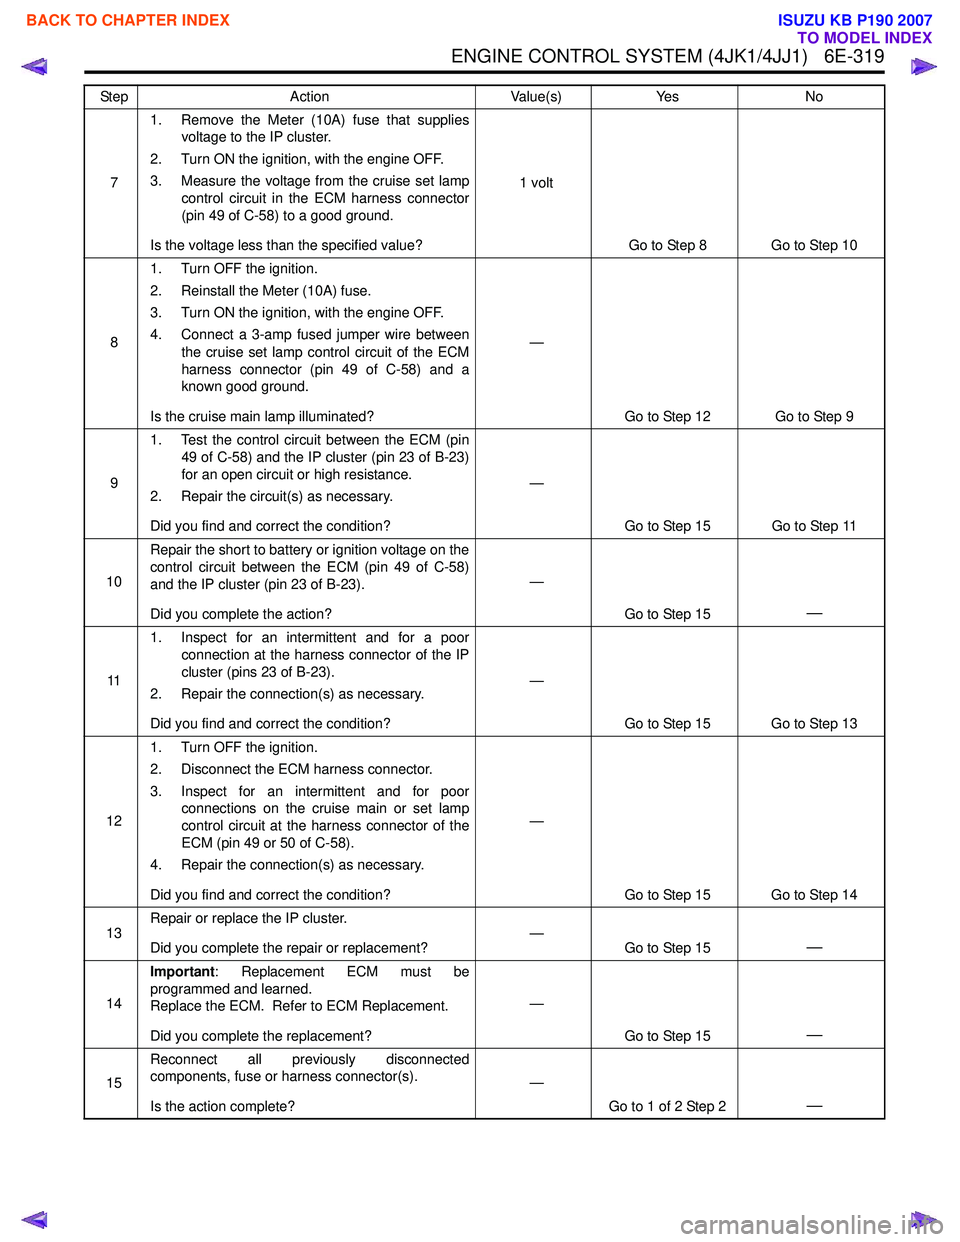
ENGINE CONTROL SYSTEM (4JK1/4JJ1) 6E-319
71. Remove the Meter (10A) fuse that supplies
voltage to the IP cluster.
2. Turn ON the ignition, with the engine OFF.
3. Measure the voltage from the cruise set lamp control circuit in the ECM harness connector
(pin 49 of C-58) to a good ground.
Is the voltage less than the specified value? 1 volt
Go to Step 8 Go to Step 10
8 1. Turn OFF the ignition.
2. Reinstall the Meter (10A) fuse.
3. Turn ON the ignition, with the engine OFF.
4. Connect a 3-amp fused jumper wire between the cruise set lamp control circuit of the ECM
harness connector (pin 49 of C-58) and a
known good ground.
Is the cruise main lamp illuminated? —
Go to Step 12 Go to Step 9
9 1. Test the control circuit between the ECM (pin
49 of C-58) and the IP cluster (pin 23 of B-23)
for an open circuit or high resistance.
2. Repair the circuit(s) as necessary.
Did you find and correct the condition? —
Go to Step 15 Go to Step 11
10 Repair the short to battery or ignition voltage on the
control circuit between the ECM (pin 49 of C-58)
and the IP cluster (pin 23 of B-23).
Did you complete the action? —
Go to Step 15
—
111. Inspect for an intermittent and for a poor
connection at the harness connector of the IP
cluster (pins 23 of B-23).
2. Repair the connection(s) as necessary.
Did you find and correct the condition? —
Go to Step 15 Go to Step 13
12 1. Turn OFF the ignition.
2. Disconnect the ECM harness connector.
3. Inspect for an intermittent and for poor connections on the cruise main or set lamp
control circuit at the harness connector of the
ECM (pin 49 or 50 of C-58).
4. Repair the connection(s) as necessary.
Did you find and correct the condition? —
Go to Step 15 Go to Step 14
13 Repair or replace the IP cluster.
Did you complete the repair or replacement? —
Go to Step 15
—
14Important
: Replacement ECM must be
programmed and learned.
Replace the ECM. Refer to ECM Replacement.
Did you complete the replacement? —
Go to Step 15
—
15Reconnect all previously disconnected
components, fuse or harness connector(s).
Is the action complete? —
Go to 1 of 2 Step 2
—
Step Action Value(s)Yes No
BACK TO CHAPTER INDEX
TO MODEL INDEX
ISUZU KB P190 2007
Page 1939 of 6020
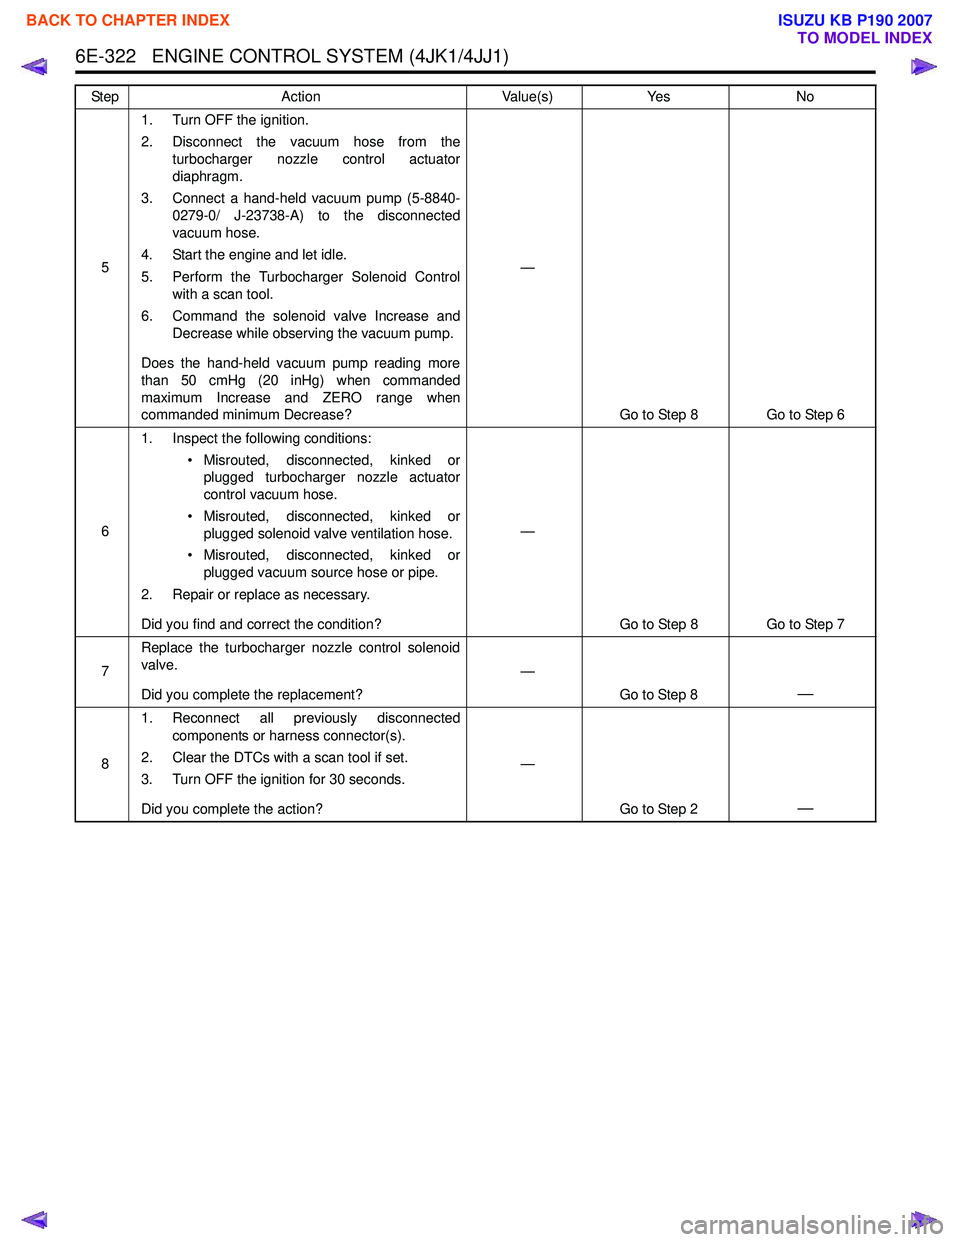
6E-322 ENGINE CONTROL SYSTEM (4JK1/4JJ1)
51. Turn OFF the ignition.
2. Disconnect the vacuum hose from the turbocharger nozzle control actuator
diaphragm.
3. Connect a hand-held vacuum pump (5-8840- 0279-0/ J-23738-A) to the disconnected
vacuum hose.
4. Start the engine and let idle.
5. Perform the Turbocharger Solenoid Control with a scan tool.
6. Command the solenoid valve Increase and Decrease while observing the vacuum pump.
Does the hand-held vacuum pump reading more
than 50 cmHg (20 inHg) when commanded
maximum Increase and ZERO range when
commanded minimum Decrease? —
Go to Step 8 Go to Step 6
6 1. Inspect the following conditions:
• Misrouted, disconnected, kinked orplugged turbocharger nozzle actuator
control vacuum hose.
• Misrouted, disconnected, kinked or plugged solenoid valve ventilation hose.
• Misrouted, disconnected, kinked or plugged vacuum source hose or pipe.
2. Repair or replace as necessary.
Did you find and correct the condition? —
Go to Step 8 Go to Step 7
7 Replace the turbocharger nozzle control solenoid
valve.
Did you complete the replacement? —
Go to Step 8
—
81. Reconnect all previously disconnected
components or harness connector(s).
2. Clear the DTCs with a scan tool if set.
3. Turn OFF the ignition for 30 seconds.
Did you complete the action? —
Go to Step 2
—
Step Action Value(s)Yes No
BACK TO CHAPTER INDEX
TO MODEL INDEX
ISUZU KB P190 2007
Page 1940 of 6020
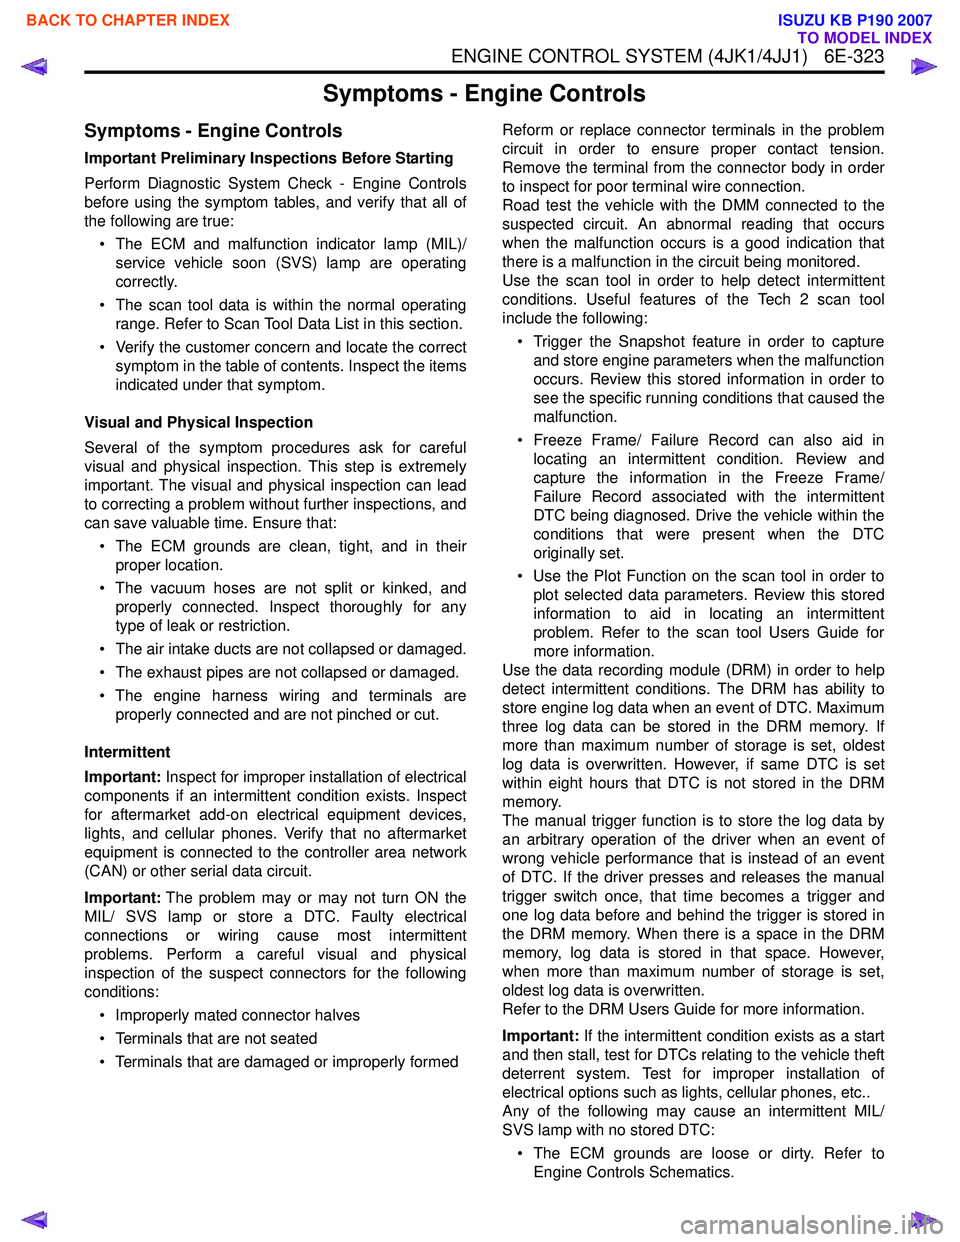
ENGINE CONTROL SYSTEM (4JK1/4JJ1) 6E-323
Symptoms - Engine Controls
Symptoms - Engine Controls
Important Preliminary Inspections Before Starting
Perform Diagnostic System Check - Engine Controls
before using the symptom tables, and verify that all of
the following are true:
• The ECM and malfunction indicator lamp (MIL)/ service vehicle soon (SVS) lamp are operating
correctly.
• The scan tool data is within the normal operating range. Refer to Scan Tool Data List in this section.
• Verify the customer concern and locate the correct symptom in the table of contents. Inspect the items
indicated under that symptom.
Visual and Physical Inspection
Several of the symptom procedures ask for careful
visual and physical inspection. This step is extremely
important. The visual and physical inspection can lead
to correcting a problem without further inspections, and
can save valuable time. Ensure that:
• The ECM grounds are clean, tight, and in their proper location.
• The vacuum hoses are not split or kinked, and properly connected. Inspect thoroughly for any
type of leak or restriction.
• The air intake ducts are not collapsed or damaged.
• The exhaust pipes are not collapsed or damaged.
• The engine harness wiring and terminals are properly connected and are not pinched or cut.
Intermittent
Important: Inspect for improper installation of electrical
components if an intermittent condition exists. Inspect
for aftermarket add-on electrical equipment devices,
lights, and cellular phones. Verify that no aftermarket
equipment is connected to the controller area network
(CAN) or other serial data circuit.
Important: The problem may or may not turn ON the
MIL/ SVS lamp or store a DTC. Faulty electrical
connections or wiring cause most intermittent
problems. Perform a careful visual and physical
inspection of the suspect connectors for the following
conditions:
• Improperly mated connector halves
• Terminals that are not seated
• Terminals that are damaged or improperly formed Reform or replace connector terminals in the problem
circuit in order to ensure proper contact tension.
Remove the terminal from the connector body in order
to inspect for poor terminal wire connection.
Road test the vehicle with the DMM connected to the
suspected circuit. An abnormal reading that occurs
when the malfunction occurs is a good indication that
there is a malfunction in the circuit being monitored.
Use the scan tool in order to help detect intermittent
conditions. Useful features of the Tech 2 scan tool
include the following:
• Trigger the Snapshot feature in order to capture and store engine parameters when the malfunction
occurs. Review this stored information in order to
see the specific running conditions that caused the
malfunction.
• Freeze Frame/ Failure Record can also aid in locating an intermittent condition. Review and
capture the information in the Freeze Frame/
Failure Record associated with the intermittent
DTC being diagnosed. Drive the vehicle within the
conditions that were present when the DTC
originally set.
• Use the Plot Function on the scan tool in order to plot selected data parameters. Review this stored
information to aid in locating an intermittent
problem. Refer to the scan tool Users Guide for
more information.
Use the data recording module (DRM) in order to help
detect intermittent conditions. The DRM has ability to
store engine log data when an event of DTC. Maximum
three log data can be stored in the DRM memory. If
more than maximum number of storage is set, oldest
log data is overwritten. However, if same DTC is set
within eight hours that DTC is not stored in the DRM
memory.
The manual trigger function is to store the log data by
an arbitrary operation of the driver when an event of
wrong vehicle performance that is instead of an event
of DTC. If the driver presses and releases the manual
trigger switch once, that time becomes a trigger and
one log data before and behind the trigger is stored in
the DRM memory. When there is a space in the DRM
memory, log data is stored in that space. However,
when more than maximum number of storage is set,
oldest log data is overwritten.
Refer to the DRM Users Guide for more information.
Important: If the intermittent condition exists as a start
and then stall, test for DTCs relating to the vehicle theft
deterrent system. Test for improper installation of
electrical options such as lights, cellular phones, etc..
Any of the following may cause an intermittent MIL/
SVS lamp with no stored DTC:
• The ECM grounds are loose or dirty. Refer to Engine Controls Schematics.
BACK TO CHAPTER INDEX
TO MODEL INDEX
ISUZU KB P190 2007
Page 1942 of 6020
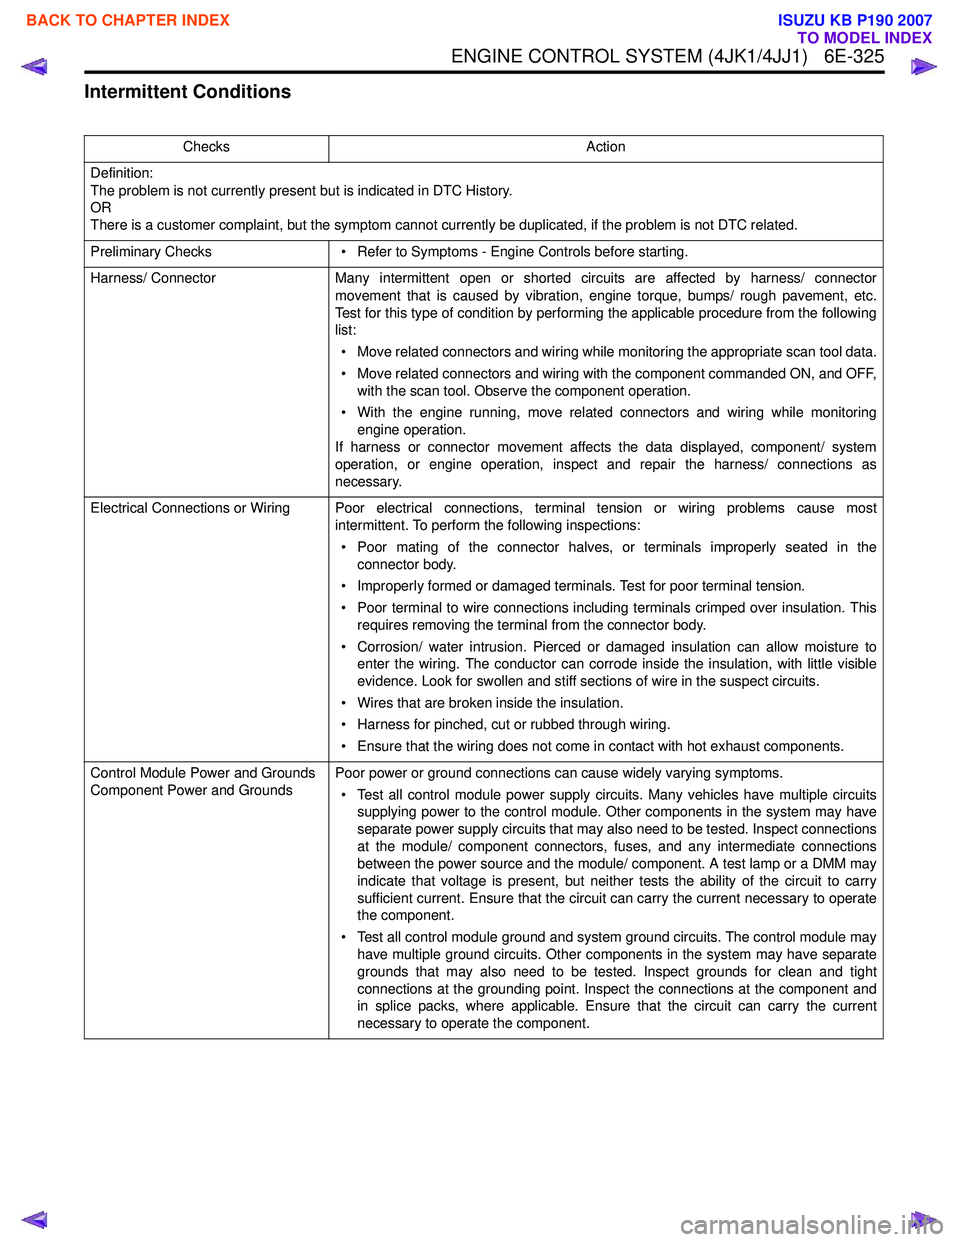
ENGINE CONTROL SYSTEM (4JK1/4JJ1) 6E-325
Intermittent Conditions
ChecksAction
Definition:
The problem is not currently present but is indicated in DTC History.
OR
There is a customer complaint, but the symptom cannot currently be duplicated, if the problem is not DTC related.
Preliminary Checks • Refer to Symptoms - Engine Controls before starting.
Harness/ Connector Many intermittent open or shorted circuits are affected by harness/ connector
movement that is caused by vibration, engine torque, bumps/ rough pavement, etc.
Test for this type of condition by performing the applicable procedure from the following
list:
• Move related connectors and wiring while monitoring the appropriate scan tool data.
• Move related connectors and wiring with the component commanded ON, and OFF, with the scan tool. Observe the component operation.
• With the engine running, move related connectors and wiring while monitoring engine operation.
If harness or connector movement affects the data displayed, component/ system
operation, or engine operation, inspect and repair the harness/ connections as
necessary.
Electrical Connections or Wiring Poor electrical connections, terminal tension or wiring problems cause most intermittent. To perform the following inspections:
• Poor mating of the connector halves, or terminals improperly seated in the connector body.
• Improperly formed or damaged terminals. Test for poor terminal tension.
• Poor terminal to wire connections including terminals crimped over insulation. This requires removing the terminal from the connector body.
• Corrosion/ water intrusion. Pierced or damaged insulation can allow moisture to enter the wiring. The conductor can corrode inside the insulation, with little visible
evidence. Look for swollen and stiff sections of wire in the suspect circuits.
• Wires that are broken inside the insulation.
• Harness for pinched, cut or rubbed through wiring.
• Ensure that the wiring does not come in contact with hot exhaust components.
Control Module Power and Grounds
Component Power and Grounds Poor power or ground connections can cause widely varying symptoms.
• Test all control module power supply circuits. Many vehicles have multiple circuits supplying power to the control module. Other components in the system may have
separate power supply circuits that may also need to be tested. Inspect connections
at the module/ component connectors, fuses, and any intermediate connections
between the power source and the module/ component. A test lamp or a DMM may
indicate that voltage is present, but neither tests the ability of the circuit to carry
sufficient current. Ensure that the circuit can carry the current necessary to operate
the component.
• Test all control module ground and system ground circuits. The control module may have multiple ground circuits. Other components in the system may have separate
grounds that may also need to be tested. Inspect grounds for clean and tight
connections at the grounding point. Inspect the connections at the component and
in splice packs, where applicable. Ensure that the circuit can carry the current
necessary to operate the component.
BACK TO CHAPTER INDEX
TO MODEL INDEX
ISUZU KB P190 2007