Page 5178 of 6020
8A-240 ELECTRICAL-BODY AND CHASSIS
B Type
RTW 580SH000401
A Type
RTW 780SH001401
4. Turn the bulb 1 counterclockwise to remove it.
B Type
RTW 78ASH002601
Installation
Follow the removal procedure in the reverse order to install the
rear combination light.
Pay close attention to the important points mentioned in the
following paragraphs.
Bulbs
Be absolutely sure that each bulb is correctly installed.
This will prevent a poor contact and an open circuit.
RTW 780SH001501
This illustration is based on RHD model
HAZARD WARNING FLASHER SWITCH
Removal
1. Disconnect the battery ground cable.
2. Instrument Panel Cluster Assembly • Refer to Section 10 “BODY” for instrument panel cluste
r
assembly removal steps.
3. Hazard W arning Switch • Disconnect the switch connector.
• To remove the switch, push the lock from the back side
of the cluster assembly.
BACK TO CHAPTER INDEX TO MODEL INDEXISUZU KB P190 2007
Page 5179 of 6020

ELECTRICAL-BODY AND CHASSIS 8A-241
Installation
To install, follow the removal procedure in the reverse order.
Connector
Be absolutely sure that the hazard warning flasher switch
connector is securely connected.
This will prevent a poor contact and an open circuit.
BACKUP LIGHT SWITCH
Removal
1. Disconnect the battery ground cable.
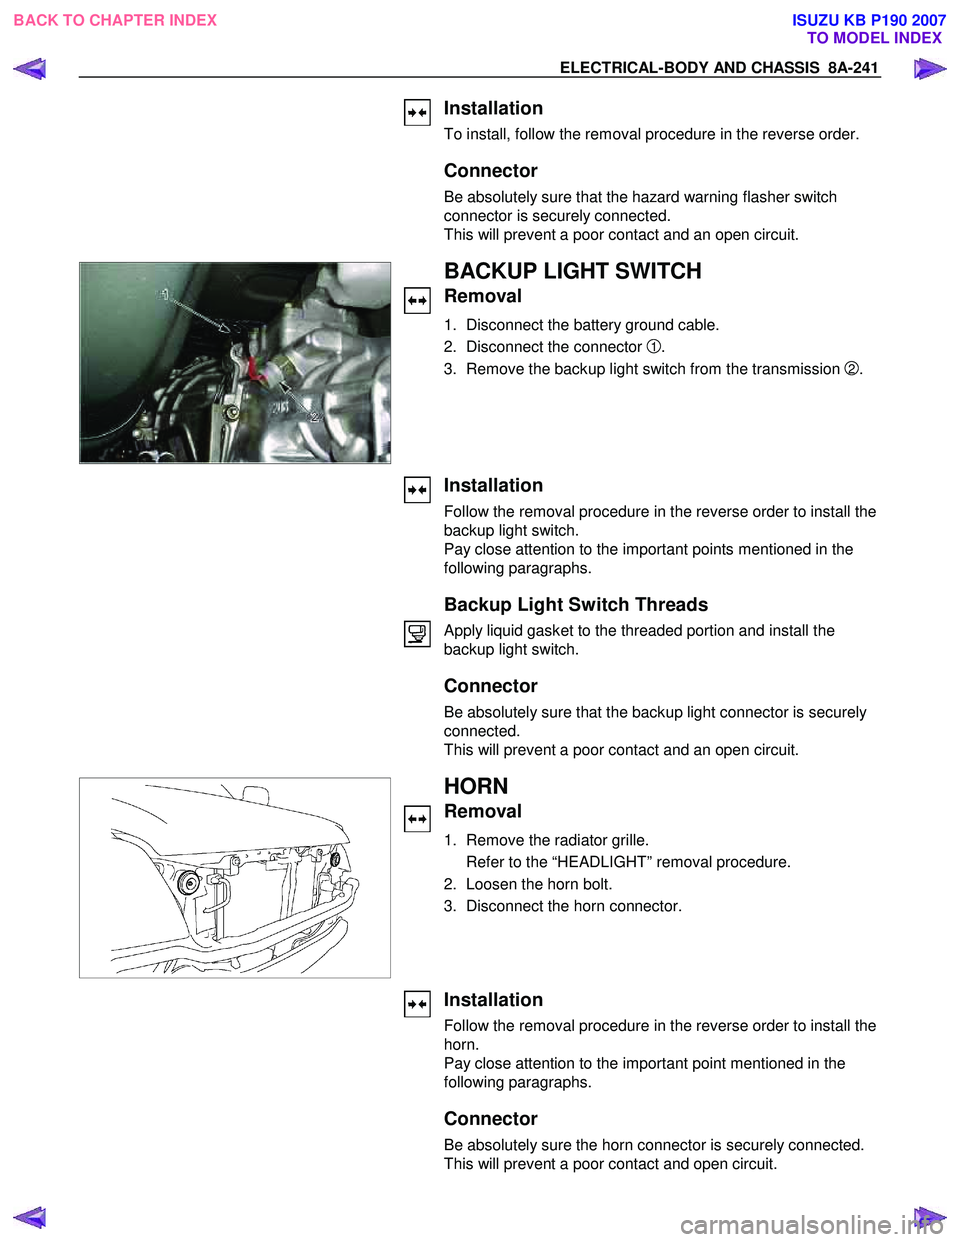
2. Disconnect the connector
1.
3. Remove the backup light switch from the transmission
2.
Installation
Follow the removal procedure in the reverse order to install the
backup light switch.
Pay close attention to the important points mentioned in the
following paragraphs.
Backup Light Switch Threads
Apply liquid gasket to the threaded portion and install the
backup light switch.
Connector
Be absolutely sure that the backup light connector is securely
connected.
This will prevent a poor contact and an open circuit.
HORN
Removal
1. Remove the radiator grille.
Refer to the “HEADLIGHT” removal procedure.
2. Loosen the horn bolt.
3. Disconnect the horn connector.
Installation
Follow the removal procedure in the reverse order to install the
horn.
Pay close attention to the important point mentioned in the
following paragraphs.
Connector
Be absolutely sure the horn connector is securely connected.
This will prevent a poor contact and open circuit.
BACK TO CHAPTER INDEX TO MODEL INDEXISUZU KB P190 2007
Page 5182 of 6020
8A-244 ELECTRICAL-BODY AND CHASSIS
Switch side
B16
HAZARD WARNING FLASHER SWITCH
Hazard Warning Flasher Switch Connections
Terminal
No.
SW position
4
6
5
3
2
1
7
8
ON
OFF
BACK TO CHAPTER INDEX TO MODEL INDEXISUZU KB P190 2007
Page 5183 of 6020
ELECTRICAL-BODY AND CHASSIS 8A-245
DOME LIGHT, SPOTLIGHT, MAP LIGHT AND WARNING BUZZER
PARTS LOCATION (RHD)
RTW 78AXF037901 & RTW 78AXF044101
BACK TO CHAPTER INDEX
TO MODEL INDEXISUZU KB P190 2007
Page 5241 of 6020
ELECTRICAL-BODY AND CHASSIS 8A-303
METER, WARNING LIGHT AND INDICATOR LIGHT
PARTS LOCATION (RHD)
RTW 78AXF038901 & RTW 78AXF045101
BACK TO CHAPTER INDEX
TO MODEL INDEXISUZU KB P190 2007
Page 5289 of 6020
ELECTRICAL-BODY AND CHASSIS 8A-351
WARNING AND INDICATOR LIGHT
1. When the parking brake lever is pulled, the brake indicator light does not light up
Checkpoint Trouble Cause Countermeasure
Replace or reinstall the bulb
Bulb burned out or loose
contact
NG
Adjust or replace the parking
brake SW .
Parking brake SW . installation
position and function
Incorrect SW . adjustment or
poor SW . point contact
Continuity between the
parking brake SW . connector
1
C39 (stick type), 1 R4
(lev er type), and 4
B23
(C24SE : 9
B23 )
Repair open circuit or
connector contact
Open circuit or poor connector
contact
NG
NG
OK
OK
Brake indicator light bulb
continuity
NG
OK
Continuity between the
parking brake SW . connector
1
C39 (stick type), 1 R4
(lev er type) and the ground
when the parking brake is
operated
Replace the parking brake
SW .
Parking brake SW .
malfunction
BACK TO CHAPTER INDEX TO MODEL INDEXISUZU KB P190 2007
Page 5290 of 6020

8A-352 ELECTRICAL-BODY AND CHASSIS
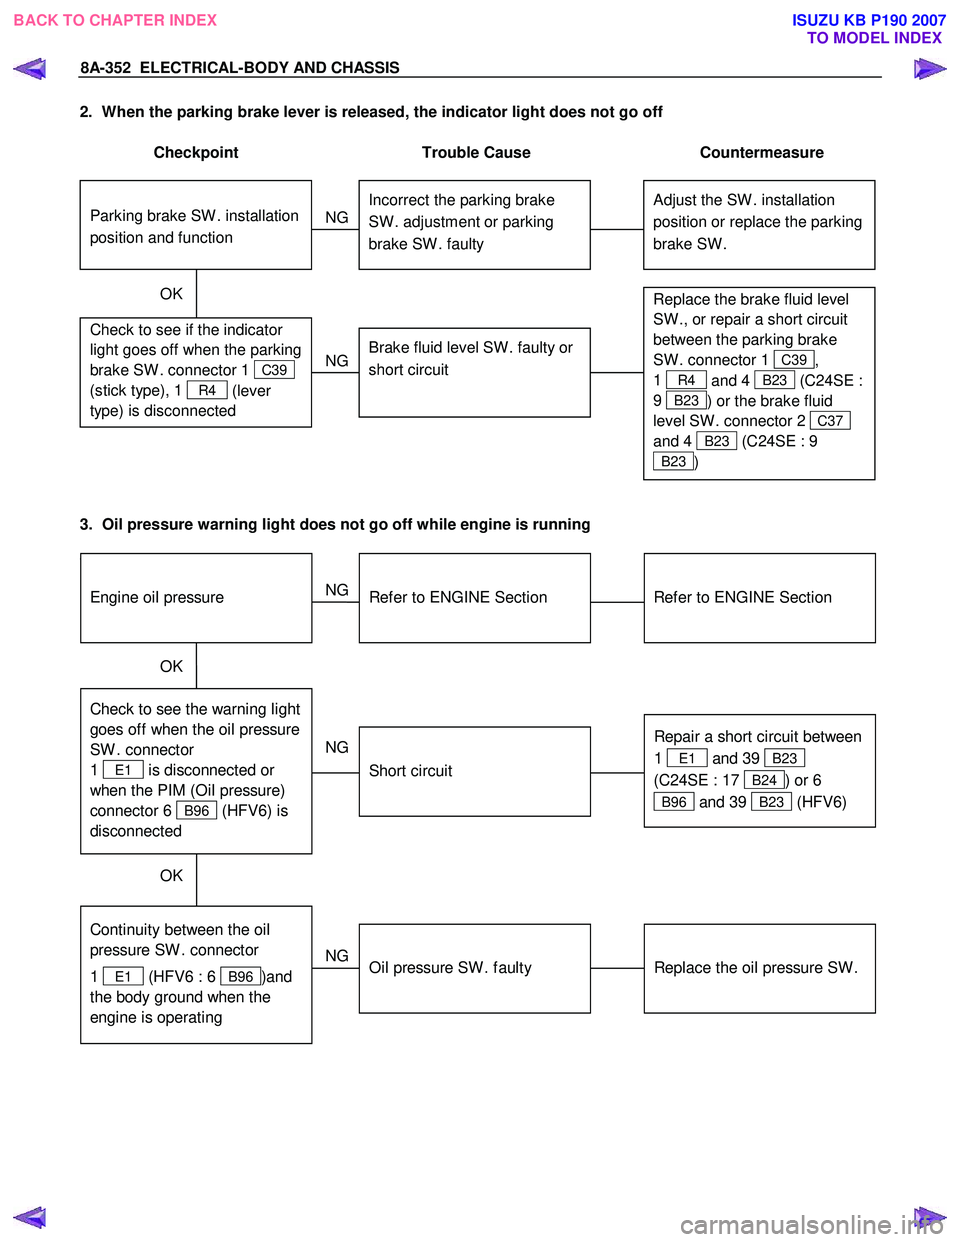
2. When the parking brake lever is released, the indicator light does not go off
Checkpoint Trouble Cause Countermeasure
Adjust the SW . installation
position or replace the parking
brake SW . Incorrect the parking brake
SW . adjustment or parking
brake SW . faulty
NG
Thermo unit malfunction
Replace the brake fluid level
SW ., or repair a short circuit
between the parking brake
SW . connector 1
C39,
1
R4 and 4 B23 (C24SE :
9
B23 ) or the brake fluid
level SW . connector 2
C37
and 4
B23 (C24SE : 9
B23 )
Check to see if the indicator
light goes off when the parking
brake SW . connector 1
C39
(stick type), 1
R4 (lever
type) is disconnected
Brake fluid level SW . faulty or
short circuit
NG
OK
Parking brake SW . installation
position and function
3. Oil pressure warning light does not go off while engine is running
Refer to ENGINE Section
Refer to ENGINE Section
NG Thermo unit malfunction
Check to see the warning light
goes off when the oil pressure
SW . connector
1
E1 is disconnected or
when the PIM (Oil pressure)
connector 6
B96 (HFV6) is
disconnected
Repair a short circuit between
1
E1 and 39 B23
(C24SE : 17
B24) or 6
B96 and 39 B23 (HFV6)
Short circuit
NG
OK
Replace the oil pressure SW .
Continuity between the oil
pressure SW . connector
1
E1 (HFV6 : 6 B96 )and
the body ground when the
engine is operating
Oil pressure SW . faulty
NG
OK
Engine oil pressure
BACK TO CHAPTER INDEX TO MODEL INDEXISUZU KB P190 2007
Page 5307 of 6020

ELECTRICAL-BODY AND CHASSIS 8A-369
Low Fuel Indicator Light
1. Disconnect the fuel gauge unit wire connector.
2. Turn the key switch on. Check that the bulb lights.
If operation is not correct, remove and check the bulb or circuit.
or If check whether low fuel turns on fuel input (B-24) at the
time of open and key on.
∗ meter is check at low fuel
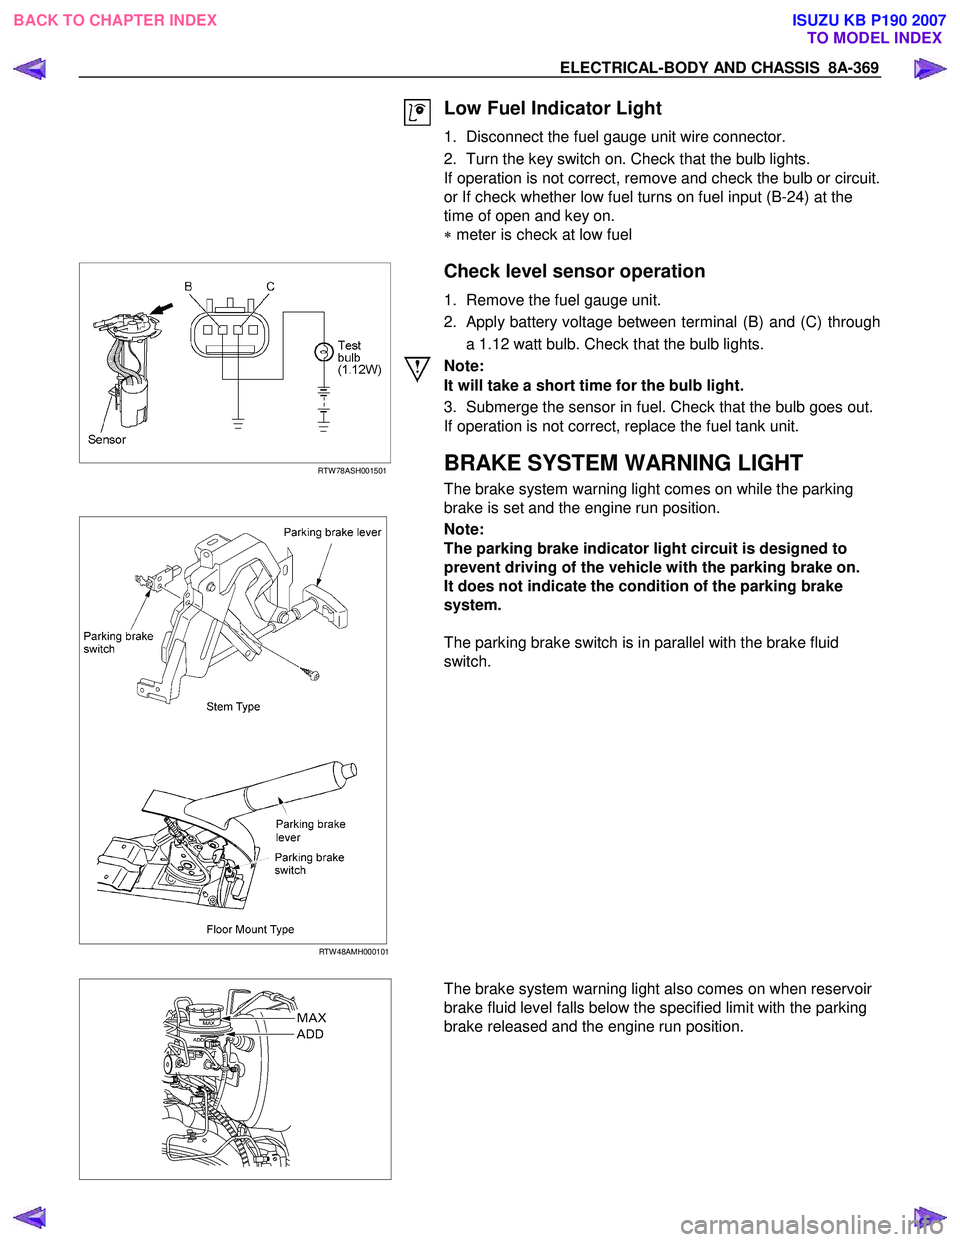
RTW 78ASH001501
Check level sensor operation
1. Remove the fuel gauge unit.
2. Apply battery voltage between terminal (B) and (C) through a 1.12 watt bulb. Check that the bulb lights.
Note:
It will take a short time for the bulb light.
3. Submerge the sensor in fuel. Check that the bulb goes out.
If operation is not correct, replace the fuel tank unit.
BRAKE SYSTEM WARNING LIGHT
The brake system warning light comes on while the parking
brake is set and the engine run position.
RTW 48AMH000101
Note:
The parking brake indicator light circuit is designed to
prevent driving of the vehicle with the parking brake on.
It does not indicate the condition of the parking brake
system.
The parking brake switch is in parallel with the brake fluid
switch.
The brake system warning light also comes on when reservoir
brake fluid level falls below the specified limit with the parking
brake released and the engine run position.
BACK TO CHAPTER INDEX TO MODEL INDEXISUZU KB P190 2007