2007 ISUZU KB P190 key
[x] Cancel search: keyPage 4314 of 6020
7A2-30 TRANSMISSION CONTROL SYSTEM (JR405E)
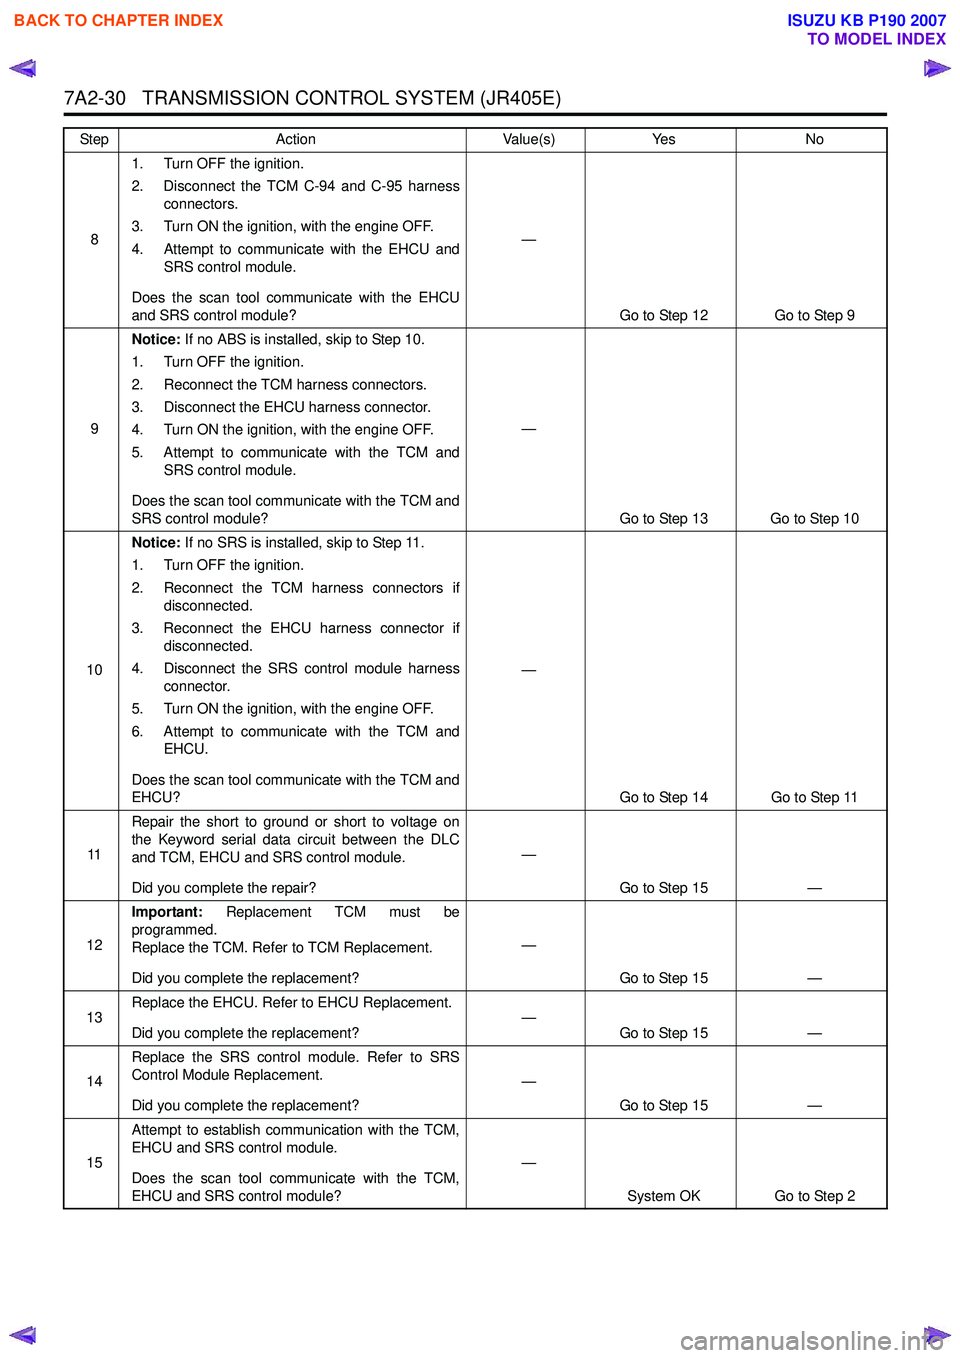
81. Turn OFF the ignition.
2. Disconnect the TCM C-94 and C-95 harness connectors.
3. Turn ON the ignition, with the engine OFF.
4. Attempt to communicate with the EHCU and SRS control module.
Does the scan tool communicate with the EHCU
and SRS control module? —
Go to Step 12 Go to Step 9
9 Notice:
If no ABS is installed, skip to Step 10.
1. Turn OFF the ignition.
2. Reconnect the TCM harness connectors.
3. Disconnect the EHCU harness connector.
4. Turn ON the ignition, with the engine OFF.
5. Attempt to communicate with the TCM and SRS control module.
Does the scan tool communicate with the TCM and
SRS control module? —
Go to Step 13 Go to Step 10
10 Notice:
If no SRS is installed, skip to Step 11.
1. Turn OFF the ignition.
2. Reconnect the TCM harness connectors if disconnected.
3. Reconnect the EHCU harness connector if disconnected.
4. Disconnect the SRS control module harness connector.
5. Turn ON the ignition, with the engine OFF.
6. Attempt to communicate with the TCM and EHCU.
Does the scan tool communicate with the TCM and
EHCU? —
Go to Step 14 Go to Step 11
11 Repair the short to ground or short to voltage on
the Keyword serial data circuit between the DLC
and TCM, EHCU and SRS control module.
Did you complete the repair? —
Go to Step 15 —
12 Important:
Replacement TCM must be
programmed.
Replace the TCM. Refer to TCM Replacement.
Did you complete the replacement? —
Go to Step 15 —
13 Replace the EHCU. Refer to EHCU Replacement.
Did you complete the replacement? —
Go to Step 15 —
14 Replace the SRS control module. Refer to SRS
Control Module Replacement.
Did you complete the replacement? —
Go to Step 15 —
15 Attempt to establish communication with the TCM,
EHCU and SRS control module.
Does the scan tool communicate with the TCM,
EHCU and SRS control module? —
System OK Go to Step 2
Step
Action Value(s)Yes No
BACK TO CHAPTER INDEX
TO MODEL INDEX
ISUZU KB P190 2007
Page 4315 of 6020
![ISUZU KB P190 2007 Workshop Repair Manual TRANSMISSION CONTROL SYSTEM (JR405E) 7A2-31
Lost Communication with The Transmission Control Module (TCM)
Circuit Description
The TCM, electronic hydraulic control unit (EHCU)
[ABS module] and sup ISUZU KB P190 2007 Workshop Repair Manual TRANSMISSION CONTROL SYSTEM (JR405E) 7A2-31
Lost Communication with The Transmission Control Module (TCM)
Circuit Description
The TCM, electronic hydraulic control unit (EHCU)
[ABS module] and sup](/manual-img/61/57177/w960_57177-4314.png)
TRANSMISSION CONTROL SYSTEM (JR405E) 7A2-31
Lost Communication with The Transmission Control Module (TCM)
Circuit Description
The TCM, electronic hydraulic control unit (EHCU)
[ABS module] and supplemental restraint system
(SRS) control module all communicate with the scan
tool over the Keyword serial data link. Schematic Reference:
Transmission Controls
Schematics
Connector End View Reference: Transmission
Controls Connector End Views or TCM Connector End
Views
Circuit/ System Testing Lost Communication with The Transmission Control Module (TCM)
Step Action ActionYes No
1 Did you perform the Diagnostic System Check -
Engine Controls? —
Go to Step 2 Go to Diagnostic
System Check - Transmission
Controls
2 Attempt to establish communication with the TCM.
Does the scan tool communicate with the TCM? —
Go to Intermittent
Conditions Go to Step 3
3 1. Inspect for an intermittent, for poor
connections and for corrosion at the TCM C-
94 and C-95 harness connectors.
2. Repair the connection(s) as necessary.
Did you find and correct the condition? —
Go to Step 9 Go to Step 4
4 1. Check the TCM (15A) in the cabin fuse block.
Replace and retest if open. If any fuse
continues to open, repair the short to ground
on each circuit fed by that fuse.
2. Turn OFF the ignition.
3. Disconnect the TCM C-95 harness connector.
4. Turn ON the ignition, with the engine OFF.
5. Connect a test lamp to ground and check for voltage at the ignition voltage supply circuit at
the TCM (pins 18 and 24 of C-95).
Does the test lamp illuminate? —
Go to Step 6 Go to Step 5
5 Repair the open in the ignition voltage circuit to the
TCM.
Did you complete the repair? —
Go to Step 9 —
6 1. Turn OFF the ignition.
2. Disconnect the TCM C-94 harness connector.
3. Inspect for an intermittent, for poor connections and corrosion at the harness
connector of the TCM (pin 5 of C-94).
4. Test the Keyword serial data circuit between the TCM (pin 5 of C-94) and the DLC (pin 7 of
B-58) for an open circuit or high resistance.
5. Repair the connection(s) or circuit(s) as necessary.
Did you find and correct the condition? —
Go to Step 9 Go to Step 7
7 1. Check TCM ground for corrosion and
tightness.
2. Clean or tighten grounds as necessary.
Did you find and correct the condition? —
Go to Step 9 Go to Step 8
BACK TO CHAPTER INDEX
TO MODEL INDEX
ISUZU KB P190 2007
Page 4418 of 6020
7A2-134 TRANSMISSION CONTROL SYSTEM (JR405E)
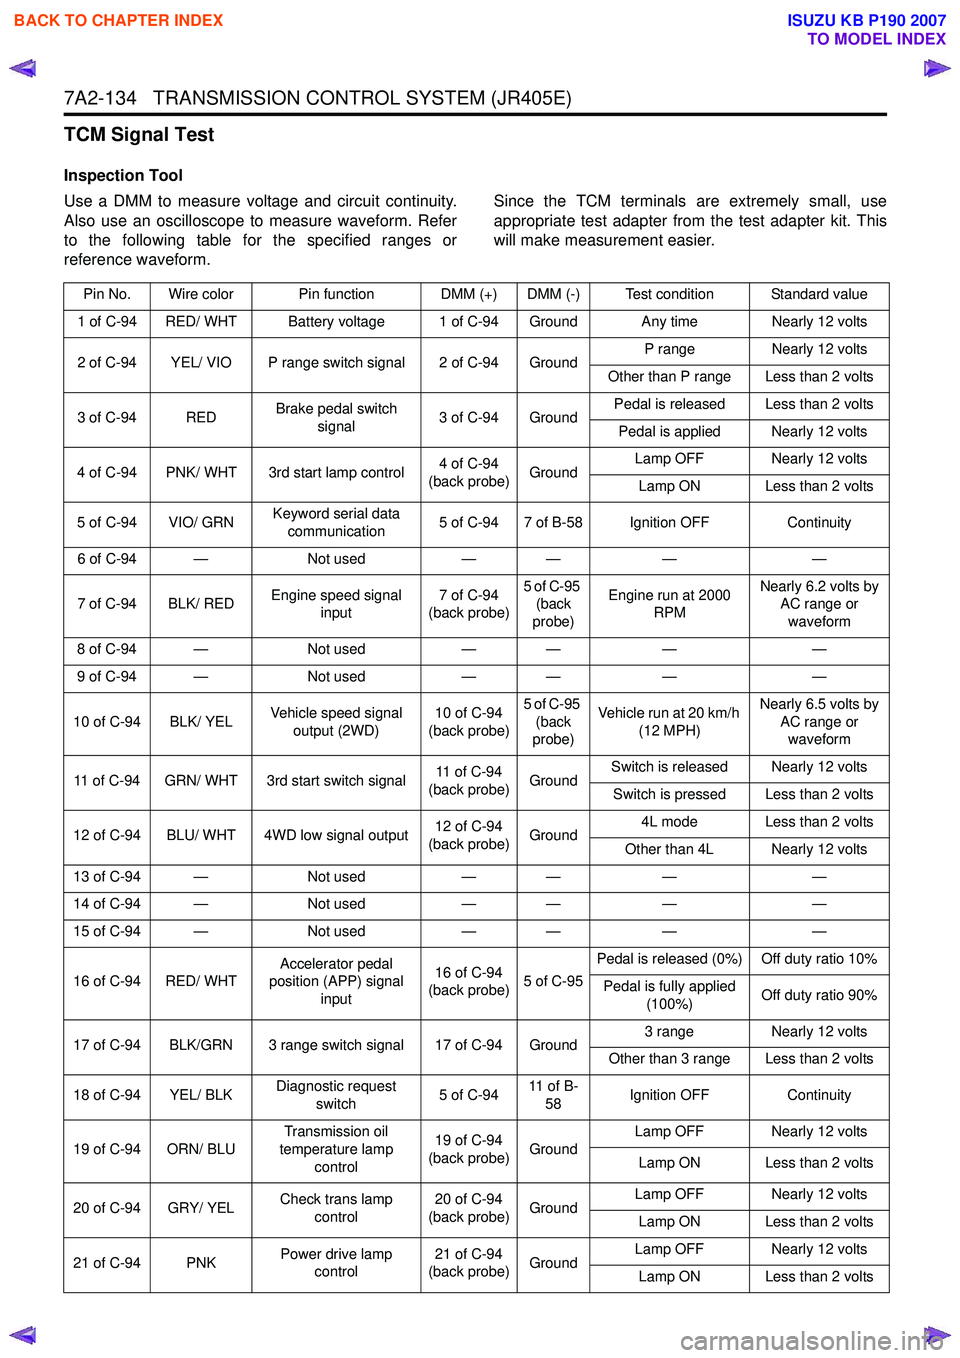
TCM Signal Test
Inspection Tool
Use a DMM to measure voltage and circuit continuity.
Also use an oscilloscope to measure waveform. Refer
to the following table for the specified ranges or
reference waveform. Since the TCM terminals are extremely small, use
appropriate test adapter from the test adapter kit. This
will make measurement easier.
Pin No. Wire color Pin function DMM (+) DMM (-) Test condition Standard value
1 of C-94 RED/ WHT Battery voltage 1 of C-94 Ground Any time Nearly 12 volts
2 of C-94 YEL/ VIO P range switch signal 2 of C-94 Ground P range
Nearly 12 volts
Other than P range Less than 2 volts
3 of C-94 RED Brake pedal switch
signal 3 of C-94 Ground Pedal is released Less than 2 volts
Pedal is applied Nearly 12 volts
4 of C-94 PNK/ WHT 3rd start lamp control 4 of C-94
(back probe) Ground Lamp OFF Nearly 12 volts
Lamp ON Less than 2 volts
5 of C-94 VIO/ GRN Keyword serial data
communication 5 of C-94 7 of B-58 Ignition OFF
Continuity
6 of C-94 — Not used— — ——
7 of C-94 BLK/ RED Engine speed signal
input 7 of C-94
(back probe) 5 of C-95
(back
probe) Engine run at 2000
RPM Nearly 6.2 volts by
AC range or
waveform
8 of C-94 — Not used— — ——
9 of C-94 — Not used— — ——
10 of C-94 BLK/ YEL Vehicle speed signal
output (2WD) 10 of C-94
(back probe) 5 of C-95
(back
probe) Vehicle run at 20 km/h
(12 MPH) Nearly 6.5 volts by
AC range or waveform
11 of C-94 GRN/ WHT 3rd start switch signal 11 of C-94
(back probe) GroundSwitch is released Nearly 12 volts
Switch is pressed Less than 2 volts
12 of C-94 BLU/ WHT 4WD low signal output 12 of C-94
(back probe) Ground 4L mode Less than 2 volts
Other than 4L Nearly 12 volts
13 of C-94 — Not used— — ——
14 of C-94 — Not used— — ——
15 of C-94 — Not used— — ——
16 of C-94 RED/ WHT Accelerator pedal
position (APP) signal
input 16 of C-94
(back probe) 5 of C-95Pedal is released (0%) Off duty ratio 10%
Pedal is fully applied (100%) Off duty ratio 90%
17 of C-94 BLK/GRN 3 range switch signal 17 of C-94 Ground 3 range
Nearly 12 volts
Other than 3 range Less than 2 volts
18 of C-94 YEL/ BLK Diagnostic request
switch 5 of C-9411 o f B -
58 Ignition OFF
Continuity
19 of C-94 ORN/ BLU Transmission oil
temperature lamp control 19 of C-94
(back probe) Ground Lamp OFF Nearly 12 volts
Lamp ON Less than 2 volts
20 of C-94 GRY/ YEL Check trans lamp
control 20 of C-94
(back probe) Ground Lamp OFF Nearly 12 volts
Lamp ON Less than 2 volts
21 of C-94 PNK Power drive lamp
control 21 of C-94
(back probe) Ground Lamp OFF Nearly 12 volts
Lamp ON Less than 2 volts
BACK TO CHAPTER INDEX
TO MODEL INDEX
ISUZU KB P190 2007
Page 4423 of 6020
TRANSMISSION CONTROL SYSTEM (JR405E) 7A2-139
Repair Instructions
Transmission Controls Module (TCM) Replacement
Description
The following A - C steps provide an overview
procedure to replace and reprogram a TCM. Each A -C
steps is explained further in this section.
A. Replace the old TCM with the new TCM.
B. Program the latest software and calibrations into the
new TCM using the Service Programming System
(SPS) if released. If not released, do not perform this
and skip to Step C.
C. Program the vehicle identification number (VIN) into
the TCM.
A. Removal and Installation
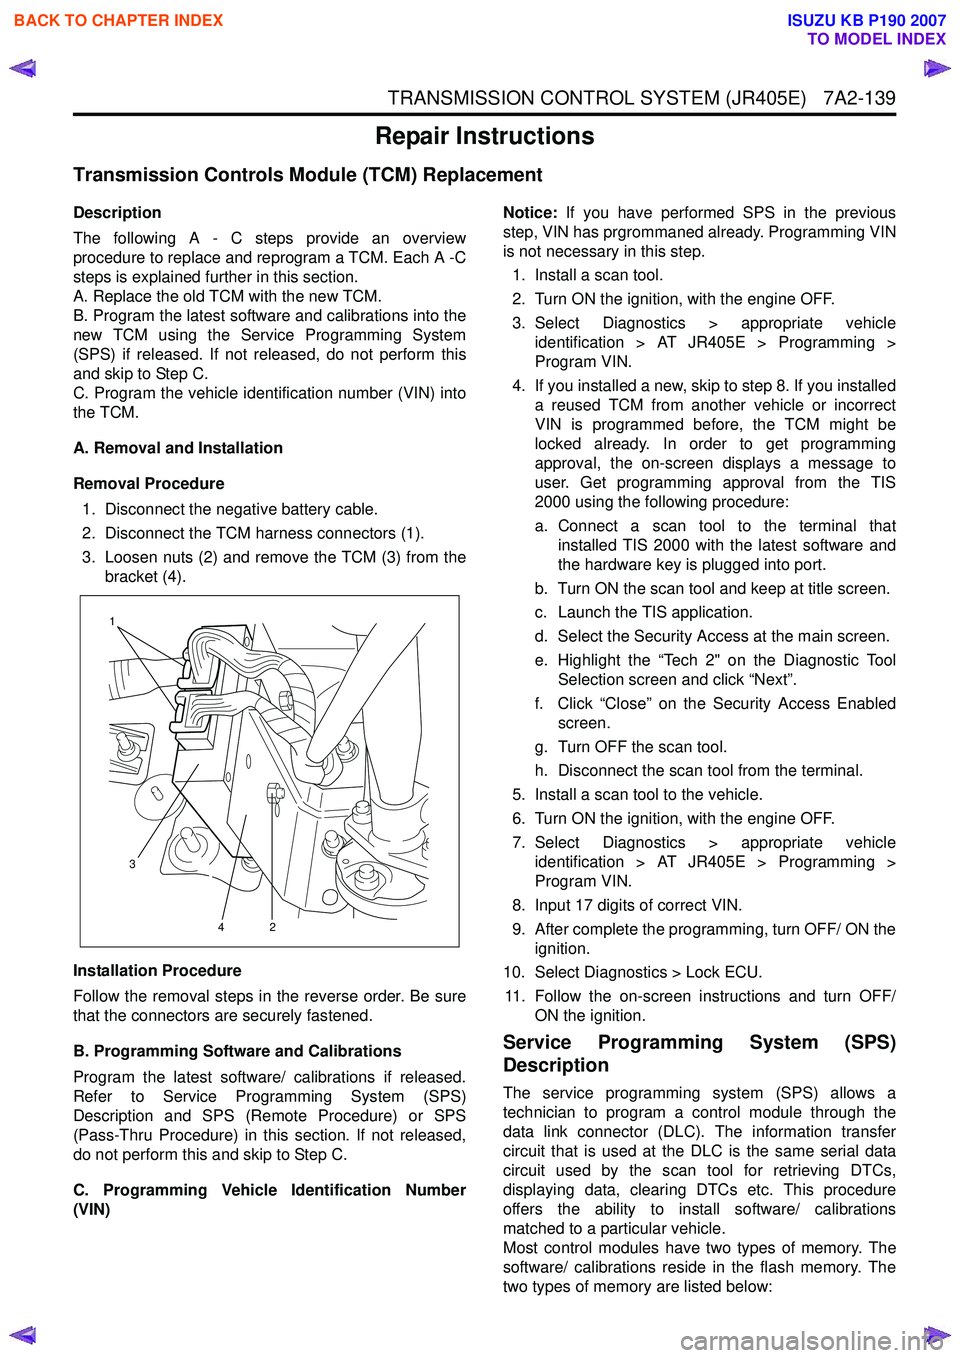
Removal Procedure 1. Disconnect the negative battery cable.
2. Disconnect the TCM harness connectors (1).
3. Loosen nuts (2) and remove the TCM (3) from the bracket (4).
Installation Procedure
Follow the removal steps in the reverse order. Be sure
that the connectors are securely fastened.
B. Programming Software and Calibrations
Program the latest software/ calibrations if released.
Refer to Service Programming System (SPS)
Description and SPS (Remote Procedure) or SPS
(Pass-Thru Procedure) in this section. If not released,
do not perform this and skip to Step C.
C. Programming Vehicle Identification Number
(VIN) Notice:
If you have performed SPS in the previous
step, VIN has prgrommaned already. Programming VIN
is not necessary in this step.
1. Install a scan tool.
2. Turn ON the ignition, with the engine OFF.
3. Select Diagnostics > appropriate vehicle identification > AT JR405E > Programming >
Program VIN.
4. If you installed a new, skip to step 8. If you installed a reused TCM from another vehicle or incorrect
VIN is programmed before, the TCM might be
locked already. In order to get programming
approval, the on-screen displays a message to
user. Get programming approval from the TIS
2000 using the following procedure:
a. Connect a scan tool to the terminal that installed TIS 2000 with the latest software and
the hardware key is plugged into port.
b. Turn ON the scan tool and keep at title screen.
c. Launch the TIS application.
d. Select the Security Access at the main screen.
e. Highlight the “Tech 2" on the Diagnostic Tool Selection screen and click “Next”.
f. Click “Close” on the Security Access Enabled screen.
g. Turn OFF the scan tool.
h. Disconnect the scan tool from the terminal.
5. Install a scan tool to the vehicle.
6. Turn ON the ignition, with the engine OFF.
7. Select Diagnostics > appropriate vehicle identification > AT JR405E > Programming >
Program VIN.
8. Input 17 digits of correct VIN.
9. After complete the programming, turn OFF/ ON the ignition.
10. Select Diagnostics > Lock ECU.
11. Follow the on-screen instructions and turn OFF/ ON the ignition.
Service Programming System (SPS)
Description
The service programming system (SPS) allows a
technician to program a control module through the
data link connector (DLC). The information transfer
circuit that is used at the DLC is the same serial data
circuit used by the scan tool for retrieving DTCs,
displaying data, clearing DTCs etc. This procedure
offers the ability to install software/ calibrations
matched to a particular vehicle.
Most control modules have two types of memory. The
software/ calibrations reside in the flash memory. The
two types of memory are listed below:
1
3 42
BACK TO CHAPTER INDEX
TO MODEL INDEX
ISUZU KB P190 2007
Page 4424 of 6020
7A2-140 TRANSMISSION CONTROL SYSTEM (JR405E)
• Electrically Erasable Programmable Read OnlyMemory (EEPROM)
This type of memory allows selected portions of
memory to be programmed while other portions
remain unchanged.
Certain learned values reside in the EEPROM,
such as:
- The vehicle identification number (VIN)
- The software/ calibrations identification numbers
- The control module security information
• Flash Read Only Memory-Flash Memory
Flash memory has increased memory storage capacity.
During programming, all information within this type of
memory is erased, and then replaced with entirely new
information.
Service Programming Methods
The two methods of programming a TCM are listed
below:
• Remote Programming
• Pass Thru Programming
For information on programming a TCM using one of
the methods listed above, refer to Service
Programming System (SPS) (Remote Procedure) or
Service Programming System (SPS) (Pass-Thru
Procedure).
Before Programming a Control Module
Important: DO NOT program an existing TCM with the
identical software/ calibration package. This procedure
is not a short cut to correct the driveability condition.
This is an ineffective repair. An TCM should only be
programmed when the following occurs:
• When a service procedure instructs you to replace the TCM.
• An updated software/ calibrations is released.
Ensure that the following conditions are met before
programming a TCM:
• The scan tool PCMCIA card is programmed with the latest software.
• The TIS 2000 is installed with the latest software.
• The hardware key is plugged into the computer port.
• Vehicle system voltage:
- There are no charging system concerns. Allcharging system concerns must be repaired
before programming the TCM.
- The battery voltage is greater than 12 volts but less than 16 volts. The battery must be fully
charged before programming the TCM.
- A battery charger is NOT connected to the vehicles battery. Incorrect system voltage or
voltage fluctuations from a battery charger may
cause programming failure or TCM damage. - Turn OFF or disable any system that may put a
load on the vehicles battery. Turn OFF or
disable systems such as:
◊ Heating, ventilation, and air conditioning
(HVAC) systems
◊ Headlights
◊ Room lights
◊ Accessory equipment
• The ignition switch is in the proper position. The scan tool prompts you to turn ON the ignition, with
the engine OFF. DO NOT change the position of
the ignition switch during the programming
procedure unless instructed to do so.
• All tool connections are secure:
- The RS-232 cable
- The connection at the DLC
- The voltage supply circuits
• DO NOT disturb the tool harnesses while programming. If an interruption occurs during the
programming procedure, programming failure or
TCM damage may occur.
• If you are performing the Pass-Thru programming procedure using a notebook computer without the
power cord, ensure that the internal battery is fully
charged.
Service Programming System (SPS)
(Remote Procedure)
Notice: Some module will not accept SPS remote
procedure using 10MB PCMCIA card. In such case,
use 32MB PCMCIA card or SPS pass-thru procedure.
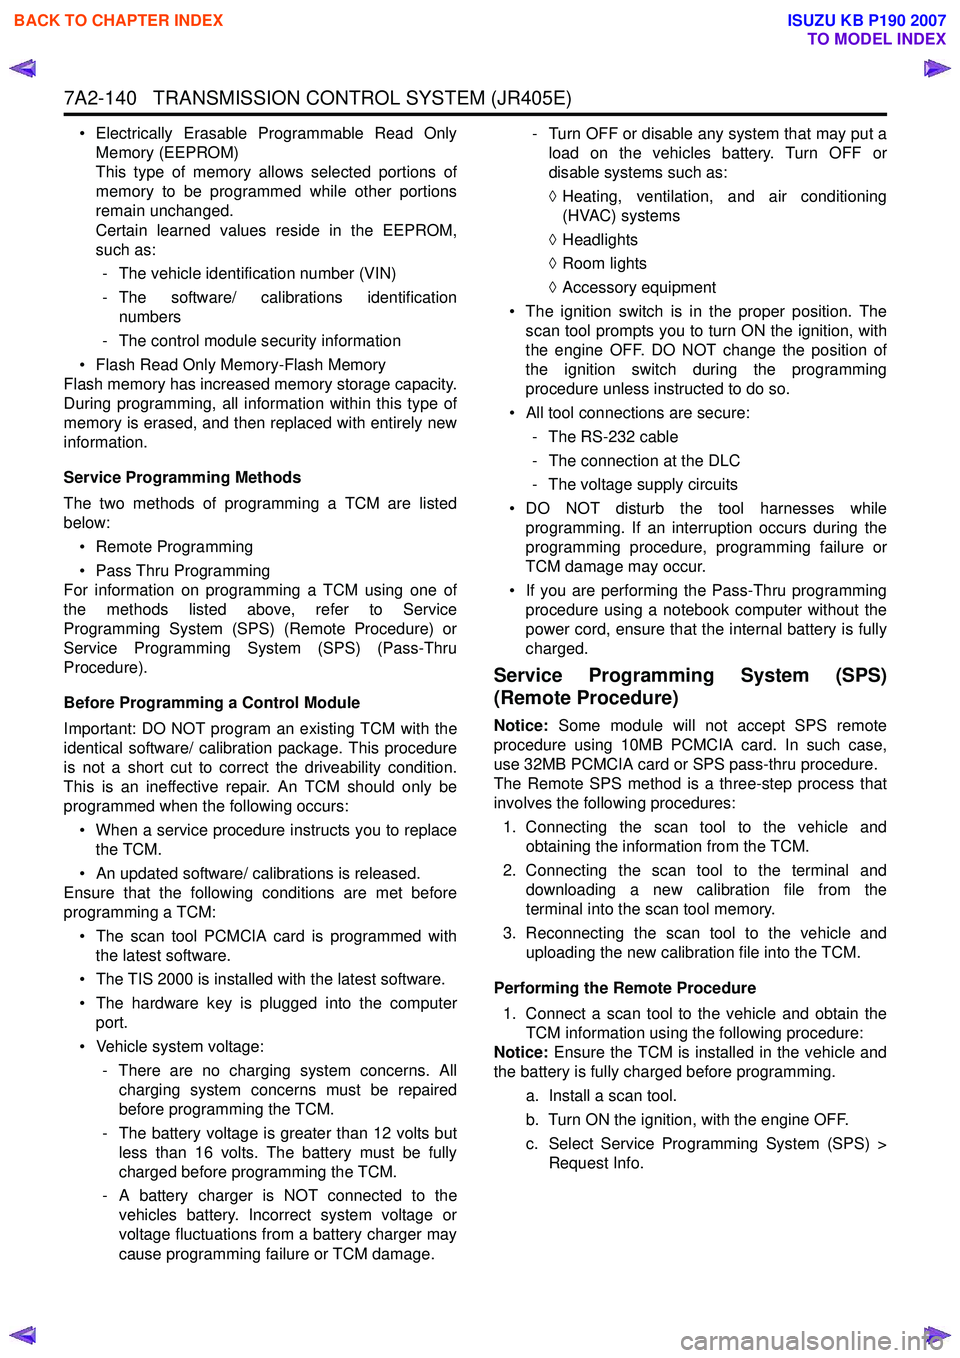
The Remote SPS method is a three-step process that
involves the following procedures:
1. Connecting the scan tool to the vehicle and obtaining the information from the TCM.
2. Connecting the scan tool to the terminal and downloading a new calibration file from the
terminal into the scan tool memory.
3. Reconnecting the scan tool to the vehicle and uploading the new calibration file into the TCM.
Performing the Remote Procedure 1. Connect a scan tool to the vehicle and obtain the TCM information using the following procedure:
Notice: Ensure the TCM is installed in the vehicle and
the battery is fully charged before programming.
a. Install a scan tool.
b. Turn ON the ignition, with the engine OFF.
c. Select Service Programming System (SPS) > Request Info.
BACK TO CHAPTER INDEX
TO MODEL INDEX
ISUZU KB P190 2007
Page 4456 of 6020
7A3-2 ON-VEHICLE SERVICE (JR405E)
DESCRIPTION
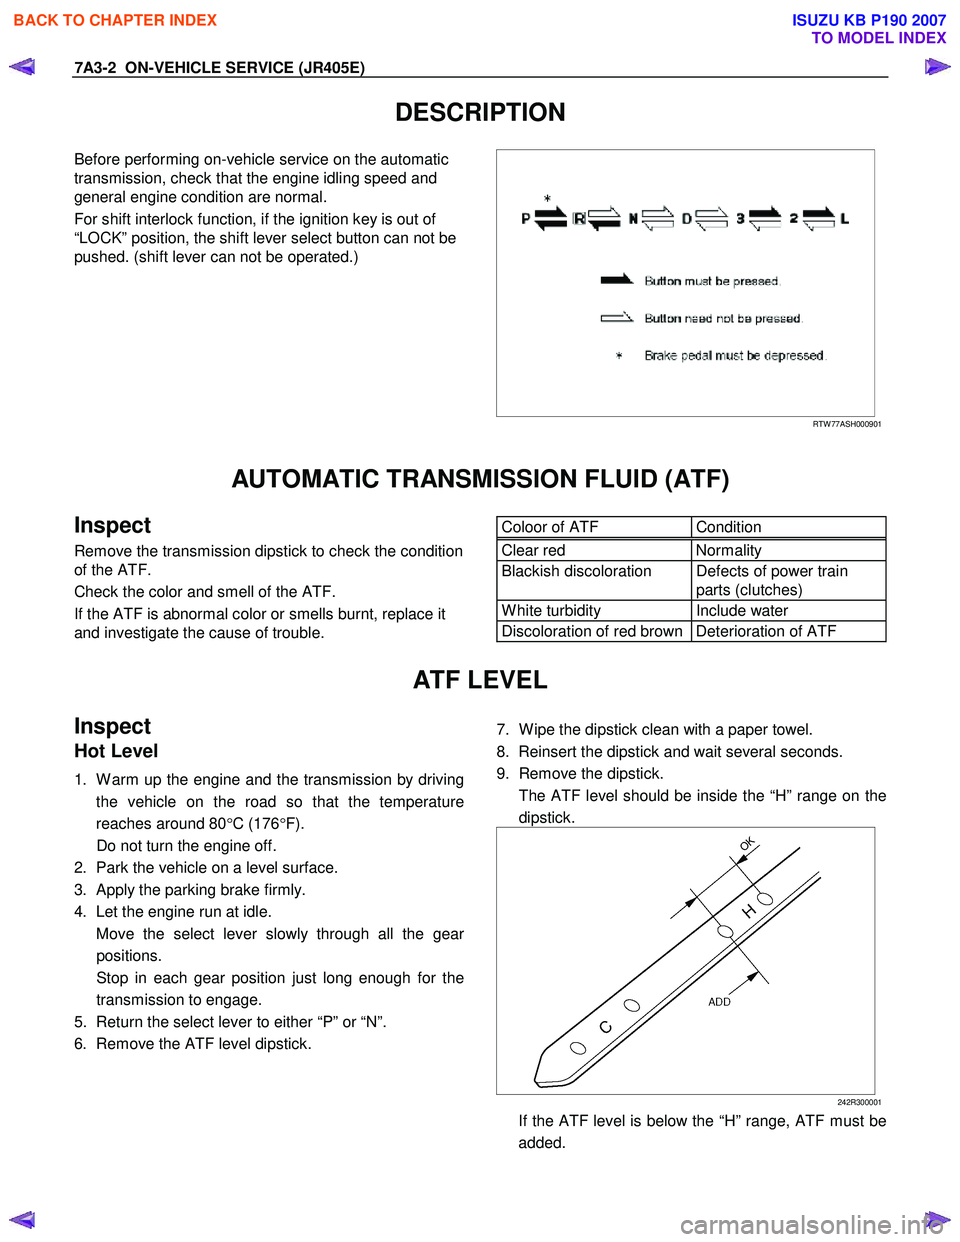
Before performing on-vehicle service on the automatic
transmission, check that the engine idling speed and
general engine condition are normal.
For shift interlock function, if the ignition key is out of
“LOCK” position, the shift lever select button can not be
pushed. (shift lever can not be operated.)
RTW 77ASH000901
AUTOMATIC TRANSMISSION FLUID (ATF)
Inspect
Remove the transmission dipstick to check the condition
of the ATF.
Check the color and smell of the ATF.
If the ATF is abnormal color or smells burnt, replace it
and investigate the cause of trouble.
Coloor of ATF Condition Clear red Normality
Blackish discoloration Defects of power train
parts (clutches)
W hite turbidity Include water
Discoloration of red brown Deterioration of ATF
ATF LEVEL
Inspect
Hot Level
1. W arm up the engine and the transmission by driving
the vehicle on the road so that the temperature
reaches around 80 °C (176 °F).
Do not turn the engine off.
2. Park the vehicle on a level surface.
3. Apply the parking brake firmly.
4. Let the engine run at idle.
Move the select lever slowly through all the gea
r
positions.
Stop in each gear position just long enough for the transmission to engage.
5. Return the select lever to either “P” or “N”.
6. Remove the ATF level dipstick.
7. W ipe the dipstick clean with a paper towel.
8. Reinsert the dipstick and wait several seconds.
9. Remove the dipstick.
The ATF level should be inside the “H” range on the dipstick.
242R300001
If the ATF level is below the “H” range, ATF must be added.
BACK TO CHAPTER INDEX
TO MODEL INDEX
ISUZU KB P190 2007
Page 4850 of 6020
7D-20 TRANSFER CASE
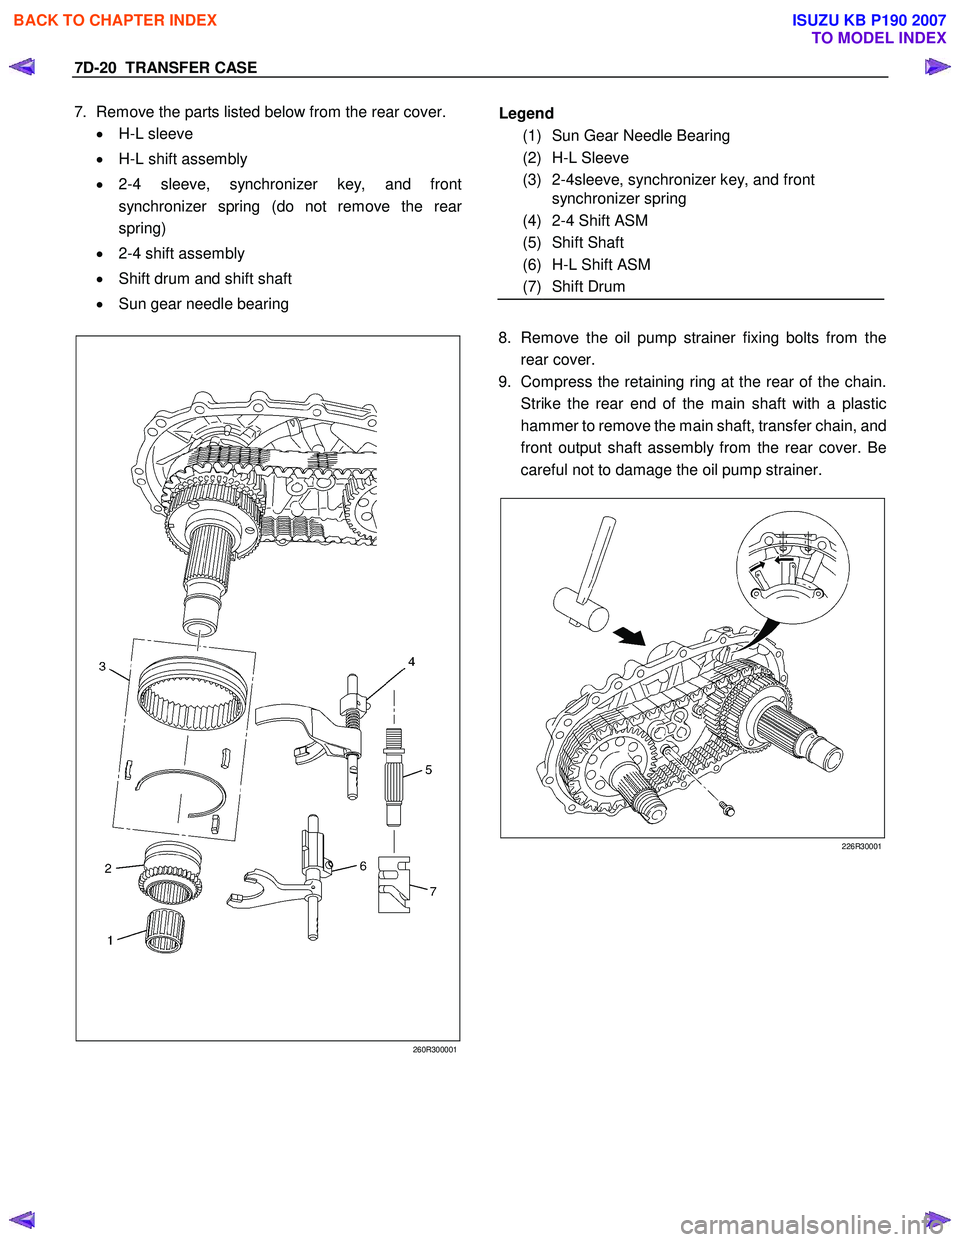
7. Remove the parts listed below from the rear cover.
• H-L sleeve
• H-L shift assembly
• 2-4 sleeve, synchronizer key, and front
synchronizer spring (do not remove the rear
spring)
• 2-4 shift assembly
• Shift drum and shift shaft
• Sun gear needle bearing
260R300001
8. Remove the oil pump strainer fixing bolts from the
rear cover.
9. Compress the retaining ring at the rear of the chain.
Strike the rear end of the main shaft with a plastic
hammer to remove the main shaft, transfer chain, and
front output shaft assembly from the rear cover. Be
careful not to damage the oil pump strainer.
226R30001
Legend
(1) Sun Gear Needle Bearing
(2) H-L Sleeve
(3) 2-4sleeve, synchronizer key, and front synchronizer spring
(4) 2-4 Shift ASM
(5) Shift Shaft
(6) H-L Shift ASM
(7) Shift Drum
BACK TO CHAPTER INDEX
TO MODEL INDEX
ISUZU KB P190 2007
Page 4858 of 6020
7D-28 TRANSFER CASE
Oil Pump
• Remove foreign materials from the strainer. If the
strainer is damaged, replace it.
If the area into which the shaft is inserted is excessively
worn or damaged, replace the oil pump assembly.
Clutch Hub Spline Play
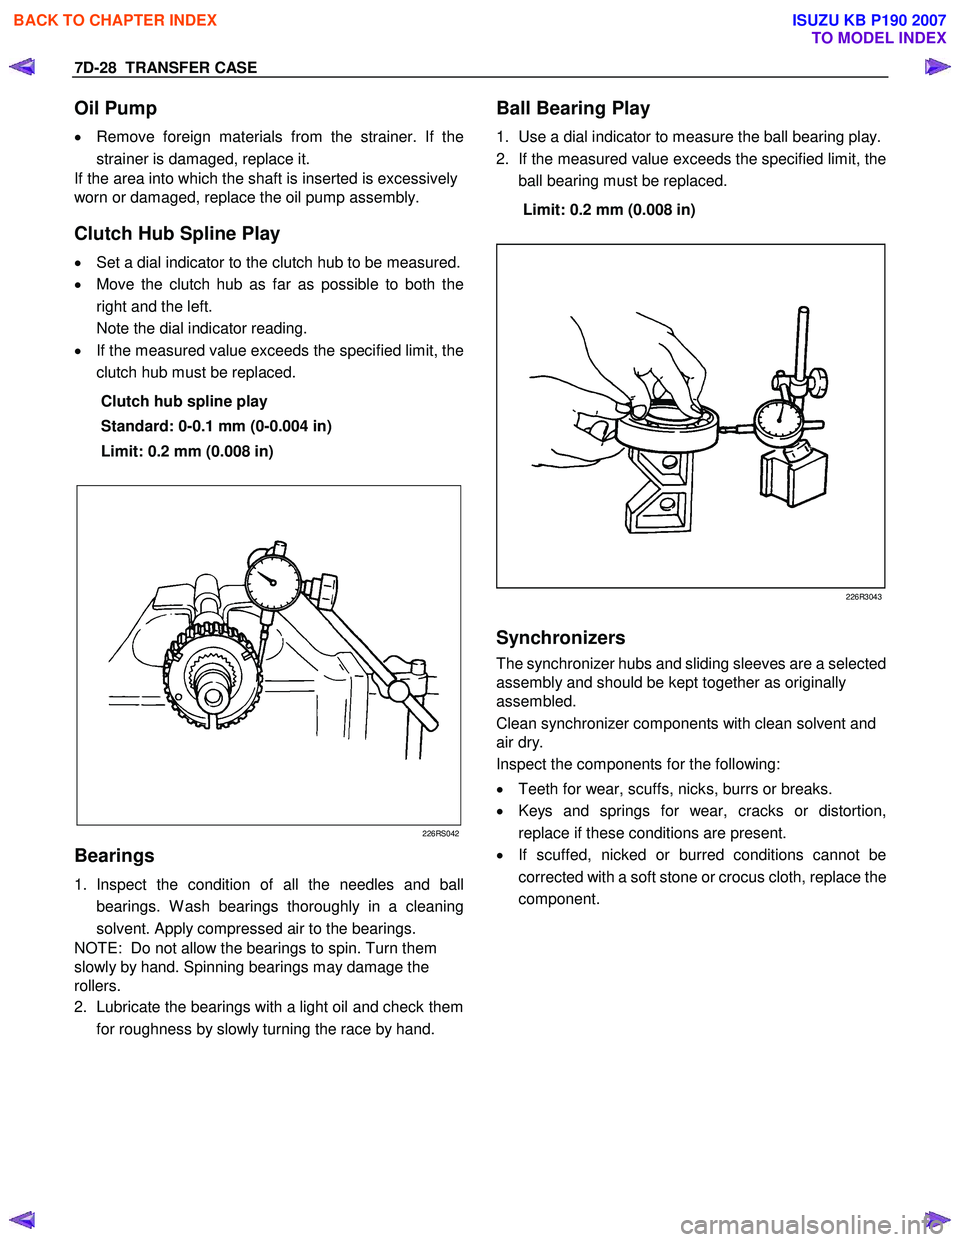
• Set a dial indicator to the clutch hub to be measured.
• Move the clutch hub as far as possible to both the
right and the left.
Note the dial indicator reading.
• If the measured value exceeds the specified limit, the
clutch hub must be replaced.
Clutch hub spline play
Standard: 0-0.1 mm (0-0.004 in)
Limit: 0.2 mm (0.008 in)
226RS042
Bearings
1. Inspect the condition of all the needles and ball
bearings. W ash bearings thoroughly in a cleaning
solvent. Apply compressed air to the bearings.
NOTE: Do not allow the bearings to spin. Turn them
slowly by hand. Spinning bearings may damage the
rollers.
2. Lubricate the bearings with a light oil and check them
for roughness by slowly turning the race by hand.
Ball Bearing Play
1. Use a dial indicator to measure the ball bearing play.
2. If the measured value exceeds the specified limit, the
ball bearing must be replaced.
Limit: 0.2 mm (0.008 in)
226R3043
Synchronizers
The synchronizer hubs and sliding sleeves are a selected
assembly and should be kept together as originally
assembled.
Clean synchronizer components with clean solvent and
air dry.
Inspect the components for the following:
• Teeth for wear, scuffs, nicks, burrs or breaks.
• Keys and springs for wear, cracks or distortion,
replace if these conditions are present.
• If scuffed, nicked or burred conditions cannot be
corrected with a soft stone or crocus cloth, replace the
component.
BACK TO CHAPTER INDEX
TO MODEL INDEX
ISUZU KB P190 2007