2007 ISUZU KB P190 Harness
[x] Cancel search: HarnessPage 1165 of 6020
Engine Control System (4JH1) 6E-131
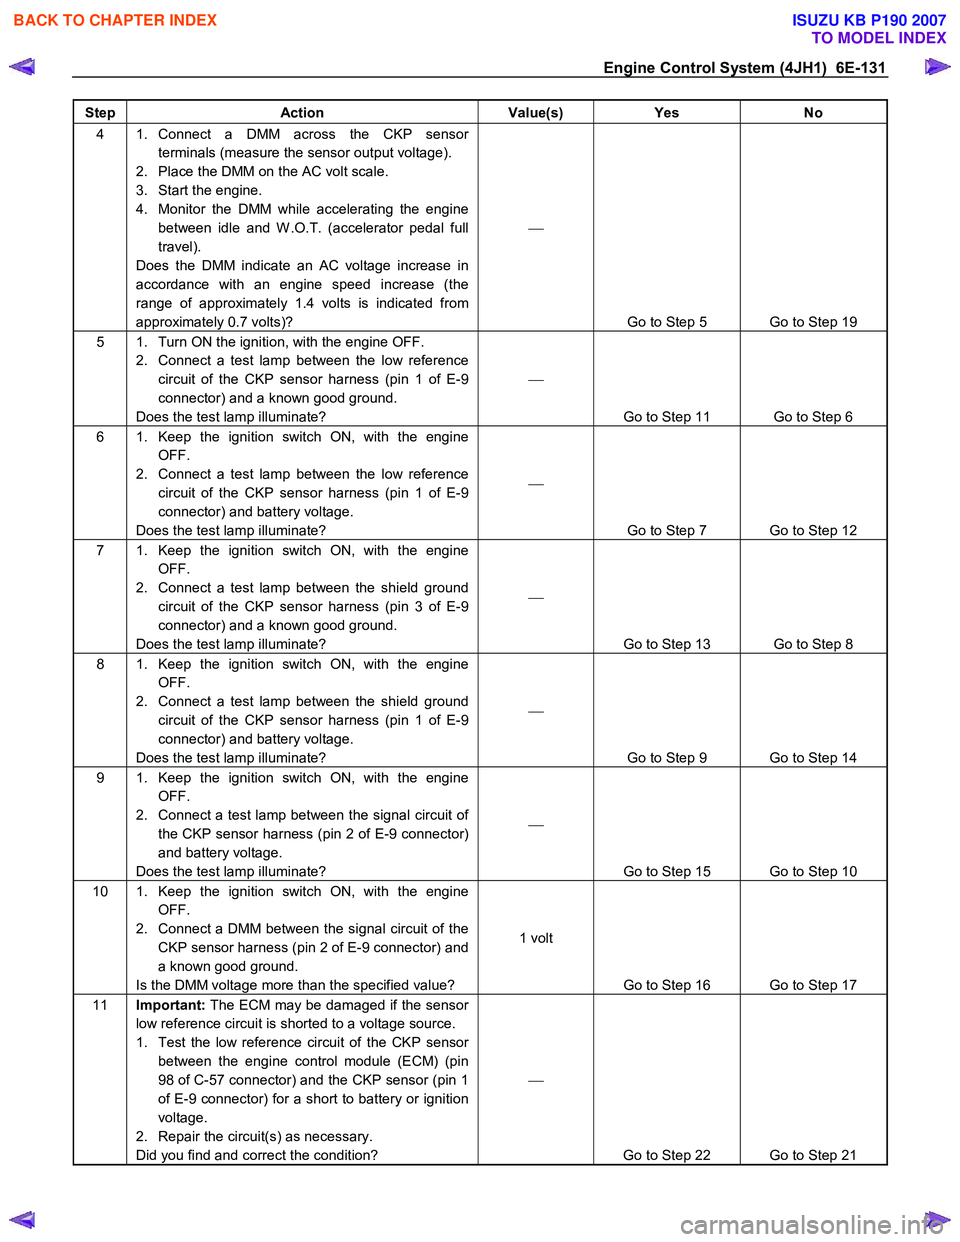
Step Action Value(s) Yes No
4 1. Connect a DMM across the CKP sensor
terminals (measure the sensor output voltage).
2. Place the DMM on the AC volt scale.
3. Start the engine.
4. Monitor the DMM while accelerating the engine between idle and W .O.T. (accelerator pedal full
travel).
Does the DMM indicate an AC voltage increase in
accordance with an engine speed increase (the
range of approximately 1.4 volts is indicated from
approximately 0.7 volts)?
Go to Step 5 Go to Step 19
5 1. Turn ON the ignition, with the engine OFF. 2. Connect a test lamp between the low reference circuit of the CKP sensor harness (pin 1 of E-9
connector) and a known good ground.
Does the test lamp illuminate?
Go to Step 11 Go to Step 6
6 1. Keep the ignition switch ON, with the engine OFF.
2. Connect a test lamp between the low reference circuit of the CKP sensor harness (pin 1 of E-9
connector) and battery voltage.
Does the test lamp illuminate?
Go to Step 7 Go to Step 12
7 1. Keep the ignition switch ON, with the engine OFF.
2. Connect a test lamp between the shield ground circuit of the CKP sensor harness (pin 3 of E-9
connector) and a known good ground.
Does the test lamp illuminate?
Go to Step 13 Go to Step 8
8 1. Keep the ignition switch ON, with the engine OFF.
2. Connect a test lamp between the shield ground circuit of the CKP sensor harness (pin 1 of E-9
connector) and battery voltage.
Does the test lamp illuminate?
Go to Step 9 Go to Step 14
9 1. Keep the ignition switch ON, with the engine OFF.
2. Connect a test lamp between the signal circuit of the CKP sensor harness (pin 2 of E-9 connector)
and battery voltage.
Does the test lamp illuminate?
Go to Step 15 Go to Step 10
10 1. Keep the ignition switch ON, with the engine OFF.
2. Connect a DMM between the signal circuit of the CKP sensor harness (pin 2 of E-9 connector) and
a known good ground.
Is the DMM voltage more than the specified value? 1 volt
Go to Step 16 Go to Step 17
11 Important: The ECM may be damaged if the sensor
low reference circuit is shorted to a voltage source.
1. Test the low reference circuit of the CKP sensor between the engine control module (ECM) (pin
98 of C-57 connector) and the CKP sensor (pin 1
of E-9 connector) for a short to battery or ignition
voltage.
2. Repair the circuit(s) as necessary.
Did you find and correct the condition?
Go to Step 22 Go to Step 21
BACK TO CHAPTER INDEX
TO MODEL INDEX
ISUZU KB P190 2007
Page 1166 of 6020
6E-132 Engine Control System (4JH1)
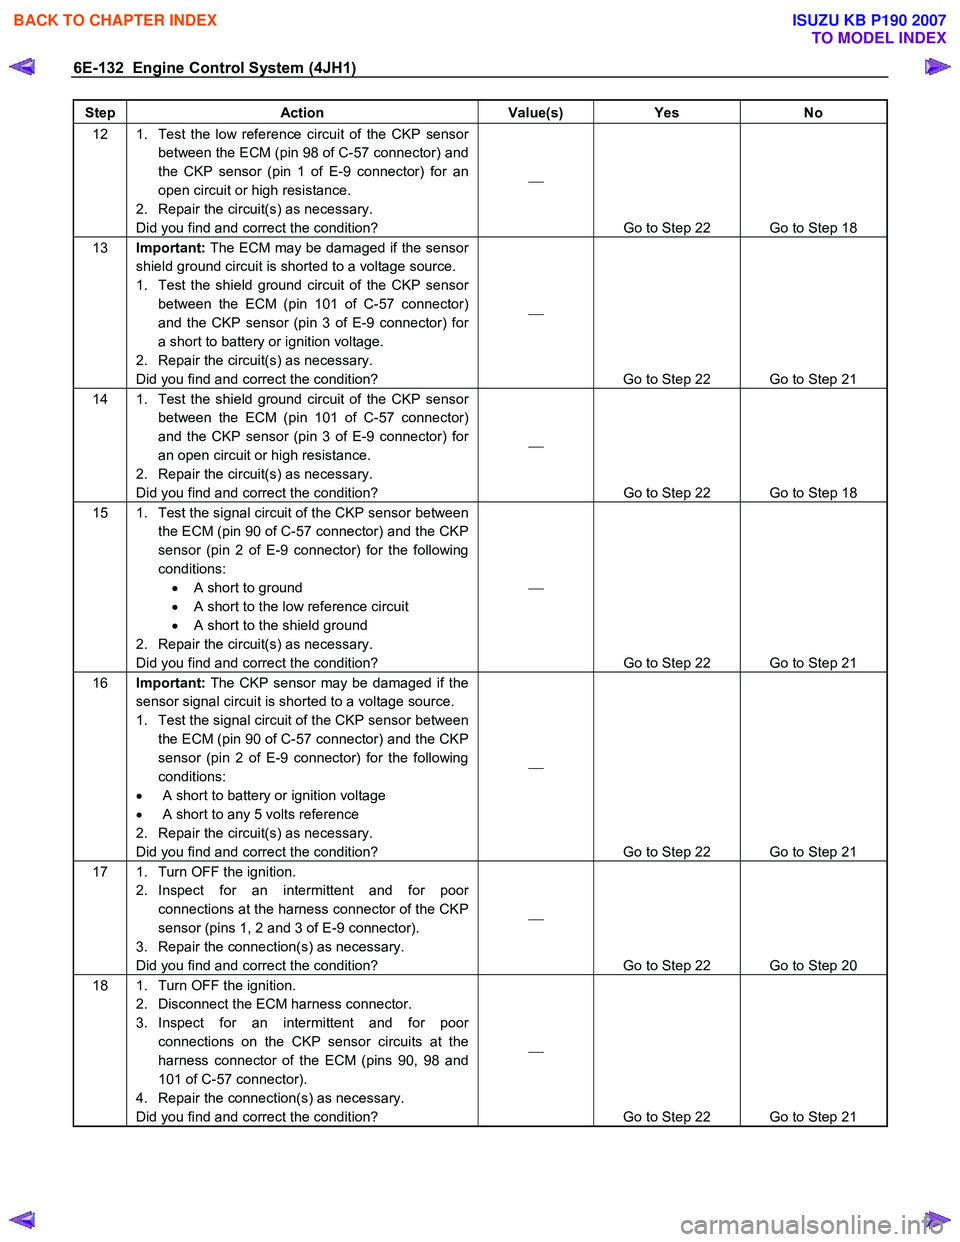
Step Action Value(s) Yes No
12 1. Test the low reference circuit of the CKP sensor
between the ECM (pin 98 of C-57 connector) and
the CKP sensor (pin 1 of E-9 connector) for an
open circuit or high resistance.
2. Repair the circuit(s) as necessary.
Did you find and correct the condition?
Go to Step 22 Go to Step 18
13 Important: The ECM may be damaged if the sensor
shield ground circuit is shorted to a voltage source.
1. Test the shield ground circuit of the CKP sensor between the ECM (pin 101 of C-57 connector)
and the CKP sensor (pin 3 of E-9 connector) for
a short to battery or ignition voltage.
2. Repair the circuit(s) as necessary.
Did you find and correct the condition?
Go to Step 22 Go to Step 21
14 1. Test the shield ground circuit of the CKP sensor between the ECM (pin 101 of C-57 connector)
and the CKP sensor (pin 3 of E-9 connector) for
an open circuit or high resistance.
2. Repair the circuit(s) as necessary.
Did you find and correct the condition?
Go to Step 22 Go to Step 18
15 1. Test the signal circuit of the CKP sensor between the ECM (pin 90 of C-57 connector) and the CKP
sensor (pin 2 of E-9 connector) for the following
conditions: • A short to ground
• A short to the low reference circuit
• A short to the shield ground
2. Repair the circuit(s) as necessary.
Did you find and correct the condition?
Go to Step 22 Go to Step 21
16 Important: The CKP sensor may be damaged if the
sensor signal circuit is shorted to a voltage source.
1. Test the signal circuit of the CKP sensor between the ECM (pin 90 of C-57 connector) and the CKP
sensor (pin 2 of E-9 connector) for the following
conditions:
• A short to battery or ignition voltage
• A short to any 5 volts reference
2. Repair the circuit(s) as necessary.
Did you find and correct the condition?
Go to Step 22 Go to Step 21
17 1. Turn OFF the ignition. 2. Inspect for an intermittent and for poor connections at the harness connector of the CKP
sensor (pins 1, 2 and 3 of E-9 connector).
3. Repair the connection(s) as necessary.
Did you find and correct the condition?
Go to Step 22 Go to Step 20
18 1. Turn OFF the ignition. 2. Disconnect the ECM harness connector.
3. Inspect for an intermittent and for poor connections on the CKP sensor circuits at the
harness connector of the ECM (pins 90, 98 and
101 of C-57 connector).
4. Repair the connection(s) as necessary.
Did you find and correct the condition?
Go to Step 22 Go to Step 21
BACK TO CHAPTER INDEX
TO MODEL INDEX
ISUZU KB P190 2007
Page 1167 of 6020
Engine Control System (4JH1) 6E-133
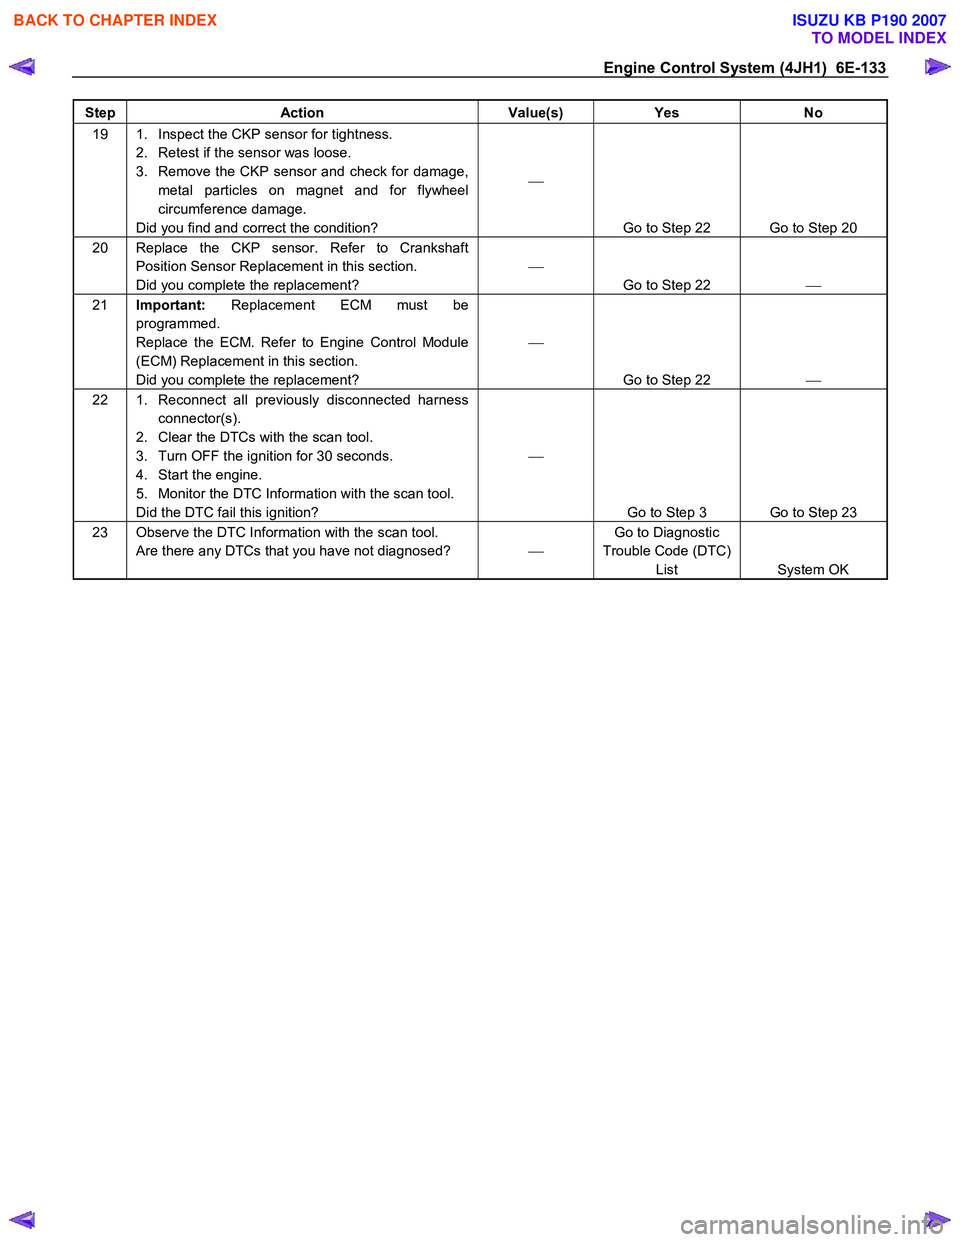
Step Action Value(s) Yes No
19 1. Inspect the CKP sensor for tightness.
2. Retest if the sensor was loose.
3. Remove the CKP sensor and check for damage, metal particles on magnet and for flywheel
circumference damage.
Did you find and correct the condition?
Go to Step 22 Go to Step 20
20 Replace the CKP sensor. Refer to Crankshaft Position Sensor Replacement in this section.
Did you complete the replacement?
Go to Step 22
21 Important: Replacement ECM must be
programmed.
Replace the ECM. Refer to Engine Control Module
(ECM) Replacement in this section.
Did you complete the replacement?
Go to Step 22
22 1. Reconnect all previously disconnected harness
connector(s).
2. Clear the DTCs with the scan tool.
3. Turn OFF the ignition for 30 seconds.
4. Start the engine.
5. Monitor the DTC Information with the scan tool.
Did the DTC fail this ignition?
Go to Step 3 Go to Step 23
23 Observe the DTC Information with the scan tool. Are there any DTCs that you have not diagnosed? Go to Diagnostic
Trouble Code (DTC) List System OK
BACK TO CHAPTER INDEX
TO MODEL INDEX
ISUZU KB P190 2007
Page 1169 of 6020
Engine Control System (4JH1) 6E-135
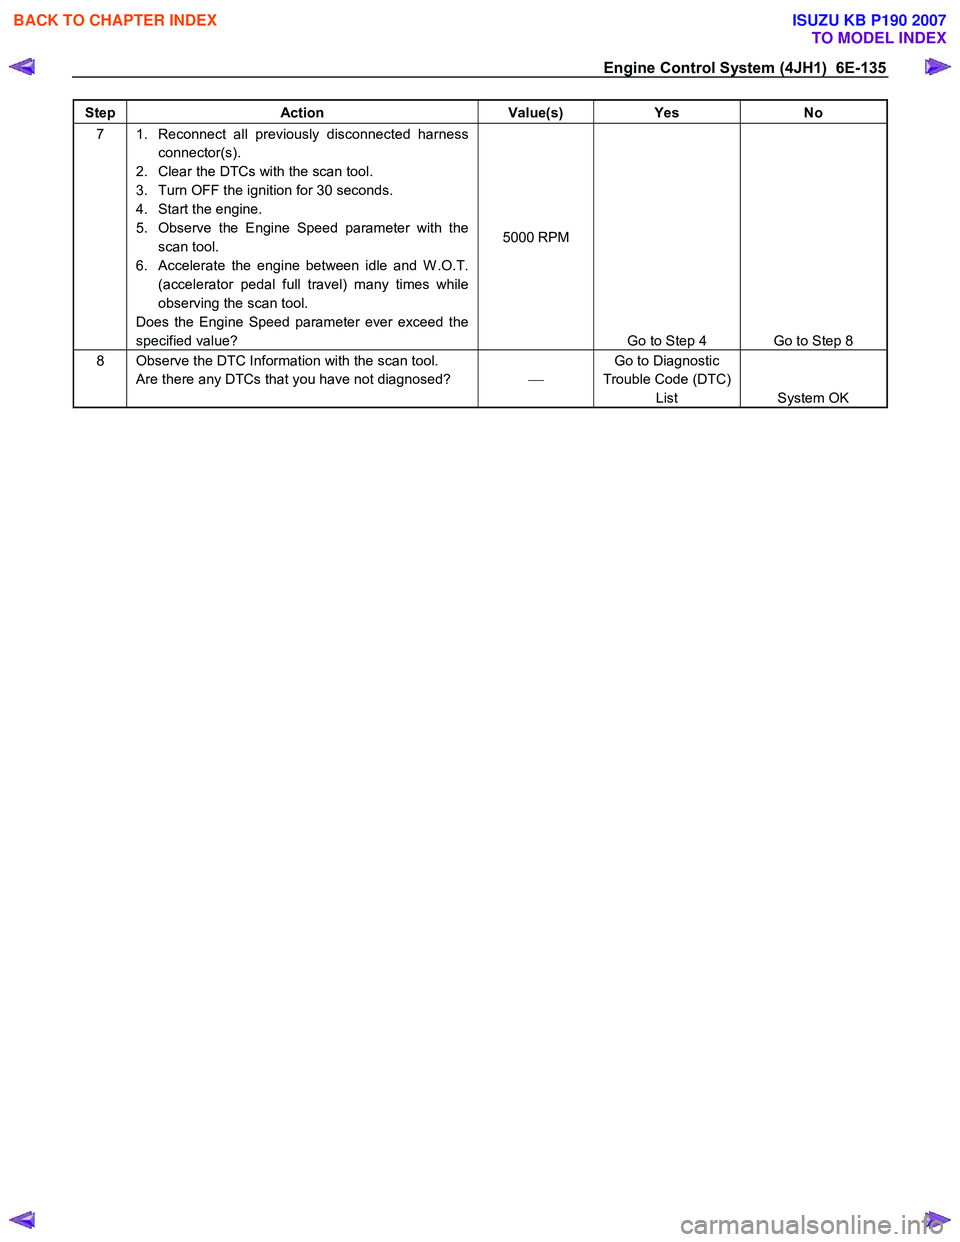
Step Action Value(s) Yes No
7 1. Reconnect all previously disconnected harness
connector(s).
2. Clear the DTCs with the scan tool.
3. Turn OFF the ignition for 30 seconds.
4. Start the engine.
5. Observe the Engine Speed parameter with the scan tool.
6. Accelerate the engine between idle and W .O.T. (accelerator pedal full travel) many times while
observing the scan tool.
Does the Engine Speed parameter ever exceed the
specified value? 5000 RPM
Go to Step 4 Go to Step 8
8 Observe the DTC Information with the scan tool. Are there any DTCs that you have not diagnosed? Go to Diagnostic
Trouble Code (DTC) List System OK
BACK TO CHAPTER INDEX
TO MODEL INDEX
ISUZU KB P190 2007
Page 1171 of 6020
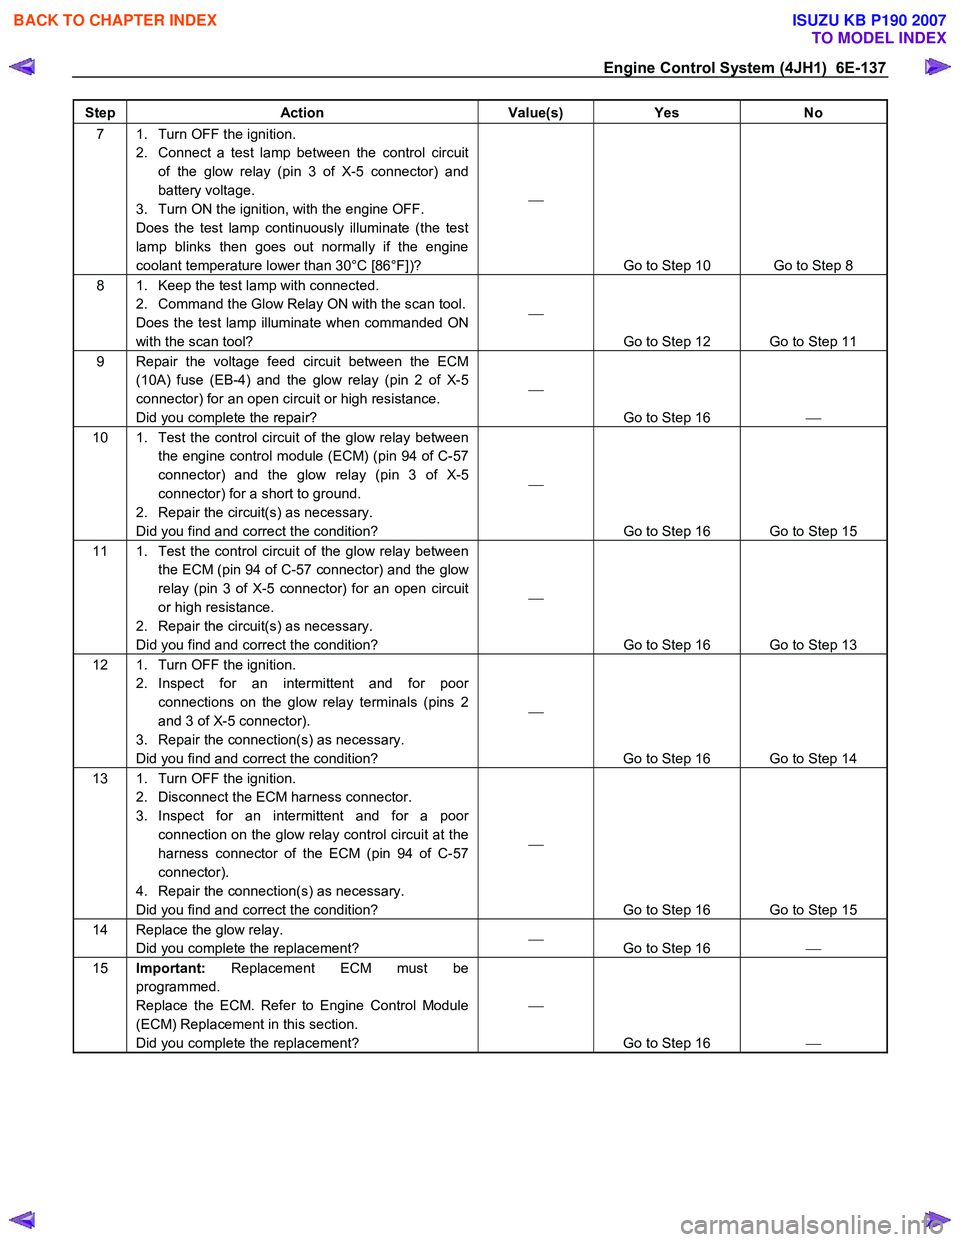
Engine Control System (4JH1) 6E-137
Step Action Value(s) Yes No
7 1. Turn OFF the ignition.
2. Connect a test lamp between the control circuit of the glow relay (pin 3 of X-5 connector) and
battery voltage.
3. Turn ON the ignition, with the engine OFF.
Does the test lamp continuously illuminate (the test
lamp blinks then goes out normally if the engine
coolant temperature lower than 30°C [86°F])?
Go to Step 10 Go to Step 8
8 1. Keep the test lamp with connected. 2. Command the Glow Relay ON with the scan tool.
Does the test lamp illuminate when commanded ON
with the scan tool?
Go to Step 12 Go to Step 11
9 Repair the voltage feed circuit between the ECM (10A) fuse (EB-4) and the glow relay (pin 2 of X-5
connector) for an open circuit or high resistance.
Did you complete the repair?
Go to Step 16
10 1. Test the control circuit of the glow relay between
the engine control module (ECM) (pin 94 of C-57
connector) and the glow relay (pin 3 of X-5
connector) for a short to ground.
2. Repair the circuit(s) as necessary.
Did you find and correct the condition?
Go to Step 16 Go to Step 15
11 1. Test the control circuit of the glow relay between the ECM (pin 94 of C-57 connector) and the glow
relay (pin 3 of X-5 connector) for an open circuit
or high resistance.
2. Repair the circuit(s) as necessary.
Did you find and correct the condition?
Go to Step 16 Go to Step 13
12 1. Turn OFF the ignition. 2. Inspect for an intermittent and for poor connections on the glow relay terminals (pins 2
and 3 of X-5 connector).
3. Repair the connection(s) as necessary.
Did you find and correct the condition?
Go to Step 16 Go to Step 14
13 1. Turn OFF the ignition. 2. Disconnect the ECM harness connector.
3. Inspect for an intermittent and for a poor connection on the glow relay control circuit at the
harness connector of the ECM (pin 94 of C-57
connector).
4. Repair the connection(s) as necessary.
Did you find and correct the condition?
Go to Step 16 Go to Step 15
14 Replace the glow relay. Did you complete the replacement?
Go to Step 16
15 Important: Replacement ECM must be
programmed.
Replace the ECM. Refer to Engine Control Module
(ECM) Replacement in this section.
Did you complete the replacement?
Go to Step 16
BACK TO CHAPTER INDEX
TO MODEL INDEX
ISUZU KB P190 2007
Page 1172 of 6020
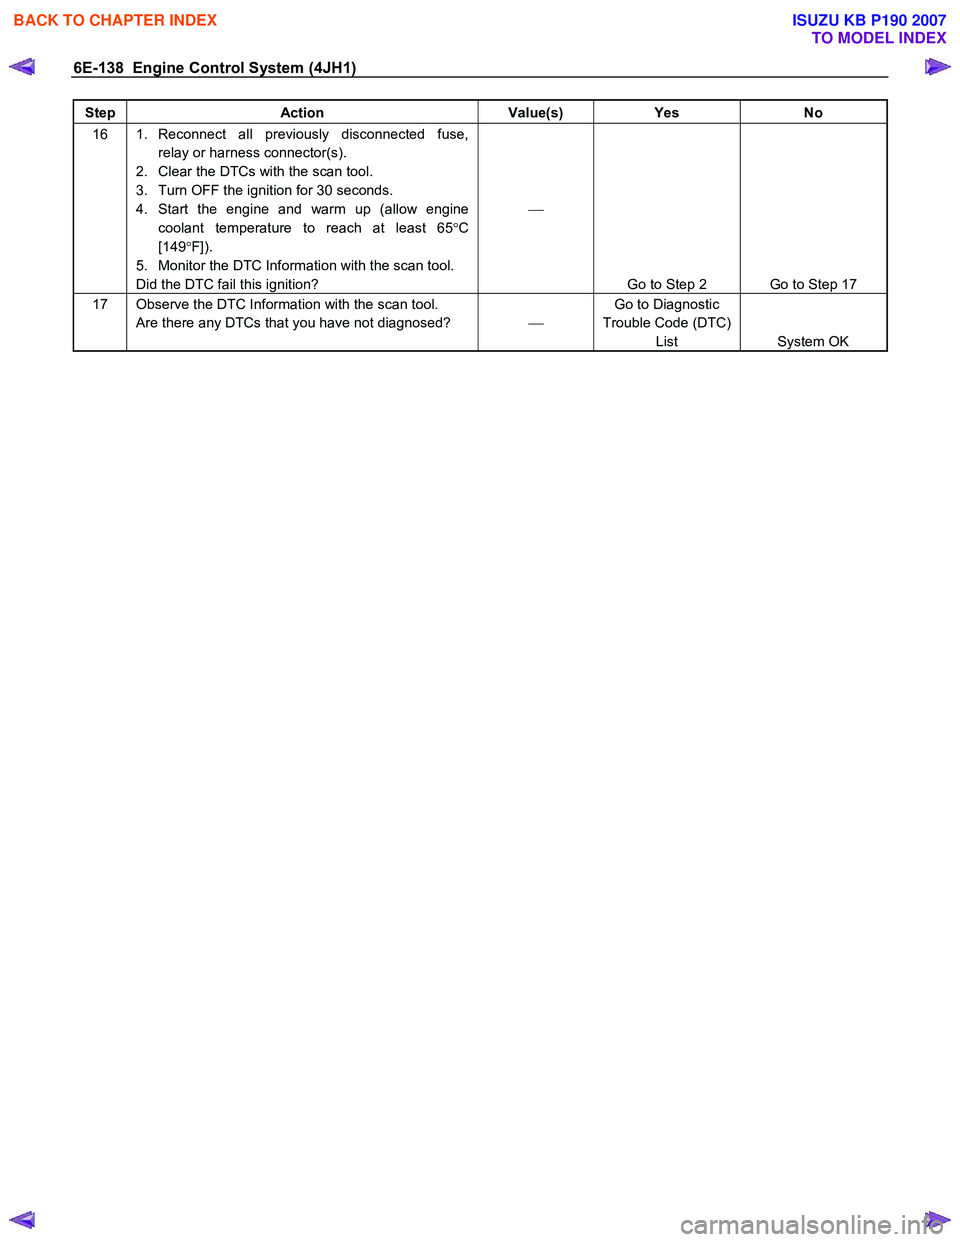
6E-138 Engine Control System (4JH1)
Step Action Value(s) Yes No
16 1. Reconnect all previously disconnected fuse,
relay or harness connector(s).
2. Clear the DTCs with the scan tool.
3. Turn OFF the ignition for 30 seconds.
4. Start the engine and warm up (allow engine coolant temperature to reach at least 65 °C
[149 °F]).
5. Monitor the DTC Information with the scan tool.
Did the DTC fail this ignition?
Go to Step 2 Go to Step 17
17 Observe the DTC Information with the scan tool. Are there any DTCs that you have not diagnosed? Go to Diagnostic
Trouble Code (DTC) List System OK
BACK TO CHAPTER INDEX
TO MODEL INDEX
ISUZU KB P190 2007
Page 1174 of 6020
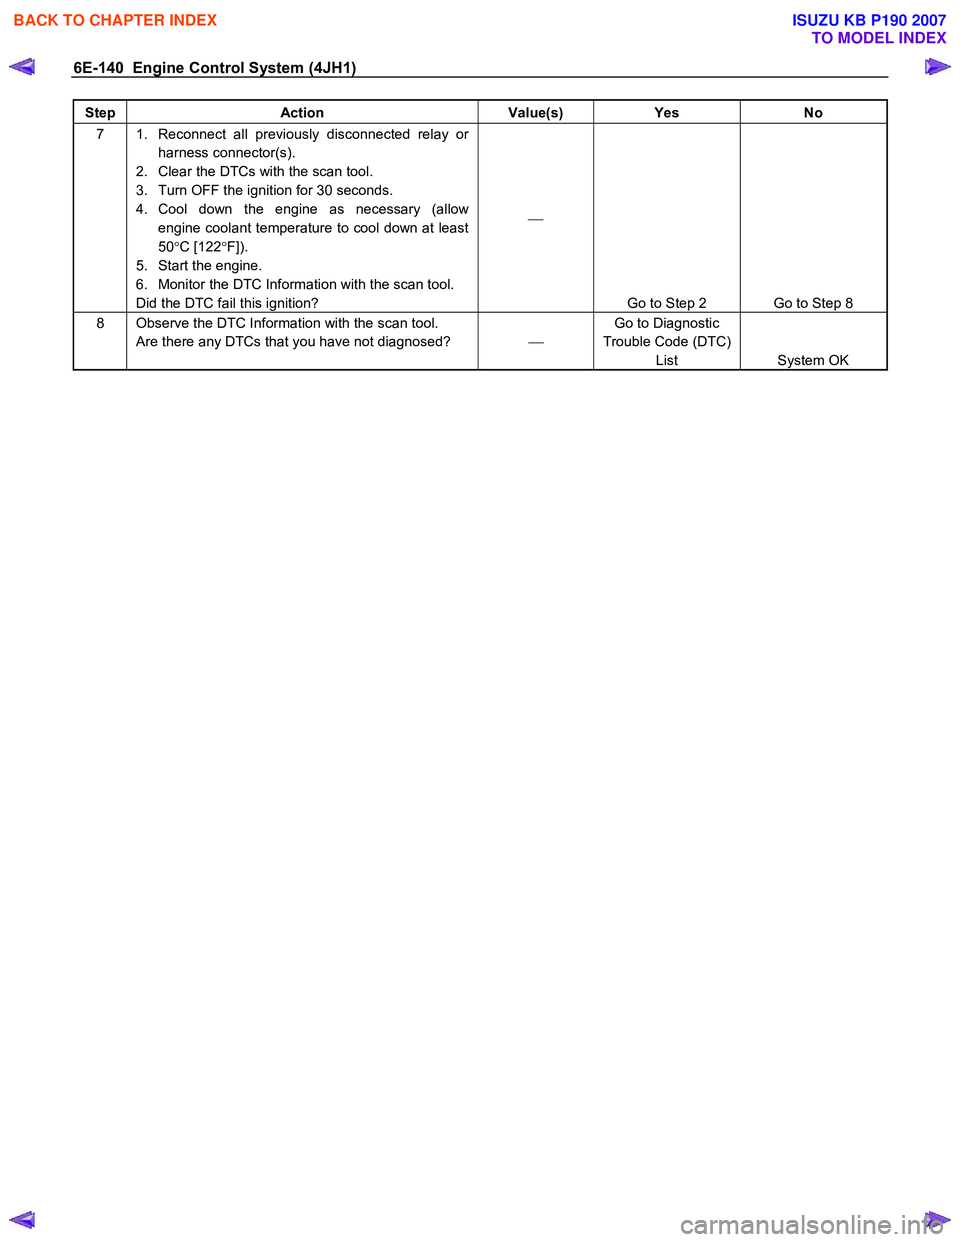
6E-140 Engine Control System (4JH1)
Step Action Value(s) Yes No
7 1. Reconnect all previously disconnected relay or
harness connector(s).
2. Clear the DTCs with the scan tool.
3. Turn OFF the ignition for 30 seconds.
4. Cool down the engine as necessary (allow engine coolant temperature to cool down at least
50 °C [122 °F]).
5. Start the engine.
6. Monitor the DTC Information with the scan tool.
Did the DTC fail this ignition?
Go to Step 2 Go to Step 8
8 Observe the DTC Information with the scan tool. Are there any DTCs that you have not diagnosed? Go to Diagnostic
Trouble Code (DTC) List System OK
BACK TO CHAPTER INDEX
TO MODEL INDEX
ISUZU KB P190 2007
Page 1176 of 6020
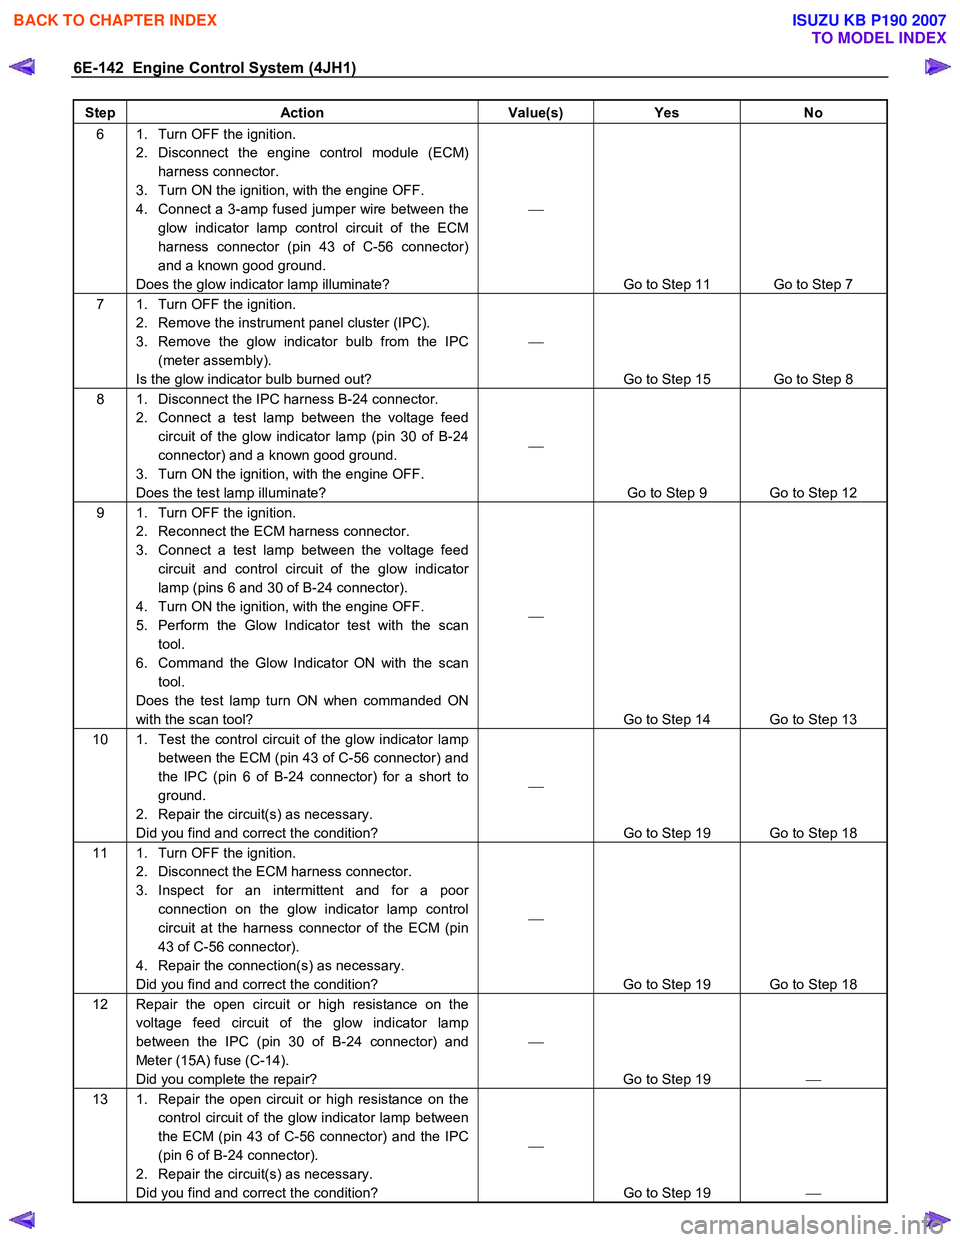
6E-142 Engine Control System (4JH1)
Step Action Value(s) Yes No
6 1. Turn OFF the ignition.
2. Disconnect the engine control module (ECM) harness connector.
3. Turn ON the ignition, with the engine OFF.
4. Connect a 3-amp fused jumper wire between the glow indicator lamp control circuit of the ECM
harness connector (pin 43 of C-56 connector)
and a known good ground.
Does the glow indicator lamp illuminate?
Go to Step 11 Go to Step 7
7 1. Turn OFF the ignition. 2. Remove the instrument panel cluster (IPC).
3. Remove the glow indicator bulb from the IPC (meter assembly).
Is the glow indicator bulb burned out?
Go to Step 15 Go to Step 8
8 1. Disconnect the IPC harness B-24 connector. 2. Connect a test lamp between the voltage feed circuit of the glow indicator lamp (pin 30 of B-24
connector) and a known good ground.
3. Turn ON the ignition, with the engine OFF.
Does the test lamp illuminate?
Go to Step 9 Go to Step 12
9 1. Turn OFF the ignition. 2. Reconnect the ECM harness connector.
3. Connect a test lamp between the voltage feed circuit and control circuit of the glow indicator
lamp (pins 6 and 30 of B-24 connector).
4. Turn ON the ignition, with the engine OFF.
5. Perform the Glow Indicator test with the scan tool.
6. Command the Glow Indicator ON with the scan tool.
Does the test lamp turn ON when commanded ON
with the scan tool?
Go to Step 14 Go to Step 13
10 1. Test the control circuit of the glow indicator lamp between the ECM (pin 43 of C-56 connector) and
the IPC (pin 6 of B-24 connector) for a short to
ground.
2. Repair the circuit(s) as necessary.
Did you find and correct the condition?
Go to Step 19 Go to Step 18
11 1. Turn OFF the ignition. 2. Disconnect the ECM harness connector.
3. Inspect for an intermittent and for a poor connection on the glow indicator lamp control
circuit at the harness connector of the ECM (pin
43 of C-56 connector).
4. Repair the connection(s) as necessary.
Did you find and correct the condition?
Go to Step 19 Go to Step 18
12 Repair the open circuit or high resistance on the voltage feed circuit of the glow indicator lamp
between the IPC (pin 30 of B-24 connector) and
Meter (15A) fuse (C-14).
Did you complete the repair?
Go to Step 19
13 1. Repair the open circuit or high resistance on the
control circuit of the glow indicator lamp between
the ECM (pin 43 of C-56 connector) and the IPC
(pin 6 of B-24 connector).
2. Repair the circuit(s) as necessary.
Did you find and correct the condition?
Go to Step 19
BACK TO CHAPTER INDEX
TO MODEL INDEX
ISUZU KB P190 2007