2007 ISUZU KB P190 oil temperature
[x] Cancel search: oil temperaturePage 3547 of 6020
Engine Management – V6 – Service Operations Page 6C1-3–23
Test
Engine Oil Level Sensor Check
1 W ith the aid of an assistant, perform the following:
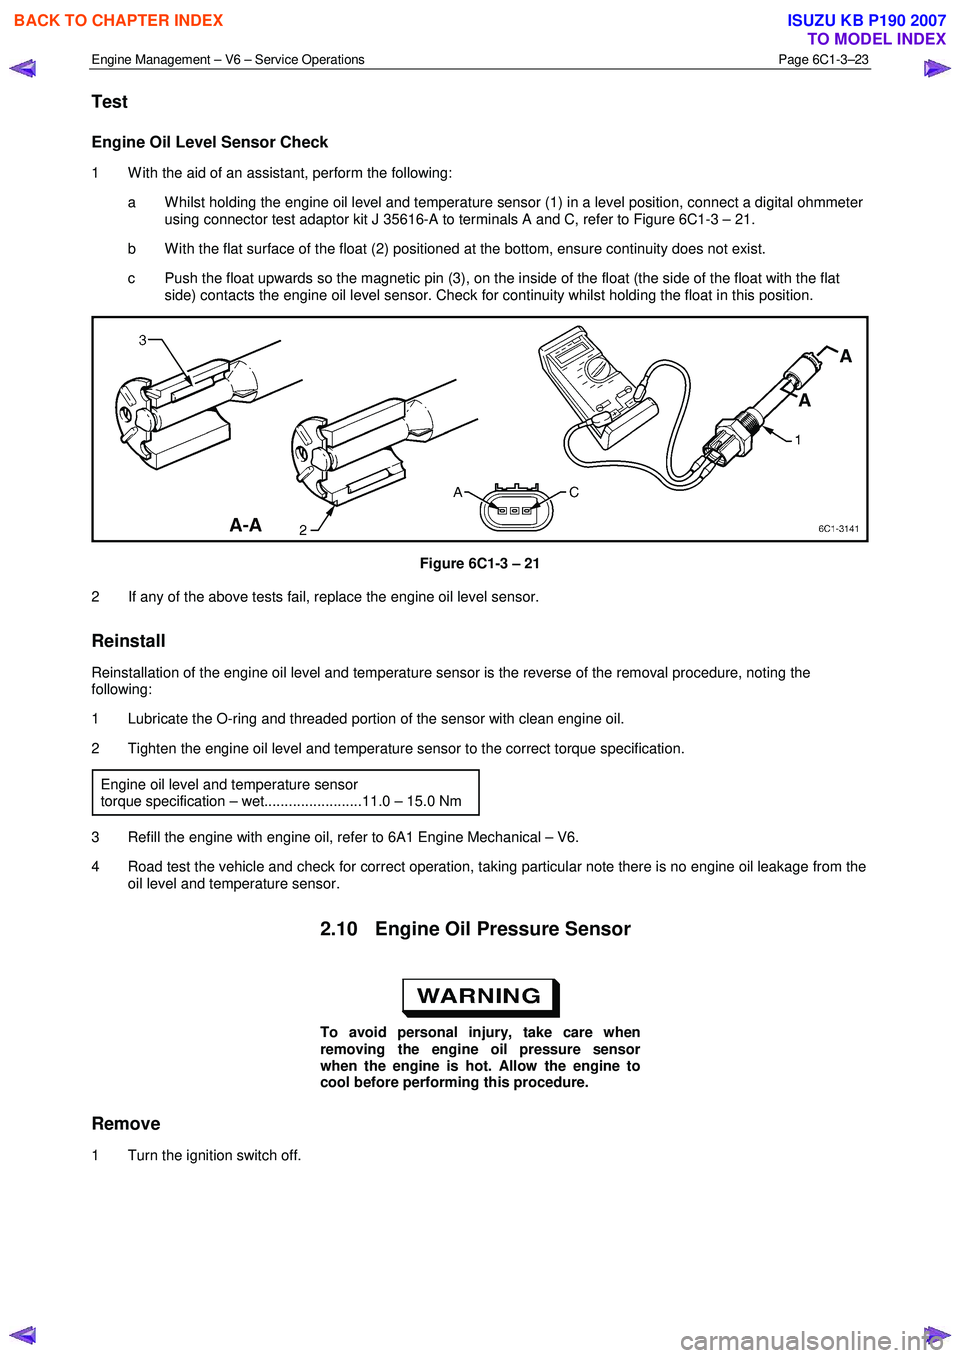
a W hilst holding the engine oil level and temperature sensor (1) in a level position, connect a digital ohmmeter using connector test adaptor kit J 35616-A to terminals A and C, refer to Figure 6C1-3 – 21.
b W ith the flat surface of the float (2) positioned at the bottom, ensure continuity does not exist.
c Push the float upwards so the magnetic pin (3), on the inside of the float (the side of the float with the flat side) contacts the engine oil level sensor. Check for continuity whilst holding the float in this position.
Figure 6C1-3 – 21
2 If any of the above tests fail, replace the engine oil level sensor.
Reinstall
Reinstallation of the engine oil level and temperature sensor is the reverse of the removal procedure, noting the
following:
1 Lubricate the O-ring and threaded portion of the sensor with clean engine oil.
2 Tighten the engine oil level and temperature sensor to the correct torque specification.
Engine oil level and temperature sensor
torque specification – wet........................11.0 – 15.0 Nm
3 Refill the engine with engine oil, refer to 6A1 Engine Mechanical – V6.
4 Road test the vehicle and check for correct operation, taking particular note there is no engine oil leakage from the oil level and temperature sensor.
2.10 Engine Oil Pressure Sensor
To avoid personal injury, take care when
removing the engine oil pressure sensor
when the engine is hot. Allow the engine to
cool before performing this procedure.
Remove
1 Turn the ignition switch off.
BACK TO CHAPTER INDEX
TO MODEL INDEX
ISUZU KB P190 2007
Page 3557 of 6020
Engine Management – V6 – Service Operations Page 6C1-3–33
Reinstall
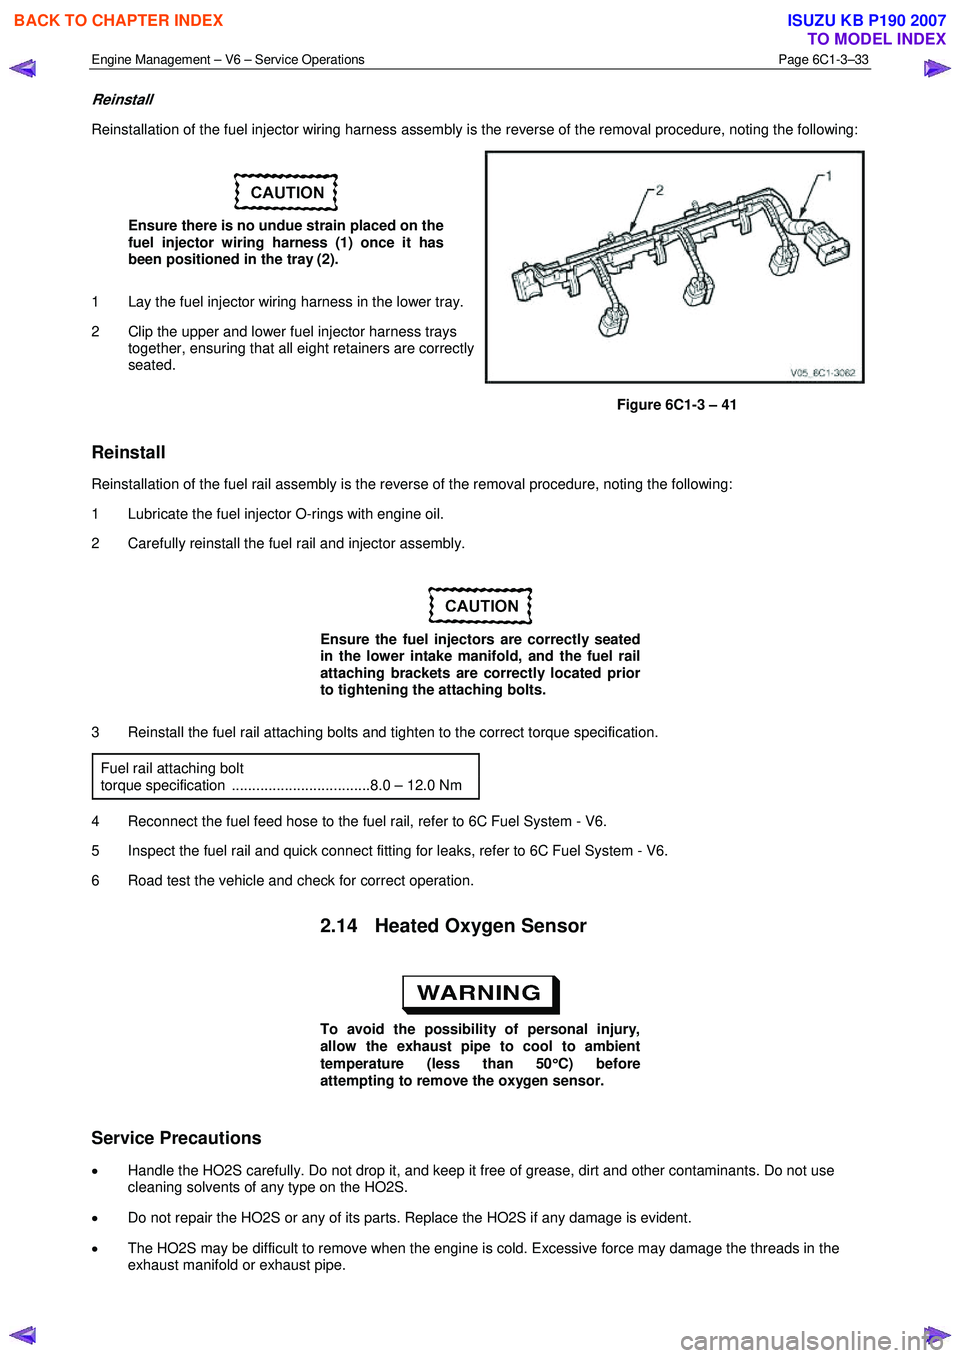
Reinstallation of the fuel injector wiring harness assembly is the reverse of the removal procedure, noting the following:
Ensure there is no undue strain placed on the
fuel injector wiring harness (1) once it has
been positioned in the tray (2).
1 Lay the fuel injector wiring harness in the lower tray.
2 Clip the upper and lower fuel injector harness trays together, ensuring that all eight retainers are correctly
seated.
Figure 6C1-3 – 41
Reinstall
Reinstallation of the fuel rail assembly is the reverse of the removal procedure, noting the following:
1 Lubricate the fuel injector O-rings with engine oil.
2 Carefully reinstall the fuel rail and injector assembly.
Ensure the fuel injectors are correctly seated
in the lower intake manifold, and the fuel rail
attaching brackets are correctly located prior
to tightening the attaching bolts.
3 Reinstall the fuel rail attaching bolts and tighten to the correct torque specification. Fuel rail attaching bolt
torque specification ..................................8.0 – 12.0 Nm
4 Reconnect the fuel feed hose to the fuel rail, refer to 6C Fuel System - V6.
5 Inspect the fuel rail and quick connect fitting for leaks, refer to 6C Fuel System - V6.
6 Road test the vehicle and check for correct operation.
2.14 Heated Oxygen Sensor
To avoid the possibility of personal injury,
allow the exhaust pipe to cool to ambient
temperature (less than 50 °
°°
°
C) before
attempting to remove the oxygen sensor.
Service Precautions
• Handle the HO2S carefully. Do not drop it, and keep it free of grease, dirt and other contaminants. Do not use
cleaning solvents of any type on the HO2S.
• Do not repair the HO2S or any of its parts. Replace the HO2S if any damage is evident.
• The HO2S may be difficult to remove when the engine is cold. Excessive force may damage the threads in the
exhaust manifold or exhaust pipe.
BACK TO CHAPTER INDEX
TO MODEL INDEX
ISUZU KB P190 2007
Page 3569 of 6020

Engine Management – V6 – Service Operations Page 6C1-3–45
Ensure the knock sensor is fully seated
before tightening the attaching bolt.
Do not over-tighten the attaching bolt as
incorrect operation of the knock sensor may
result.
2 Reinstall the knock sensor and bolt (1). Align the knock sensor so that it is parallel to the engine oil pan
mounting surface (2), ± 3° (3).
3 Tighten the knock sensor bolt to the correct torque specification.
Knock sensor attaching bolt
torque specification .................................21.0 – 25.0 Nm
4 Road test the vehicle and check for correct operation.
Figure 6C1-3 – 61
2.20 Mass Air Flow Sensor
The intake air temperature (IAT) sensor is part of the mass air flow (MAF) Sensor. For the IAT sensor test procedure
refer to 2.17 Intake Air Temperature Sensor.
Handling Precautions
Under no circumstances should the MAF
sensor retaining screws (1) be loosened or
removed as the MAF will become
unserviceable and will require replacement.
Figure 6C1-3 – 62
Remove
1 Turn the ignition switch off.
BACK TO CHAPTER INDEX
TO MODEL INDEX
ISUZU KB P190 2007
Page 3575 of 6020
Engine Management – V6 – Service Operations Page 6C1-3–51
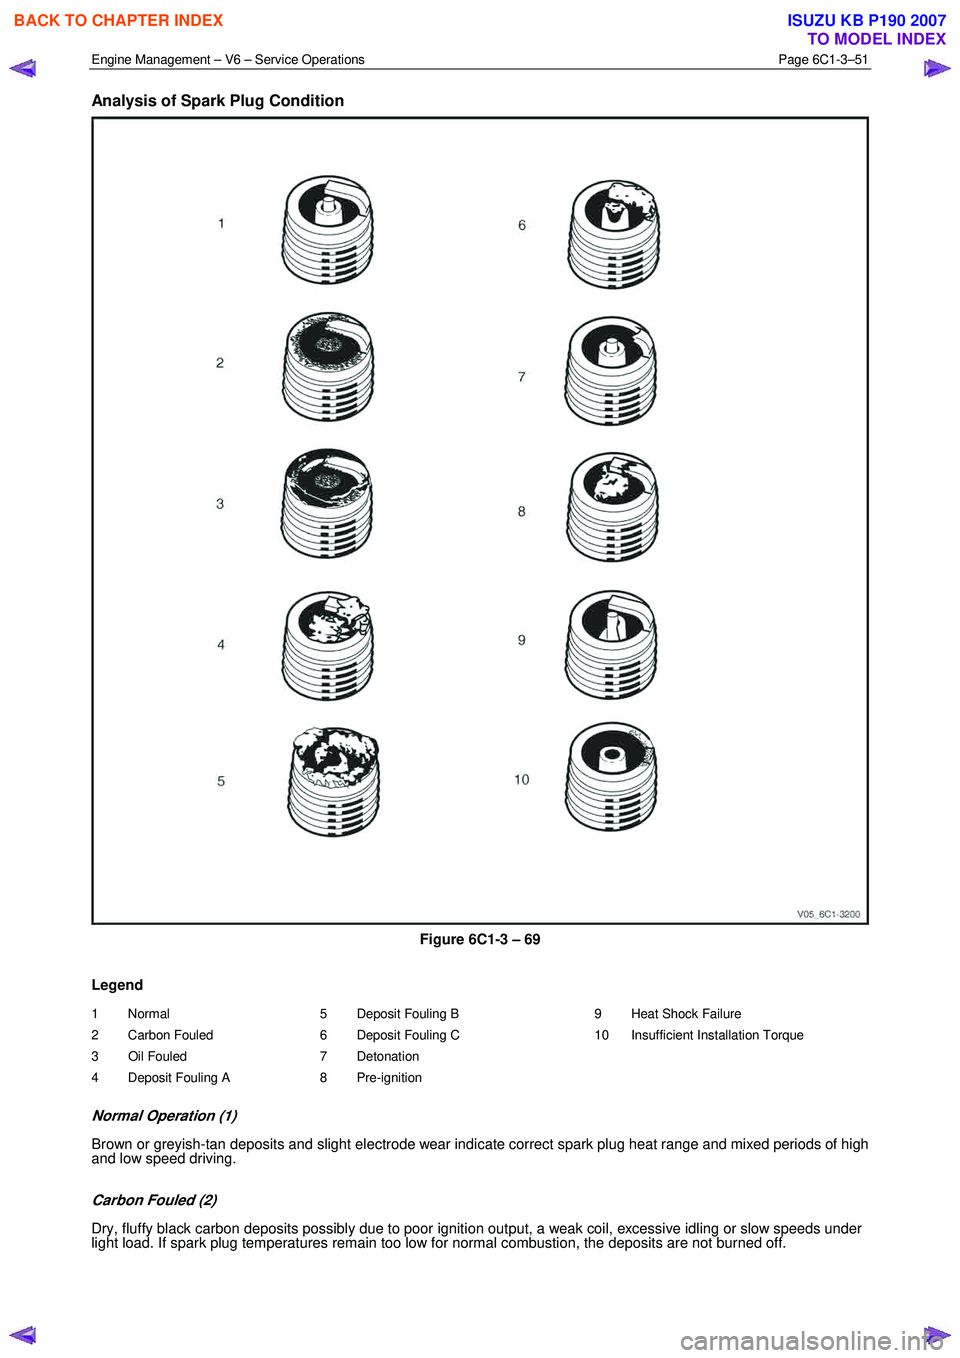
Analysis of Spark Plug Condition
Figure 6C1-3 – 69
Legend
1 Normal
2 Carbon Fouled
3 Oil Fouled
4 Deposit Fouling A 5 Deposit Fouling B
6 Deposit Fouling C
7 Detonation
8 Pre-ignition 9 Heat Shock Failure
10 Insufficient Installation Torque
Normal Operation (1)
Brown or greyish-tan deposits and slight electrode wear indicate correct spark plug heat range and mixed periods of high
and low speed driving.
Carbon Fouled (2)
Dry, fluffy black carbon deposits possibly due to poor ignition output, a weak coil, excessive idling or slow speeds under
light load. If spark plug temperatures remain too low for normal combustion, the deposits are not burned off.
BACK TO CHAPTER INDEX
TO MODEL INDEX
ISUZU KB P190 2007
Page 3576 of 6020
Engine Management – V6 – Service Operations Page 6C1-3–52
Oil Fouled (3)
W et, oily deposits with minor electrode wear possibly due to oil leaking past worn piston rings.
Breaking in a new or recently overhauled engine before the rings are fully seated may also result in this condition.
Deposit Fouling A (4)
Red brown, yellow and white coloured coatings on the insulator tip which are by-products of combustion. They come
from fuel and lubricating oil which generally contain additives. Most powdery deposits have no adverse effect on spark
plug operation, however, they may cause intermittent missing under severe operating conditions.
Deposit Fouling B (5)
Deposits similar to those identified in deposit fouling A (4). These are also by-products of combustion from fuel and
lubricating oil. Excessive valve stem clearances and / or defective intake valve seals allow too much oil to enter the
combustion chamber. The deposits will accumulate on the portion of the spark plug that projects into the chamber and
will be heaviest on the side facing the intake valve. If this condition is only detected in one or two cylinders, check the
valve stem seals.
Deposit Fouling C (6)
Most powdery deposits identified in deposit fouling A (4) have no adverse effect on the operation of the spark plug as
long as they remain powdery.
Under certain conditions of operation however, these deposits melt and form a shiny glaze coating on the insulator.
W hen hot, this acts as a good electrical conductor allowing the current to flow along the deposit instead of sparking
across the gap.
Detonation (7)
Commonly referred to as engine knock or pinging, detonation causes severe shocks inside the combustion chamber
causing damage to parts.
Pre-ignition (8)
Burnt or blistered insulator tip and badly eroded electrodes probably due to the excessive heat.
This is often caused by a cooling system blockage, sticking valves, improperly installed spark plugs or plugs that are the
wrong heat rating (too hot).
Sustained high speed with a heavy load can produce temperatures high enough to cause pre-ignition.
Heat Shock Failure (9)
A rapid increase in spark plug tip temperature under severe operating conditions can cause heat shock and result in
fractured insulators. This is a common cause of broken and cracked insulator tips.
Insufficient Installation Torque (10)
Poor contact between the spark plug and the cylinder head seat.
The lack of proper heat transfer that results from poor seat contact causes overheating of the spark plug. In many cases,
severe damage occurs. Dirty threads in the cylinder head can cause the plug to seize before it is seated.
Ensure the cylinder head and spark plug threads are free of deposits, burrs and scale before installation.
BACK TO CHAPTER INDEX
TO MODEL INDEX
ISUZU KB P190 2007
Page 3581 of 6020
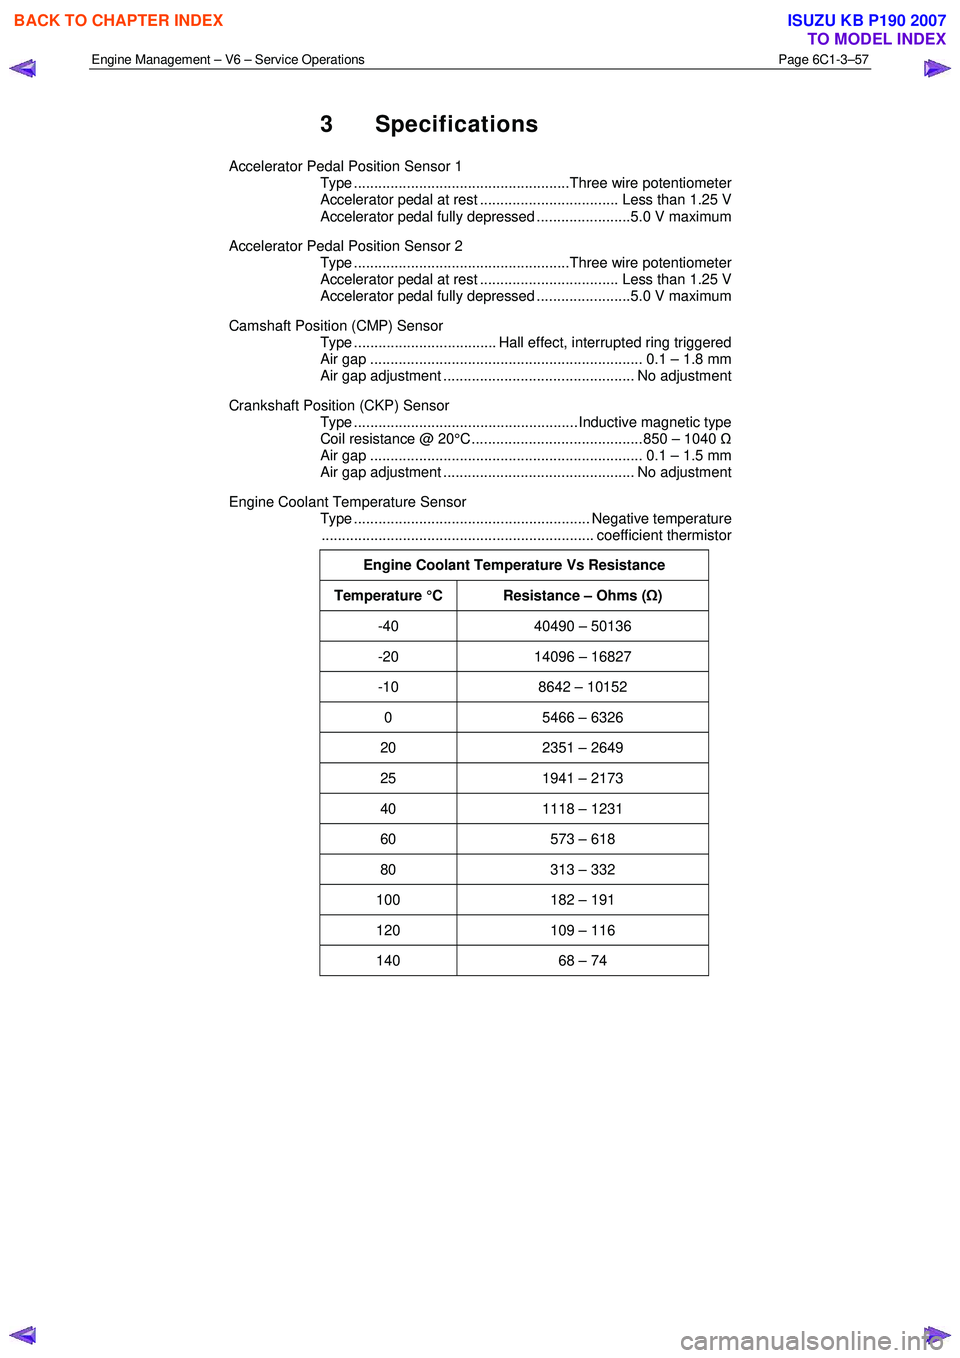
Engine Management – V6 – Service Operations Page 6C1-3–57
3 Specifications
Accelerator Pedal Position Sensor 1
Type .....................................................Three wire potentiometer
Accelerator pedal at rest .................................. Less than 1.25 V
Accelerator pedal fully depressed .......................5.0 V maximum
Accelerator Pedal Position Sensor 2
Type .....................................................Three wire potentiometer
Accelerator pedal at rest .................................. Less than 1.25 V
Accelerator pedal fully depressed .......................5.0 V maximum
Camshaft Position (CMP) Sensor
Type ................................... Hall effect, interrupted ring triggered
Air gap ................................................................... 0.1 – 1.8 mm
Air gap adjustment ............................................... No adjustment
Crankshaft Position (CKP) Sensor
Type ....................................................... Inductive magnetic type
Coil resistance @ 20°C .......................................... 850 – 1040 Ω
Air gap ................................................................... 0.1 – 1.5 mm
Air gap adjustment ............................................... No adjustment
Engine Coolant Temperature Sensor
Type .......................................................... Negative temperature
................................................................... coefficient thermistor
Engine Coolant Temperature Vs Resistance
Temperature °C Resistance – Ohms ( Ω)
-40 40490 – 50136
-20 14096 – 16827
-10 8642 – 10152
0 5466 – 6326
20 2351 – 2649
25 1941 – 2173
40 1118 – 1231
60 573 – 618
80 313 – 332
100 182 – 191
120 109 – 116
140 68 – 74
BACK TO CHAPTER INDEX
TO MODEL INDEX
ISUZU KB P190 2007
Page 3582 of 6020
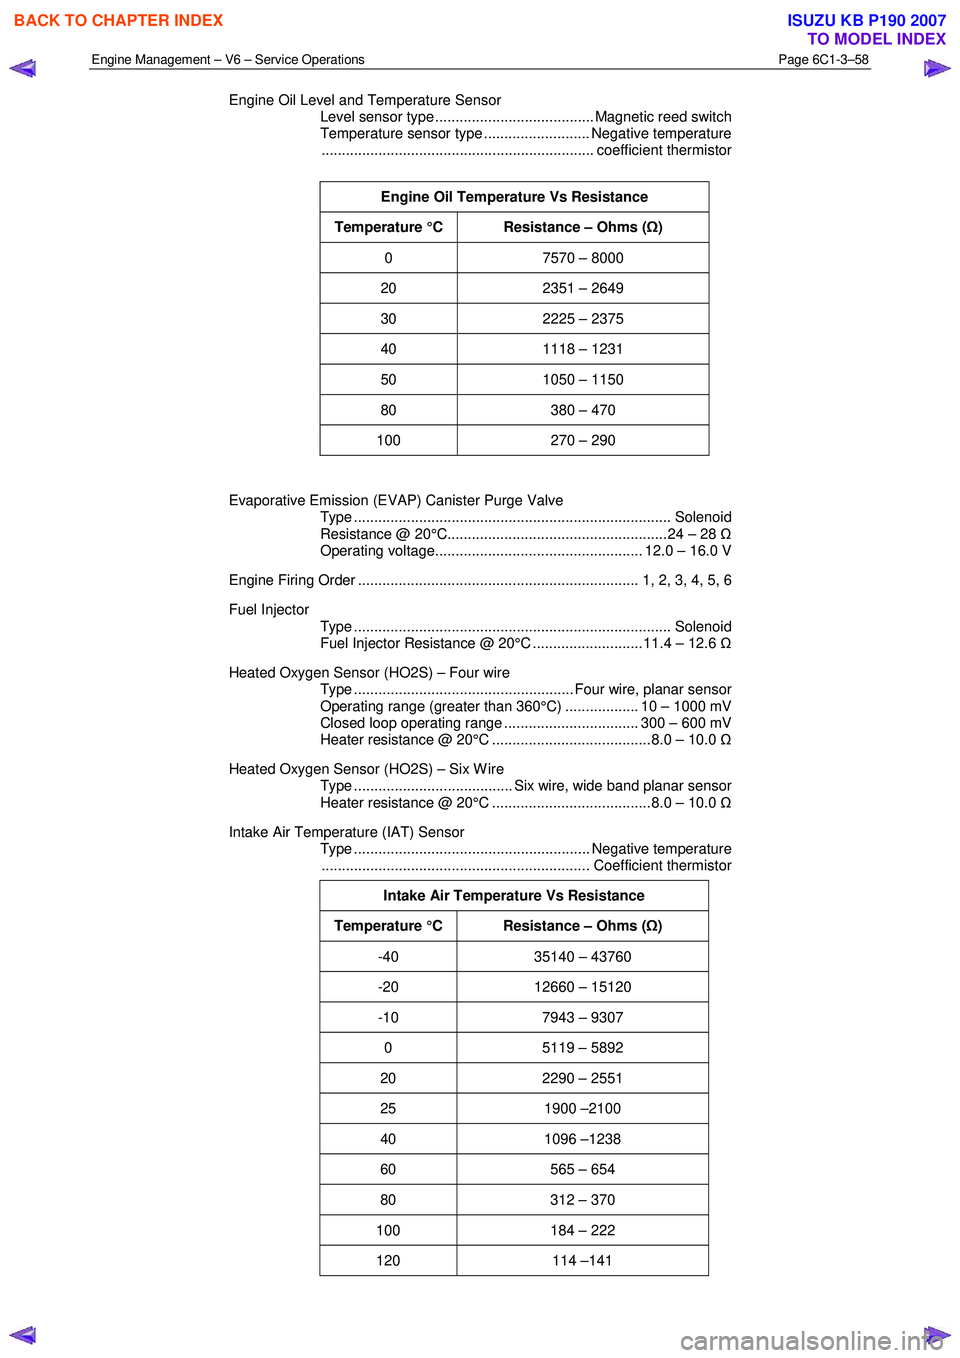
Engine Management – V6 – Service Operations Page 6C1-3–58
Engine Oil Level and Temperature Sensor
Level sensor type ....................................... Magnetic reed switch
Temperature sensor type .......................... Negative temperature
................................................................... coefficient thermistor
Engine Oil Temperature Vs Resistance
Temperature °C Resistance – Ohms ( Ω)
0 7570 – 8000
20 2351 – 2649
30 2225 – 2375
40 1118 – 1231
50 1050 – 1150
80 380 – 470
100 270 – 290
Evaporative Emission (EVAP) Canister Purge Valve
Type .............................................................................. Solenoid
Resistance @ 20°C...................................................... 24 – 28 Ω
Operating voltage................................................... 12.0 – 16.0 V
Engine Firing Order ..................................................................... 1, 2, 3, 4, 5, 6
Fuel Injector
Type .............................................................................. Solenoid
Fuel Injector Resistance @ 20°C ........................... 11.4 – 12.6 Ω
Heated Oxygen Sensor (HO2S) – Four wire
Type ...................................................... Four wire, planar sensor
Operating range (greater than 360°C) .................. 10 – 1000 mV
Closed loop operating range ................................. 300 – 600 mV
Heater resistance @ 20°C ....................................... 8.0 – 10.0 Ω
Heated Oxygen Sensor (HO2S) – Six W ire
Type ....................................... Six wire, wide band planar sensor
Heater resistance @ 20°C ....................................... 8.0 – 10.0 Ω
Intake Air Temperature (IAT) Sensor
Type .......................................................... Negative temperature
.................................................................. Coefficient thermistor
Intake Air Temperature Vs Resistance
Temperature °C Resistance – Ohms ( Ω)
-40 35140 – 43760
-20 12660 – 15120
-10 7943 – 9307
0 5119 – 5892
20 2290 – 2551
25 1900 –2100
40 1096 –1238
60 565 – 654
80 312 – 370
100 184 – 222
120 114 –141
BACK TO CHAPTER INDEX
TO MODEL INDEX
ISUZU KB P190 2007
Page 3585 of 6020
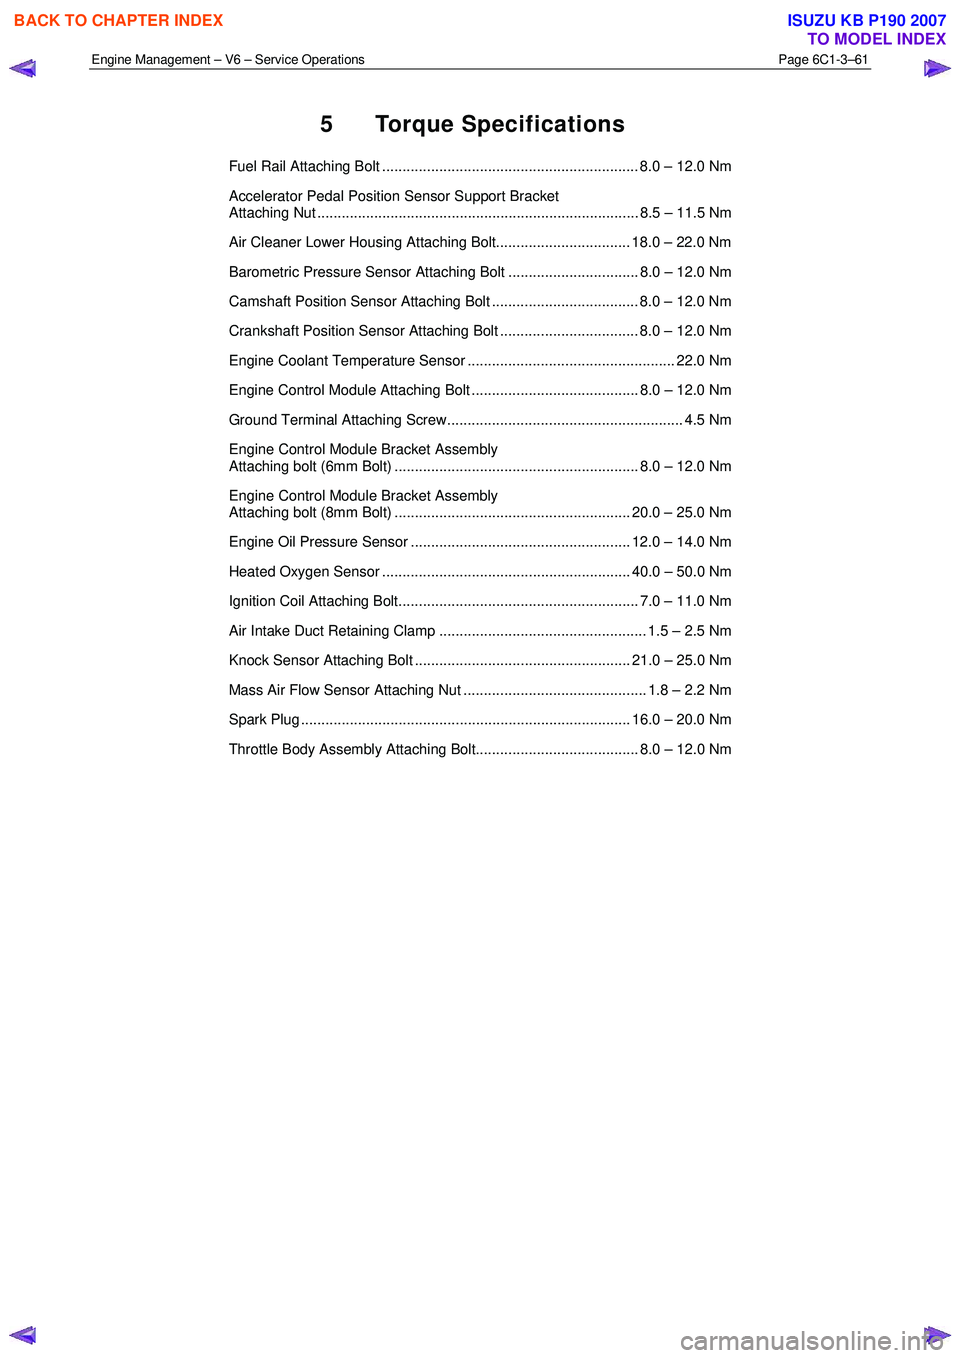
Engine Management – V6 – Service Operations Page 6C1-3–61
5 Torque Specifications
Fuel Rail Attaching Bolt ............................................................... 8.0 – 12.0 Nm
Accelerator Pedal Position Sensor Support Bracket
Attaching Nut ............................................................................... 8.5 – 11.5 Nm
Air Cleaner Lower Housing Attaching Bolt................................. 18.0 – 22.0 Nm
Barometric Pressure Sensor Attaching Bolt ................................ 8.0 – 12.0 Nm
Camshaft Position Sensor Attaching Bolt .................................... 8.0 – 12.0 Nm
Crankshaft Position Sensor Attaching Bolt .................................. 8.0 – 12.0 Nm
Engine Coolant Temperature Sensor ................................................... 22.0 Nm
Engine Control Module Attaching Bolt ......................................... 8.0 – 12.0 Nm
Ground Terminal Attaching Screw.......................................................... 4.5 Nm
Engine Control Module Bracket Assembly
Attaching bolt (6mm Bolt) ............................................................ 8.0 – 12.0 Nm
Engine Control Module Bracket Assembly
Attaching bolt (8mm Bolt) .......................................................... 20.0 – 25.0 Nm
Engine Oil Pressure Sensor ...................................................... 12.0 – 14.0 Nm
Heated Oxygen Sensor ............................................................. 40.0 – 50.0 Nm
Ignition Coil Attaching Bolt........................................................... 7.0 – 11.0 Nm
Air Intake Duct Retaining Clamp ................................................... 1.5 – 2.5 Nm
Knock Sensor Attaching Bolt ..................................................... 21.0 – 25.0 Nm
Mass Air Flow Sensor Attaching Nut ............................................. 1.8 – 2.2 Nm
Spark Plug ................................................................................. 16.0 – 20.0 Nm
Throttle Body Assembly Attaching Bolt........................................ 8.0 – 12.0 Nm
BACK TO CHAPTER INDEX
TO MODEL INDEX
ISUZU KB P190 2007