Page 1340 of 6020
EXHAUST SYSTEM 6F – 7
GENERAL DESCRIPTION
This system controls the formation of NOx emission by recirculating the exhaust gas into the combustion chamber
through the intake manifold.
4JA1T(L):
The two EGR valves are controlled by two Vacuum Switching Valve (VSV) controlled by EGR controller according to
signals from various sensors.
The amount of EGR depends on the number of engine rotations and the opening of the accelerator.
RTW 46ELF001201
BACK TO CHAPTER INDEX
TO MODEL INDEX
ISUZU KB P190 2007
Page 1344 of 6020
EXHAUST SYSTEM 6F – 11
INSPECTION
4JA1T(L)
Vacuum switch valve (VSV)
Use a circuit tester to measure the V.S.V. resistance.
V.S.V Resistance Ω at 20°C
37 ~ 44
If the resistance is not within specification, replace it.
EGR Valve
Apply vacuum to the EGR valve, check to see the valve
operation.
Negative Pressure
4JA1TC/4JH1TC
RTW 46ESH000301
EVRV
Use a circuit tester to measure the EVRV resistance.
EVRV Resistance Ω at 20°C
14
If the resistance is not within specification, replace it.
EGR Valve
Apply vacuum to the EGR valve, check to see the valve
operation.
Negative Pressure 4JH1TC
Less than 250 mmHg Not operation
More than 300 mmHg Operation
Negative Pressure 4JA1TC
Less than 100 mmHg Not operation
More than 170 mmHg Operation
Less then 180 mmHg Not operation
More than 240 mmHg
Operation
BACK TO CHAPTER INDEX
TO MODEL INDEX
ISUZU KB P190 2007
Page 1376 of 6020

6A-16 ENGINE MECHANICAL (4JK1/4JJ1)
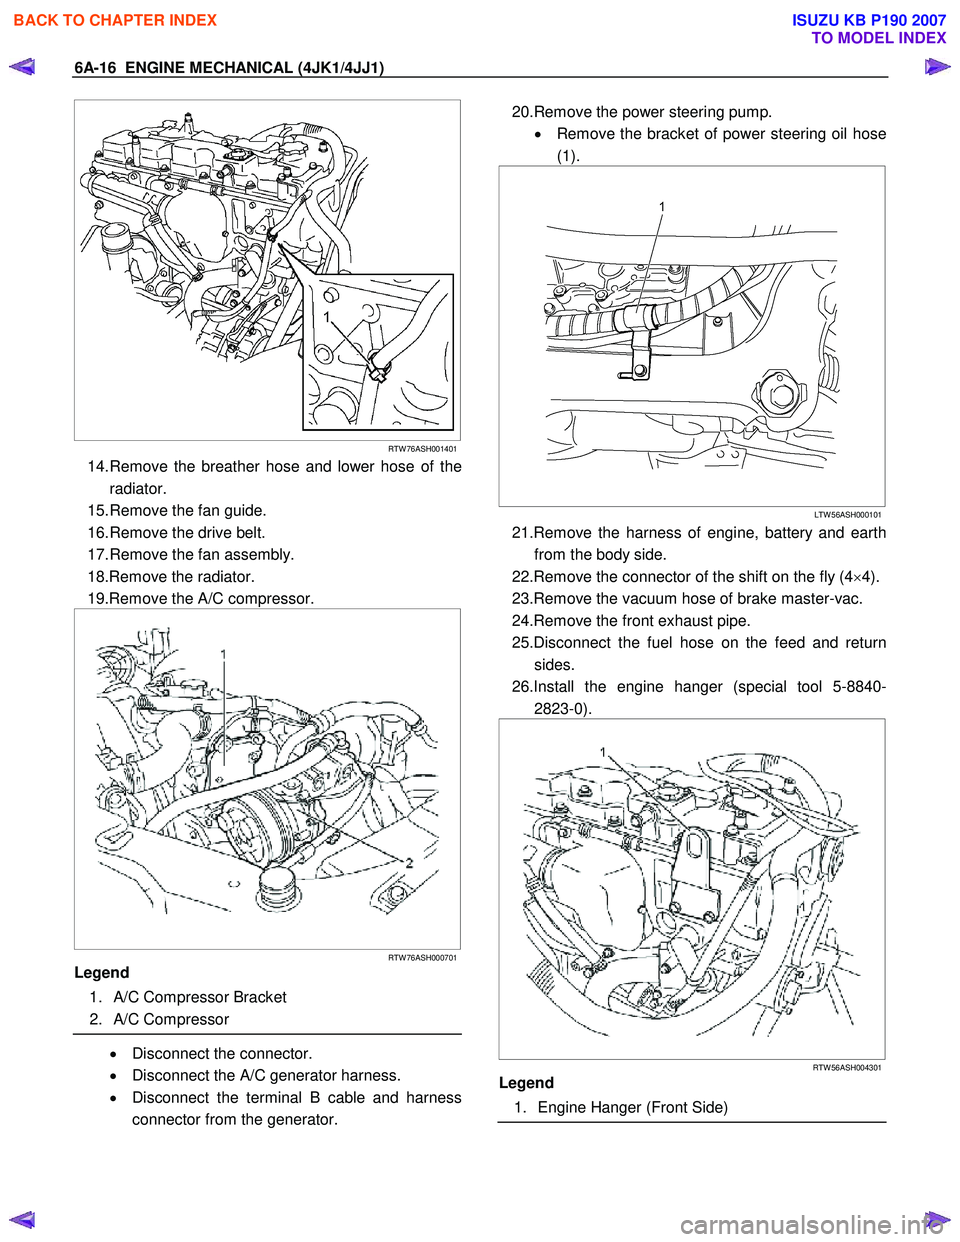
RTW 76ASH001401
14. Remove the breather hose and lower hose of the
radiator.
15. Remove the fan guide.
16. Remove the drive belt.
17. Remove the fan assembly.
18.Remove the radiator.
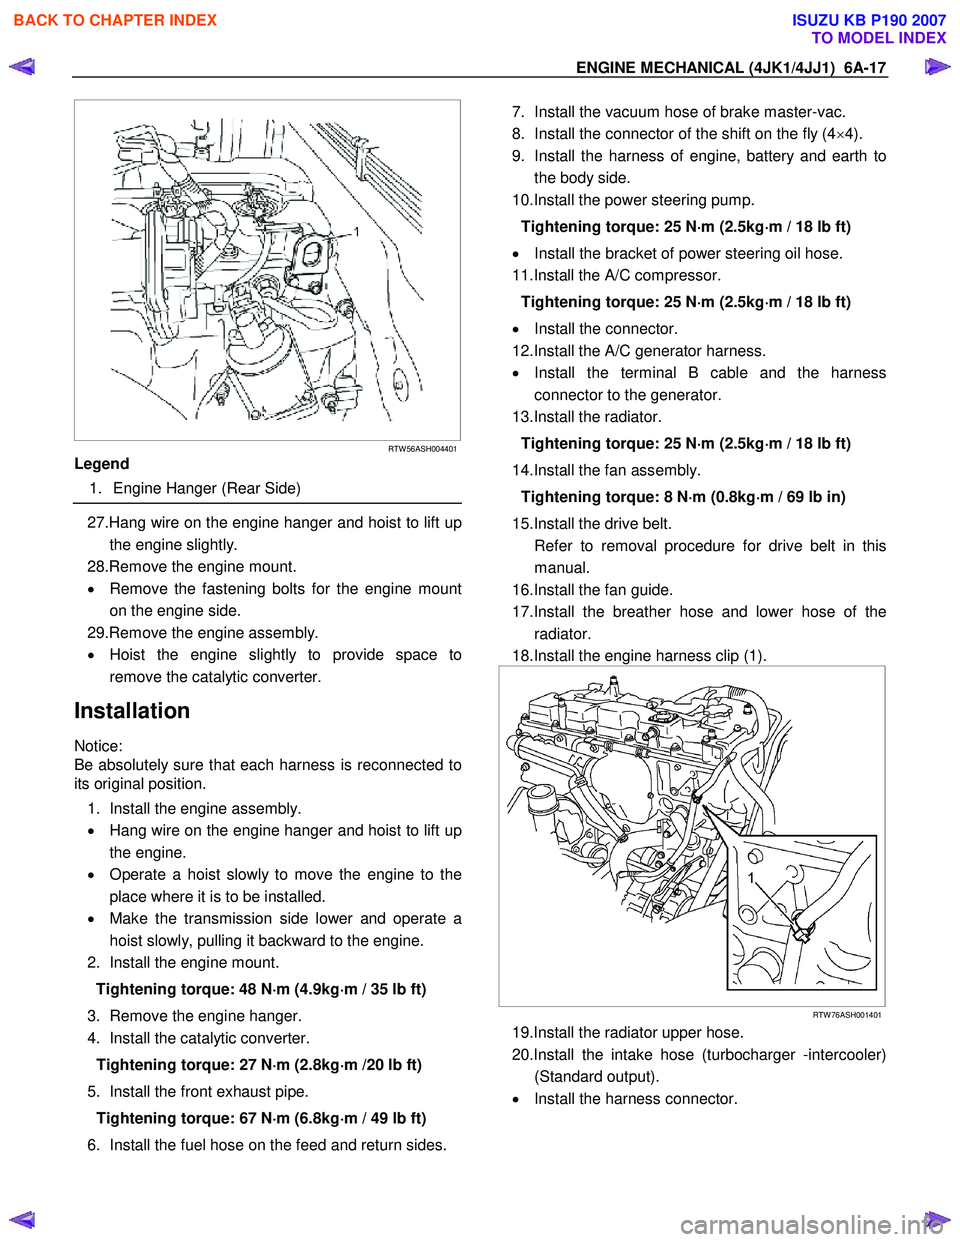
19.Remove the A/C compressor.
RTW 76ASH000701
Legend
1. A/C Compressor Bracket
2. A/C Compressor
• Disconnect the connector.
• Disconnect the A/C generator harness.
• Disconnect the terminal B cable and harness
connector from the generator.
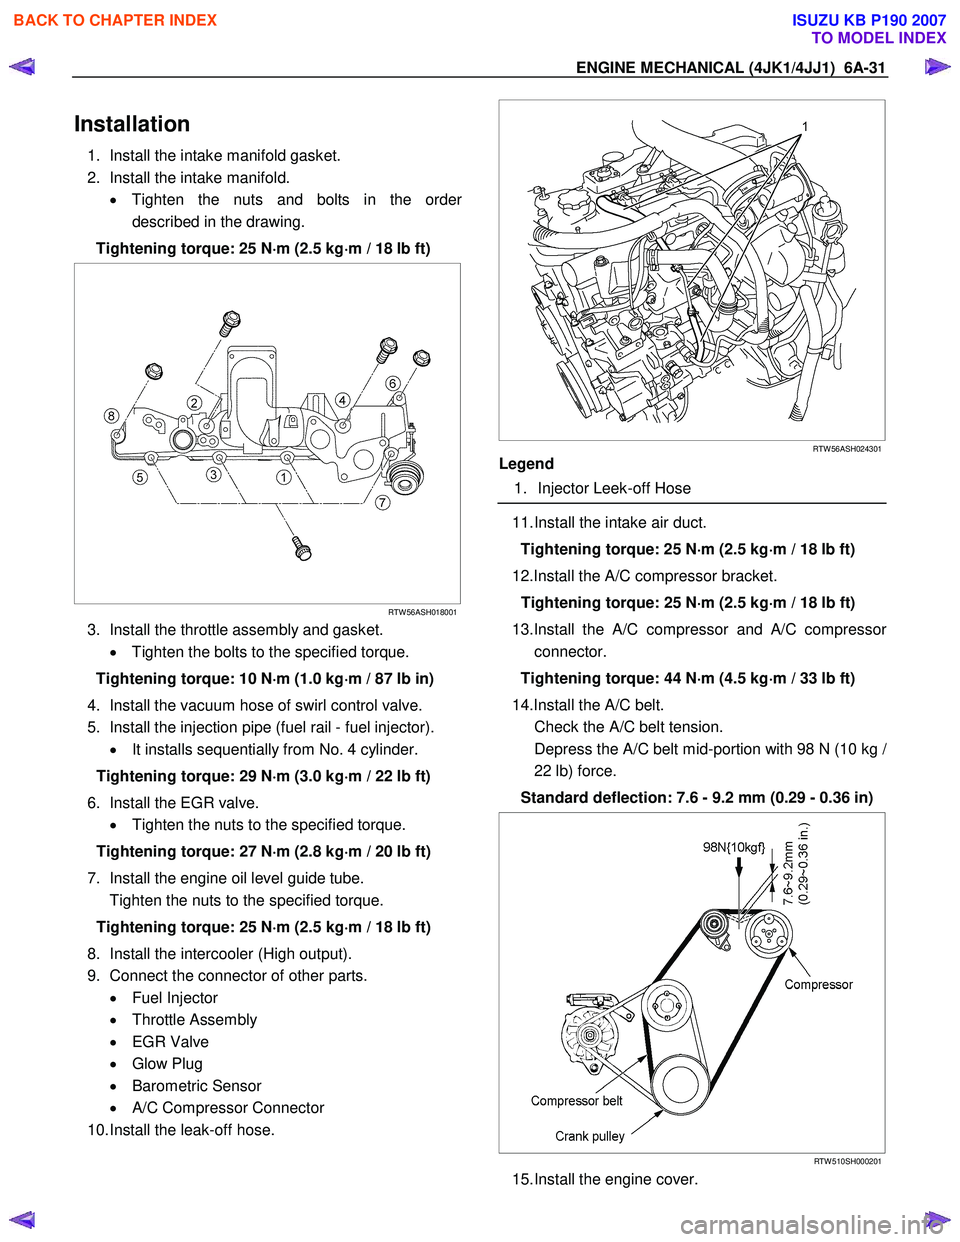
20.Remove the power steering pump.
• Remove the bracket of power steering oil hose
(1).
LTW 56ASH000101
21.Remove the harness of engine, battery and earth
from the body side.
22.Remove the connector of the shift on the fly (4 ×4).
23.Remove the vacuum hose of brake master-vac.
24.Remove the front exhaust pipe.
25.Disconnect the fuel hose on the feed and return sides.
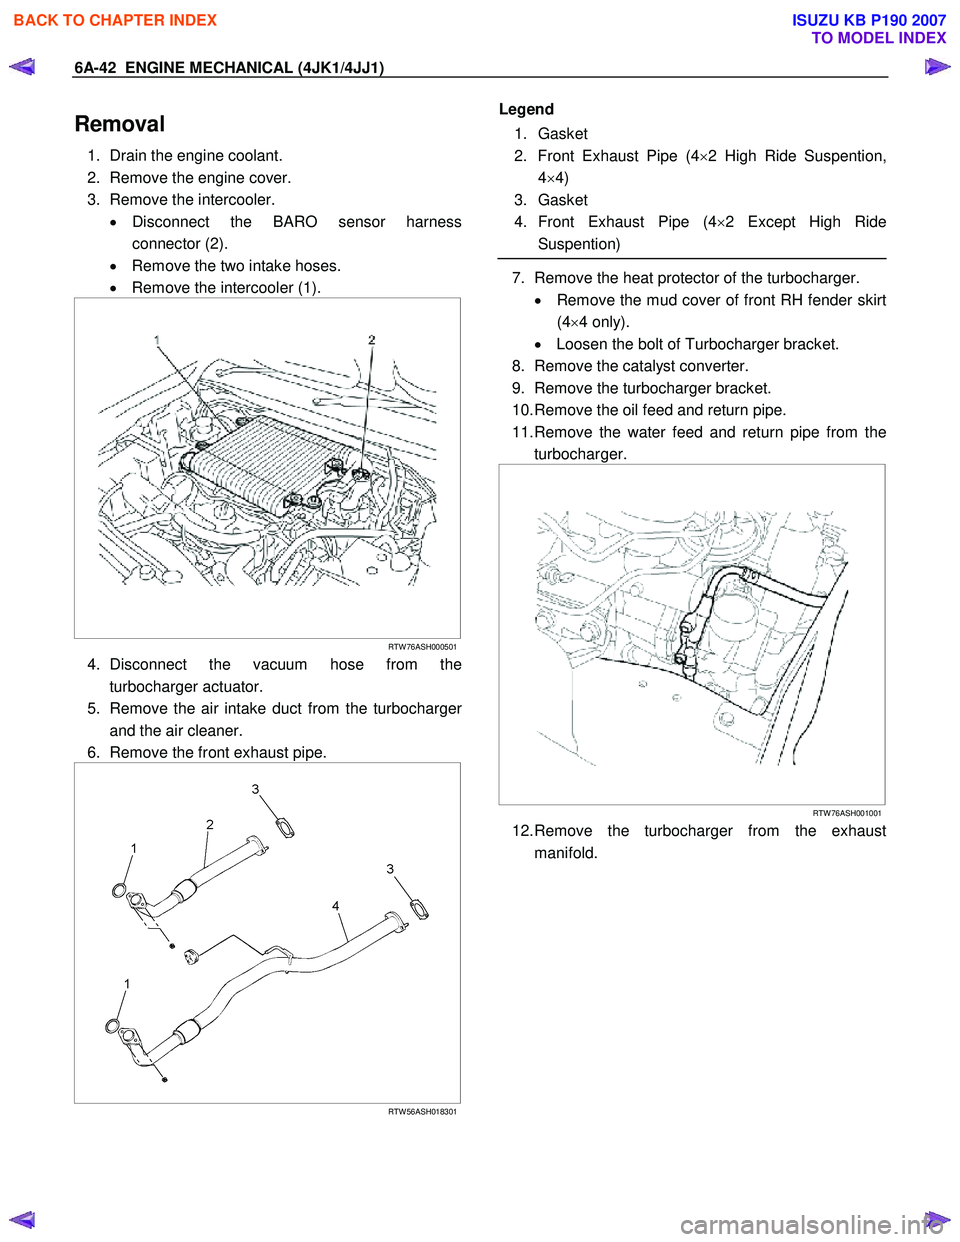
26.Install the engine hanger (special tool 5-8840- 2823-0).
RTW 56ASH004301
Legend
1. Engine Hanger (Front Side)
BACK TO CHAPTER INDEX
TO MODEL INDEX
ISUZU KB P190 2007
Page 1377 of 6020

ENGINE MECHANICAL (4JK1/4JJ1) 6A-17
RTW 56ASH004401
Legend
1. Engine Hanger (Rear Side)
27.Hang wire on the engine hanger and hoist to lift up
the engine slightly.
28.Remove the engine mount.
• Remove the fastening bolts for the engine mount
on the engine side.
29.Remove the engine assembly.
• Hoist the engine slightly to provide space to
remove the catalytic converter.
Installation
Notice:
Be absolutely sure that each harness is reconnected to
its original position.
1. Install the engine assembly.
• Hang wire on the engine hanger and hoist to lift up
the engine.
• Operate a hoist slowly to move the engine to the
place where it is to be installed.
• Make the transmission side lower and operate a
hoist slowly, pulling it backward to the engine.
2. Install the engine mount.
Tightening torque: 48 N ⋅
⋅⋅
⋅
m (4.9kg ⋅
⋅⋅
⋅
m / 35 lb ft)
3. Remove the engine hanger.
4. Install the catalytic converter.
Tightening torque: 27 N ⋅
⋅⋅
⋅
m (2.8kg ⋅
⋅⋅
⋅
m /20 lb ft)
5. Install the front exhaust pipe. Tightening torque: 67 N ⋅
⋅⋅
⋅
m (6.8kg ⋅
⋅⋅
⋅
m / 49 lb ft)
6. Install the fuel hose on the feed and return sides.
7. Install the vacuum hose of brake master-vac.
8. Install the connector of the shift on the fly (4 ×4).
9. Install the harness of engine, battery and earth to the body side.
10.Install the power steering pump.
Tightening torque: 25 N ⋅
⋅⋅
⋅
m (2.5kg ⋅
⋅⋅
⋅
m / 18 lb ft)
• Install the bracket of power steering oil hose.
11.Install the A/C compressor.
Tightening torque: 25 N ⋅
⋅⋅
⋅
m (2.5kg ⋅
⋅⋅
⋅
m / 18 lb ft)
• Install the connector.
12.Install the A/C generator harness.
• Install the terminal B cable and the harness
connector to the generator.
13.Install the radiator.
Tightening torque: 25 N ⋅
⋅⋅
⋅
m (2.5kg ⋅
⋅⋅
⋅
m / 18 lb ft)
14.Install the fan assembly. Tightening torque: 8 N ⋅
⋅⋅
⋅
m (0.8kg ⋅
⋅⋅
⋅
m / 69 lb in)
15.Install the drive belt.
Refer to removal procedure for drive belt in this manual.
16.Install the fan guide.
17.Install the breather hose and lower hose of the radiator.
18.Install the engine harness clip (1).
RTW 76ASH001401
19.Install the radiator upper hose.
20.Install the intake hose (turbocharger -intercooler) (Standard output).
• Install the harness connector.
BACK TO CHAPTER INDEX
TO MODEL INDEX
ISUZU KB P190 2007
Page 1390 of 6020
6A-30 ENGINE MECHANICAL (4JK1/4JJ1)
RTW 66ASH003001
11. Remove the injection pipes.
• Remove sequentially from No.1 cylinder.
12. Disconnect the vacuum hose of swirl control valve (1).
RTW 66ASH003101
13. Remove the throttle assembly and gasket.
RTW 56ASH005201
Legend
1. Throttle Assembly
2. Intake Manifold
14. Remove the intake manifold.
RTW 56ASH018001
15. Remove the intake manifold gasket.
BACK TO CHAPTER INDEX
TO MODEL INDEX
ISUZU KB P190 2007
Page 1391 of 6020

ENGINE MECHANICAL (4JK1/4JJ1) 6A-31
Installation
1. Install the intake manifold gasket.
2. Install the intake manifold. • Tighten the nuts and bolts in the orde
r
described in the drawing.
Tightening torque: 25 N ⋅
⋅⋅
⋅
m (2.5 kg ⋅
⋅⋅
⋅
m / 18 lb ft)
RTW 56ASH018001
3. Install the throttle assembly and gasket.
• Tighten the bolts to the specified torque.
Tightening torque: 10 N ⋅
⋅⋅
⋅
m (1.0 kg ⋅
⋅⋅
⋅
m / 87 lb in)
4. Install the vacuum hose of swirl control valve.
5. Install the injection pipe (fuel rail - fuel injector). • It installs sequentially from No. 4 cylinder.
Tightening torque: 29 N ⋅
⋅⋅
⋅
m (3.0 kg ⋅
⋅⋅
⋅
m / 22 lb ft)
6. Install the EGR valve. • Tighten the nuts to the specified torque.
Tightening torque: 27 N ⋅
⋅⋅
⋅
m (2.8 kg ⋅
⋅⋅
⋅
m / 20 lb ft)
7. Install the engine oil level guide tube.
Tighten the nuts to the specified torque.
Tightening torque: 25 N ⋅
⋅⋅
⋅
m (2.5 kg ⋅
⋅⋅
⋅
m / 18 lb ft)
8. Install the intercooler (High output).
9. Connect the connector of other parts. • Fuel Injector
• Throttle Assembly
• EGR Valve
• Glow Plug
• Barometric Sensor
• A/C Compressor Connector
10. Install the leak-off hose.
RTW 56ASH024301
Legend
1. Injector Leek-off Hose
11. Install the intake air duct.
Tightening torque: 25 N ⋅
⋅⋅
⋅
m (2.5 kg ⋅
⋅⋅
⋅
m / 18 lb ft)
12.Install the A/C compressor bracket. Tightening torque: 25 N ⋅
⋅⋅
⋅
m (2.5 kg ⋅
⋅⋅
⋅
m / 18 lb ft)
13.Install the A/C compressor and A/C compresso
r
connector.
Tightening torque: 44 N ⋅
⋅⋅
⋅
m (4.5 kg ⋅
⋅⋅
⋅
m / 33 lb ft)
14.Install the A/C belt.
Check the A/C belt tension.
Depress the A/C belt mid-portion with 98 N (10 kg
/
22 lb) force.
Standard deflection: 7.6 - 9.2 mm (0.29 - 0.36 in)
RTW 510SH000201
15. Install the engine cover.
BACK TO CHAPTER INDEX
TO MODEL INDEX
ISUZU KB P190 2007
Page 1402 of 6020

6A-42 ENGINE MECHANICAL (4JK1/4JJ1)
Removal
1. Drain the engine coolant.
2. Remove the engine cover.
3. Remove the intercooler. • Disconnect the BARO sensor harness
connector (2).
• Remove the two intake hoses.
• Remove the intercooler (1).
RTW 76ASH000501
4. Disconnect the vacuum hose from the
turbocharger actuator.
5. Remove the air intake duct from the turbocharge
r
and the air cleaner.
6. Remove the front exhaust pipe.
RTW 56ASH018301
Legend
1. Gasket
2. Front Exhaust Pipe (4 ×2 High Ride Suspention,
4 ×4)
3. Gasket
4. Front Exhaust Pipe (4 ×2 Except High Ride
Suspention)
7. Remove the heat protector of the turbocharger.
• Remove the mud cover of front RH fender skirt
(4×4 only).
• Loosen the bolt of Turbocharger bracket.
8. Remove the catalyst converter.
9. Remove the turbocharger bracket.
10. Remove the oil feed and return pipe.
11. Remove the water feed and return pipe from the turbocharger.
RTW 76ASH001001
12. Remove the turbocharger from the exhaust
manifold.
BACK TO CHAPTER INDEX
TO MODEL INDEX
ISUZU KB P190 2007
Page 1403 of 6020
ENGINE MECHANICAL (4JK1/4JJ1) 6A-43
Inspection
Wheel shaft axial play
Use a dial gauge to measure the wheel axle shaft pla
y
when a force of 12 N (1.2kg / 2.6 lb) is alternately
applied to both sides of the compressor wheel.
Axial play mm (in)
Standard 0.03 − 0.06 (0.0012 − 0.0024)
Limit 0.09 (0.0035)
LNW 21BSH022201
Wheel shaft and bearing clearance
Use a dial gauge to measure the clearance between the
wheel shaft and the bearing.
Clearance mm (in)
Standard 0.056 − 0.127 (0.0022 − 0.0050)
Limit 0.14 (0.0055)
LNW 21BSH022301
Legend
1. Oil Outlet
2. Oil Intake
Actuator operation
1. Install a vacuum pump (2) to the actuator (1).
LNW 71JSH000201
2. Operate the vacuum pump and apply vacuum
pressure to the actuator.
W orking vacuum pressure kPa (mmHg / psi)
52.8 (396 / 7.66)
BACK TO CHAPTER INDEX
TO MODEL INDEX
ISUZU KB P190 2007