2007 ISUZU KB P190 air condition
[x] Cancel search: air conditionPage 3720 of 6020
Powertrain Interface Module – V6 Page 6E1–59
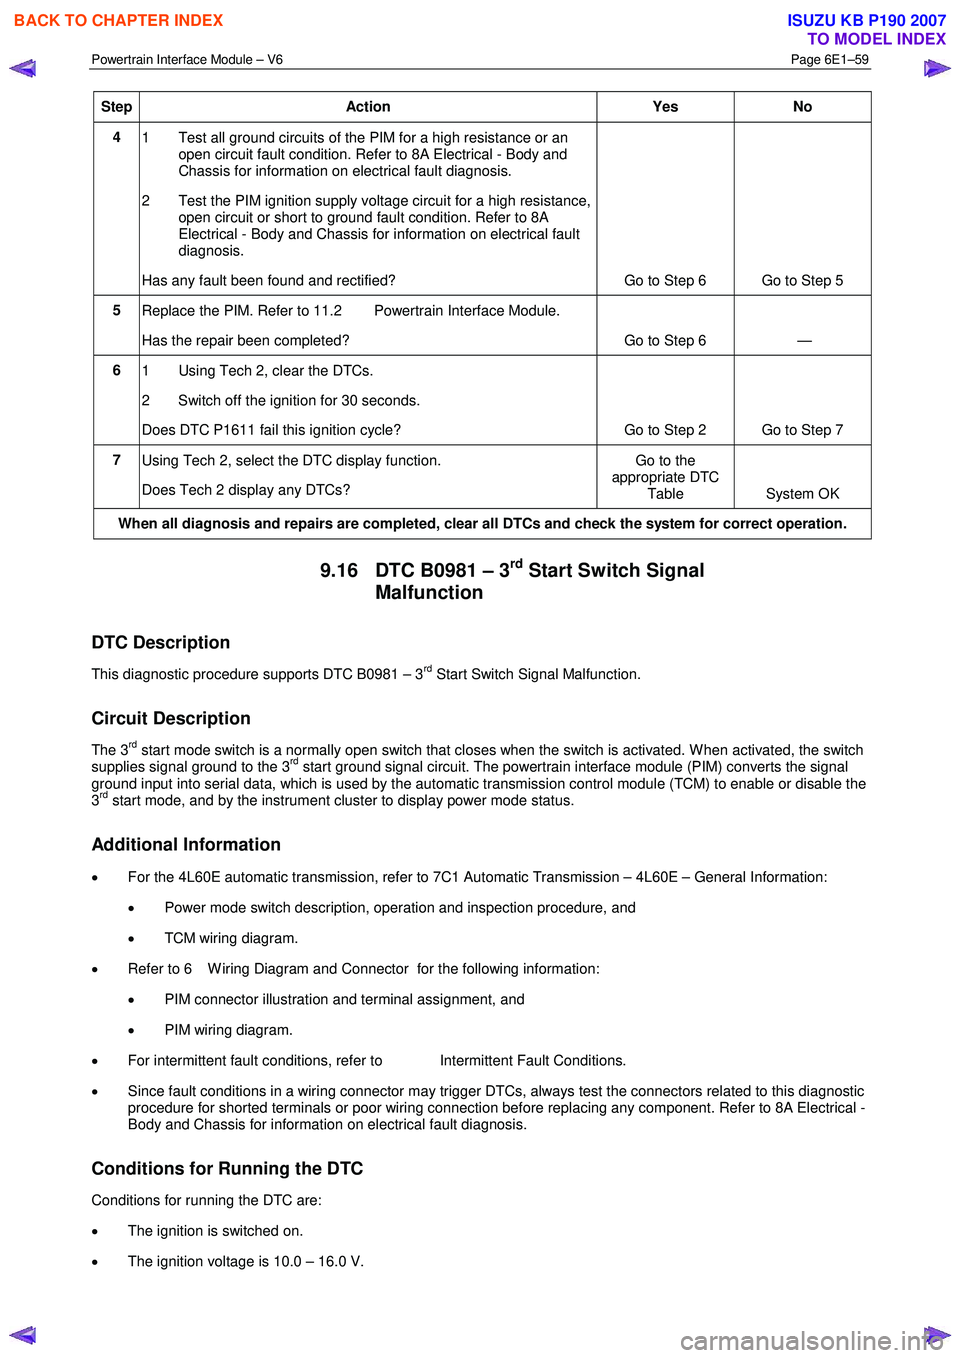
Step Action Yes No
4
1 Test all ground circuits of the PIM for a high resistance or an
open circuit fault condition. Refer to 8A Electrical - Body and
Chassis for information on electrical fault diagnosis.
2 Test the PIM ignition supply voltage circuit for a high resistance, open circuit or short to ground fault condition. Refer to 8A
Electrical - Body and Chassis for information on electrical fault
diagnosis.
Has any fault been found and rectified? Go to Step 6 Go to Step 5
5 Replace the PIM. Refer to 11.2 Powertrain Interface Module.
Has the repair been completed? Go to Step 6 —
6 1 Using Tech 2, clear the DTCs.
2 Switch off the ignition for 30 seconds.
Does DTC P1611 fail this ignition cycle? Go to Step 2 Go to Step 7
7 Using Tech 2, select the DTC display function.
Does Tech 2 display any DTCs? Go to the
appropriate DTC Table System OK
When all diagnosis and repairs are completed, clear all DTCs and check the system for correct operation.
9.16 DTC B0981 – 3rd Start Switch Signal
Malfunction
DTC Description
This diagnostic procedure supports DTC B0981 – 3rd Start Switch Signal Malfunction.
Circuit Description
The 3rd start mode switch is a normally open switch that closes when the switch is activated. W hen activated, the switch
supplies signal ground to the 3rd start ground signal circuit. The powertrain interface module (PIM) converts the signal
ground input into serial data, which is used by the automatic transmission control module (TCM) to enable or disable the
3
rd start mode, and by the instrument cluster to display power mode status.
Additional Information
• For the 4L60E automatic transmission, refer to 7C1 Automatic Transmission – 4L60E – General Information:
• Power mode switch description, operation and inspection procedure, and
• TCM wiring diagram.
• Refer to 6 W iring Diagram and Connector for the following information:
• PIM connector illustration and terminal assignment, and
• PIM wiring diagram.
• For intermittent fault conditions, refer to Intermittent Fault Conditions.
• Since fault conditions in a wiring connector may trigger DTCs, always test the connectors related to this diagnostic
procedure for shorted terminals or poor wiring connection before replacing any component. Refer to 8A Electrical -
Body and Chassis for information on electrical fault diagnosis.
Conditions for Running the DTC
Conditions for running the DTC are:
• The ignition is switched on.
• The ignition voltage is 10.0 – 16.0 V.
BACK TO CHAPTER INDEX
TO MODEL INDEX
ISUZU KB P190 2007
Page 3721 of 6020
Powertrain Interface Module – V6 Page 6E1–60
Conditions for Setting the DTC
The PIM detects the power mode switch is activated for 120 seconds or more.
Action Taken When the DTC Sets
W hen the DTC sets, there is no warning lamp displayed on the instrument cluster.
Conditions for Clearing the DTC
Refer to 4.1 Diagnostic General Descriptions for information on the conditions for clearing DTCs.
Test Description
The following numbers refer to the step numbers in the diagnostic table:
2 This step tests the power mode switch using Tech 2.
6 This step tests the power mode switch signal circuit.
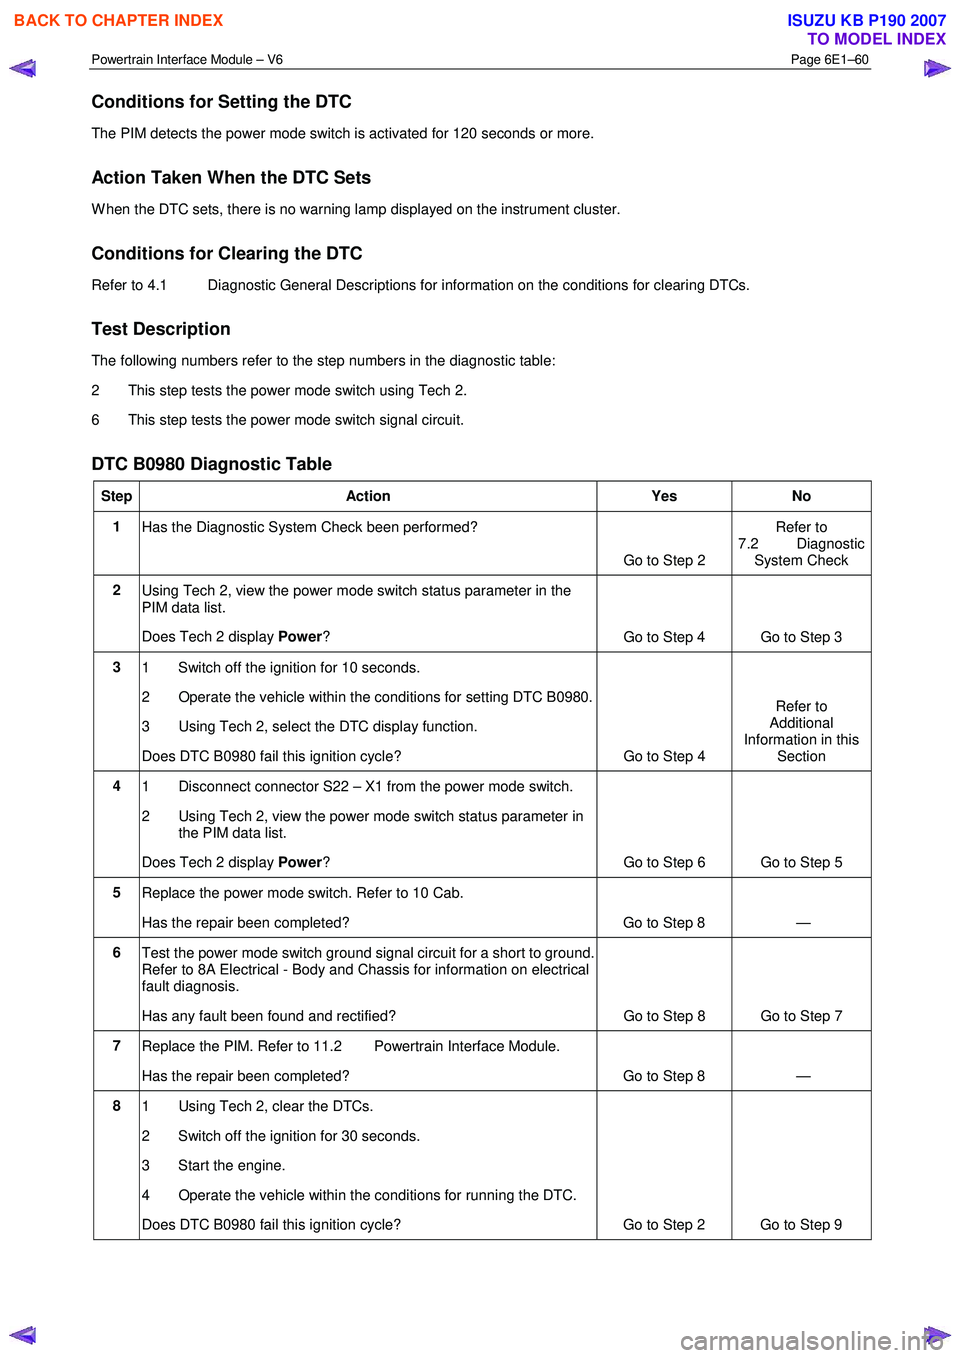
DTC B0980 Diagnostic Table
Step Action Yes No
1
Has the Diagnostic System Check been performed?
Go to Step 2 Refer to
7.2 Diagnostic
System Check
2 Using Tech 2, view the power mode switch status parameter in the
PIM data list.
Does Tech 2 display Power?
Go to Step 4 Go to Step 3
3
1 Switch off the ignition for 10 seconds.
2 Operate the vehicle within the conditions for setting DTC B0980.
3 Using Tech 2, select the DTC display function.
Does DTC B0980 fail this ignition cycle? Go to Step 4 Refer to
Additional
Information in this
Section
4 1 Disconnect connector S22 – X1 from the power mode switch.
2 Using Tech 2, view the power mode switch status parameter in the PIM data list.
Does Tech 2 display Power?
Go to Step 6 Go to Step 5
5
Replace the power mode switch. Refer to 10 Cab.
Has the repair been completed? Go to Step 8 —
6 Test the power mode switch ground signal circuit for a short to ground.
Refer to 8A Electrical - Body and Chassis for information on electrical
fault diagnosis.
Has any fault been found and rectified? Go to Step 8 Go to Step 7
7
Replace the PIM. Refer to 11.2 Powertrain Interface Module.
Has the repair been completed? Go to Step 8 —
8 1 Using Tech 2, clear the DTCs.
2 Switch off the ignition for 30 seconds.
3 Start the engine.
4 Operate the vehicle within the conditions for running the DTC.
Does DTC B0980 fail this ignition cycle? Go to Step 2 Go to Step 9
BACK TO CHAPTER INDEX
TO MODEL INDEX
ISUZU KB P190 2007
Page 3724 of 6020
Powertrain Interface Module – V6 Page 6E1–63
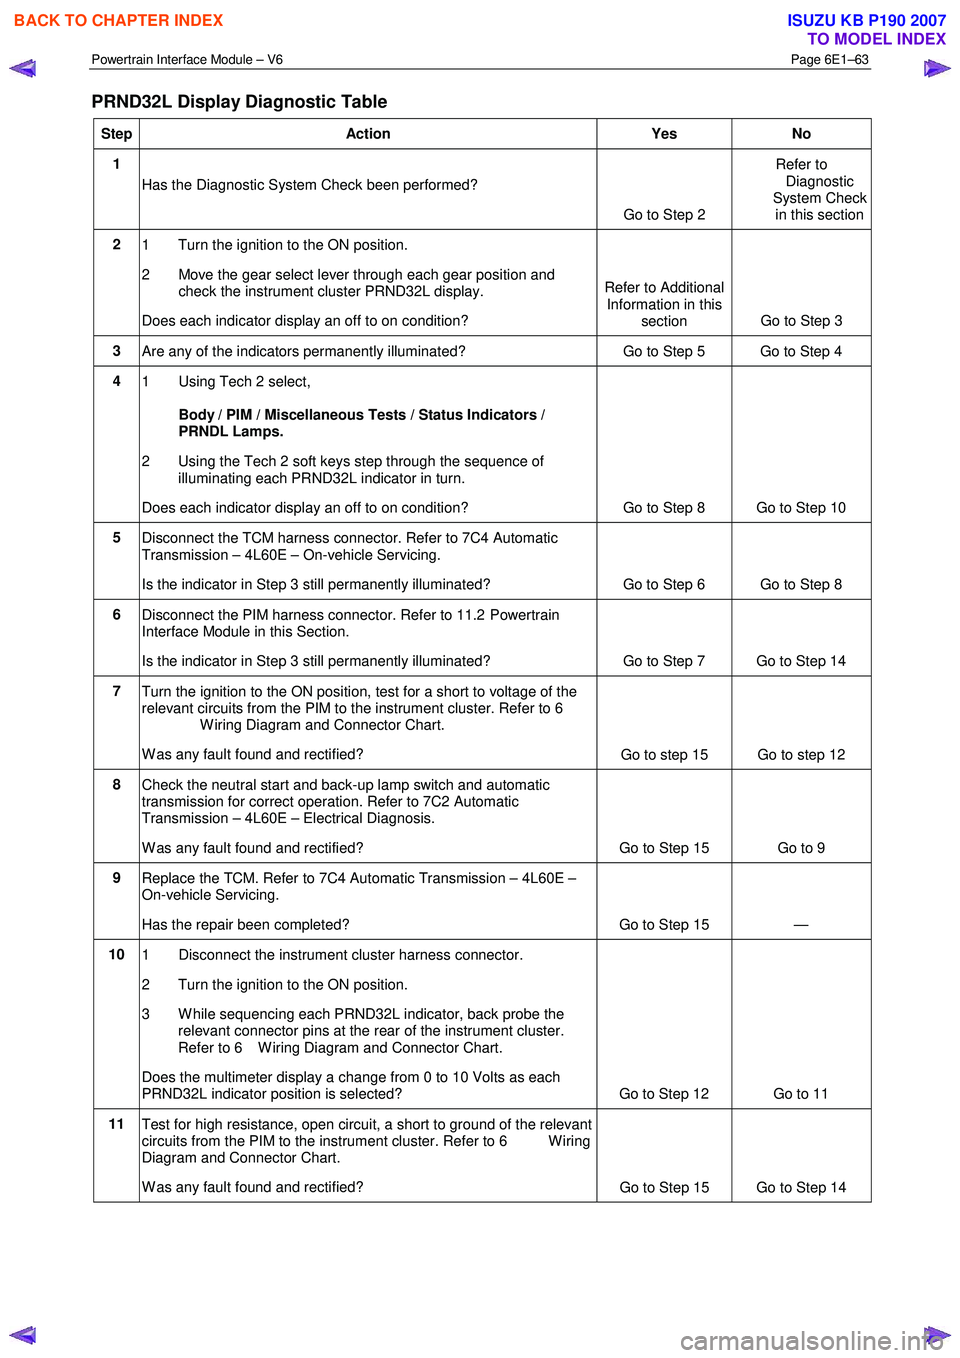
PRND32L Display Diagnostic Table
Step Action Yes No
1
Has the Diagnostic System Check been performed?
Go to Step 2 Refer to
Diagnostic
System Check in this section
2 1 Turn the ignition to the ON position.
2 Move the gear select lever through each gear position and check the instrument cluster PRND32L display.
Does each indicator display an off to on condition? Refer to Additional
Information in this section Go to Step 3
3
Are any of the indicators permanently illuminated? Go to Step 5 Go to Step 4
4 1 Using Tech 2 select,
Body / PIM / Miscellaneous Tests / Status Indicators /
PRNDL Lamps.
2 Using the Tech 2 soft keys step through the sequence of illuminating each PRND32L indicator in turn.
Does each indicator display an off to on condition? Go to Step 8 Go to Step 10
5
Disconnect the TCM harness connector. Refer to 7C4 Automatic
Transmission – 4L60E – On-vehicle Servicing.
Is the indicator in Step 3 still permanently illuminated? Go to Step 6 Go to Step 8
6 Disconnect the PIM harness connector. Refer to 11.2 Powertrain
Interface Module in this Section.
Is the indicator in Step 3 still permanently illuminated? Go to Step 7 Go to Step 14
7
Turn the ignition to the ON position, test for a short to voltage of the
relevant circuits from the PIM to the instrument cluster. Refer to 6
W iring Diagram and Connector Chart.
W as any fault found and rectified? Go to step 15 Go to step 12
8
Check the neutral start and back-up lamp switch and automatic
transmission for correct operation. Refer to 7C2 Automatic
Transmission – 4L60E – Electrical Diagnosis.
W as any fault found and rectified? Go to Step 15 Go to 9
9 Replace the TCM. Refer to 7C4 Automatic Transmission – 4L60E –
On-vehicle Servicing.
Has the repair been completed? Go to Step 15 —
10 1 Disconnect the instrument cluster harness connector.
2 Turn the ignition to the ON position.
3 W hile sequencing each PRND32L indicator, back probe the relevant connector pins at the rear of the instrument cluster.
Refer to 6 W iring Diagram and Connector Chart.
Does the multimeter display a change from 0 to 10 Volts as each
PRND32L indicator position is selected? Go to Step 12 Go to 11
11 Test for high resistance, open circuit, a short to ground of the relevant
circuits from the PIM to the instrument cluster. Refer to 6 W iring
Diagram and Connector Chart.
W as any fault found and rectified? Go to Step 15 Go to Step 14
BACK TO CHAPTER INDEX
TO MODEL INDEX
ISUZU KB P190 2007
Page 3725 of 6020
Powertrain Interface Module – V6 Page 6E1–64
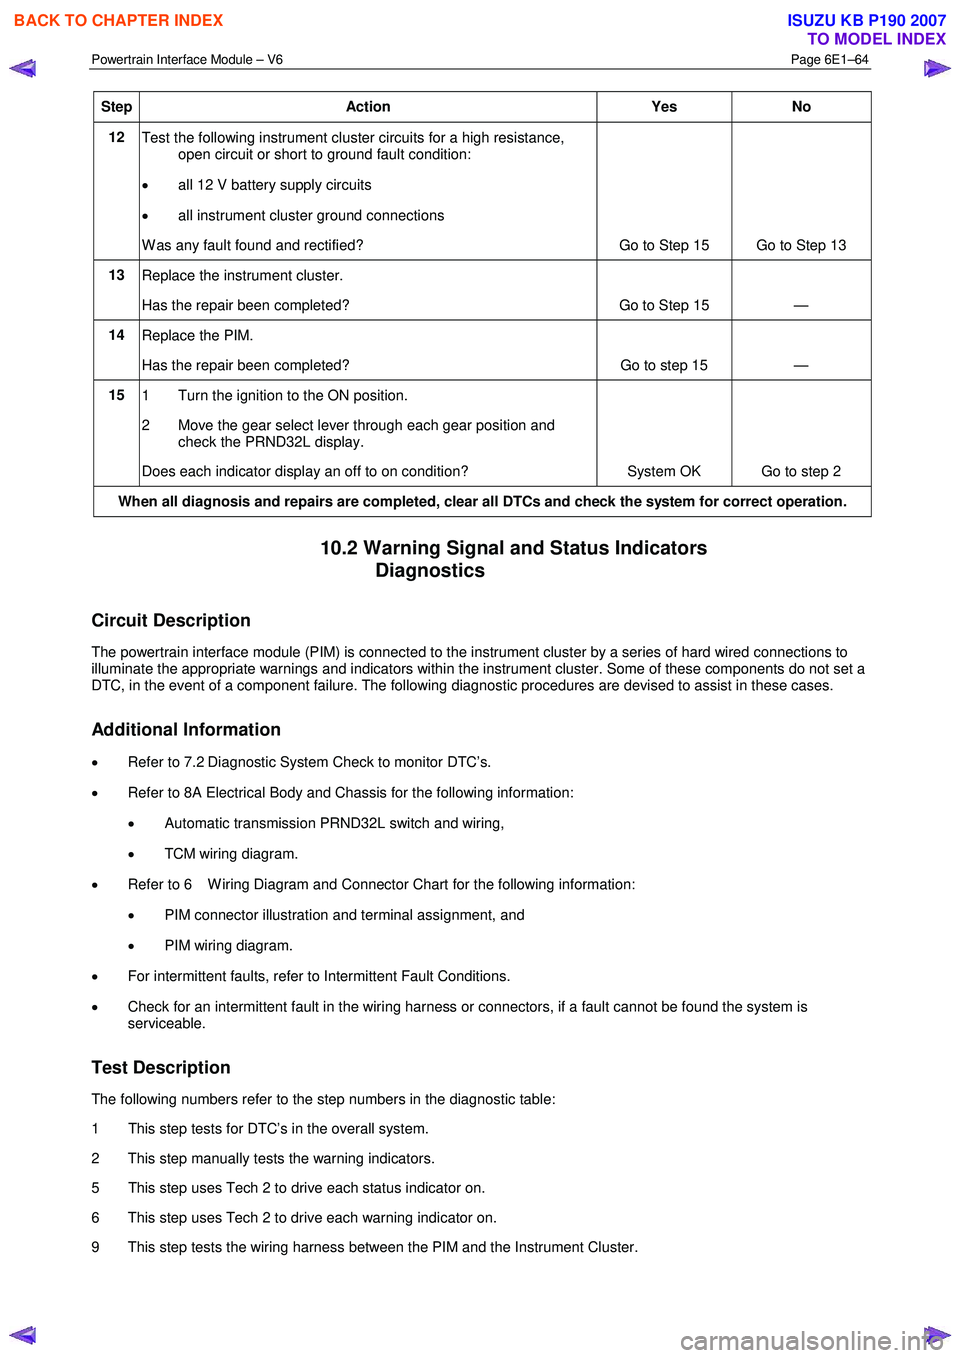
Step Action Yes No
12
Test the following instrument cluster circuits for a high resistance,
open circuit or short to ground fault condition:
• all 12 V battery supply circuits
• all instrument cluster ground connections
W as any fault found and rectified? Go to Step 15 Go to Step 13
13 Replace the instrument cluster.
Has the repair been completed? Go to Step 15 —
14 Replace the PIM.
Has the repair been completed? Go to step 15 —
15 1 Turn the ignition to the ON position.
2 Move the gear select lever through each gear position and check the PRND32L display.
Does each indicator display an off to on condition? System OK Go to step 2
When all diagnosis and repairs are completed, clear all DTCs and check the system for correct operation.
10.2 Warning Signal and Status Indicators Diagnostics
Circuit Description
The powertrain interface module (PIM) is connected to the instrument cluster by a series of hard wired connections to
illuminate the appropriate warnings and indicators within the instrument cluster. Some of these components do not set a
DTC, in the event of a component failure. The following diagnostic procedures are devised to assist in these cases.
Additional Information
• Refer to 7.2 Diagnostic System Check to monitor DTC’s.
• Refer to 8A Electrical Body and Chassis for the following information:
• Automatic transmission PRND32L switch and wiring,
• TCM wiring diagram.
• Refer to 6 W iring Diagram and Connector Chart for the following information:
• PIM connector illustration and terminal assignment, and
• PIM wiring diagram.
• For intermittent faults, refer to Intermittent Fault Conditions.
• Check for an intermittent fault in the wiring harness or connectors, if a fault cannot be found the system is
serviceable.
Test Description
The following numbers refer to the step numbers in the diagnostic table:
1 This step tests for DTC’s in the overall system.
2 This step manually tests the warning indicators.
5 This step uses Tech 2 to drive each status indicator on.
6 This step uses Tech 2 to drive each warning indicator on.
9 This step tests the wiring harness between the PIM and the Instrument Cluster.
BACK TO CHAPTER INDEX
TO MODEL INDEX
ISUZU KB P190 2007
Page 3727 of 6020
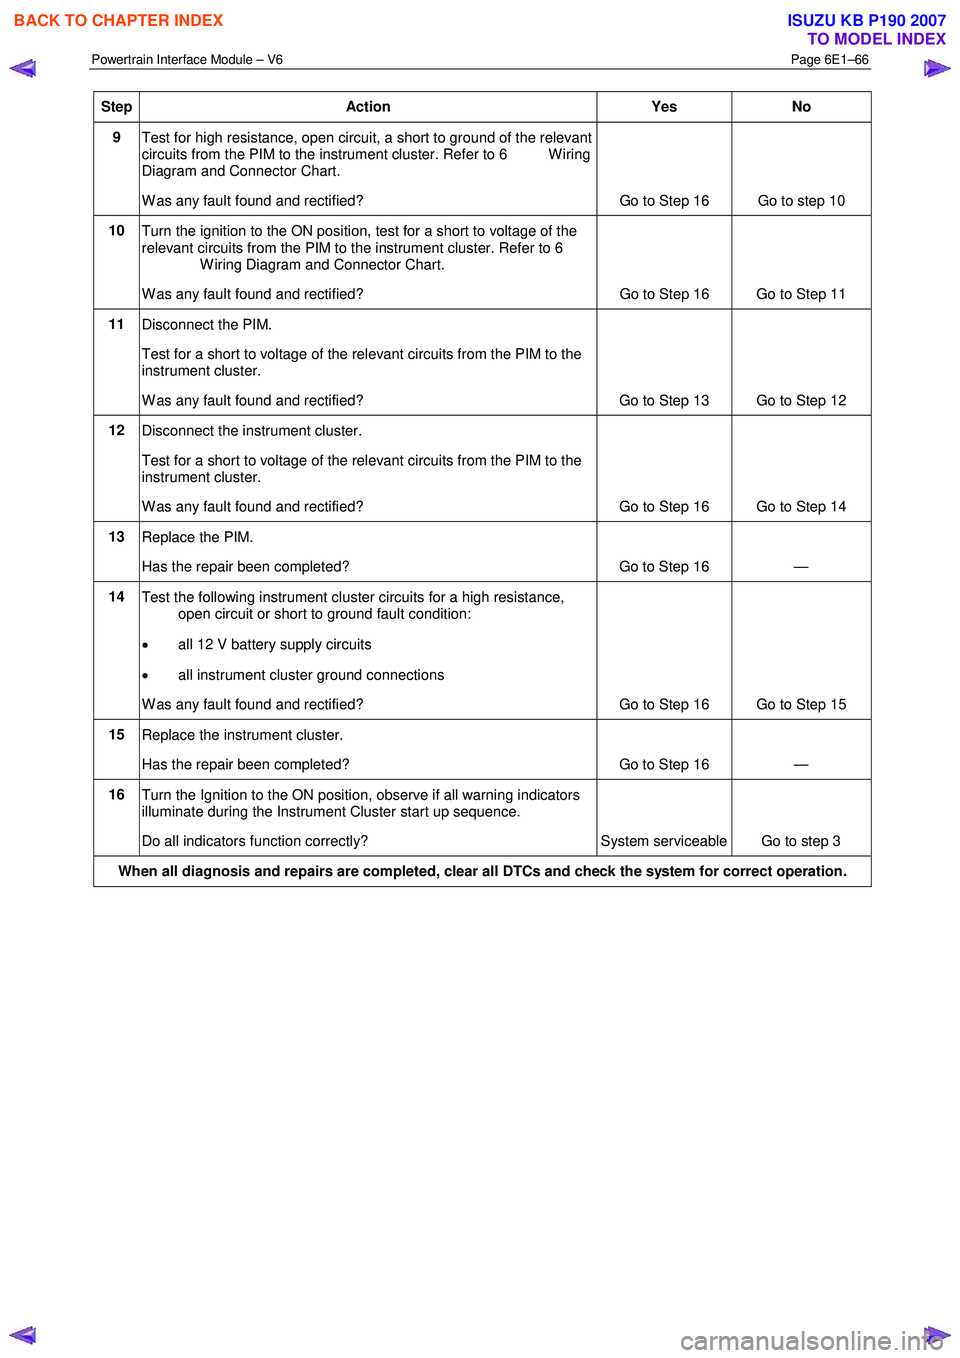
Powertrain Interface Module – V6 Page 6E1–66
Step Action Yes No
9
Test for high resistance, open circuit, a short to ground of the relevant
circuits from the PIM to the instrument cluster. Refer to 6 W iring
Diagram and Connector Chart.
W as any fault found and rectified? Go to Step 16 Go to step 10
10
Turn the ignition to the ON position, test for a short to voltage of the
relevant circuits from the PIM to the instrument cluster. Refer to 6
W iring Diagram and Connector Chart.
W as any fault found and rectified? Go to Step 16 Go to Step 11
11
Disconnect the PIM.
Test for a short to voltage of the relevant circuits from the PIM to the
instrument cluster.
W as any fault found and rectified? Go to Step 13 Go to Step 12
12 Disconnect the instrument cluster.
Test for a short to voltage of the relevant circuits from the PIM to the
instrument cluster.
W as any fault found and rectified? Go to Step 16 Go to Step 14
13 Replace the PIM.
Has the repair been completed? Go to Step 16 —
14 Test the following instrument cluster circuits for a high resistance,
open circuit or short to ground fault condition:
• all 12 V battery supply circuits
• all instrument cluster ground connections
W as any fault found and rectified? Go to Step 16 Go to Step 15
15 Replace the instrument cluster.
Has the repair been completed? Go to Step 16 —
16 Turn the Ignition to the ON position, observe if all warning indicators
illuminate during the Instrument Cluster start up sequence.
Do all indicators function correctly? System serviceable Go to step 3
When all diagnosis and repairs are completed, clear all DTCs and check the system for correct operation.
BACK TO CHAPTER INDEX
TO MODEL INDEX
ISUZU KB P190 2007
Page 3729 of 6020

Powertrain Interface Module – V6 Page 6E1–68
4
Test for high resistance, open circuit, a short to ground of the relevant
circuits from the PIM to the instrument cluster. Refer to 6 W iring
Diagram and Connector Chart.
W as any fault found and rectified? Go to Step 10 Go to Step 5
5
Turn the ignition to the ON position, test for a short to voltage of the
relevant circuits from the PIM to the instrument cluster. Refer to 6
W iring Diagram and Connector Chart.
W as any fault found and rectified? Go to Step 10 Go to Step 6
6
Measure the frequency at the tachometer signal output from the ECM,
refer to 8A Electrical Body and Chassis.
Is the tachometer frequency present? Go to Step 7 Refer to
6C1-2 Engine Management
Diagnostics
7 Replace the PIM.
Has the repair been completed? Go to Step 10 —
8 Test the following instrument cluster circuits for a high resistance,
open circuit or short to ground fault condition:
• all 12 V battery supply circuits
• all instrument cluster ground connections
W as any fault found and rectified? Go to Step 10 Go to Step 9
9 Replace the instrument cluster.
Has the repair been completed? Go to Step 10 —
10 Start the vehicles engine.
Does the tachometer function normally? System OK Go to Step 2
When all diagnosis and repairs are completed, clear all DTCs and check the system for correct operation.
BACK TO CHAPTER INDEX
TO MODEL INDEX
ISUZU KB P190 2007
Page 3731 of 6020
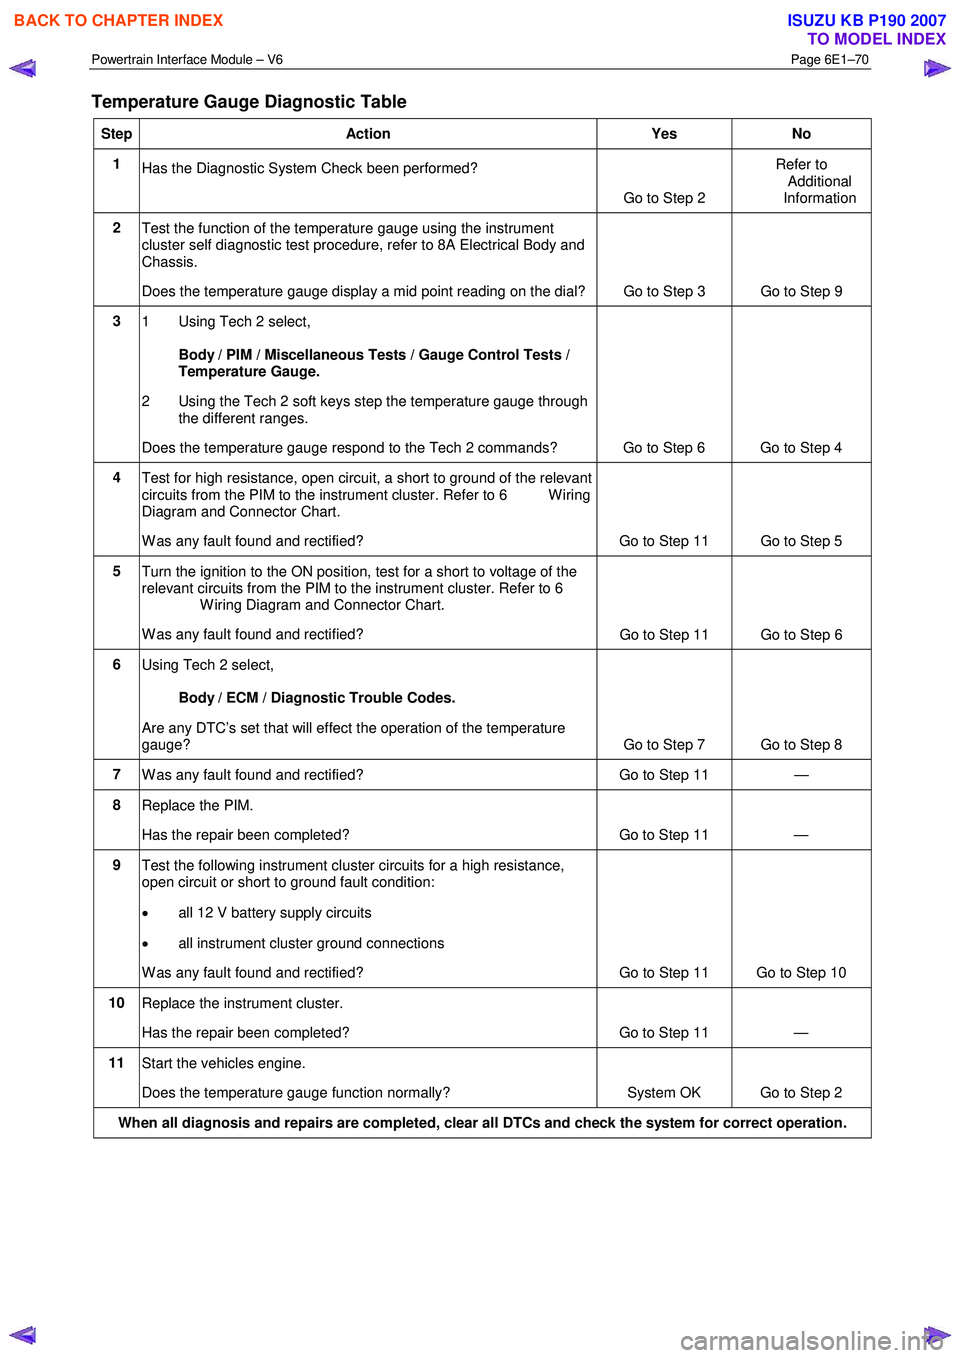
Powertrain Interface Module – V6 Page 6E1–70
Temperature Gauge Diagnostic Table
Step Action Yes No
1
Has the Diagnostic System Check been performed?
Go to Step 2 Refer to
Additional
Information
2 Test the function of the temperature gauge using the instrument
cluster self diagnostic test procedure, refer to 8A Electrical Body and
Chassis.
Does the temperature gauge display a mid point reading on the dial? Go to Step 3 Go to Step 9
3
1 Using Tech 2 select,
Body / PIM / Miscellaneous Tests / Gauge Control Tests /
Temperature Gauge.
2 Using the Tech 2 soft keys step the temperature gauge through the different ranges.
Does the temperature gauge respond to the Tech 2 commands? Go to Step 6 Go to Step 4
4 Test for high resistance, open circuit, a short to ground of the relevant
circuits from the PIM to the instrument cluster. Refer to 6 W iring
Diagram and Connector Chart.
W as any fault found and rectified? Go to Step 11 Go to Step 5
5 Turn the ignition to the ON position, test for a short to voltage of the
relevant circuits from the PIM to the instrument cluster. Refer to 6
W iring Diagram and Connector Chart.
W as any fault found and rectified? Go to Step 11 Go to Step 6
6
Using Tech 2 select,
Body / ECM / Diagnostic Trouble Codes.
Are any DTC’s set that will effect the operation of the temperature
gauge? Go to Step 7 Go to Step 8
7 W as any fault found and rectified? Go to Step 11 —
8 Replace the PIM.
Has the repair been completed? Go to Step 11 —
9 Test the following instrument cluster circuits for a high resistance,
open circuit or short to ground fault condition:
• all 12 V battery supply circuits
• all instrument cluster ground connections
W as any fault found and rectified? Go to Step 11 Go to Step 10
10 Replace the instrument cluster.
Has the repair been completed? Go to Step 11 —
11 Start the vehicles engine.
Does the temperature gauge function normally? System OK Go to Step 2
When all diagnosis and repairs are completed, clear all DTCs and check the system for correct operation.
BACK TO CHAPTER INDEX
TO MODEL INDEX
ISUZU KB P190 2007
Page 3740 of 6020
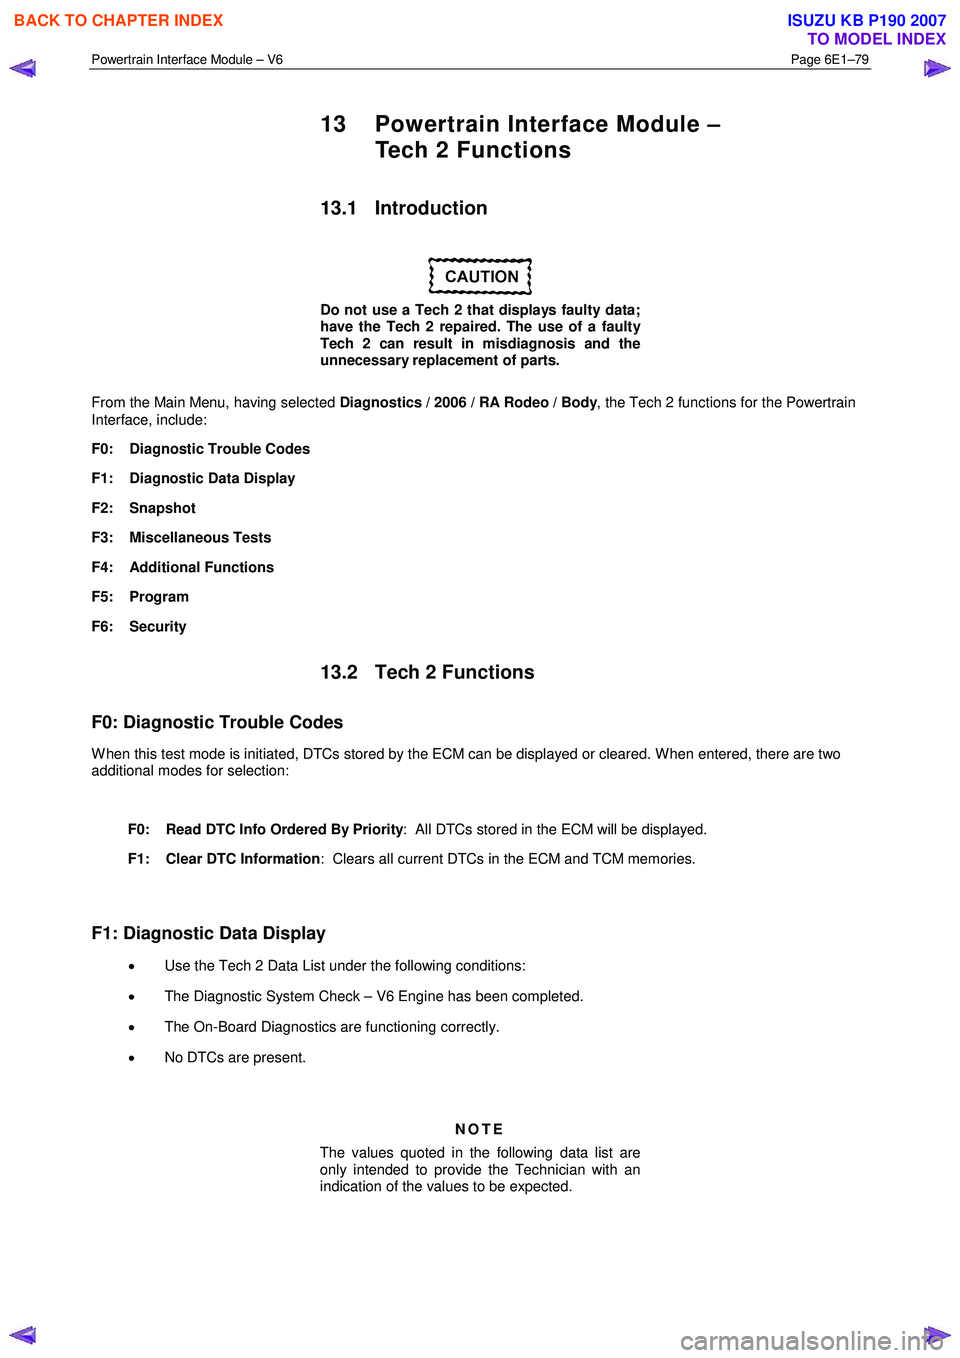
Powertrain Interface Module – V6 Page 6E1–79
13 Powertrain Interface Module –
Tech 2 Functions
13.1 Introduction
Do not use a Tech 2 that displays faulty data;
have the Tech 2 repaired. The use of a faulty
Tech 2 can result in misdiagnosis and the
unnecessary replacement of parts.
From the Main Menu, having selected Diagnostics / 2006 / RA Rodeo / Body , the Tech 2 functions for the Powertrain
Interface, include:
F0: Diagnostic Trouble Codes
F1: Diagnostic Data Display
F2: Snapshot
F3: Miscellaneous Tests
F4: Additional Functions
F5: Program
F6: Security
13.2 Tech 2 Functions
F0: Diagnostic Trouble Codes
W hen this test mode is initiated, DTCs stored by the ECM can be displayed or cleared. W hen entered, there are two
additional modes for selection:
F0: Read DTC Info Ordered By Priority : All DTCs stored in the ECM will be displayed.
F1: Clear DTC Information : Clears all current DTCs in the ECM and TCM memories.
F1: Diagnostic Data Display
• Use the Tech 2 Data List under the following conditions:
• The Diagnostic System Check – V6 Engine has been completed.
• The On-Board Diagnostics are functioning correctly.
• No DTCs are present.
NOTE
The values quoted in the following data list are
only intended to provide the Technician with an
indication of the values to be expected.
BACK TO CHAPTER INDEX
TO MODEL INDEX
ISUZU KB P190 2007