2007 ISUZU KB P190 cooling
[x] Cancel search: coolingPage 1481 of 6020
ENGINE MECHANICAL (4JK1/4JJ1) 6A-121
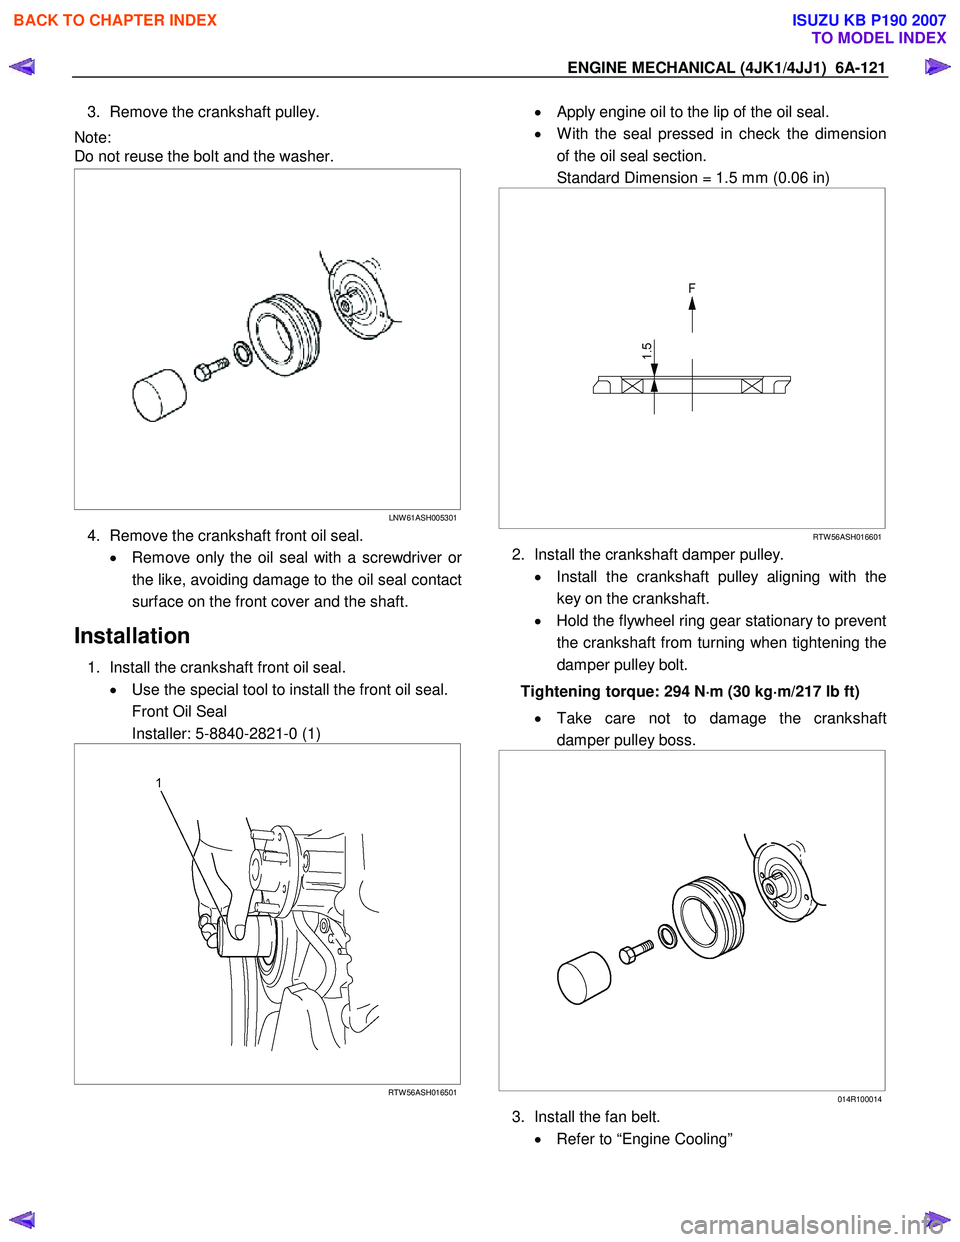
3. Remove the crankshaft pulley.
Note:
Do not reuse the bolt and the washer.
LNW 61ASH005301
4. Remove the crankshaft front oil seal.
• Remove only the oil seal with a screwdriver o
r
the like, avoiding damage to the oil seal contact
surface on the front cover and the shaft.
Installation
1. Install the crankshaft front oil seal. • Use the special tool to install the front oil seal.
Front Oil Seal
Installer: 5-8840-2821-0 (1)
RTW 56ASH016501
• Apply engine oil to the lip of the oil seal.
• W ith the seal pressed in check the dimension
of the oil seal section.
Standard Dimension = 1.5 mm (0.06 in)
RTW 56ASH016601
2. Install the crankshaft damper pulley.
• Install the crankshaft pulley aligning with the
key on the crankshaft.
• Hold the flywheel ring gear stationary to prevent
the crankshaft from turning when tightening the
damper pulley bolt.
Tightening torque: 294 N ⋅
⋅⋅
⋅
m (30 kg ⋅
⋅⋅
⋅
m/217 lb ft)
• Take care not to damage the crankshaft
damper pulley boss.
014R100014
3. Install the fan belt.
• Refer to “Engine Cooling”
BACK TO CHAPTER INDEX
TO MODEL INDEX
ISUZU KB P190 2007
Page 1487 of 6020
ENGINE MECHANICAL (4JK1/4JJ1) 6A-127
Removal
1. Demount the engine assembly.
Refer to "Engine Assembly".
2. Remove the cylinder head cover.
Refer to "Cylinder Head Cover".
3. Remove the camshaft.
Refer to "Camshaft Assembly".
4. Remove the cylinder head.
Refer to "Cylinder Head".
5. Remove the fuel supply pump and fuel rail.
Refer to "Fuel Supply Pump" and "Fuel Rail" in the fuel system section.
6. Remove the front cover.
Refer to "Front Cover".
7. Remove the crankshaft rear oil seal.
Refer to "Crankshaft Rear Oil Seal".
8. Remove the water pump.
Refer to "W ater Pump" in Cooling System Section.
9. Remove the timing gear train.
Refer to "Timing Gear Train".
10.Remove the oil pump.
Refer to "Oil Pump".
11. Remove the gear case assembly.
Refer to “Gear Case Assembly”.
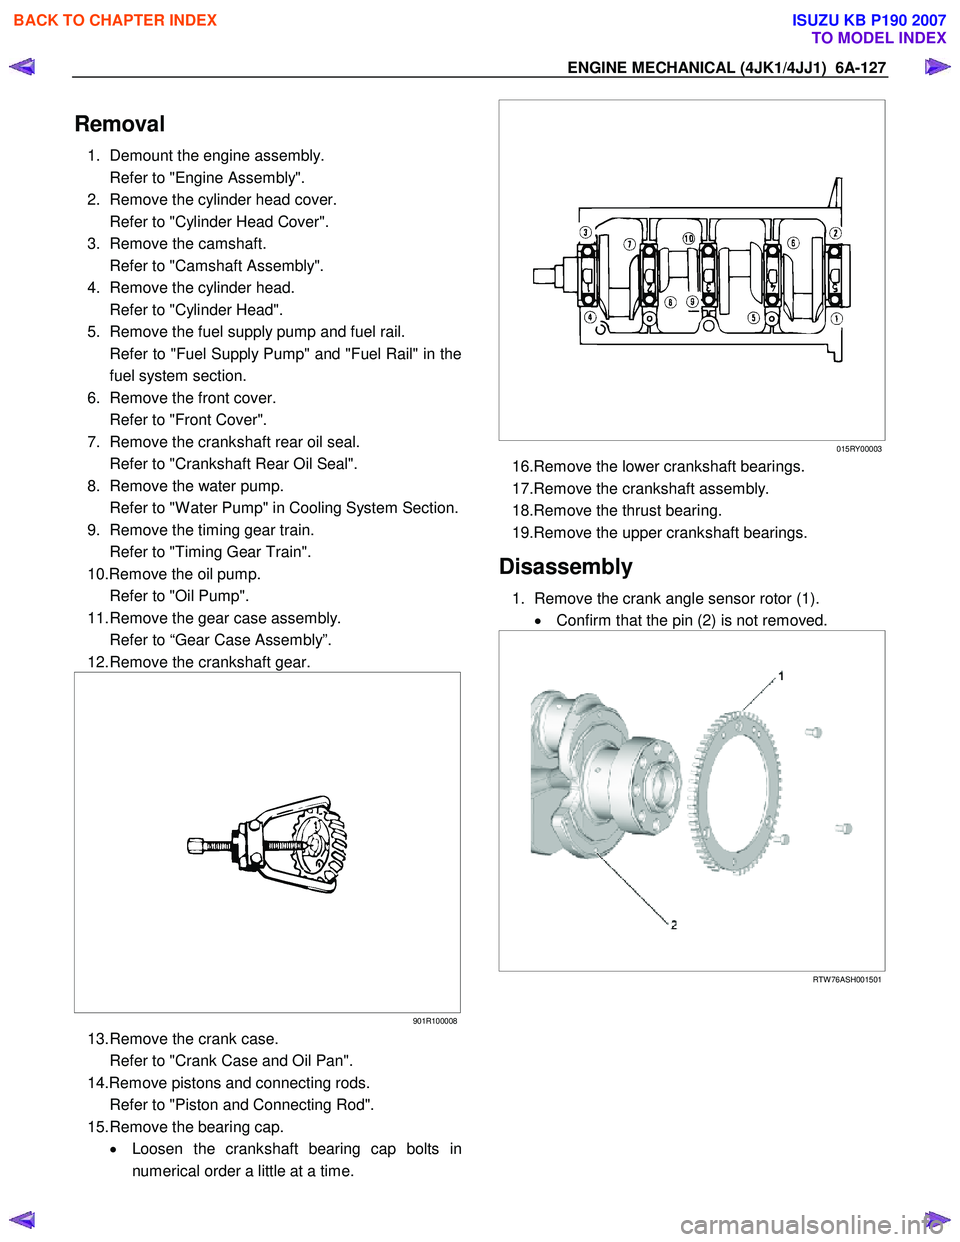
12. Remove the crankshaft gear.
901R100008
13. Remove the crank case.
Refer to "Crank Case and Oil Pan".
14.Remove pistons and connecting rods.
Refer to "Piston and Connecting Rod".
15. Remove the bearing cap. • Loosen the crankshaft bearing cap bolts in
numerical order a little at a time.
015RY00003
16.Remove the lower crankshaft bearings.
17.Remove the crankshaft assembly.
18.Remove the thrust bearing.
19.Remove the upper crankshaft bearings.
Disassembly
1. Remove the crank angle sensor rotor (1). • Confirm that the pin (2) is not removed.
RTW 76ASH001501
BACK TO CHAPTER INDEX
TO MODEL INDEX
ISUZU KB P190 2007
Page 1494 of 6020
6A-134 ENGINE MECHANICAL (4JK1/4JJ1)
7. Install the crank case.
Refer to "Crank Case and Oil Pan".
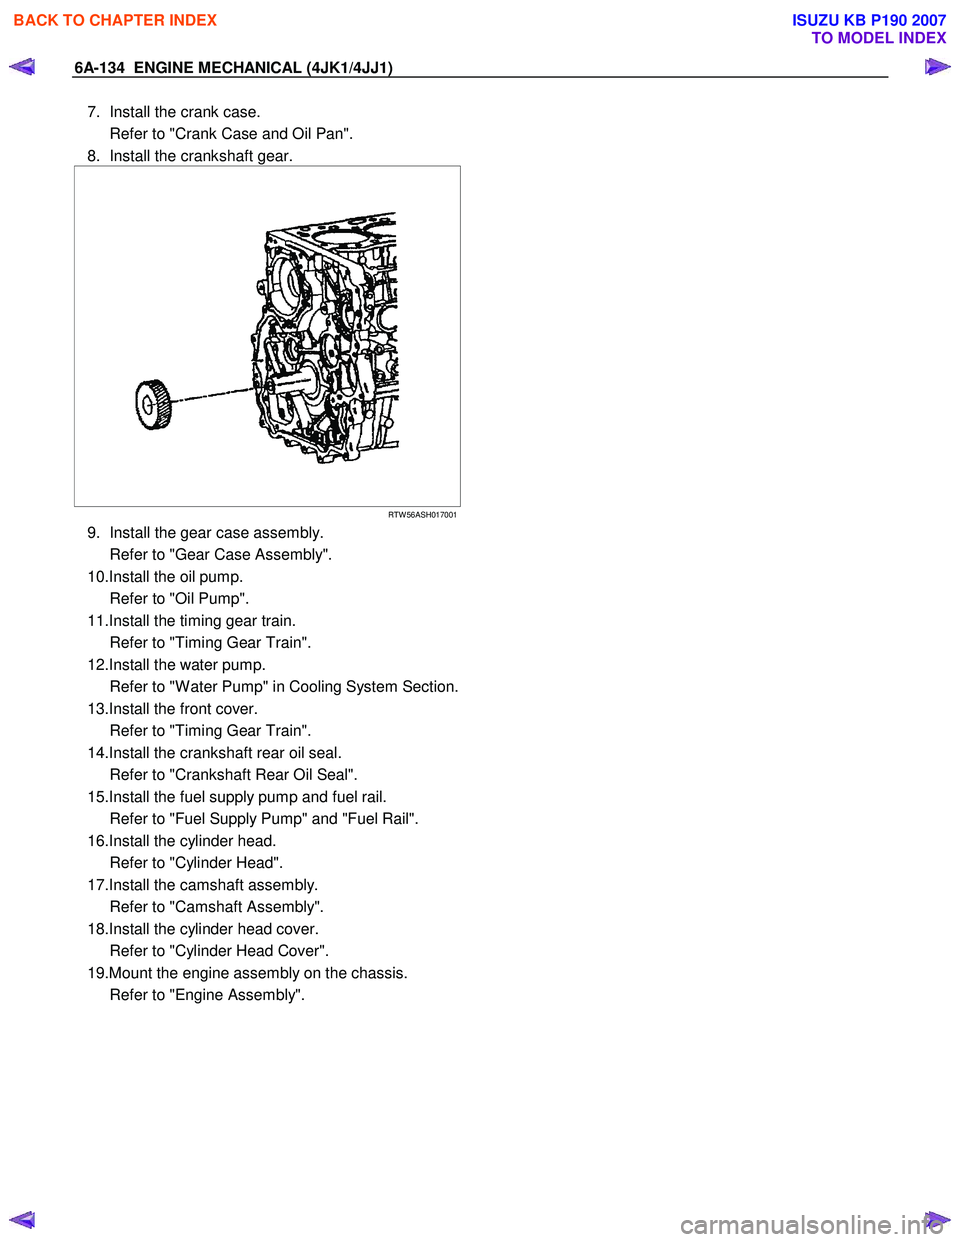
8. Install the crankshaft gear.
RTW 56ASH017001
9. Install the gear case assembly.
Refer to "Gear Case Assembly".
10.Install the oil pump.
Refer to "Oil Pump".
11.Install the timing gear train.
Refer to "Timing Gear Train".
12.Install the water pump.
Refer to "W ater Pump" in Cooling System Section.
13.Install the front cover.
Refer to "Timing Gear Train".
14.Install the crankshaft rear oil seal.
Refer to "Crankshaft Rear Oil Seal".
15.Install the fuel supply pump and fuel rail.
Refer to "Fuel Supply Pump" and "Fuel Rail".
16.Install the cylinder head.
Refer to "Cylinder Head".
17.Install the camshaft assembly.
Refer to "Camshaft Assembly".
18.Install the cylinder head cover.
Refer to "Cylinder Head Cover".
19.Mount the engine assembly on the chassis.
Refer to "Engine Assembly".
BACK TO CHAPTER INDEX
TO MODEL INDEX
ISUZU KB P190 2007
Page 1496 of 6020
6A-136 ENGINE MECHANICAL (4JK1/4JJ1)
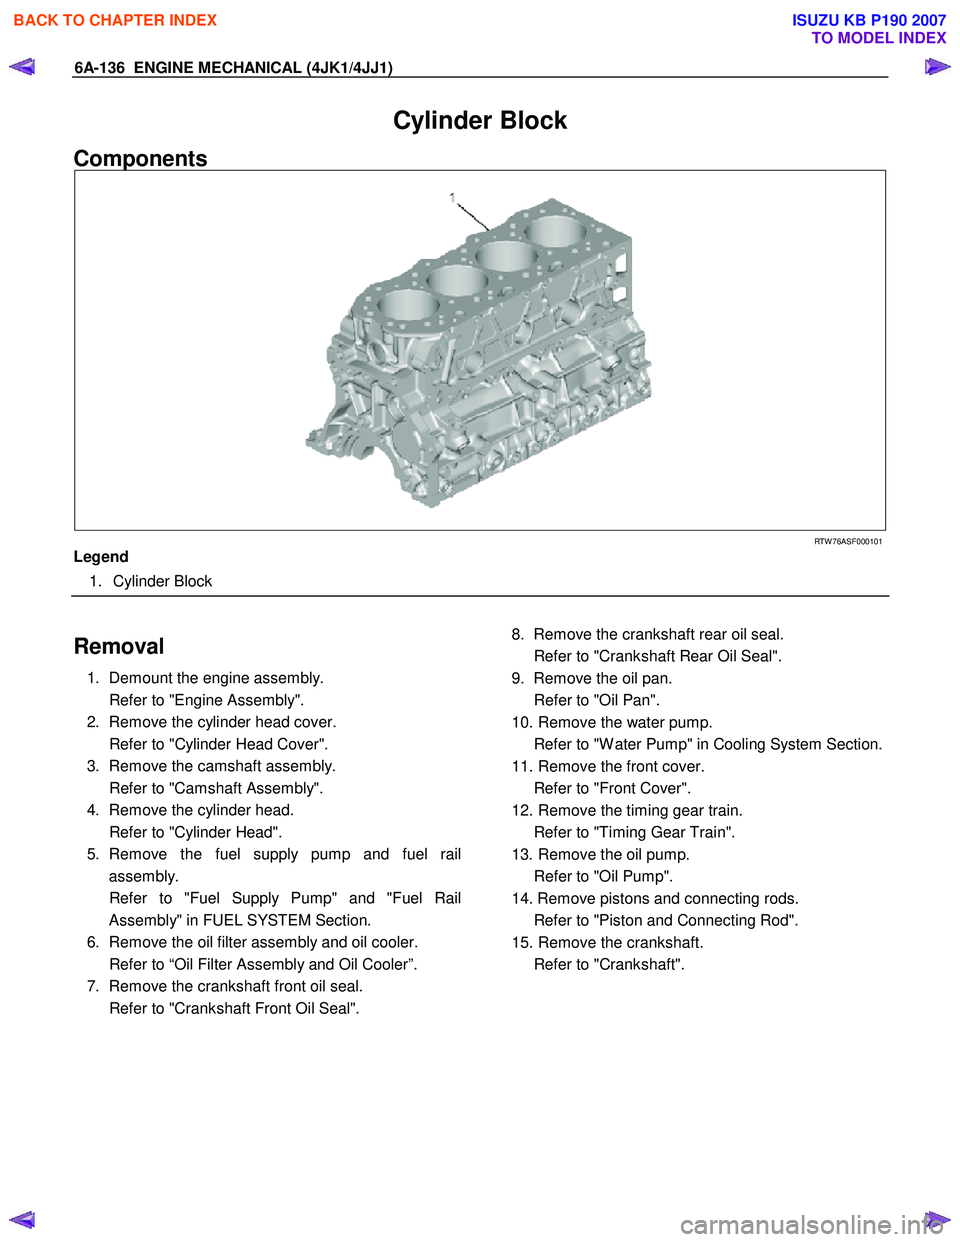
Cylinder Block
Components
RTW 76ASF000101
Legend
1. Cylinder Block
Removal
1. Demount the engine assembly.
Refer to "Engine Assembly".
2. Remove the cylinder head cover.
Refer to "Cylinder Head Cover".
3. Remove the camshaft assembly.
Refer to "Camshaft Assembly".
4. Remove the cylinder head.
Refer to "Cylinder Head".
5. Remove the fuel supply pump and fuel rail assembly.
Refer to "Fuel Supply Pump" and "Fuel Rail Assembly" in FUEL SYSTEM Section.
6. Remove the oil filter assembly and oil cooler.
Refer to “Oil Filter Assembly and Oil Cooler”.
7. Remove the crankshaft front oil seal.
Refer to "Crankshaft Front Oil Seal".
8. Remove the crankshaft rear oil seal.
Refer to "Crankshaft Rear Oil Seal".
9. Remove the oil pan.
Refer to "Oil Pan".
10. Remove the water pump.
Refer to "W ater Pump" in Cooling System Section.
11. Remove the front cover.
Refer to "Front Cover".
12. Remove the timing gear train.
Refer to "Timing Gear Train".
13. Remove the oil pump.
Refer to "Oil Pump".
14. Remove pistons and connecting rods.
Refer to "Piston and Connecting Rod".
15. Remove the crankshaft.
Refer to "Crankshaft".
BACK TO CHAPTER INDEX
TO MODEL INDEX
ISUZU KB P190 2007
Page 1497 of 6020
ENGINE MECHANICAL (4JK1/4JJ1) 6A-137
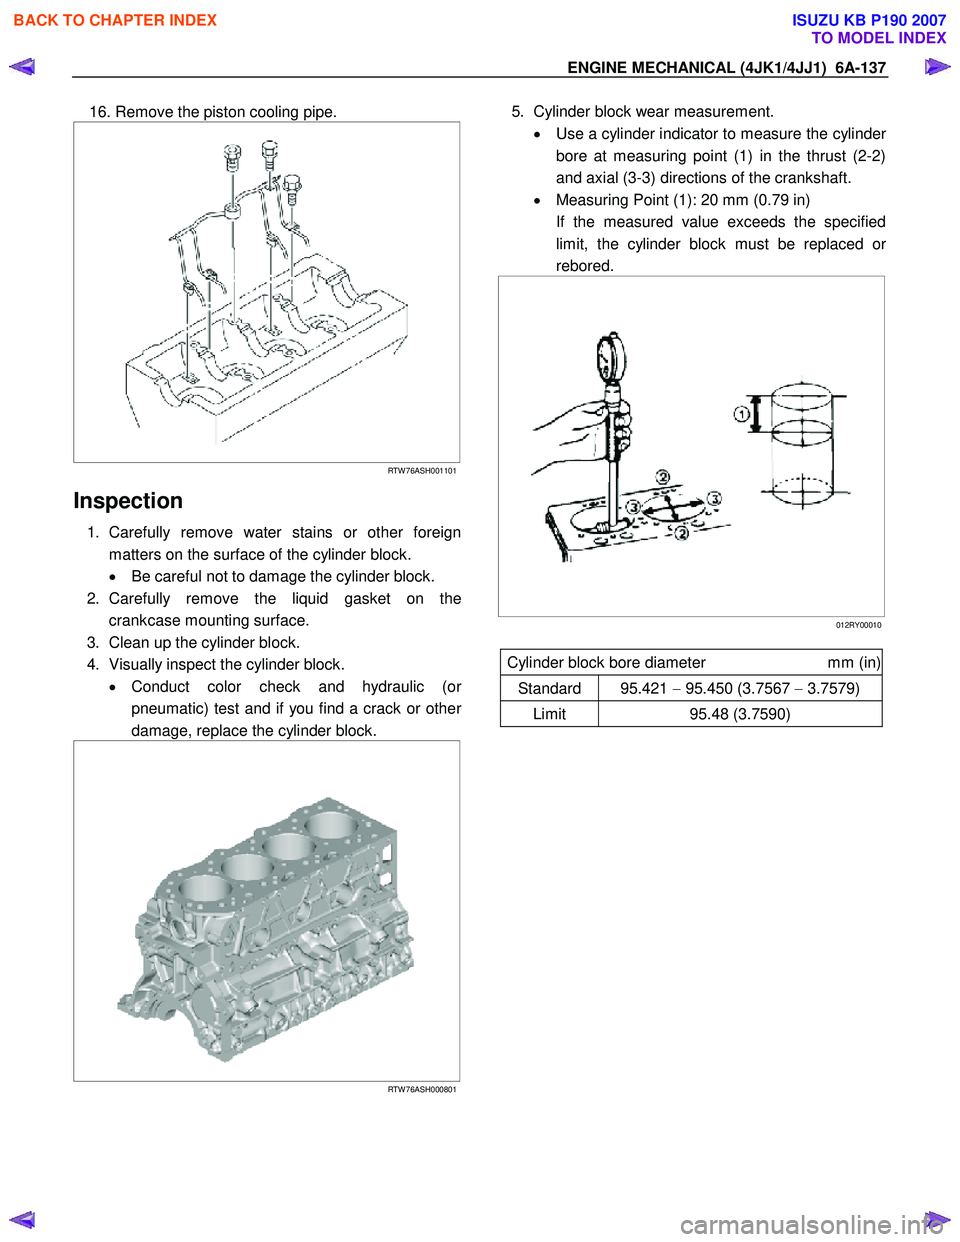
16. Remove the piston cooling pipe.
RTW 76ASH001101
Inspection
1. Carefully remove water stains or other foreign
matters on the surface of the cylinder block.
• Be careful not to damage the cylinder block.
2. Carefully remove the liquid gasket on the crankcase mounting surface.
3. Clean up the cylinder block.
4. Visually inspect the cylinder block. • Conduct color check and hydraulic (o
r
pneumatic) test and if you find a crack or other
damage, replace the cylinder block.
RTW 76ASH000801
5. Cylinder block wear measurement.
• Use a cylinder indicator to measure the cylinde
r
bore at measuring point (1) in the thrust (2-2)
and axial (3-3) directions of the crankshaft.
• Measuring Point (1): 20 mm (0.79 in)
If the measured value exceeds the specified limit, the cylinder block must be replaced o
r
rebored.
012RY00010
Cylinder block bore diameter mm (in)
Standard 95.421 − 95.450 (3.7567 − 3.7579)
Limit 95.48 (3.7590)
BACK TO CHAPTER INDEX
TO MODEL INDEX
ISUZU KB P190 2007
Page 1499 of 6020
ENGINE MECHANICAL (4JK1/4JJ1) 6A-139
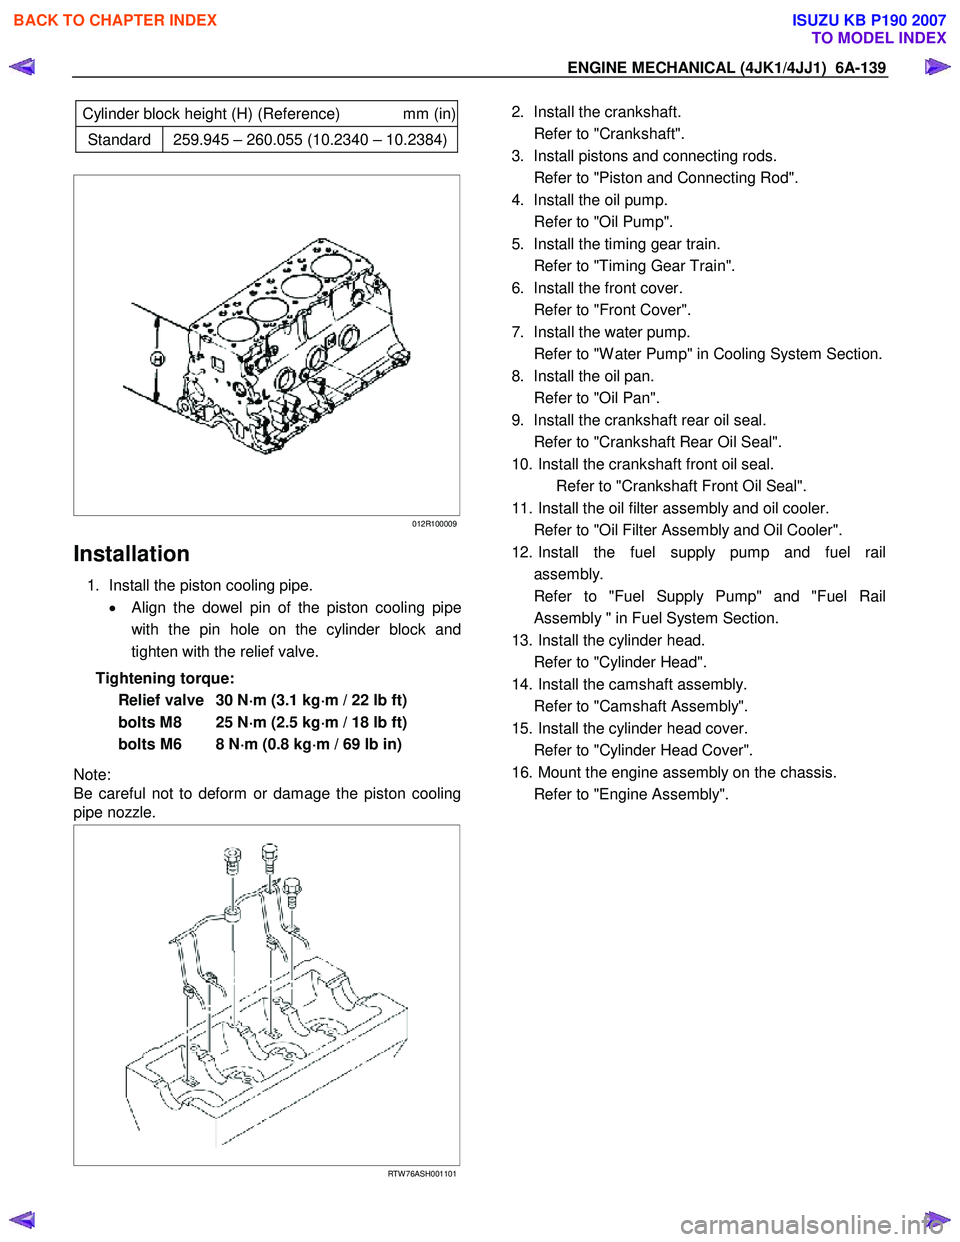
Cylinder block height (H) (Reference) mm (in)
Standard 259.945 – 260.055 (10.2340 – 10.2384)
012R100009
Installation
1. Install the piston cooling pipe.
• Align the dowel pin of the piston cooling pipe
with the pin hole on the cylinder block and
tighten with the relief valve.
Tightening torque: Relief valve 30 N ⋅
⋅⋅
⋅
m (3.1 kg ⋅
⋅⋅
⋅
m / 22 lb ft)
bolts M8 25 N ⋅
⋅⋅
⋅
m (2.5 kg ⋅
⋅⋅
⋅
m / 18 lb ft)
bolts M6 8 N ⋅
⋅⋅
⋅
m (0.8 kg ⋅
⋅⋅
⋅
m / 69 lb in)
Note:
Be careful not to deform or damage the piston cooling
pipe nozzle.
RTW 76ASH001101
2. Install the crankshaft.
Refer to "Crankshaft".
3. Install pistons and connecting rods.
Refer to "Piston and Connecting Rod".
4. Install the oil pump.
Refer to "Oil Pump".
5. Install the timing gear train.
Refer to "Timing Gear Train".
6. Install the front cover.
Refer to "Front Cover".
7. Install the water pump.
Refer to "W ater Pump" in Cooling System Section.
8. Install the oil pan.
Refer to "Oil Pan".
9. Install the crankshaft rear oil seal.
Refer to "Crankshaft Rear Oil Seal".
10. Install the crankshaft front oil seal. Refer to "Crankshaft Front Oil Seal".
11. Install the oil filter assembly and oil cooler.
Refer to "Oil Filter Assembly and Oil Cooler".
12. Install the fuel supply pump and fuel rail assembly.
Refer to "Fuel Supply Pump" and "Fuel Rail Assembly " in Fuel System Section.
13. Install the cylinder head.
Refer to "Cylinder Head".
14. Install the camshaft assembly.
Refer to "Camshaft Assembly".
15. Install the cylinder head cover.
Refer to "Cylinder Head Cover".
16. Mount the engine assembly on the chassis.
Refer to "Engine Assembly".
BACK TO CHAPTER INDEX
TO MODEL INDEX
ISUZU KB P190 2007
Page 1500 of 6020
6A-140 ENGINE MECHANICAL (4JK1/4JJ1)
Lubrication System
Service Precautions
• During each disassembly, remove the old gasket
adhering to each part and mating part completel
y
using a scraper at the location, where the fluid
gasket is to be used, clean the traces of oil,
moisture, and dirt completely using waste cotton
and apply the specified new fluid gasket at each
location.
•
Avoid excessive or insufficient coating volume.
Note that seizure may occur in case of excessive
coating due to clogging of the oil gallery and oil jet,
and oil and water leakage may occur if the coating
is insufficient.
• Always, the start and end of the application should
be overlapped.
Explanations on functions and operation
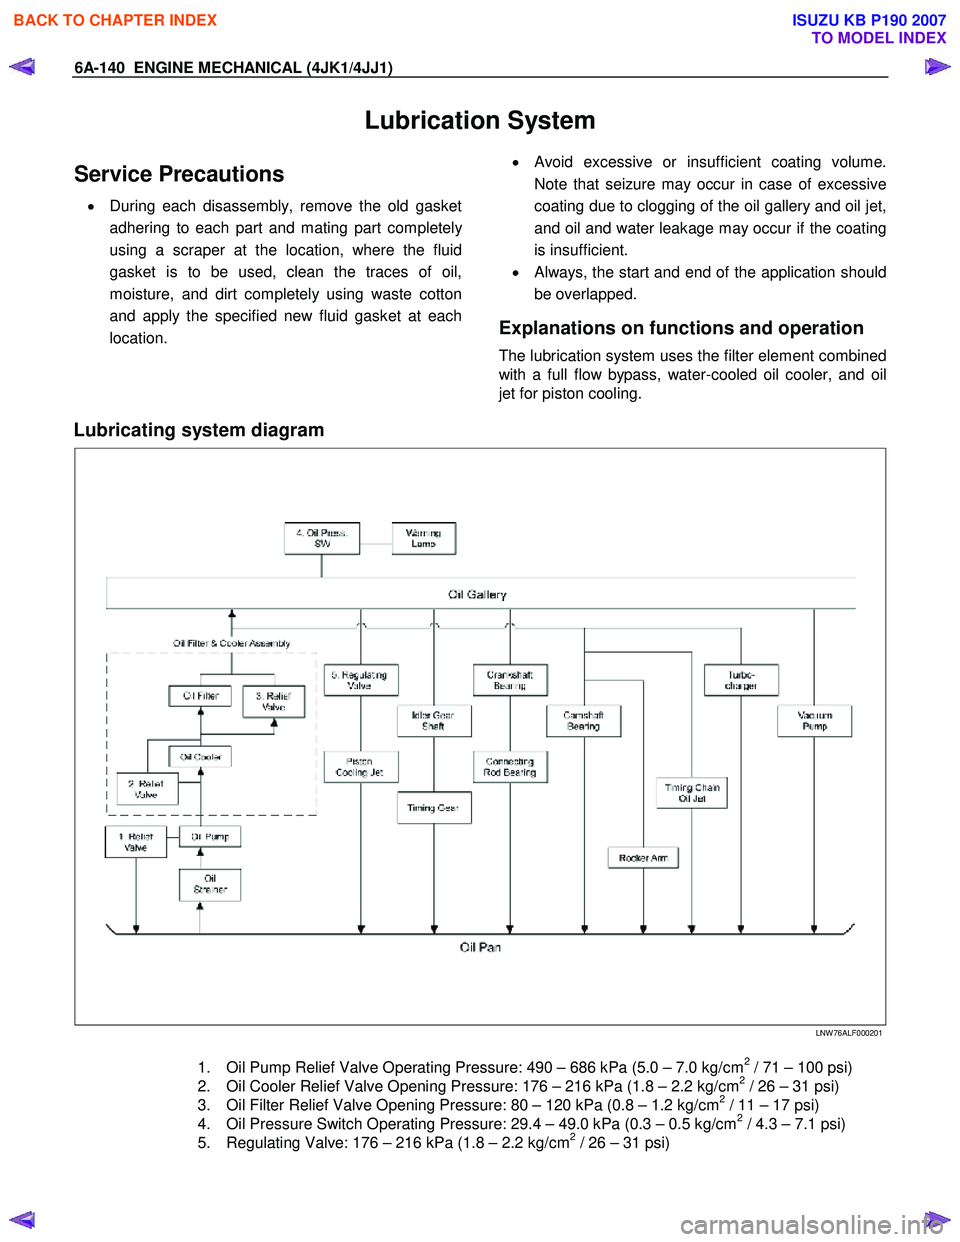
The lubrication system uses the filter element combined
with a full flow bypass, water-cooled oil cooler, and oil
jet for piston cooling.
Lubricating system diagram
LNW 76ALF000201
1. Oil Pump Relief Valve Operating Pressure: 490 – 686 kPa (5.0 – 7.0 kg/cm2 / 71 – 100 psi)
2. Oil Cooler Relief Valve Opening Pressure: 176 – 216 kPa (1.8 – 2.2 kg/cm2 / 26 – 31 psi)
3. Oil Filter Relief Valve Opening Pressure: 80 – 120 kPa (0.8 – 1.2 kg/cm2 / 11 – 17 psi)
4. Oil Pressure Switch Operating Pressure: 29.4 – 49.0 kPa (0.3 – 0.5 kg/cm2 / 4.3 – 7.1 psi)
5. Regulating Valve: 176 – 216 kPa (1.8 – 2.2 kg/cm2 / 26 – 31 psi)
BACK TO CHAPTER INDEX
TO MODEL INDEX
ISUZU KB P190 2007
Page 1524 of 6020
ENGINE COOLING (4JK1/4JJ1) 6B-1
SECTION 6B
ENGINE COOLING
TABLE OF CONTENTS
Main Data and Specifications ............................. 6B-2
General Description............................................ 6B-3 Coolant Flow ................................................... 6B-3
W ater Pump .................................................... 6B-4
Thermostat ...................................................... 6B-4
Radiator ........................................................... 6B-5
Antifreeze Solution .......................................... 6B-5
Diagnosis............................................................ 6B-6
Draining and Refilling Cooling System ............... 6B-7
W ater Pump ....................................................... 6B-8 Removal .......................................................... 6B-8
Inspection and Repair ..................................... 6B-9
Installation ....................................................... 6B-9
Thermostat ......................................................... 6B-11 Removal .......................................................... 6B-11
Inspection and Repair ..................................... 6B-11
Operating Test of Thermostat ......................... 6B-11
Installation ....................................................... 6B-12
Radiator .............................................................. 6B-13 Radiator and Associated Parts........................ 6B-13
Removal .......................................................... 6B-14
Inspection and Repair ..................................... 6B-15
Radiator Cap ................................................... 6B-15
Radiator Core .................................................. 6B-15
Flushing the Radiator ...................................... 6B-15
Cooling System Leakage Check ..................... 6B-15
Installation ....................................................... 6B-16
Engine Coolant Change .................................. 6B-16
Fan Clutch with Cooling Fan .............................. 6B-17 Inspection and Repair ..................................... 6B-17
Special Tools................................................... 6B-18
BACK TO CHAPTER INDEX
TO MODEL INDEX
ISUZU KB P190 2007