Page 2932 of 3061

TF-110
< SERVICE INFORMATION >
TROUBLE DIAGNOSIS FOR SYMPTOMS
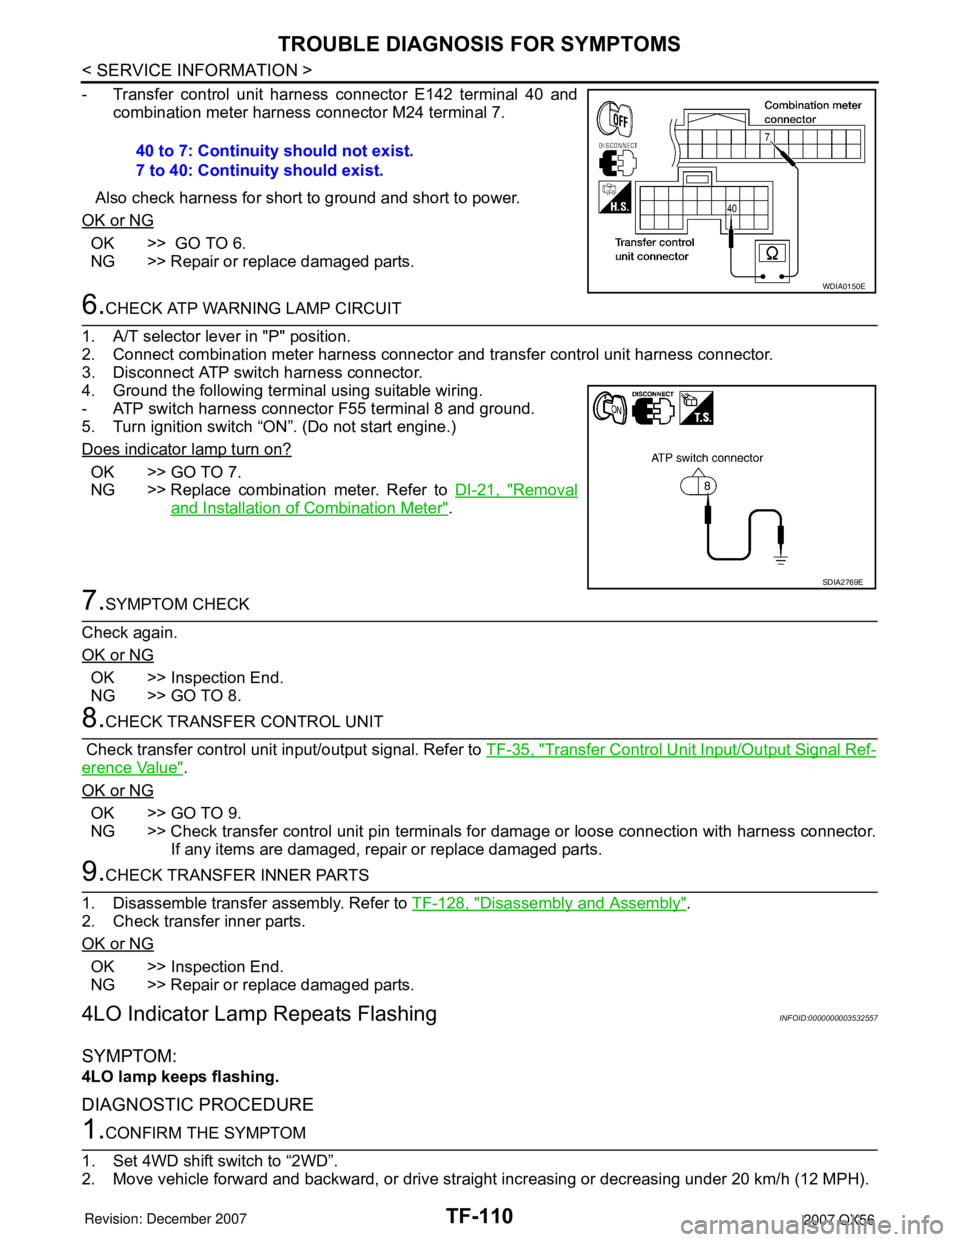
- Transfer control unit harness connector E142 terminal 40 and
combination meter harness connector M24 terminal 7.
Also check harness for short to ground and short to power.
OK or NG
OK >> GO TO 6.
NG >> Repair or replace damaged parts.
6.CHECK ATP WARNING LAMP CIRCUIT
1. A/T selector lever in "P" position.
2. Connect combination meter harness connector and transfer control unit harness connector.
3. Disconnect ATP switch harness connector.
4. Ground the following terminal using suitable wiring.
- ATP switch harness connector F55 terminal 8 and ground.
5. Turn ignition switch “ON”. (Do not start engine.)
Does indicator lamp turn on?
OK >> GO TO 7.
NG >> Replace combination meter. Refer to DI-21, "
Removal
and Installation of Combination Meter".
7.SYMPTOM CHECK
Check again.
OK or NG
OK >> Inspection End.
NG >> GO TO 8.
8.CHECK TRANSFER CONTROL UNIT
Check transfer control unit input/output signal. Refer to TF-35, "
Transfer Control Unit Input/Output Signal Ref-
erence Value".
OK or NG
OK >> GO TO 9.
NG >> Check transfer control unit pin terminals for damage or loose connection with harness connector.
If any items are damaged, repair or replace damaged parts.
9.CHECK TRANSFER INNER PARTS
1. Disassemble transfer assembly. Refer to TF-128, "
Disassembly and Assembly".
2. Check transfer inner parts.
OK or NG
OK >> Inspection End.
NG >> Repair or replace damaged parts.
4LO Indicator Lamp Repeats FlashingINFOID:0000000003532557
SYMPTOM:
4LO lamp keeps flashing.
DIAGNOSTIC PROCEDURE
1.CONFIRM THE SYMPTOM
1. Set 4WD shift switch to “2WD”.
2. Move vehicle forward and backward, or drive straight increasing or decreasing under 20 km/h (12 MPH). 40 to 7: Continuity should not exist.
7 to 40: Continuity should exist.
WDIA0150E
SDIA2769E
Page 2935 of 3061

TROUBLE DIAGNOSIS FOR SYMPTOMS
TF-113
< SERVICE INFORMATION >
C
E
F
G
H
I
J
K
L
MA
B
TF
N
O
P
NG >> GO TO 5.
5.CHECK TRANSFER CONTROL UNIT
Check transfer control unit input/output signal. Refer to TF-35, "
Transfer Control Unit Input/Output Signal Ref-
erence Value".
OK or NG
OK >> Inspection End.
NG >> Check transfer control unit pin terminals for damage or loose connection with harness connector.
If any items are damaged, repair or replace damaged parts.
Heavy Tight-corner Braking Symptom OccursINFOID:0000000003532560
SYMPTOM:
Heavy tight-corner braking symptom occurs when vehicle is driven in AUTO mode and steering wheel
is turned fully to either side.
DIAGNOSTIC PROCEDURE
NOTE:
• Light tight-corner braking symptom may occur depending on driving conditions in AUTO mode. This is not a
malfunction.
• Heavy tight-corner braking symptom occurs when vehicle is driven in the following conditions: 4WD shift
switch is "4H" or "4LO", steering wheel is turned fully to either side.
1.CHECK SYSTEM FOR CAN COMMUNICATION LINE
Perform self-diagnosis. Refer to TF-48, "
Self-Diagnosis Procedure".
Is "CAN COMM CIRCUIT [U1000]" displayed?
YES >> Perform trouble diagnosis for CAN communication line. Refer to TF-99, "CAN Communication
Line" .
NO >> GO TO 2.
2.CHECK SYSTEM FOR 4WD SHIFT SWITCH
Perform trouble diagnosis for 4WD shift switch system. Refer to TF-57, "
4WD Shift Switch".
OK or NG
OK >> GO TO 3.
NG >> Repair or replace damaged parts.
3.CHECK ACCELERATOR PEDAL POSITION SIGNAL CIRCUIT
Perform self diagnosis for ECM. Refer to E C - 111 , "
CONSULT-II Function (ENGINE)".
Is any malfunction deteced by self-diagnosis?
YES >> Check the malfunctioning system.
NO >> GO TO 4.
4.CHECK SYSTEM FOR CLUTCH PRESSURE SOLENOID
Perform trouble diagnosis for clutch pressure solenoid system. Refer toTF-92, "
Clutch Pressure Switch" .
OK or NG
OK >> GO TO 5.
NG >> Repair or replace damaged parts.
5.SYMPTOM CHECK
Check again.
OK or NG
OK >> Inspection End.
NG >> GO TO 6.
6.CHECK TRANSFER CONTROL UNIT
Check transfer control unit input/output signal. Refer to TF-35, "
Transfer Control Unit Input/Output Signal Ref-
erence Value".
OK or NG
Page 2947 of 3061

TRANSFER MOTOR
TF-125
< SERVICE INFORMATION >
C
E
F
G
H
I
J
K
L
MA
B
TF
N
O
P
TRANSFER MOTOR
Removal and InstallationINFOID:0000000003532568
REMOVAL
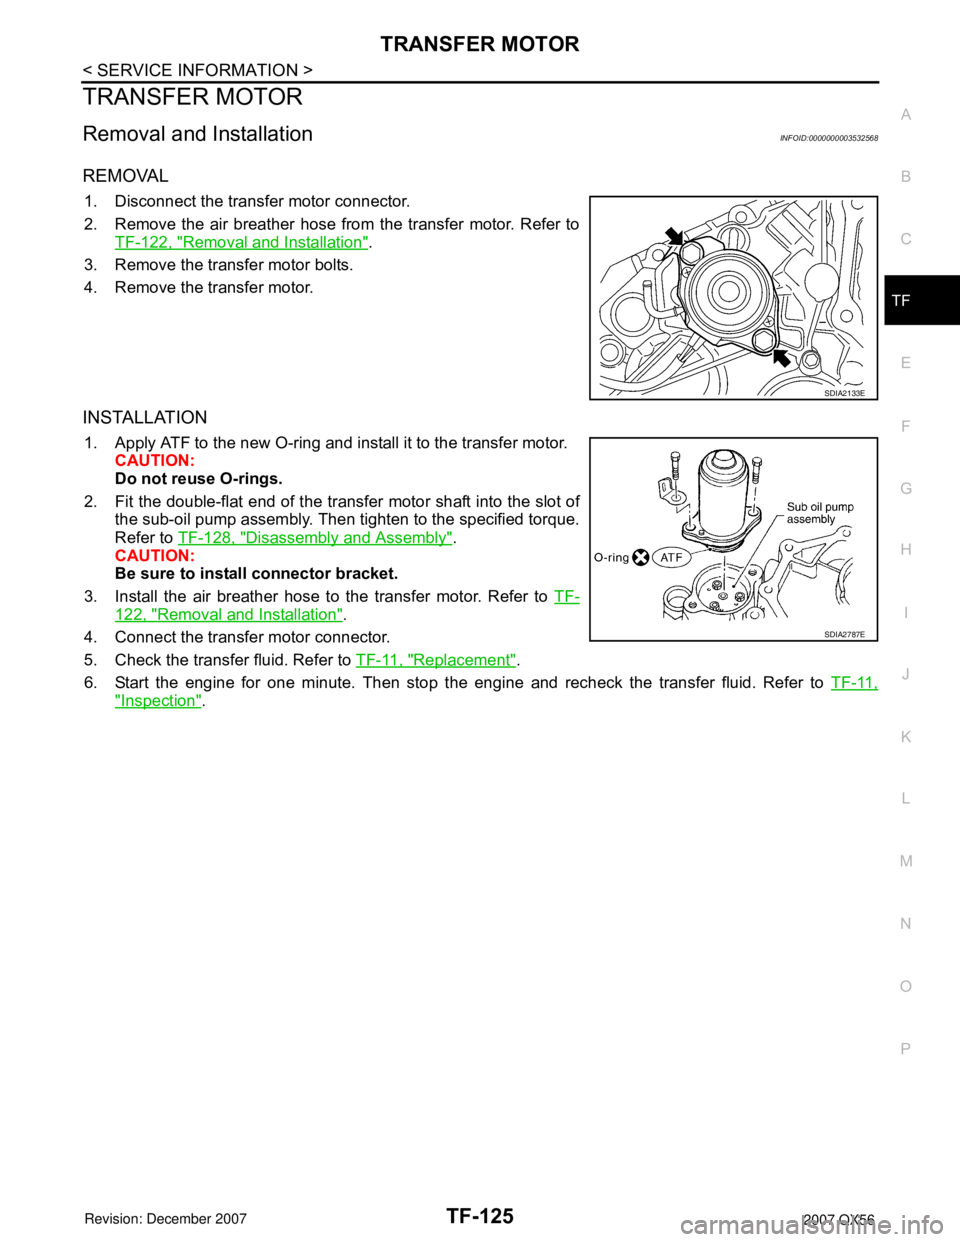
1. Disconnect the transfer motor connector.
2. Remove the air breather hose from the transfer motor. Refer to
TF-122, "
Removal and Installation".
3. Remove the transfer motor bolts.
4. Remove the transfer motor.
INSTALLATION
1. Apply ATF to the new O-ring and install it to the transfer motor.
CAUTION:
Do not reuse O-rings.
2. Fit the double-flat end of the transfer motor shaft into the slot of
the sub-oil pump assembly. Then tighten to the specified torque.
Refer to TF-128, "
Disassembly and Assembly".
CAUTION:
Be sure to install connector bracket.
3. Install the air breather hose to the transfer motor. Refer to TF-
122, "Removal and Installation".
4. Connect the transfer motor connector.
5. Check the transfer fluid. Refer to TF-11, "
Replacement".
6. Start the engine for one minute. Then stop the engine and recheck the transfer fluid. Refer to TF-11,
"Inspection".
SDIA2133E
SDIA2787E
Page 2949 of 3061
TRANSFER OIL FILTER
TF-127
< SERVICE INFORMATION >
C
E
F
G
H
I
J
K
L
MA
B
TF
N
O
P
3. Apply ATF to the two new O-rings (1), and install them on the oil
filter (2).
CAUTION:
Do not reuse O-rings.
4. Install the oil filter to the transfer assembly. Tighten the bolts to
the specified torque. Refer to TF-128, "
Disassembly and
Assembly".
CAUTION:
• Do not damage oil filter.
• Attach oil filter and tighten bolts evenly.
5. Check the transfer fluid. Refer to TF-11
.
6. Start the engine and let it run for one minute. Then stop the
engine and recheck the transfer fluid. Refer to TF-11
.
WDIA0285E
SDIA2136E
Page 2950 of 3061

TF-128
< SERVICE INFORMATION >
TRANSFER ASSEMBLY
TRANSFER ASSEMBLY
Removal and InstallationINFOID:0000000003532570
REMOVAL
1. Remove the drain plug and gasket. Drain the fluid. Refer to TF-11, "Replacement".
2. Remove the A/T undercover using power tool.
3. Remove the center exhaust tube and main muffler. Refer to EX-3, "
Removal and Installation".
4. Remove the front and rear propeller shafts. Refer to PR-4, "
Removal and Installation" (front), PR-8,
"Removal and Installation" (rear).
CAUTION:
Do not damage spline, sleeve yoke and rear oil seal when removing rear propeller shaft.
NOTE:
Insert a plug into the rear oil seal after removing the rear propeller shaft.
5. Remove the A/T nuts from the A/T crossmember.
6. Position two suitable jacks under the A/T and transfer assembly.
7. Remove the crossmember. Refer to AT-223, "
Removal and Installation (2WD)".
WARNING:
Support A/T and transfer assembly using two suitable jacks while removing crossmember.
8. Disconnect the electrical connectors from the following:
•ATP switch
• Neutral 4LO switch
• Wait detection switch
• Transfer motor
• Transfer control device
• Transfer terminal cord assembly
9. Disconnect each air breather hose from the following. Refer to TF-122, "
Removal and Installation".
• Actuator
• Breather tube (transfer)
• Transfer motor (case connector)
10. Remove the transfer control device from the extension housing.
11. Remove the transfer to A/T and A/T to transfer bolts.
WARNING:
Support transfer assembly with suitable jack while removing it.
12. Remove the transfer assembly.
INSTALLATION
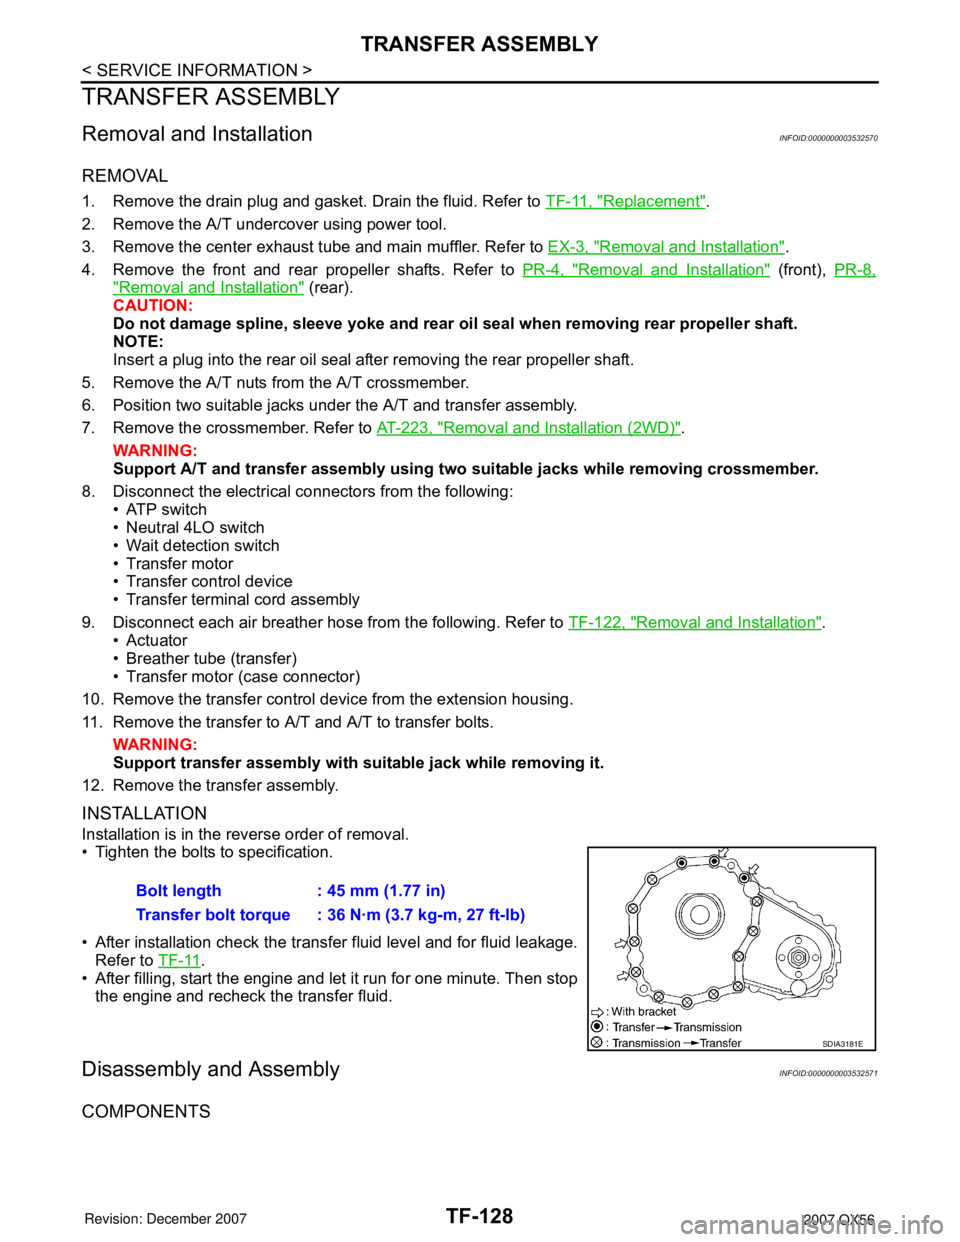
Installation is in the reverse order of removal.
• Tighten the bolts to specification.
• After installation check the transfer fluid level and for fluid leakage.
Refer to TF-11
.
• After filling, start the engine and let it run for one minute. Then stop
the engine and recheck the transfer fluid.
Disassembly and AssemblyINFOID:0000000003532571
COMPONENTS
Bolt length : 45 mm (1.77 in)
Transfer bolt torque : 36 N·m (3.7 kg-m, 27 ft-lb)
SDIA3181E