2007 INFINITI QX56 display
[x] Cancel search: displayPage 2912 of 3061
TF-90
< SERVICE INFORMATION >
TROUBLE DIAGNOSIS FOR SYSTEM
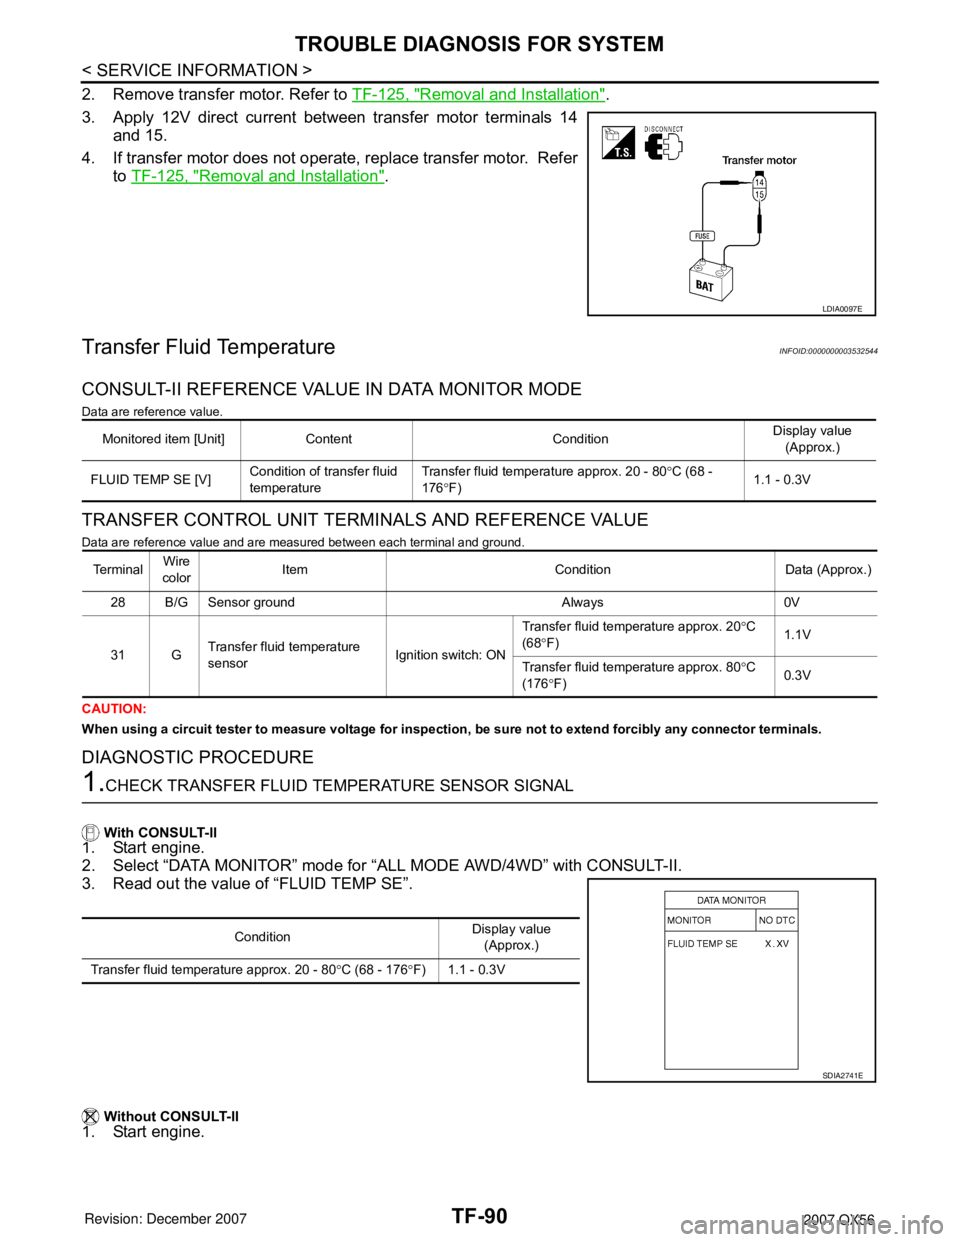
2. Remove transfer motor. Refer to TF-125, "Removal and Installation".
3. Apply 12V direct current between transfer motor terminals 14
and 15.
4. If transfer motor does not operate, replace transfer motor. Refer
to TF-125, "
Removal and Installation".
Transfer Fluid TemperatureINFOID:0000000003532544
CONSULT-II REFERENCE VALUE IN DATA MONITOR MODE
Data are reference value.
TRANSFER CONTROL UNIT TERMINALS AND REFERENCE VALUE
Data are reference value and are measured between each terminal and ground.
CAUTION:
When using a circuit tester to measure voltage for inspection, be sure not to extend forcibly any connector terminals.
DIAGNOSTIC PROCEDURE
1.CHECK TRANSFER FLUID TEMPERATURE SENSOR SIGNAL
With CONSULT-II
1. Start engine.
2. Select “DATA MONITOR” mode for “ALL MODE AWD/4WD” with CONSULT-II.
3. Read out the value of “FLUID TEMP SE”.
Without CONSULT-II
1. Start engine.
LDIA0097E
Monitored item [Unit] Content ConditionDisplay value
(Approx.)
FLUID TEMP SE [V]Condition of transfer fluid
temperatureTransfer fluid temperature approx. 20 - 80°C (68 -
176°F)1.1 - 0.3V
Te r m i n a lWire
colorItem Condition Data (Approx.)
28 B/G Sensor ground Always 0V
31 GTransfer fluid temperature
sensorIgnition switch: ONTransfer fluid temperature approx. 20°C
(68°F)1.1V
Transfer fluid temperature approx. 80°C
(176°F)0.3V
ConditionDisplay value
(Approx.)
Transfer fluid temperature approx. 20 - 80°C (68 - 176°F) 1.1 - 0.3V
SDIA2741E
Page 2914 of 3061
TF-92
< SERVICE INFORMATION >
TROUBLE DIAGNOSIS FOR SYSTEM
Perform the self-diagnosis, after driving a vehicle for a while.
OK or NG
OK >> Inspection End.
NG >> Replace transfer control unit. Refer to TF-115, "
Removal and Installation".
COMPONENT INSPECTION
1. Turn ignition switch “OFF”. (Stay for at least 5 seconds.)
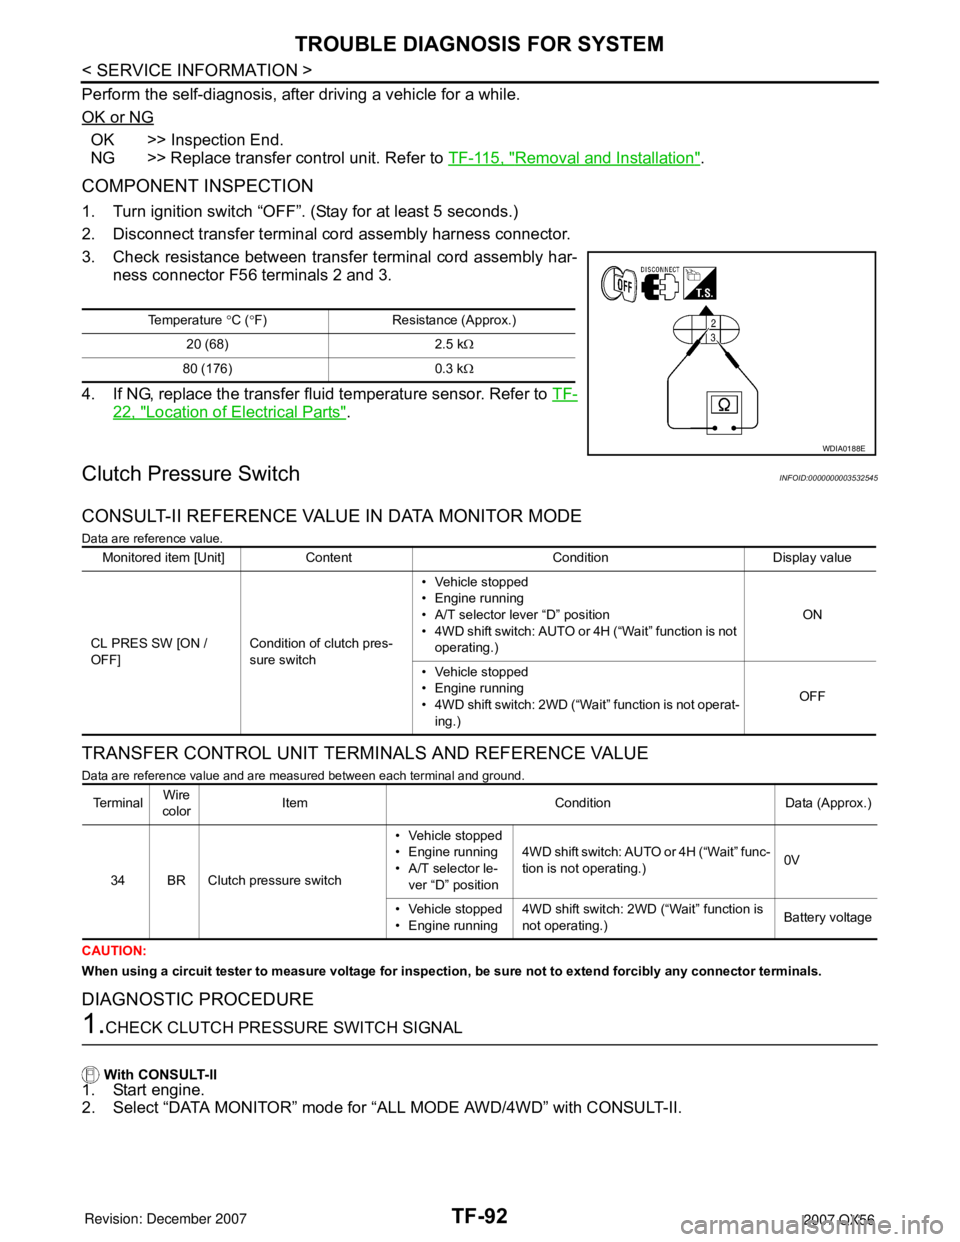
2. Disconnect transfer terminal cord assembly harness connector.
3. Check resistance between transfer terminal cord assembly har-
ness connector F56 terminals 2 and 3.
4. If NG, replace the transfer fluid temperature sensor. Refer to TF-
22, "Location of Electrical Parts".
Clutch Pressure SwitchINFOID:0000000003532545
CONSULT-II REFERENCE VALUE IN DATA MONITOR MODE
Data are reference value.
TRANSFER CONTROL UNIT TERMINALS AND REFERENCE VALUE
Data are reference value and are measured between each terminal and ground.
CAUTION:
When using a circuit tester to measure voltage for inspection, be sure not to extend forcibly any connector terminals.
DIAGNOSTIC PROCEDURE
1.CHECK CLUTCH PRESSURE SWITCH SIGNAL
With CONSULT-II
1. Start engine.
2. Select “DATA MONITOR” mode for “ALL MODE AWD/4WD” with CONSULT-II.
Temperature °C (°F) Resistance (Approx.)
20 (68) 2.5 kΩ
80 (176) 0.3 kΩ
WDIA0188E
Monitored item [Unit] Content Condition Display value
CL PRES SW [ON /
OFF]Condition of clutch pres-
sure switch• Vehicle stopped
• Engine running
• A/T selector lever “D” position
• 4WD shift switch: AUTO or 4H (“Wait” function is not
operating.)ON
• Vehicle stopped
• Engine running
• 4WD shift switch: 2WD (“Wait” function is not operat-
ing.)OFF
Te r m i n a lWire
colorItem Condition Data (Approx.)
34 BR Clutch pressure switch• Vehicle stopped
• Engine running
• A/T selector le-
ver “D” position4WD shift switch: AUTO or 4H (“Wait” func-
tion is not operating.)0V
• Vehicle stopped
• Engine running4WD shift switch: 2WD (“Wait” function is
not operating.)Battery voltage
Page 2915 of 3061
TROUBLE DIAGNOSIS FOR SYSTEM
TF-93
< SERVICE INFORMATION >
C
E
F
G
H
I
J
K
L
MA
B
TF
N
O
P
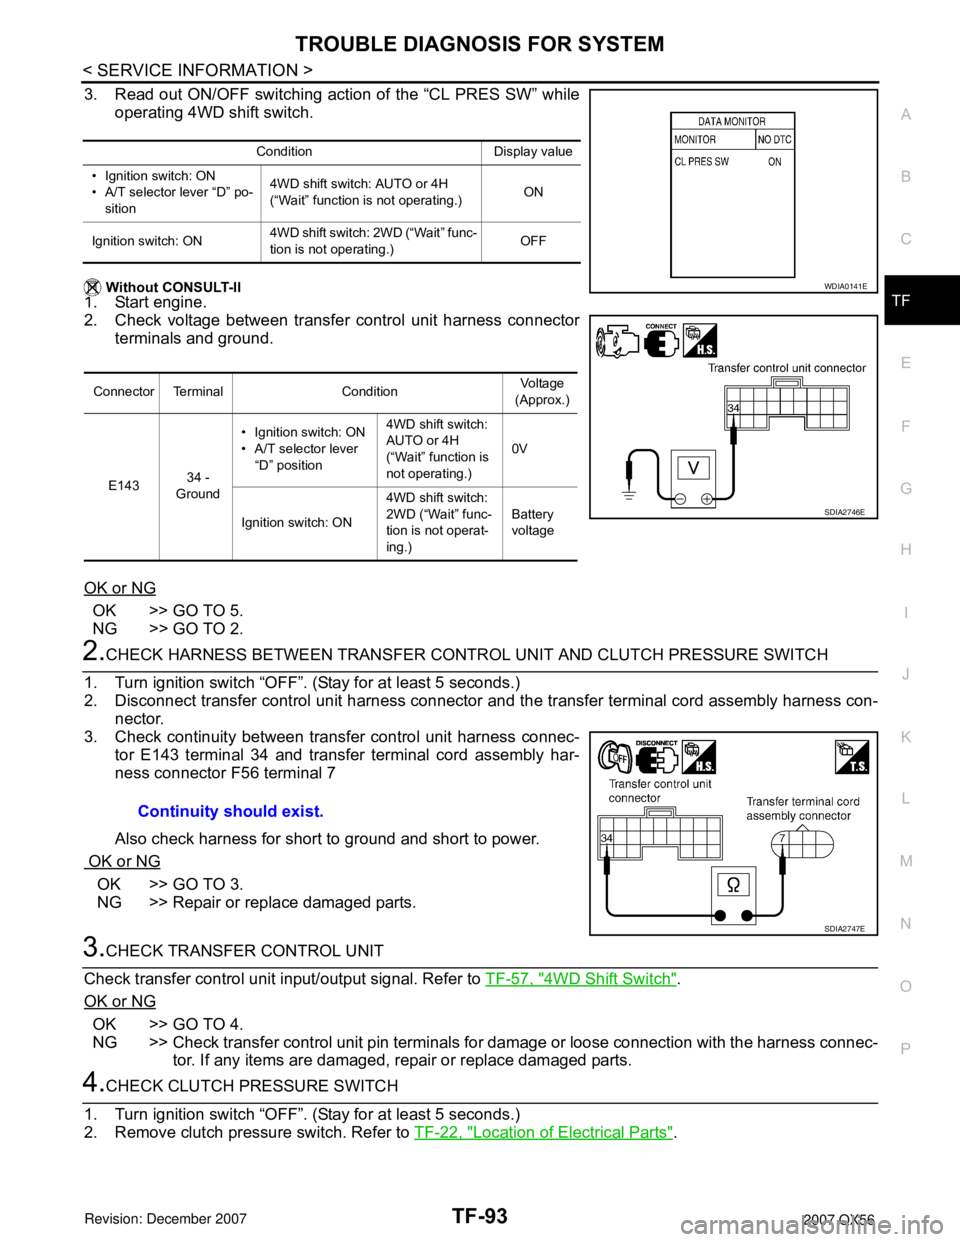
3. Read out ON/OFF switching action of the “CL PRES SW” while
operating 4WD shift switch.
Without CONSULT-II
1. Start engine.
2. Check voltage between transfer control unit harness connector
terminals and ground.
OK or NG
OK >> GO TO 5.
NG >> GO TO 2.
2.CHECK HARNESS BETWEEN TRANSFER CONTROL UNIT AND CLUTCH PRESSURE SWITCH
1. Turn ignition switch “OFF”. (Stay for at least 5 seconds.)
2. Disconnect transfer control unit harness connector and the transfer terminal cord assembly harness con-
nector.
3. Check continuity between transfer control unit harness connec-
tor E143 terminal 34 and transfer terminal cord assembly har-
ness connector F56 terminal 7
Also check harness for short to ground and short to power.
OK or NG
OK >> GO TO 3.
NG >> Repair or replace damaged parts.
3.CHECK TRANSFER CONTROL UNIT
Check transfer control unit input/output signal. Refer to TF-57, "
4WD Shift Switch".
OK or NG
OK >> GO TO 4.
NG >> Check transfer control unit pin terminals for damage or loose connection with the harness connec-
tor. If any items are damaged, repair or replace damaged parts.
4.CHECK CLUTCH PRESSURE SWITCH
1. Turn ignition switch “OFF”. (Stay for at least 5 seconds.)
2. Remove clutch pressure switch. Refer to TF-22, "
Location of Electrical Parts".
Condition Display value
• Ignition switch: ON
• A/T selector lever “D” po-
sition4WD shift switch: AUTO or 4H
(“Wait” function is not operating.)ON
Ignition switch: ON4WD shift switch: 2WD (“Wait” func-
tion is not operating.)OFF
Connector Terminal ConditionVoltage
(Approx.)
E14334 -
Ground• Ignition switch: ON
• A/T selector lever
“D” position4WD shift switch:
AUTO or 4H
(“Wait” function is
not operating.)0V
Ignition switch: ON4WD shift switch:
2WD (“Wait” func-
tion is not operat-
ing.)Battery
voltage
WDIA0141E
SDIA2746E
Continuity should exist.
SDIA2747E
Page 2916 of 3061
TF-94
< SERVICE INFORMATION >
TROUBLE DIAGNOSIS FOR SYSTEM
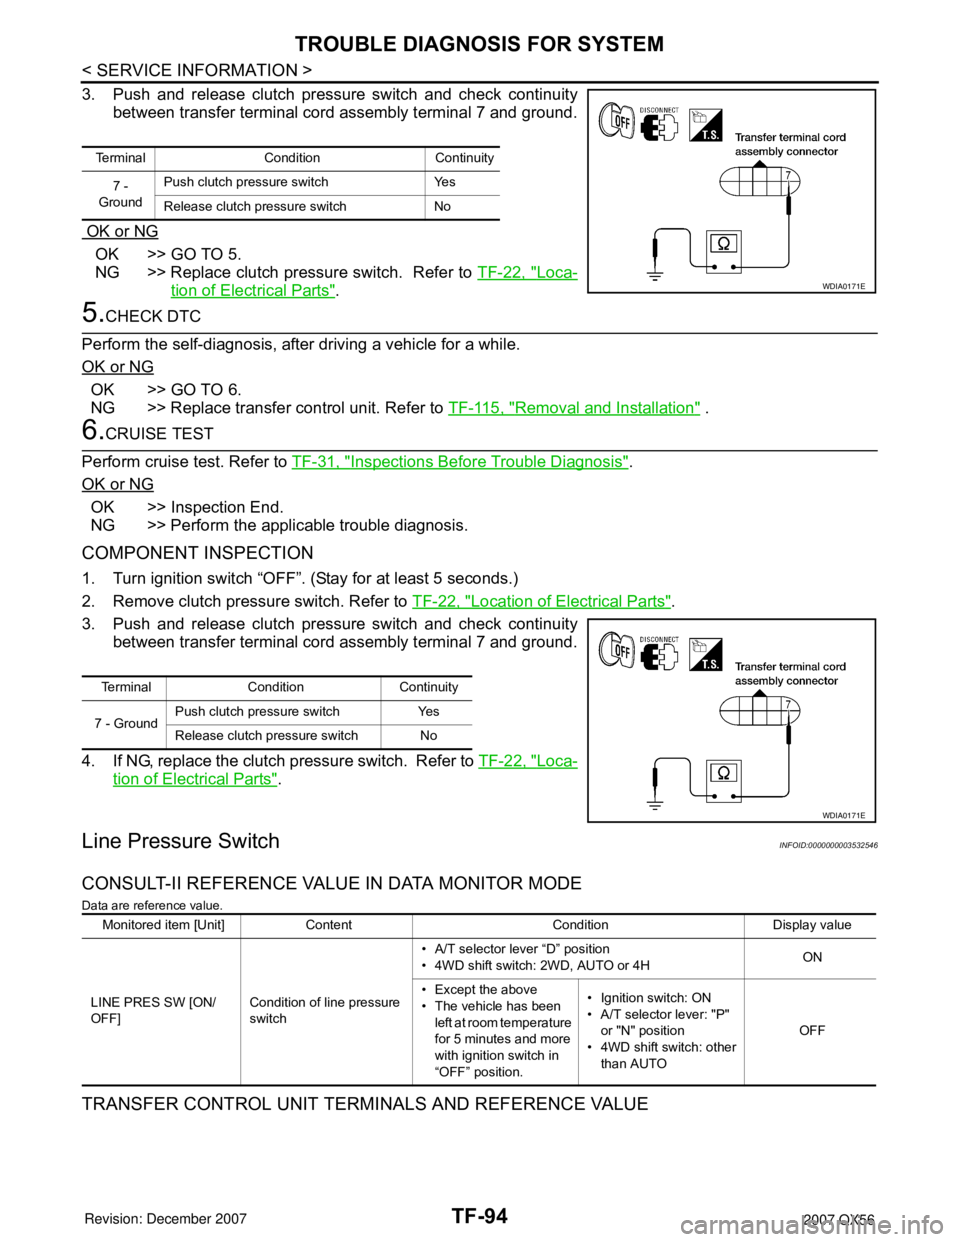
3. Push and release clutch pressure switch and check continuity
between transfer terminal cord assembly terminal 7 and ground.
OK or NG
OK >> GO TO 5.
NG >> Replace clutch pressure switch. Refer to TF-22, "
Loca-
tion of Electrical Parts".
5.CHECK DTC
Perform the self-diagnosis, after driving a vehicle for a while.
OK or NG
OK >> GO TO 6.
NG >> Replace transfer control unit. Refer to TF-115, "
Removal and Installation" .
6.CRUISE TEST
Perform cruise test. Refer to TF-31, "
Inspections Before Trouble Diagnosis".
OK or NG
OK >> Inspection End.
NG >> Perform the applicable trouble diagnosis.
COMPONENT INSPECTION
1. Turn ignition switch “OFF”. (Stay for at least 5 seconds.)
2. Remove clutch pressure switch. Refer to TF-22, "
Location of Electrical Parts".
3. Push and release clutch pressure switch and check continuity
between transfer terminal cord assembly terminal 7 and ground.
4. If NG, replace the clutch pressure switch. Refer to TF-22, "
Loca-
tion of Electrical Parts".
Line Pressure SwitchINFOID:0000000003532546
CONSULT-II REFERENCE VALUE IN DATA MONITOR MODE
Data are reference value.
TRANSFER CONTROL UNIT TERMINALS AND REFERENCE VALUE
Terminal Condition Continuity
7 -
GroundPush clutch pressure switch Yes
Release clutch pressure switch No
WDIA0171E
Terminal Condition Continuity
7 - GroundPush clutch pressure switch Yes
Release clutch pressure switch No
WDIA0171E
Monitored item [Unit] Content Condition Display value
LINE PRES SW [ON/
OFF]Condition of line pressure
switch• A/T selector lever “D” position
• 4WD shift switch: 2WD, AUTO or 4HON
• Except the above
• The vehicle has been
left at room temperature
for 5 minutes and more
with ignition switch in
“OFF” position.• Ignition switch: ON
• A/T selector lever: "P"
or "N" position
• 4WD shift switch: other
than AUTOOFF
Page 2917 of 3061
TROUBLE DIAGNOSIS FOR SYSTEM
TF-95
< SERVICE INFORMATION >
C
E
F
G
H
I
J
K
L
MA
B
TF
N
O
P
Data are reference value and are measured between each terminal and ground.
CAUTION:
When using a circuit tester to measure voltage for inspection, be sure not to extend forcibly any connector terminals.
DIAGNOSTIC PROCEDURE
1.CHECK LINE PRESSURE SWITCH SIGNAL
With CONSULT-II
1. Start engine.
2. Select “DATA MONITOR” mode for “ALL MODE AWD/4WD” with CONSULT-II.
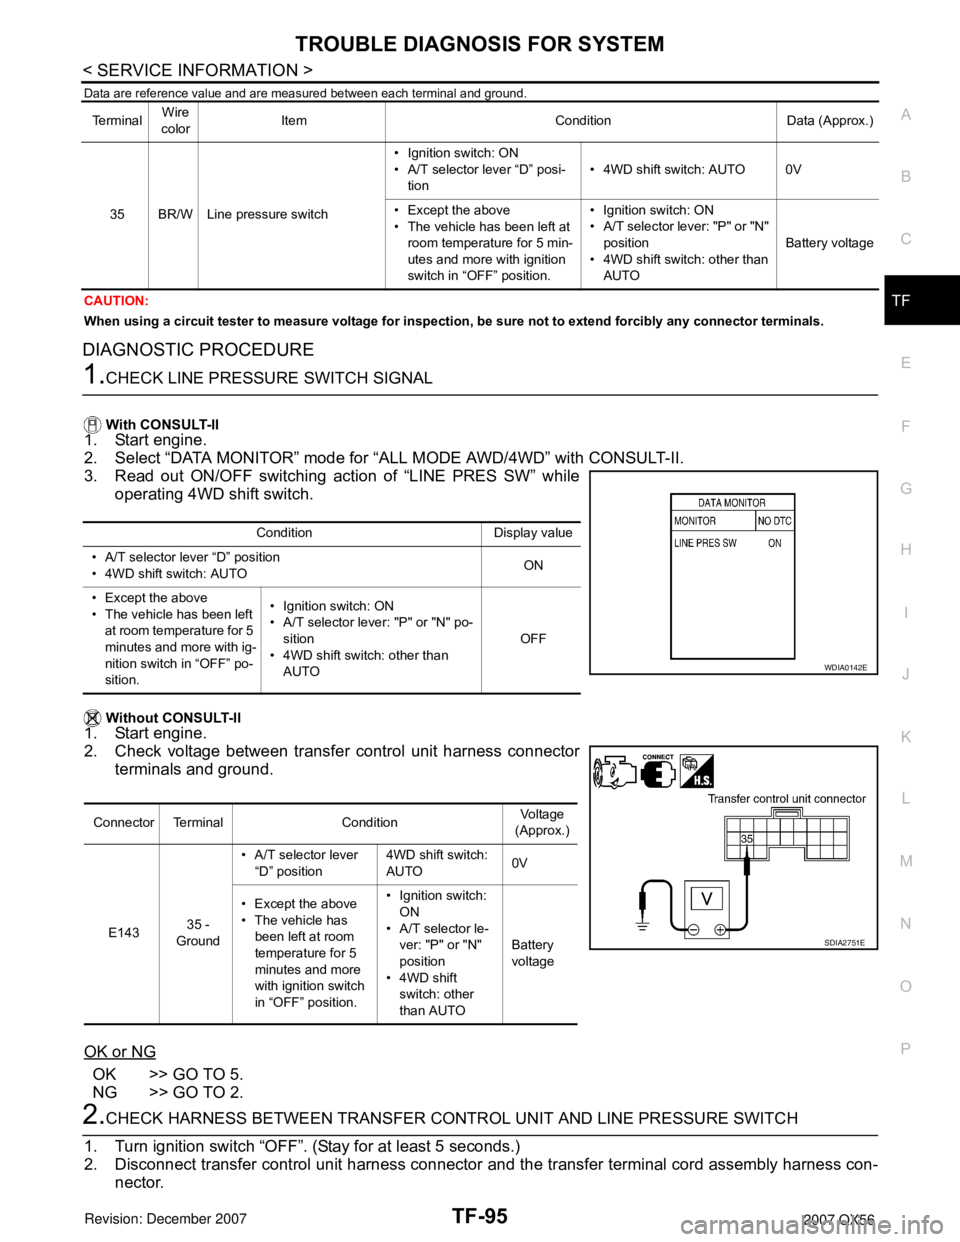
3. Read out ON/OFF switching action of “LINE PRES SW” while
operating 4WD shift switch.
Without CONSULT-II
1. Start engine.
2. Check voltage between transfer control unit harness connector
terminals and ground.
OK or NG
OK >> GO TO 5.
NG >> GO TO 2.
2.CHECK HARNESS BETWEEN TRANSFER CONTROL UNIT AND LINE PRESSURE SWITCH
1. Turn ignition switch “OFF”. (Stay for at least 5 seconds.)
2. Disconnect transfer control unit harness connector and the transfer terminal cord assembly harness con-
nector.
Te r m i n a lWire
colorItem Condition Data (Approx.)
35 BR/W Line pressure switch• Ignition switch: ON
• A/T selector lever “D” posi-
tion• 4WD shift switch: AUTO 0V
• Except the above
• The vehicle has been left at
room temperature for 5 min-
utes and more with ignition
switch in “OFF” position.• Ignition switch: ON
• A/T selector lever: "P" or "N"
position
• 4WD shift switch: other than
AUTOBattery voltage
Condition Display value
• A/T selector lever “D” position
• 4WD shift switch: AUTOON
• Except the above
• The vehicle has been left
at room temperature for 5
minutes and more with ig-
nition switch in “OFF” po-
sition.• Ignition switch: ON
• A/T selector lever: "P" or "N" po-
sition
• 4WD shift switch: other than
AUTOOFF
Connector Terminal ConditionVoltage
(Approx.)
E14335 -
Ground• A/T selector lever
“D” position4WD shift switch:
AUTO0V
• Except the above
• The vehicle has
been left at room
temperature for 5
minutes and more
with ignition switch
in “OFF” position.• Ignition switch:
ON
• A/T selector le-
ver: "P" or "N"
position
• 4WD shift
switch: other
than AUTOBattery
voltage
WDIA0142E
SDIA2751E
Page 2921 of 3061
TROUBLE DIAGNOSIS FOR SYSTEM
TF-99
< SERVICE INFORMATION >
C
E
F
G
H
I
J
K
L
MA
B
TF
N
O
P
CAN Communication LineINFOID:0000000003532551
DIAGNOSTIC PROCEDURE
1.CHECK CAN COMMUNICATION CIRCUIT
With CONSULT-II
1. Turn ignition switch “ON” and start engine.
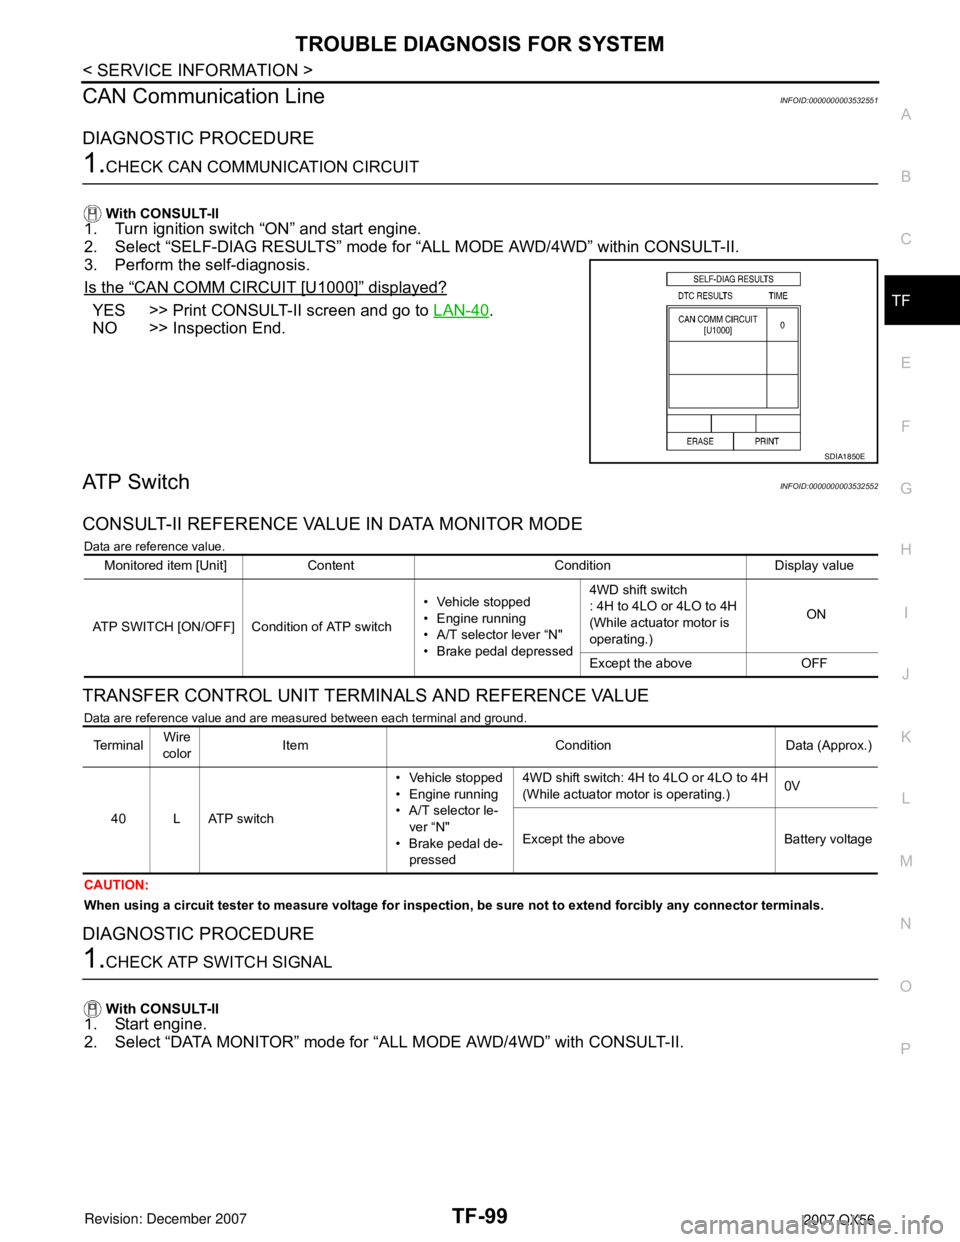
2. Select “SELF-DIAG RESULTS” mode for “ALL MODE AWD/4WD” within CONSULT-II.
3. Perform the self-diagnosis.
Is the
“CAN COMM CIRCUIT [U1000]” displayed?
YES >> Print CONSULT-II screen and go to LAN-40.
NO >> Inspection End.
ATP SwitchINFOID:0000000003532552
CONSULT-II REFERENCE VALUE IN DATA MONITOR MODE
Data are reference value.
TRANSFER CONTROL UNIT TERMINALS AND REFERENCE VALUE
Data are reference value and are measured between each terminal and ground.
CAUTION:
When using a circuit tester to measure voltage for inspection, be sure not to extend forcibly any connector terminals.
DIAGNOSTIC PROCEDURE
1.CHECK ATP SWITCH SIGNAL
With CONSULT-II
1. Start engine.
2. Select “DATA MONITOR” mode for “ALL MODE AWD/4WD” with CONSULT-II.
SDIA1850E
Monitored item [Unit] Content Condition Display value
ATP SWITCH [ON/OFF] Condition of ATP switch• Vehicle stopped
• Engine running
• A/T selector lever “N"
• Brake pedal depressed4WD shift switch
: 4H to 4LO or 4LO to 4H
(While actuator motor is
operating.) ON
Except the above OFF
Te r m i n a lWire
colorItem Condition Data (Approx.)
40 L ATP switch• Vehicle stopped
• Engine running
• A/T selector le-
ver “N"
• Brake pedal de-
pressed4WD shift switch: 4H to 4LO or 4LO to 4H
(While actuator motor is operating.)0V
Except the above Battery voltage
Page 2922 of 3061
TF-100
< SERVICE INFORMATION >
TROUBLE DIAGNOSIS FOR SYSTEM
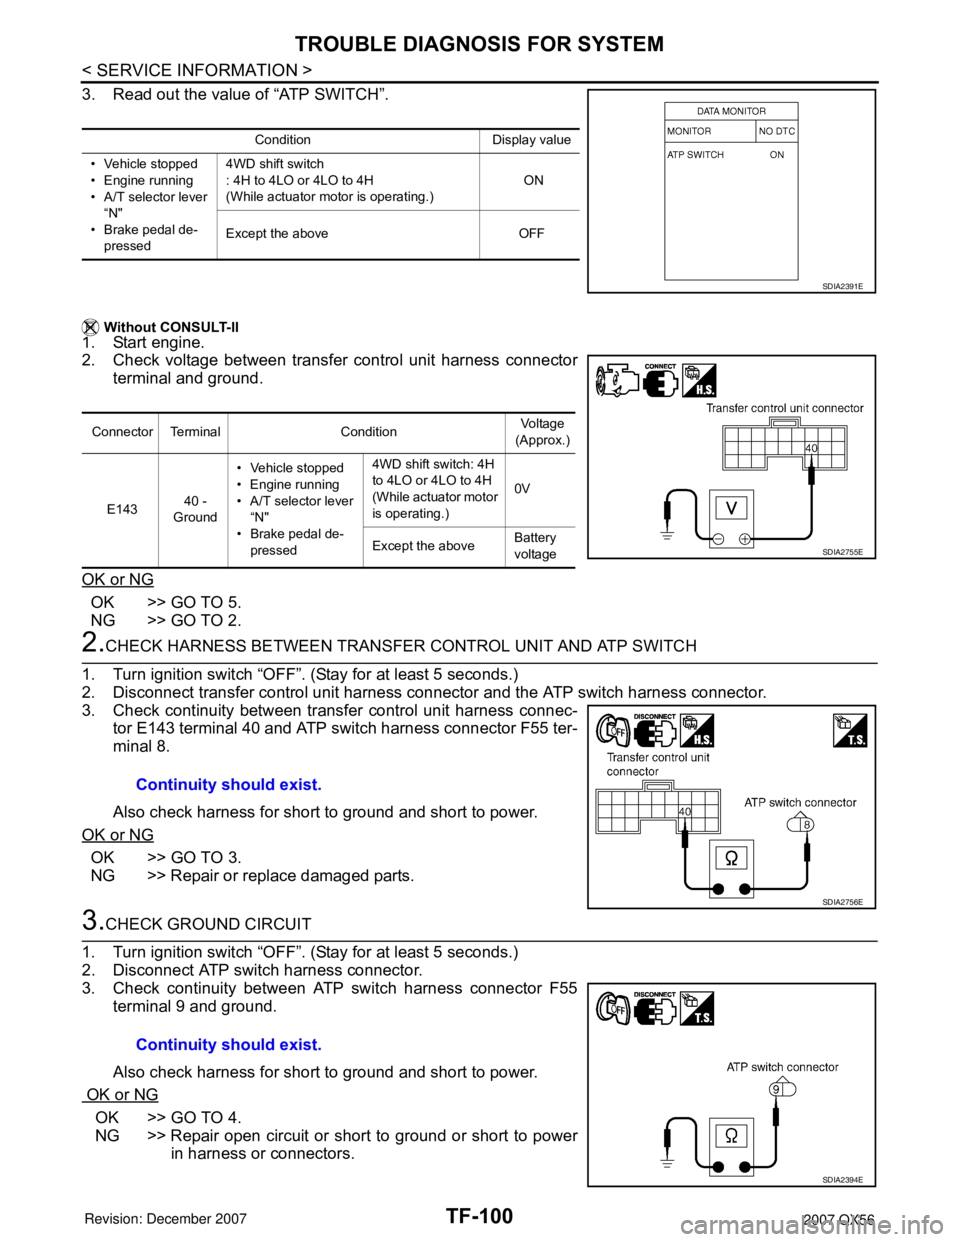
3. Read out the value of “ATP SWITCH”.
Without CONSULT-II
1. Start engine.
2. Check voltage between transfer control unit harness connector
terminal and ground.
OK or NG
OK >> GO TO 5.
NG >> GO TO 2.
2.CHECK HARNESS BETWEEN TRANSFER CONTROL UNIT AND ATP SWITCH
1. Turn ignition switch “OFF”. (Stay for at least 5 seconds.)
2. Disconnect transfer control unit harness connector and the ATP switch harness connector.
3. Check continuity between transfer control unit harness connec-
tor E143 terminal 40 and ATP switch harness connector F55 ter-
minal 8.
Also check harness for short to ground and short to power.
OK or NG
OK >> GO TO 3.
NG >> Repair or replace damaged parts.
3.CHECK GROUND CIRCUIT
1. Turn ignition switch “OFF”. (Stay for at least 5 seconds.)
2. Disconnect ATP switch harness connector.
3. Check continuity between ATP switch harness connector F55
terminal 9 and ground.
Also check harness for short to ground and short to power.
OK or NG
OK >> GO TO 4.
NG >> Repair open circuit or short to ground or short to power
in harness or connectors.
Condition Display value
• Vehicle stopped
• Engine running
• A/T selector lever
“N"
• Brake pedal de-
pressed4WD shift switch
: 4H to 4LO or 4LO to 4H
(While actuator motor is operating.) ON
Except the above OFF
SDIA2391E
Connector Terminal ConditionVoltage
(Approx.)
E14340 -
Ground• Vehicle stopped
• Engine running
• A/T selector lever
“N"
• Brake pedal de-
pressed4WD shift switch: 4H
to 4LO or 4LO to 4H
(While actuator motor
is operating.)0V
Except the aboveBattery
voltage
SDIA2755E
Continuity should exist.
SDIA2756E
Continuity should exist.
SDIA2394E
Page 2935 of 3061
TROUBLE DIAGNOSIS FOR SYMPTOMS
TF-113
< SERVICE INFORMATION >
C
E
F
G
H
I
J
K
L
MA
B
TF
N
O
P
NG >> GO TO 5.
5.CHECK TRANSFER CONTROL UNIT
Check transfer control unit input/output signal. Refer to TF-35, "
Transfer Control Unit Input/Output Signal Ref-
erence Value".
OK or NG
OK >> Inspection End.
NG >> Check transfer control unit pin terminals for damage or loose connection with harness connector.
If any items are damaged, repair or replace damaged parts.
Heavy Tight-corner Braking Symptom OccursINFOID:0000000003532560
SYMPTOM:
Heavy tight-corner braking symptom occurs when vehicle is driven in AUTO mode and steering wheel
is turned fully to either side.
DIAGNOSTIC PROCEDURE
NOTE:
• Light tight-corner braking symptom may occur depending on driving conditions in AUTO mode. This is not a
malfunction.
• Heavy tight-corner braking symptom occurs when vehicle is driven in the following conditions: 4WD shift
switch is "4H" or "4LO", steering wheel is turned fully to either side.
1.CHECK SYSTEM FOR CAN COMMUNICATION LINE
Perform self-diagnosis. Refer to TF-48, "
Self-Diagnosis Procedure".
Is "CAN COMM CIRCUIT [U1000]" displayed?
YES >> Perform trouble diagnosis for CAN communication line. Refer to TF-99, "CAN Communication
Line" .
NO >> GO TO 2.
2.CHECK SYSTEM FOR 4WD SHIFT SWITCH
Perform trouble diagnosis for 4WD shift switch system. Refer to TF-57, "
4WD Shift Switch".
OK or NG
OK >> GO TO 3.
NG >> Repair or replace damaged parts.
3.CHECK ACCELERATOR PEDAL POSITION SIGNAL CIRCUIT
Perform self diagnosis for ECM. Refer to E C - 111 , "
CONSULT-II Function (ENGINE)".
Is any malfunction deteced by self-diagnosis?
YES >> Check the malfunctioning system.
NO >> GO TO 4.
4.CHECK SYSTEM FOR CLUTCH PRESSURE SOLENOID
Perform trouble diagnosis for clutch pressure solenoid system. Refer toTF-92, "
Clutch Pressure Switch" .
OK or NG
OK >> GO TO 5.
NG >> Repair or replace damaged parts.
5.SYMPTOM CHECK
Check again.
OK or NG
OK >> Inspection End.
NG >> GO TO 6.
6.CHECK TRANSFER CONTROL UNIT
Check transfer control unit input/output signal. Refer to TF-35, "
Transfer Control Unit Input/Output Signal Ref-
erence Value".
OK or NG