Page 2274 of 3061

TURN SIGNAL AND HAZARD WARNING LAMPS
LT-67
< SERVICE INFORMATION >
C
D
E
F
G
H
I
J
L
MA
B
LT
N
O
P
OK or NG
OK >> GO TO 2.
NG >> Replace turn signal lamp bulb. Refer to LT-69, "
Bulb Replacement" .
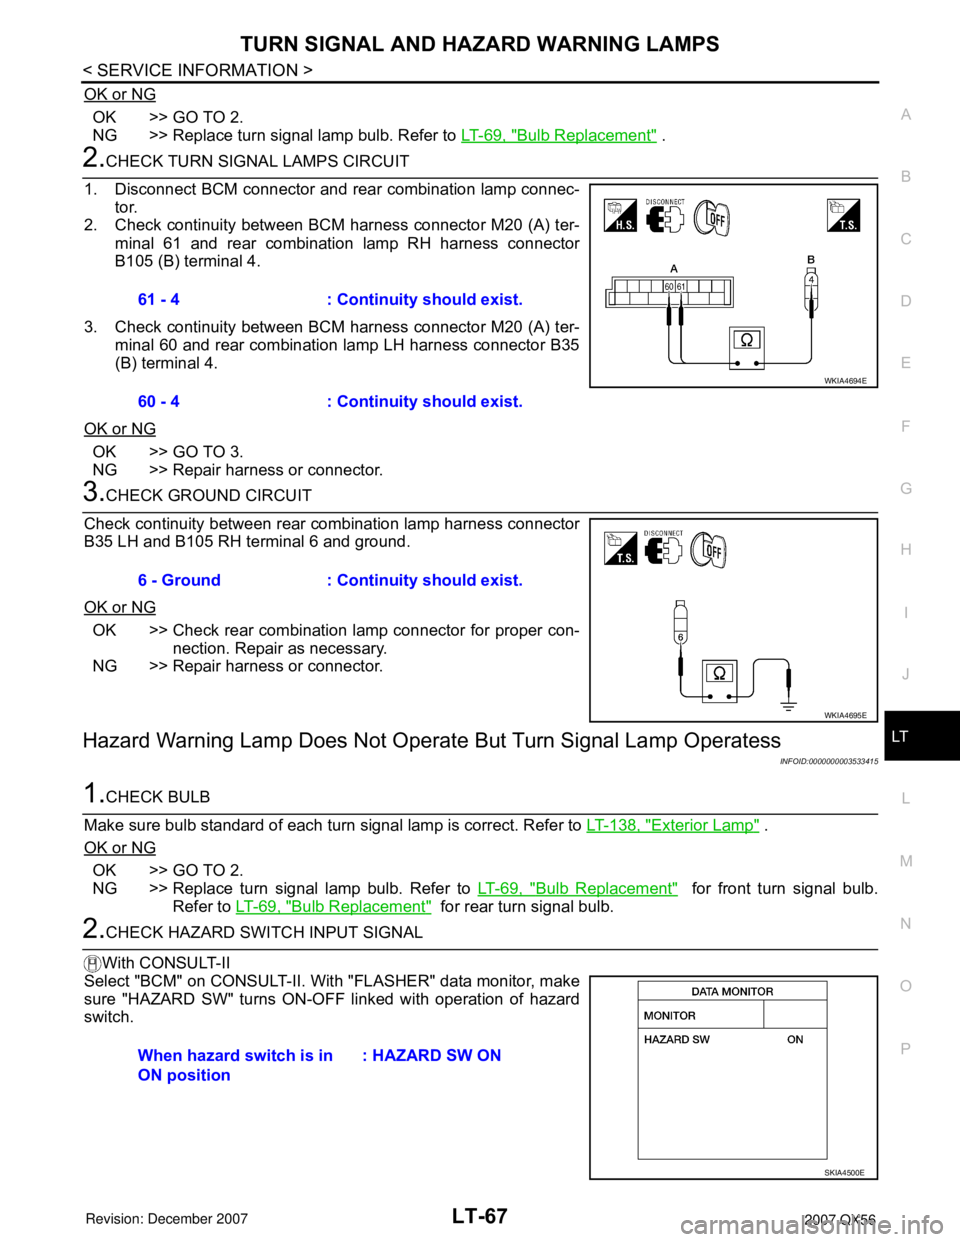
2.CHECK TURN SIGNAL LAMPS CIRCUIT
1. Disconnect BCM connector and rear combination lamp connec-
tor.
2. Check continuity between BCM harness connector M20 (A) ter-
minal 61 and rear combination lamp RH harness connector
B105 (B) terminal 4.
3. Check continuity between BCM harness connector M20 (A) ter-
minal 60 and rear combination lamp LH harness connector B35
(B) terminal 4.
OK or NG
OK >> GO TO 3.
NG >> Repair harness or connector.
3.CHECK GROUND CIRCUIT
Check continuity between rear combination lamp harness connector
B35 LH and B105 RH terminal 6 and ground.
OK or NG
OK >> Check rear combination lamp connector for proper con-
nection. Repair as necessary.
NG >> Repair harness or connector.
Hazard Warning Lamp Does Not Operate But Turn Signal Lamp Operatess
INFOID:0000000003533415
1.CHECK BULB
Make sure bulb standard of each turn signal lamp is correct. Refer to LT-138, "
Exterior Lamp" .
OK or NG
OK >> GO TO 2.
NG >> Replace turn signal lamp bulb. Refer to LT-69, "
Bulb Replacement" for front turn signal bulb.
Refer to LT-69, "
Bulb Replacement" for rear turn signal bulb.
2.CHECK HAZARD SWITCH INPUT SIGNAL
With CONSULT-II
Select "BCM" on CONSULT-II. With "FLASHER" data monitor, make
sure "HAZARD SW" turns ON-OFF linked with operation of hazard
switch.61 - 4 : Continuity should exist.
60 - 4 : Continuity should exist.
WKIA4694E
6 - Ground : Continuity should exist.
WKIA4695E
When hazard switch is in
ON position : HAZARD SW ON
SKIA4500E
Page 2276 of 3061
TURN SIGNAL AND HAZARD WARNING LAMPS
LT-69
< SERVICE INFORMATION >
C
D
E
F
G
H
I
J
L
MA
B
LT
N
O
P
Check CAN communication. Refer to LAN-4, "CAN Communication System".
OK or NG
OK >> Replace combination meter. Refer to DI-21, "Removal and Installation of Combination Meter" .
NG >> Repair as necessary.
Bulb ReplacementINFOID:0000000003533417
TURN SIGNAL LAMP (FRONT)
Removal
1. Remove front fog lamp. Refer to LT-56, "Removal and Installation".
2. Twist turn signal socket and remove from front fog lamp.
3. Remove turn signal bulb from socket.
Installation
Installation is in the reverse order of removal.
TURN SIGNAL LAMP (REAR)
Refer to LT-93, "Bulb Replacement".
Removal and InstallationINFOID:0000000003533418
FRONT TURN SIGNAL LAMP
Refer to LT-22, "Removal and Installation".
REAR TURN SIGNAL LAMP
Refer to LT-93, "Removal and Installation".
Page 2285 of 3061
LT-78
< SERVICE INFORMATION >
STOP LAMP
Wiring Diagram - STOP/L -
INFOID:0000000003533428
Bulb ReplacementINFOID:0000000003533429
HIGH-MOUNTED STOP LAMP
The high-mounted stop lamp bulbs are not serviceable.
STOP LAMP
WKWA3659E
Page 2286 of 3061
STOP LAMP
LT-79
< SERVICE INFORMATION >
C
D
E
F
G
H
I
J
L
MA
B
LT
N
O
P
The stop lamp bulbs are not serviceable separately. Replace rear combination lamp. Refer to LT-93, "Removal
and Installation".
Removal and InstallationINFOID:0000000003533430
HIGH-MOUNTED STOP LAMP
Removal
1. Remove back door upper finisher. Refer to EI-39.
2. Remove two nuts and remove high-mounted stop lamp.
Installation
Installation is in the reverse order of removal.
STOP LAMP
Refer to LT-93, "Removal and Installation".
WKIA1397E
Page 2287 of 3061
LT-80
< SERVICE INFORMATION >
BACK-UP LAMP
BACK-UP LAMP
Wiring Diagram - BACK/L -INFOID:0000000003533431
Bulb ReplacementINFOID:0000000003533432
BACK-UP LAMP
Removal
AWLWA0434GB
Page 2288 of 3061
BACK-UP LAMP
LT-81
< SERVICE INFORMATION >
C
D
E
F
G
H
I
J
L
MA
B
LT
N
O
P
1. Remove back door lower finisher. Refer to EI-39.
2. Turn bulb socket counterclockwise and remove it from the lamp housing.
3. Pull bulb from socket.
Installation
Installation is in the reverse order of removal.
Removal and InstallationINFOID:0000000003533433
BACK-UP LAMP
Removal
1. Remove license lamp finisher. Refer to EI-23.
2. Carefully release tabs to remove back up lamp housing from
license plate finisher.
Installation
Installation is in the reverse order of removal.
WKIA1898E
Page 2298 of 3061

PARKING, LICENSE PLATE AND TAIL LAMPS
LT-91
< SERVICE INFORMATION >
C
D
E
F
G
H
I
J
L
MA
B
LT
N
O
P
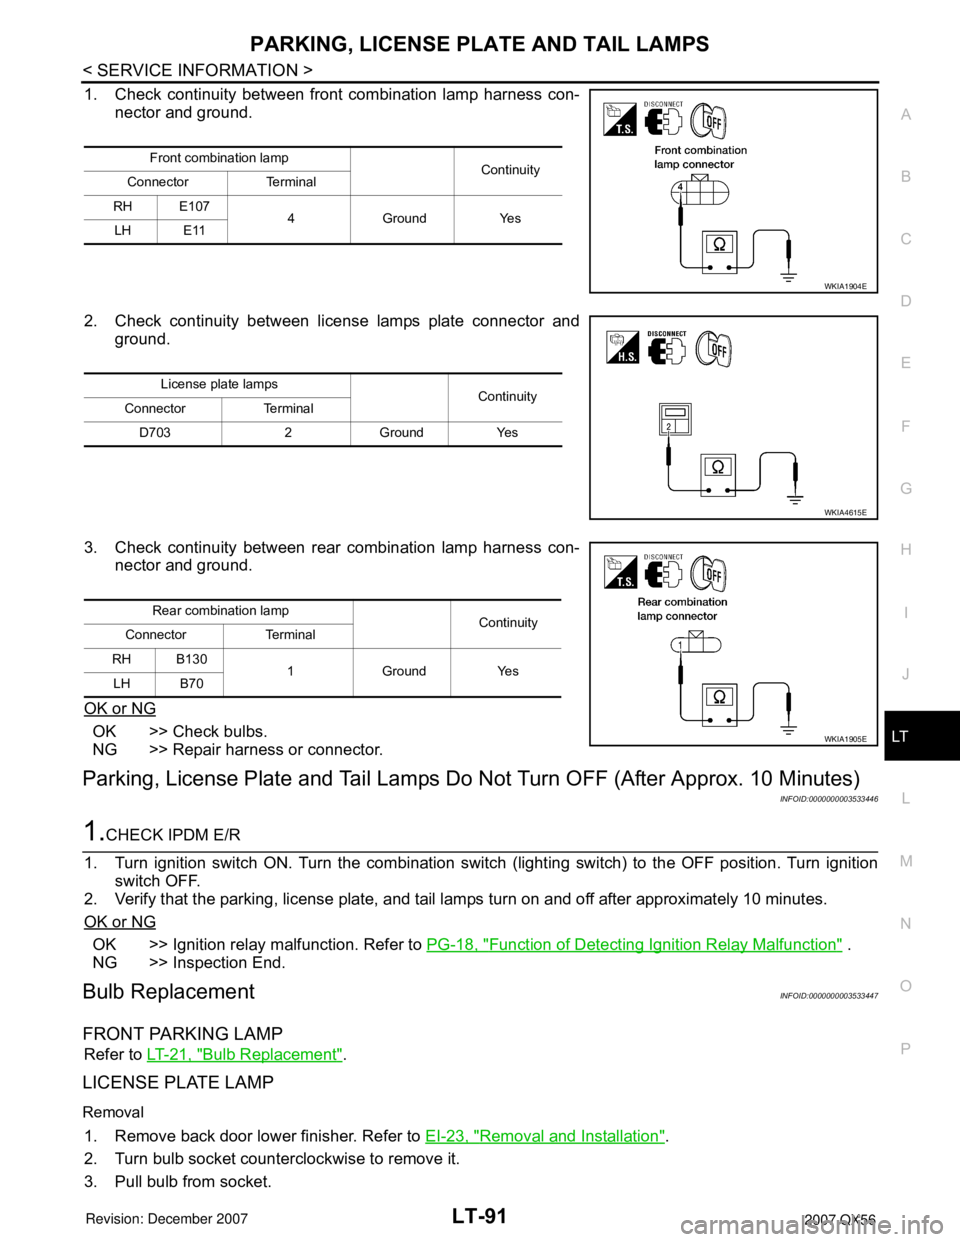
1. Check continuity between front combination lamp harness con-
nector and ground.
2. Check continuity between license lamps plate connector and
ground.
3. Check continuity between rear combination lamp harness con-
nector and ground.
OK or NG
OK >> Check bulbs.
NG >> Repair harness or connector.
Parking, License Plate and Tail Lamps Do Not Turn OFF (After Approx. 10 Minutes)
INFOID:0000000003533446
1.CHECK IPDM E/R
1. Turn ignition switch ON. Turn the combination switch (lighting switch) to the OFF position. Turn ignition
switch OFF.
2. Verify that the parking, license plate, and tail lamps turn on and off after approximately 10 minutes.
OK or NG
OK >> Ignition relay malfunction. Refer to PG-18, "Function of Detecting Ignition Relay Malfunction" .
NG >> Inspection End.
Bulb ReplacementINFOID:0000000003533447
FRONT PARKING LAMP
Refer to LT-21, "Bulb Replacement".
LICENSE PLATE LAMP
Removal
1. Remove back door lower finisher. Refer to EI-23, "Removal and Installation".
2. Turn bulb socket counterclockwise to remove it.
3. Pull bulb from socket.
Front combination lamp
Continuity
Connector Terminal
RH E107
4GroundYes
LH E11
WKIA1904E
License plate lamps
Continuity
Connector Terminal
D703 2 Ground Yes
WKIA4615E
Rear combination lamp
Continuity
Connector Terminal
RH B130
1 Ground Yes
LH B70
WKIA1905E
Page 2299 of 3061
LT-92
< SERVICE INFORMATION >
PARKING, LICENSE PLATE AND TAIL LAMPS
Installation
Installation is in the reverse order of removal.
SIDE MARKER LAMP (FRONT)
Refer to LT-21, "Bulb Replacement".
TA I L L A M P
The tail lamp bulbs are not serviceable separately. Replace rear combination lamp. Refer to LT-93, "Removal
and Installation".
Removal and InstallationINFOID:0000000003533448
FRONT PARKING LAMP
Refer to LT-22, "Removal and Installation".
LICENSE PLATE LAMP
Removal
1. Remove back door lower finisher. Refer to EI-23, "Removal and Installation".
2. Remove license plate lamp screws.
3. Remove license plate lamp.
Installation
Installation is in the reverse order of removal.
SIDE MARKER LAMP (REAR)
Refer to LT-93, "Removal and Installation".
TA I L L A M P
Refer to LT-93, "Removal and Installation".