2007 INFINITI QX56 horn
[x] Cancel search: hornPage 894 of 3061

BODY REPAIR
BL-183
< SERVICE INFORMATION >
C
D
E
F
G
H
J
K
L
MA
B
BL
N
O
P
•
CRUSH HORN
WIIA0282E
Page 895 of 3061

BL-184
< SERVICE INFORMATION >
BODY REPAIR
• Work after 1st crossmember has been removed.
Portions to be welded:
A. Inner side rail crush horn, inner side rail crush horn and outer side rail crush horn.
B. Outer side rail crush horn, outer side rail crush horn and inner side rail crush horn.
Removal Notes
LIIA1083E
Page 896 of 3061

BODY REPAIR
BL-185
< SERVICE INFORMATION >
C
D
E
F
G
H
J
K
L
MA
B
BL
N
O
P
• Scribe a straight line on the outer side rail crush horn and inner side rail crush horn along the hole center as
shown in the figure.
• Cut off outer side rail crush horn and inner side rail crush horn along scribed line A. Do not cut on the hole.
• Cut inner side rail crush horn at 45 mm backward cut position of cut line A. (along line B)
LIIA1084E
LIIA1085E
Page 897 of 3061

BL-186
< SERVICE INFORMATION >
BODY REPAIR
• After removing outer panel, dress area on the inner panel surface with a sander or equivalent.
Installation Notes
• Scribe a straight line on the inner side rail crush horn along the hole center as shown in the figure. Cut off
inner side rail crush horn along scribed line.
• Scribe a straight line on the outer side rail crush horn along the hole center as shown in the figure. Cut off
outer side rail crush horn along scribed line.
LIIA1086E
LIIA1087E
LIIA1088E
Page 1004 of 3061

RADIATOR
CO-15
< SERVICE INFORMATION >
C
D
E
F
G
H
I
J
K
L
MA
CO
N
P O
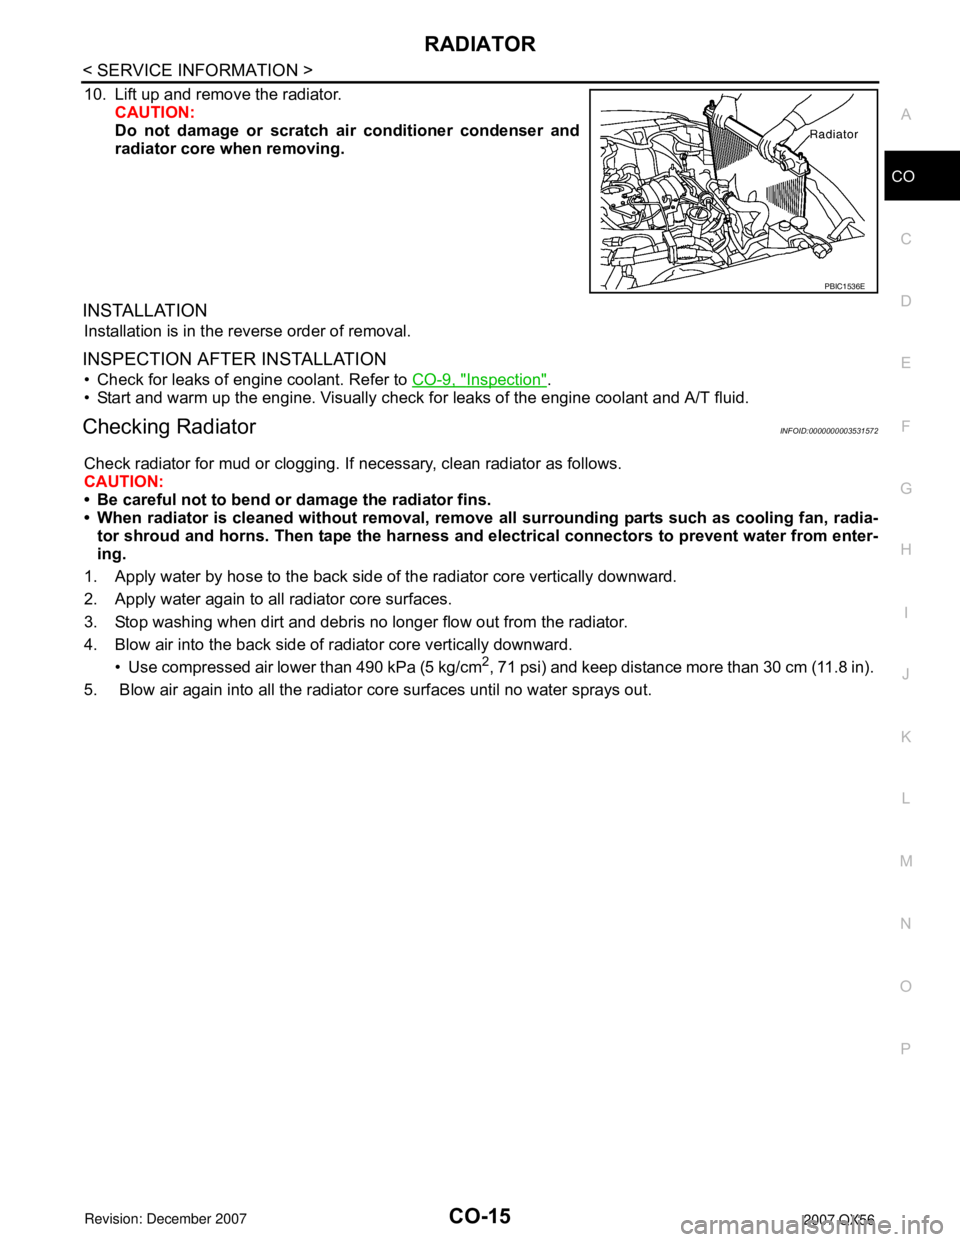
10. Lift up and remove the radiator.
CAUTION:
Do not damage or scratch air conditioner condenser and
radiator core when removing.
INSTALLATION
Installation is in the reverse order of removal.
INSPECTION AFTER INSTALLATION
• Check for leaks of engine coolant. Refer to CO-9, "Inspection".
• Start and warm up the engine. Visually check for leaks of the engine coolant and A/T fluid.
Checking RadiatorINFOID:0000000003531572
Check radiator for mud or clogging. If necessary, clean radiator as follows.
CAUTION:
• Be careful not to bend or damage the radiator fins.
• When radiator is cleaned without removal, remove all surrounding parts such as cooling fan, radia-
tor shroud and horns. Then tape the harness and electrical connectors to prevent water from enter-
ing.
1. Apply water by hose to the back side of the radiator core vertically downward.
2. Apply water again to all radiator core surfaces.
3. Stop washing when dirt and debris no longer flow out from the radiator.
4. Blow air into the back side of radiator core vertically downward.
• Use compressed air lower than 490 kPa (5 kg/cm
2, 71 psi) and keep distance more than 30 cm (11.8 in).
5. Blow air again into all the radiator core surfaces until no water sprays out.
PBIC1536E
Page 1062 of 3061

REAR SONAR SYSTEM
DI-51
< SERVICE INFORMATION >
C
D
E
F
G
H
I
J
L
MA
B
DI
N
O
P
How to Proceed with Trouble DiagnosisINFOID:0000000003533529
1. Confirm the symptom or customer complaint.
2. Understand operation description and function description. Refer to DI-46, "
System Description".
3. Perform pre-diagnosis inspection. Refer to DI-51, "
Pre-diagnosis Inspection".
4. Perform self-diagnosis. Refer to DI-51, "
Self-Diagnosis Function".
5. Perform the preliminary check. Refer to DI-53, "
Preliminary Check".
6. Check symptom and repair or replace the cause of malfunction. Refer to DI-54, "
Symptom Chart".
7. Does the rear sonar system operate properly? If so, go to 8. If not, go to 3.
8. Clear fault codes. Refer to DI-51, "
Self-Diagnosis Function".
9. Inspection End.
Pre-diagnosis InspectionINFOID:0000000003533530
SENSOR STATUS CHECK
• Check that the rear sonar sensor is properly aligned (bumper is not misaligned, no deformation in sensor
mounting area.
• Check that snow, mud, or other foreign objects are not adhering to the rear sonar sensor.
• Check that there is no deformation, scratches, or other damage to the rear sonar sensor.
• Check that water has not accumulated in the rear sonar sensor.
CAUTION:
Use water, cotton swab, or other soft material for cleaning the sensor.
1. Check that there are no obstacles within each rear sonar sensor's detection range.
2. Check that there are no nearby ultrasound sources (such as the sounds of vehicle horns, motorcycle
engines, or truck air brakes).
3. Check that the vehicle is on a level surface.
Self-Diagnosis FunctionINFOID:0000000003533531
There are four modes of self-diagnosis; entering diagnostics, requesting number of fault codes, requesting
fault codes, and idling or clearing fault codes. These steps must be followed in order. Self-diagnosis can be
manually exited by turning the ignition switch OFF, or selecting reverse gear. Self-diagnosis will exit unless a
fault code request occurs before a message is repeated five times without acknowledgement.
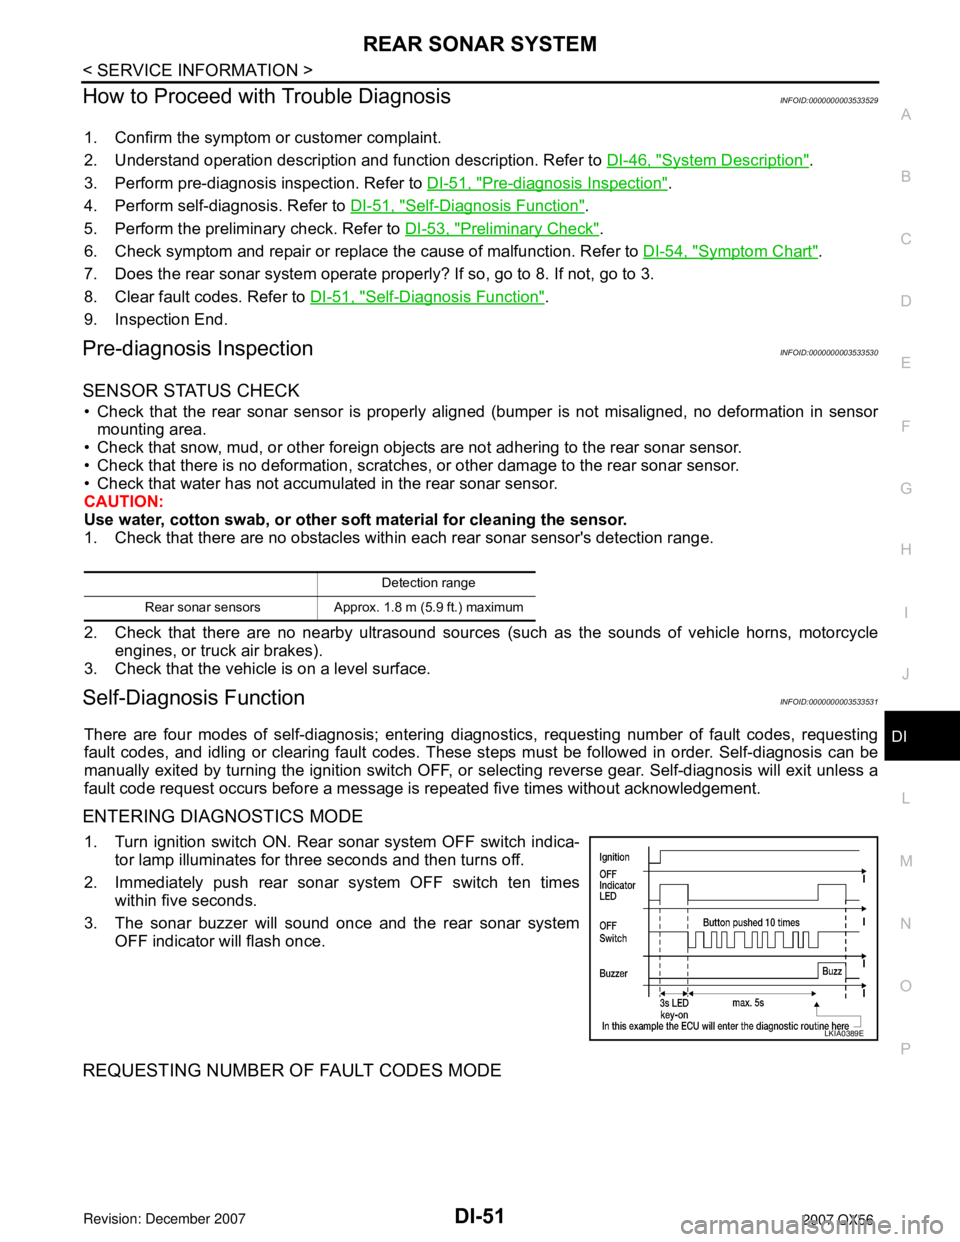
ENTERING DIAGNOSTICS MODE
1. Turn ignition switch ON. Rear sonar system OFF switch indica-
tor lamp illuminates for three seconds and then turns off.
2. Immediately push rear sonar system OFF switch ten times
within five seconds.
3. The sonar buzzer will sound once and the rear sonar system
OFF indicator will flash once.
REQUESTING NUMBER OF FAULT CODES MODE
Detection range
Rear sonar sensors Approx. 1.8 m (5.9 ft.) maximum
LKIA0389E
Page 2109 of 3061

IDX-5
A
C
D
E
F
G
H
I
J
K
L B
IDX
ALPHABETICAL INDEX
Grease .............................................................. MA-11
Ground distribution ............................................ PG-31
H
H/AIM - Wiring diagram ...................................... LT-51
H/LAMP - Wiring diagram .................................... LT-9
Handling precautions for plastics ..................... BL-179
Harness connector ............................................ PG-68
Harness layout .................................................. PG-41
Hazard warning lamp ......................................... LT-63
Headlamp ............................................................. LT-5
Headlamp aiming control ................................... LT-51
Headlamp leveler - See Headlamp aiming control . LT-
51
Headlamp removal and installation .................... LT-25
Heated oxygen sensor 2 (bank 1) .... EC-276, EC-287,
EC-300
Heated oxygen sensor 2 (bank 2) .... EC-276, EC-287,
EC-300
Heated oxygen sensor 2 heater (bank 1) ........ EC-181
Heated oxygen sensor 2 heater (bank 2) ........ EC-181
Heated seat ....................................................... SE-82
Heater and cooling unit (Heater core) . ATC-157, ATC-
160
Heater unit (heater core) ............... ATC-157, ATC-160
Height (Dimensions) ........................................... GI-51
HFC134a (R134a) system identification ........... ATC-6
HFC134a (R134a) system precaution ............... ATC-5
HFC134a (R134a) system service procedure ATC-175
HFC134a (R134a) system service tools ......... ATC-14
HFC134a system service equipment precaution ATC-
11
High and low reverse clutch solenoid valve .... AT-147,
AT-149
Homelink universal transceiver ........................ BL-146
Horn ................................................................ WW-48
HORN - Wiring diagram .................................. WW-48
How to erase DTC for OBD system .................. EC-63
HSEAT - Wiring diagram ................................... SE-84
I
IATS - Wiring diagram ..................................... EC-215
ICC - Wiring diagram ....................................... ACS-20
ICC/BS - Wiring diagram ................................. EC-565
ICC/SW - Wiring diagram ................................ EC-550
ICCBOF - Wiring diagram ............................... EC-672
Identification plate .............................................. GI-49
Idle air volume learning ..................................... EC-80
Idle speed .............................................. EC-73, EC-78
Idle speed control (ISC) .................... EC-466, EC-468
Ignition coil .......................................... EM-28, EC-679
Ignition control system .................................... EC-679
Ignition key hole illumination ............................ LT-110
Ignition timing ........................................ EC-73, EC-78
IGNSYS - Wiring diagram ............................... EC-680
ILL - Wiring diagram ......................................... LT-136
Illumination ....................................................... LT-130
In vehicle sensor ........................... ATC-141, ATC-150
In-cabin Microfilter ............................................. MA-21
INJECT - Wiring diagram ................................. EC-660
Injector ............................................................. EC-659
Input clutch solenoid valve ................. AT-135, AT-137
Instrument panel .................................................. IP-10
Intake air temperature sensor ............ EC-214, EC-234
Intake door control linkage adjustment . ATC-85, ATC-
88
Intake door motor ........................... ATC-83, ATC-164
Intake manifold .................................................. EM-17
Intake sensor ................................ ATC-146, ATC-152
Intake valve timing control (Bank 1) ................ EC-161
Intake valve timing control (Bank 2) ................ EC-161
Intake valve timing control position sensor (Bank 1) ....
EC-492
Intake valve timing control position sensor (Bank 2) ....
EC-492
Intake valve timing control solenoid valve (Bank 1) EC-
189
Intake valve timing control solenoid valve (Bank 2) EC-
189
Integrated homelink transmitter - See Homelink univer-
sal tranceiver .................................................... BL-146
Intelligent cruise control (ICC) system ............... ACS-6
Interior ................................................................. EI-35
Interior lamp ...................................................... LT-110
Interior lamp on-off control ................................ LT-111
Internal gear (Transfer) ....................... TF-149, TF-176
IPDM (Intelligent power distribution module engine
room) ................................................................. PG-18
IVCB1 - Wiring diagram ................................... EC-190
IVCB2 - Wiring diagram ................................... EC-192
IVCSB1 - Wiring diagram ................................ EC-493
IVCSB2 - Wiring diagram ................................ EC-495
IVIS (Infiniti vehicle immobilizer system) .......... BL-127
IVIS (Infiniti vehicle immobilizer system) precautions ...
GI-3
IVTB1 - Wiring diagram ................................... EC-164
IVTB2 - Wiring diagram ................................... EC-166
J
Jacking points ..................................................... GI-42
Junction box (J/B) .............................................. PG-76
K
Key illumination ................................................ LT-111
KEYLES - Wiring diagram .................................. BL-45
Knock sensor (KS) ........................................... EC-357
KS - Wiring diagram ........................................ EC-358
L
Laser beam aiming adjustment ....................... ACS-12
Length (Dimensions) .......................................... GI-51
License lamp ...................................................... LT-89
Lifting points ....................................................... GI-43
Page 2176 of 3061
![INFINITI QX56 2007 Factory Service Manual TROUBLE DIAGNOSIS
LAN-45
< SERVICE INFORMATION >[CAN]
C
D
E
F
G
H
I
J
L
MA
B
LAN
N
O
P
Engine speed signal T R R R R R R
Engine status signal T R
Fuel consumption monitor signalTR
RT
ICC steering swit INFINITI QX56 2007 Factory Service Manual TROUBLE DIAGNOSIS
LAN-45
< SERVICE INFORMATION >[CAN]
C
D
E
F
G
H
I
J
L
MA
B
LAN
N
O
P
Engine speed signal T R R R R R R
Engine status signal T R
Fuel consumption monitor signalTR
RT
ICC steering swit](/manual-img/42/57029/w960_57029-2175.png)
TROUBLE DIAGNOSIS
LAN-45
< SERVICE INFORMATION >[CAN]
C
D
E
F
G
H
I
J
L
MA
B
LAN
N
O
P
Engine speed signal T R R R R R R
Engine status signal T R
Fuel consumption monitor signalTR
RT
ICC steering switch signal T R
Malfunction indicator lamp signal T R
Wide open throttle position signal T R
A/T CHECK indicator lamp signal T R
A/T fluid temperature sensor signal T R
A/T position indicator lamp signal T R R
A/T self-diagnosis signal R T
Current gear position signal T R R
Output shaft revolution signal R T R
P range signal T R R R R
Turbine revolution signal R T R
ICC sensor signal T R
Buzzer output signalTR
TR
ICC OD cancel request signal R R T
ICC operation signal R R T
ICC system display signal T R
System setting signalTR
RT
A/C switch signal R T R
Blower fan motor switch signal R T
Day time running light request signal T R R
Door switch signal R T R R R
Front fog light request signal T R
Front wiper request signal R T R
High beam request signal T R R
Horn chirp signal T R
Ignition switch signal R T R
Key fob door unlock signal R T
Key fob ID signal R T
Key switch signal R T
Low beam request signal T R
Position light request signal T R R
Rear window defogger switch signal T R R
Sleep wake up signal R T R R
Theft warning horn request signal T R
Tire pressure data signal T R
Tire pressure signal T R R
Turn indicator signal T RSignal name/Connecting unit
ECM
TCM
LASER
ICC
ADP
BCM
DISP
HVAC
M&A
STRG
ABS
IPDM-E