Page 2387 of 3061

CHASSIS AND BODY MAINTENANCE
MA-25
< SERVICE INFORMATION >
C
D
E
F
G
H
I
J
K
MA
B
MA
N
O
P
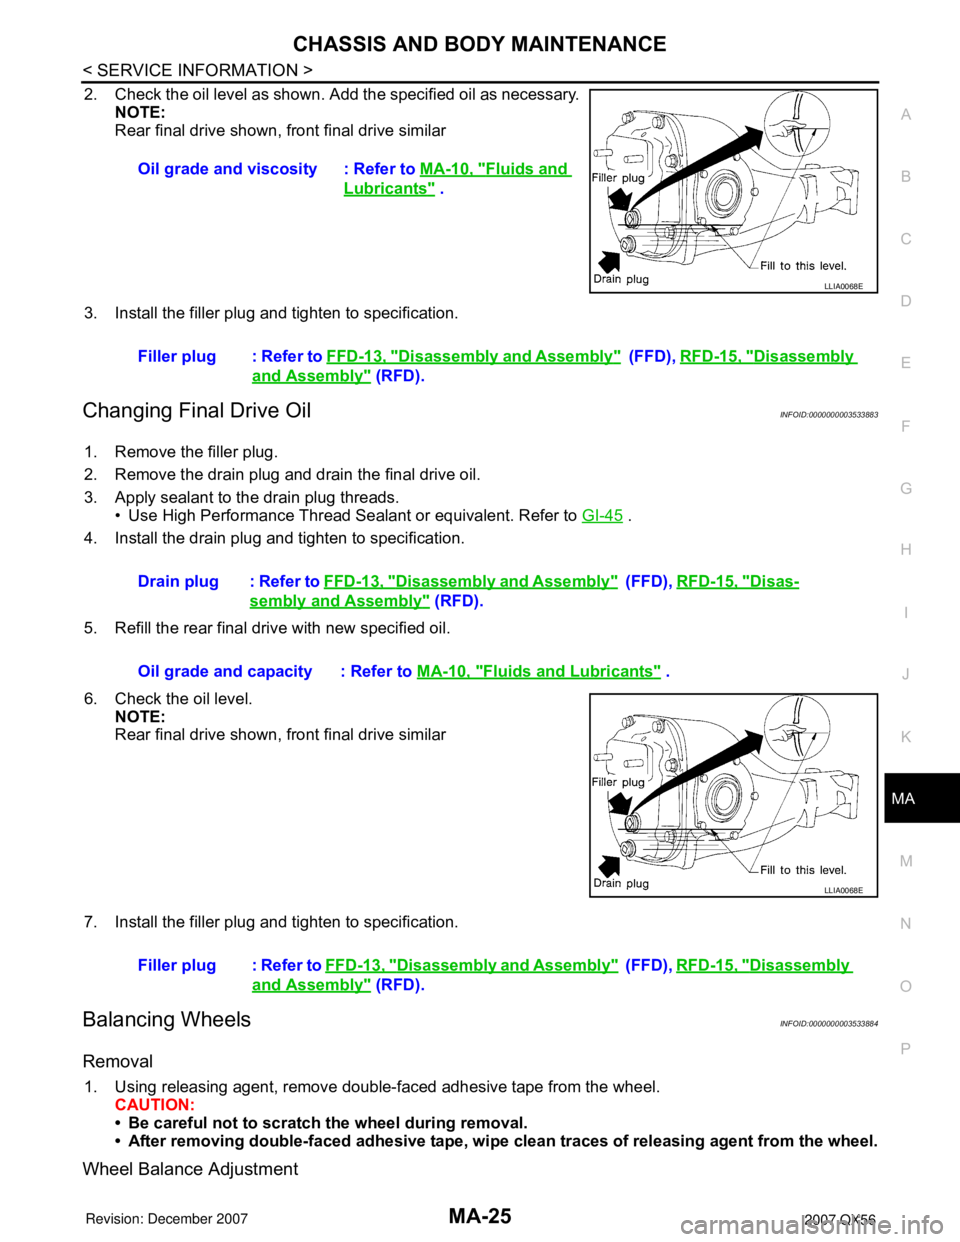
2. Check the oil level as shown. Add the specified oil as necessary.
NOTE:
Rear final drive shown, front final drive similar
3. Install the filler plug and tighten to specification.
Changing Final Drive OilINFOID:0000000003533883
1. Remove the filler plug.
2. Remove the drain plug and drain the final drive oil.
3. Apply sealant to the drain plug threads.
• Use High Performance Thread Sealant or equivalent. Refer to GI-45
.
4. Install the drain plug and tighten to specification.
5. Refill the rear final drive with new specified oil.
6. Check the oil level.
NOTE:
Rear final drive shown, front final drive similar
7. Install the filler plug and tighten to specification.
Balancing WheelsINFOID:0000000003533884
Removal
1. Using releasing agent, remove double-faced adhesive tape from the wheel.
CAUTION:
• Be careful not to scratch the wheel during removal.
• After removing double-faced adhesive tape, wipe clean traces of releasing agent from the wheel.
Wheel Balance Adjustment
Oil grade and viscosity : Refer to MA-10, "Fluids and
Lubricants" .
LLIA0068E
Filler plug : Refer to FFD-13, "Disassembly and Assembly" (FFD), RFD-15, "Disassembly
and Assembly" (RFD).
Drain plug : Refer to FFD-13, "
Disassembly and Assembly" ( F F D ) , RFD-15, "Disas-
sembly and Assembly" (RFD).
Oil grade and capacity : Refer to MA-10, "
Fluids and Lubricants" .
LLIA0068E
Filler plug : Refer to FFD-13, "Disassembly and Assembly" ( F F D ) , RFD-15, "Disassembly
and Assembly" (RFD).
Page 2391 of 3061

CHASSIS AND BODY MAINTENANCE
MA-29
< SERVICE INFORMATION >
C
D
E
F
G
H
I
J
K
MA
B
MA
N
O
P
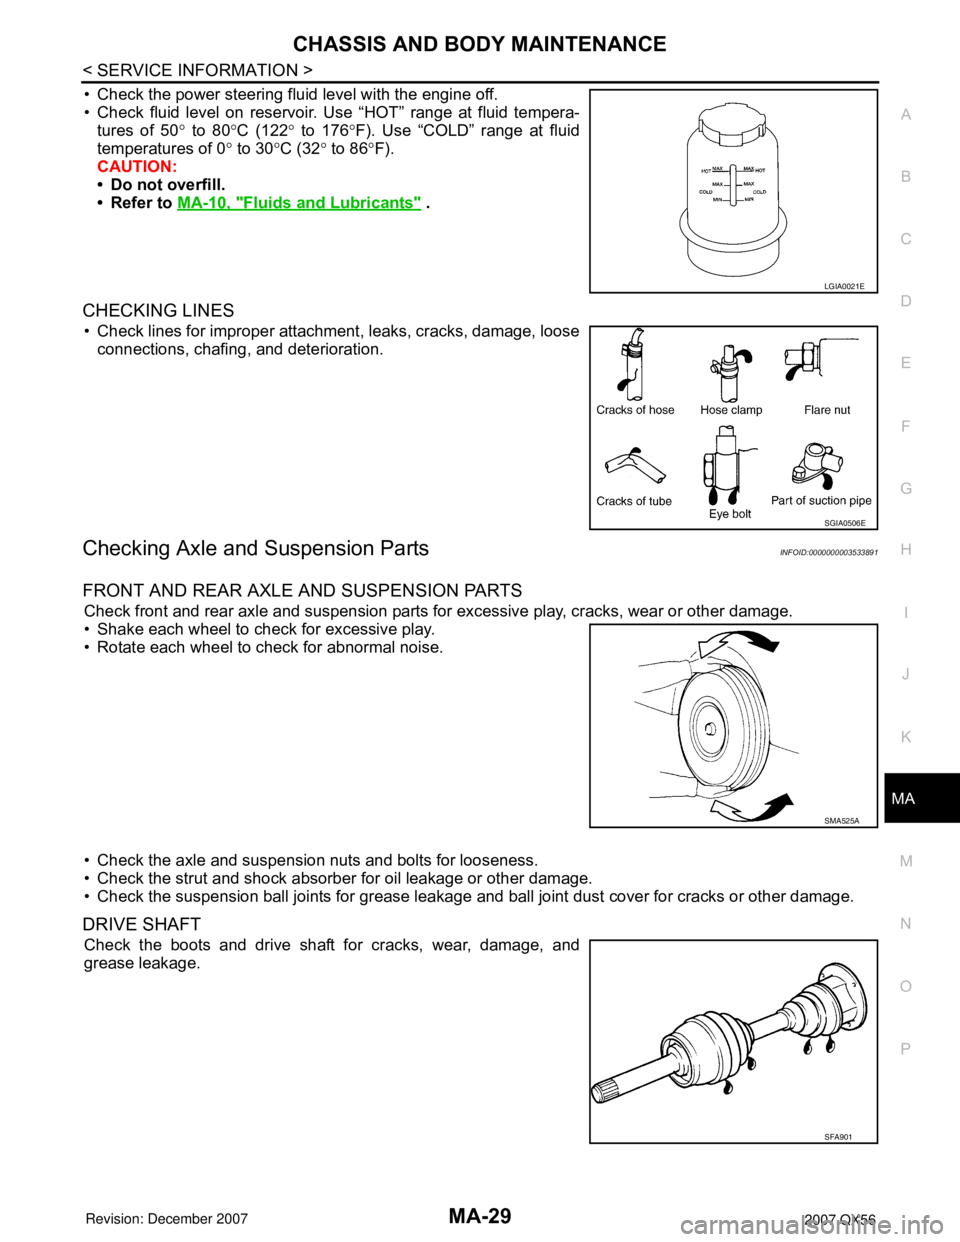
• Check the power steering fluid level with the engine off.
• Check fluid level on reservoir. Use “HOT” range at fluid tempera-
tures of 50° to 80°C (122° to 176°F). Use “COLD” range at fluid
temperatures of 0° to 30°C (32° to 86°F).
CAUTION:
• Do not overfill.
• Refer to MA-10, "
Fluids and Lubricants" .
CHECKING LINES
• Check lines for improper attachment, leaks, cracks, damage, loose
connections, chafing, and deterioration.
Checking Axle and Suspension PartsINFOID:0000000003533891
FRONT AND REAR AXLE AND SUSPENSION PARTS
Check front and rear axle and suspension parts for excessive play, cracks, wear or other damage.
• Shake each wheel to check for excessive play.
• Rotate each wheel to check for abnormal noise.
• Check the axle and suspension nuts and bolts for looseness.
• Check the strut and shock absorber for oil leakage or other damage.
• Check the suspension ball joints for grease leakage and ball joint dust cover for cracks or other damage.
DRIVE SHAFT
Check the boots and drive shaft for cracks, wear, damage, and
grease leakage.
LGIA0021E
SGIA0506E
SMA525A
SFA901
Page 2392 of 3061
MA-30
< SERVICE INFORMATION >
CHASSIS AND BODY MAINTENANCE
Lubricating Locks, Hinges and Hood Latches
INFOID:0000000003533892
Lubricate the locks, hinges, and latches at the locations as shown. Refer to MA-10, "Fluids and Lubricants" .
Checking Seat Belts, Buckles, Retractors, Anchors and AdjustersINFOID:0000000003533893
Check the seat belt buckles, webbing, retractors, anchors and adjusters. Replace any seat belt assembly as
necessary. Refer to SB-10, "
Seat Belt Inspection".
• Check the seat belt anchors for loose mounting bolts, damage, or excessive wear.
• Check the seat belt webbing for any damage, cuts, fraying, or excessive wear.
• Check the retractor for smooth operation.
• Check the function of the buckles by inserting the seat belt tongue and checking for proper engagement of
the buckle and press the button on the buckle to check for proper release of the seat belt tongue.
WLIA0024E
Page 2565 of 3061

RFD-8
< SERVICE INFORMATION >
DIFFERENTIAL GEAR OIL
DIFFERENTIAL GEAR OIL
Changing Differential Gear OilINFOID:0000000003532601
DRAINING
1. Stop the engine.
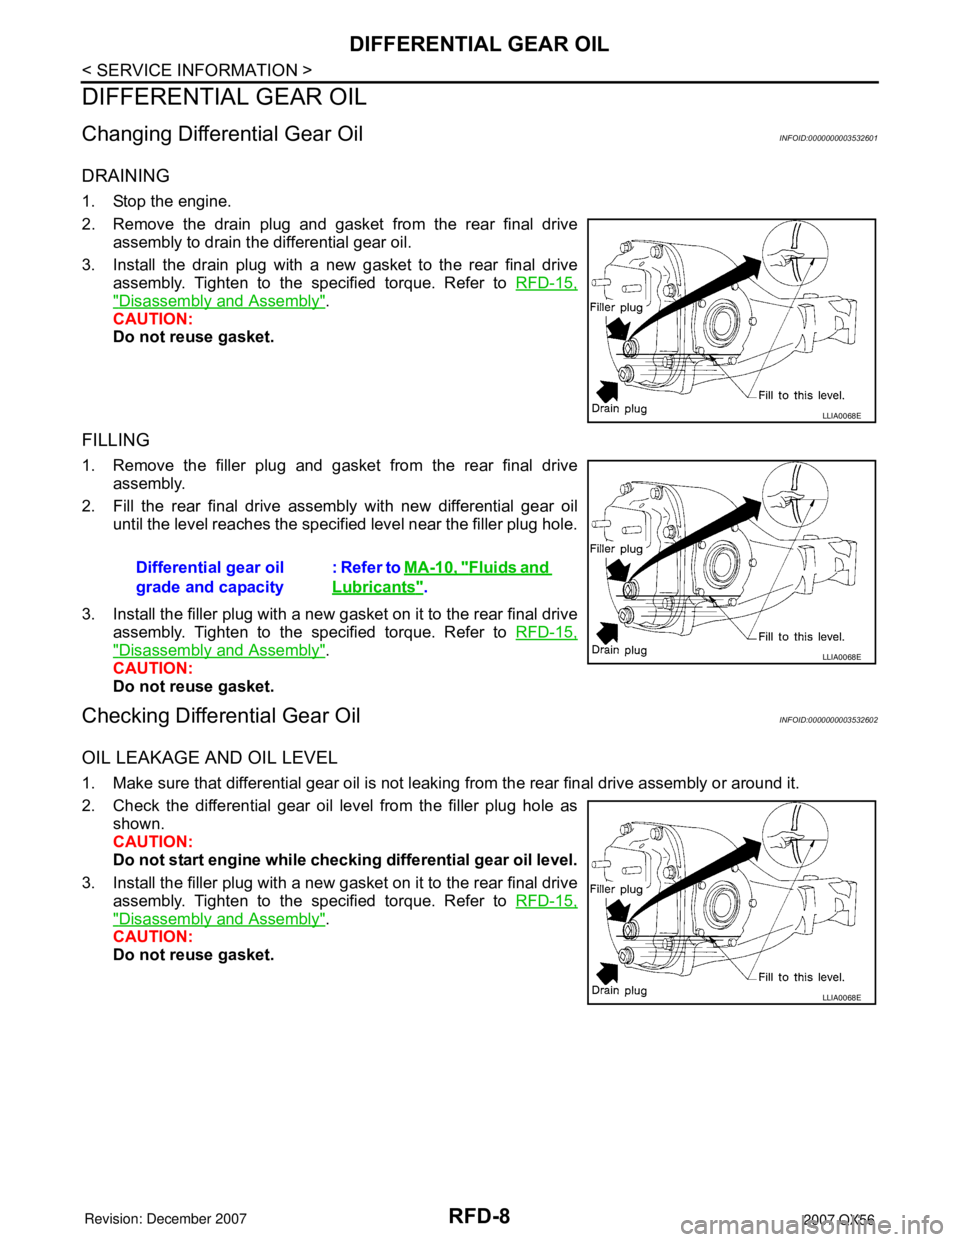
2. Remove the drain plug and gasket from the rear final drive
assembly to drain the differential gear oil.
3. Install the drain plug with a new gasket to the rear final drive
assembly. Tighten to the specified torque. Refer to RFD-15,
"Disassembly and Assembly".
CAUTION:
Do not reuse gasket.
FILLING
1. Remove the filler plug and gasket from the rear final drive
assembly.
2. Fill the rear final drive assembly with new differential gear oil
until the level reaches the specified level near the filler plug hole.
3. Install the filler plug with a new gasket on it to the rear final drive
assembly. Tighten to the specified torque. Refer to RFD-15,
"Disassembly and Assembly".
CAUTION:
Do not reuse gasket.
Checking Differential Gear OilINFOID:0000000003532602
OIL LEAKAGE AND OIL LEVEL
1. Make sure that differential gear oil is not leaking from the rear final drive assembly or around it.
2. Check the differential gear oil level from the filler plug hole as
shown.
CAUTION:
Do not start engine while checking differential gear oil level.
3. Install the filler plug with a new gasket on it to the rear final drive
assembly. Tighten to the specified torque. Refer to RFD-15,
"Disassembly and Assembly".
CAUTION:
Do not reuse gasket.
LLIA0068E
Differential gear oil
grade and capacity: Refer to MA-10, "Fluids and
Lubricants".
LLIA0068E
LLIA0068E
Page 2833 of 3061

TRANSFER FLUID
TF-11
< SERVICE INFORMATION >
C
E
F
G
H
I
J
K
L
MA
B
TF
N
O
P
TRANSFER FLUID
ReplacementINFOID:0000000003532513
DRAINING
1. Stop the engine.
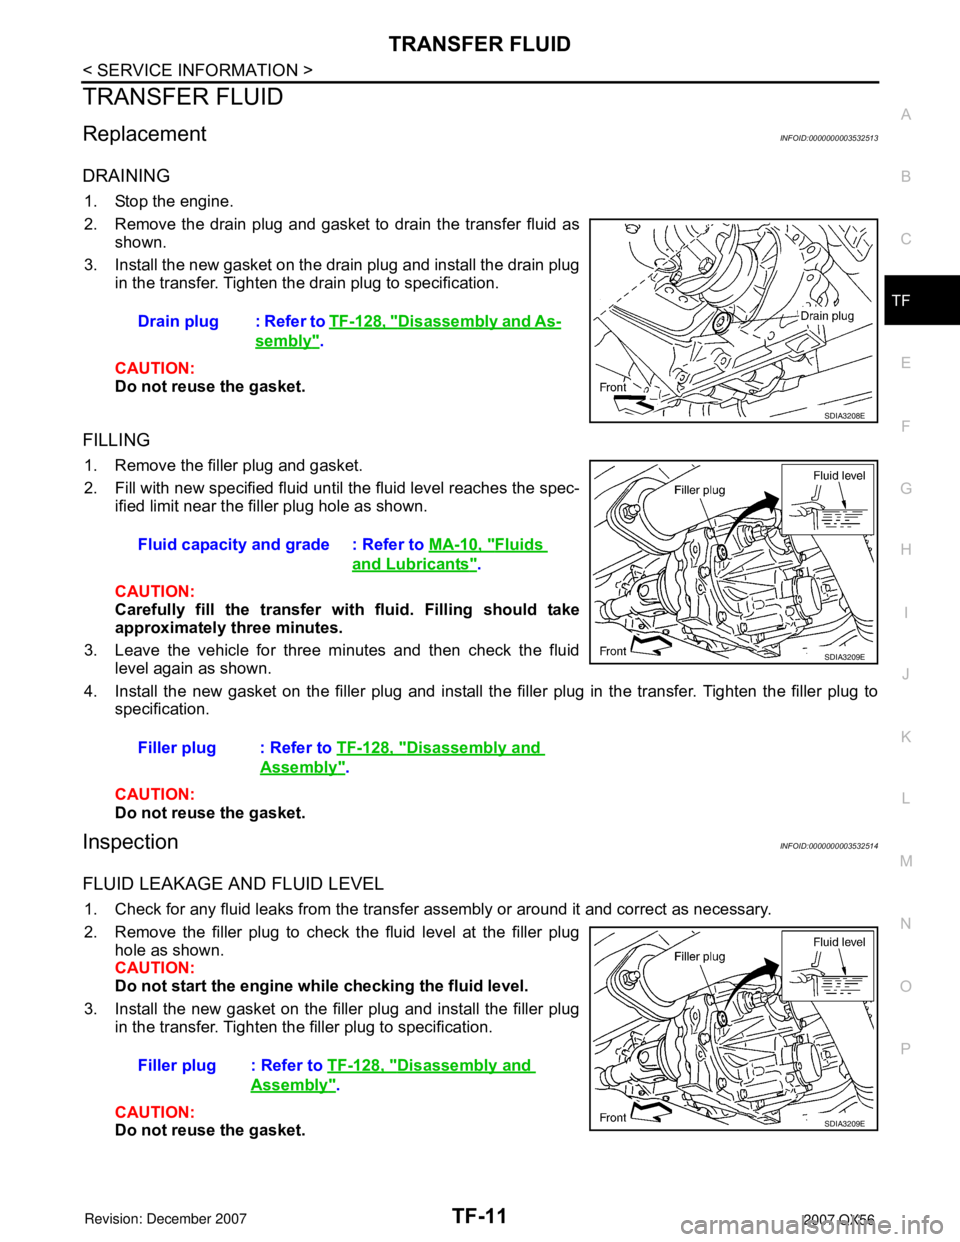
2. Remove the drain plug and gasket to drain the transfer fluid as
shown.
3. Install the new gasket on the drain plug and install the drain plug
in the transfer. Tighten the drain plug to specification.
CAUTION:
Do not reuse the gasket.
FILLING
1. Remove the filler plug and gasket.
2. Fill with new specified fluid until the fluid level reaches the spec-
ified limit near the filler plug hole as shown.
CAUTION:
Carefully fill the transfer with fluid. Filling should take
approximately three minutes.
3. Leave the vehicle for three minutes and then check the fluid
level again as shown.
4. Install the new gasket on the filler plug and install the filler plug in the transfer. Tighten the filler plug to
specification.
CAUTION:
Do not reuse the gasket.
InspectionINFOID:0000000003532514
FLUID LEAKAGE AND FLUID LEVEL
1. Check for any fluid leaks from the transfer assembly or around it and correct as necessary.
2. Remove the filler plug to check the fluid level at the filler plug
hole as shown.
CAUTION:
Do not start the engine while checking the fluid level.
3. Install the new gasket on the filler plug and install the filler plug
in the transfer. Tighten the filler plug to specification.
CAUTION:
Do not reuse the gasket.Drain plug : Refer to TF-128, "
Disassembly and As-
sembly".
SDIA3208E
Fluid capacity and grade : Refer to MA-10, "Fluids
and Lubricants".
Filler plug : Refer to TF-128, "
Disassembly and
Assembly".
SDIA3209E
Filler plug : Refer to TF-128, "Disassembly and
Assembly".
SDIA3209E
Page:
< prev 1-8 9-16 17-24