2007 INFINITI QX56 wheel
[x] Cancel search: wheelPage 2857 of 3061

TROUBLE DIAGNOSIS
TF-35
< SERVICE INFORMATION >
C
E
F
G
H
I
J
K
L
MA
B
TF
N
O
P
• Heavy tight-corner braking symptom occurs when vehicle is driven in the following conditions: 4WD shift
switch is "4H" or "4LO", steering wheel is turned fully to either side.
Transfer Control Unit Input/Output Signal Reference ValueINFOID:0000000003532526
TRANSFER CONTROL UNIT INSPECTION TABLE
Specifications with CONSULT-II
Monitored item [Unit] Content Condition Display value
VHCL/S SEN·FR [km/h]
or [mph]Front wheel speedVehicle stopped 0 km/h (0 MPH)
Vehicle running
CAUTION:
Check air pressure of tire under standard condition.Approximately
equal to the indica-
tion on speedome-
ter (Inside of
±10%)
VHCL/S SEN·RR [km/h]
or [mph]Rear wheel speedVehicle stopped 0 km/h (0 MPH)
Vehicle running
CAUTION:
Check air pressure of tire under standard condition.Approximately
equal to the indica-
tion on speedome-
ter (Inside of
±10%)
ENGINE SPEED [rpm] Engine speedEngine stopped
(Engine speed: Less than 400 rpm)0 rpm
Engine running
(Engine speed: 400 rpm or more)Approximately
equal to the indica-
tion on tachometer
THRTL POS SEN [V]Accelerator pedal posi-
tion (APP) sensor signal
voltageAccelerator pedal: Release Approx. 0.5V
Accelerator pedal: Fully depressed Approx. 4.0V
FLUID TEMP SE [V]Transfer fluid tempera-
ture signal voltageTransfer fluid temperature approx. 20 - 80°C (68 - 176°F) Approx. 1.1 - 0.3V
BATTERY VOLT [V]Power supply voltage for
transfer control unitIgnition switch: ON Battery voltage
2WD SWITCH [ON/OFF]Input condition from 4WD
shift switch4WD shift switch: 2WD ON
4WD shift switch: AUTO, 4H or 4LO OFF
AUTO SWITCH [ON/
OFF]Input condition from 4WD
shift switch4WD shift switch: AUTO ON
4WD shift switch: 2WD, 4H or 4LO OFF
LOCK SWITCH [ON/
OFF]Input condition from 4WD
shift switch4WD shift switch: 4H ON
4WD shift switch: 2WD, AUTO or 4LO OFF
4L SWITCH [ON/OFF]Input condition from 4WD
shift switch4WD shift switch: 4LO ON
4WD shift switch: 2WD, AUTO or 4H OFF
N POSI SW TF [ON/
OFF]Condition of neutral-4LO
switch• Vehicle stopped
• Engine running
• A/T selector lever “N” posi-
tion
• Brake pedal depressed4WD shift switch: 2WD,
AUTO or 4HOFF
4WD shift switch: 4H to
4LO (While actuator mo-
tor is operating.)OFF → ON
4WD shift switch: 4LO to
4H (While actuator motor
is operating.)ON → OFF
4WD shift switch: 4LO ON
Page 2867 of 3061

TROUBLE DIAGNOSIS
TF-45
< SERVICE INFORMATION >
C
E
F
G
H
I
J
K
L
MA
B
TF
N
O
P
2. Start engine and select “SELF-DIAG RESULTS” mode for “ALL MODE AWD/4WD” with CONSULT-II.
3. Touch “ERASE” on CONSULT-II screen to erase DTC memory.
CAUTION:
If memory cannot be erased, perform applicable diagnosis.
DATA MONITOR MODE
Operation Procedure
Refer to GI-36, "CONSULT-II Start Procedure".
Display Item List
×: Standard –: Not applicable
Monitored item (Unit)Monitor item selection
Remarks
ECU INPUT
SIGNALSMAIN
SIGNALSSELEC-
TION FROM
MENU
VHCL/S SEN·FR [km/h] or [mph]×–×Wheel speed calculated by ABS actuator and
electric unit (control unit).
Signal input with CAN communication line.
VHCL/S SEN·RR [km/h] or [mph]×–×Wheel speed calculated by TCM.
Signal input with CAN communication line.
ENGINE SPEED [rpm]×–×Engine speed calculated by ECM.
Signal input with CAN communication line.
THRTL POS SEN [V]×–×Accelerator pedal position (APP) sensor sig-
nal voltage is displayed.
Signal input with CAN communication line.
FLUID TEMP SE [V]×–×Transfer fluid temperature sensor signal volt-
age is displayed.
BATTERY VOLT [V]×–×Power supply voltage for transfer control unit.
2WD SWITCH [ON/OFF]×–×4WD shift switch status is displayed.
AUTO SWITCH [ON/OFF]×–×4WD shift switch status is displayed.
LOCK SWITCH [ON/OFF]×–×4WD shift switch status is displayed.
(LOCK means 4H of 4WD shift switch.)
4L SW [ON/OFF]×–×4WD shift switch status is displayed.
(4L means 4LO of 4WD shift switch.)
N POSI SW TF [ON/OFF]×–×Neutral-4LO switch signal status is displayed.
ATP SWITCH [ON/OFF]×–×ATP switch signal status is displayed.
WAIT DETCT SW [ON/OFF]×–×Wait detection switch status is displayed.
LINE PRES SW [ON/OFF]×–×Line pressure switch status is displayed.
CL PRES SW [ON / OFF]×–×Clutch pressure switch status is displayed.
N POSI SW AT [ON/OFF]זדN” position signal of A/T PNP switch status is
displayed.
Signal input with CAN communication line.
R POSI SW AT [ON/OFF]זדR” position signal of A/T PNP switch status is
displayed.
Signal input with CAN communication line.
P POSI SW AT [ON/OFF]זדP” position signal of A/T PNP switch status is
displayed.
Signal input with CAN communication line.
ABS OPER SW [ON/OFF]×–×ABS operation signal status is displayed.
Signal input with CAN communication line.
VDC OPER SW [ON/OFF]×–×VDC operation signal status is displayed.
Signal input with CAN communication line.
TCS OPER SW [ON/OFF]×–×TCS operation signal status is displayed.
Signal input with CAN communication line.
Page 2935 of 3061

TROUBLE DIAGNOSIS FOR SYMPTOMS
TF-113
< SERVICE INFORMATION >
C
E
F
G
H
I
J
K
L
MA
B
TF
N
O
P
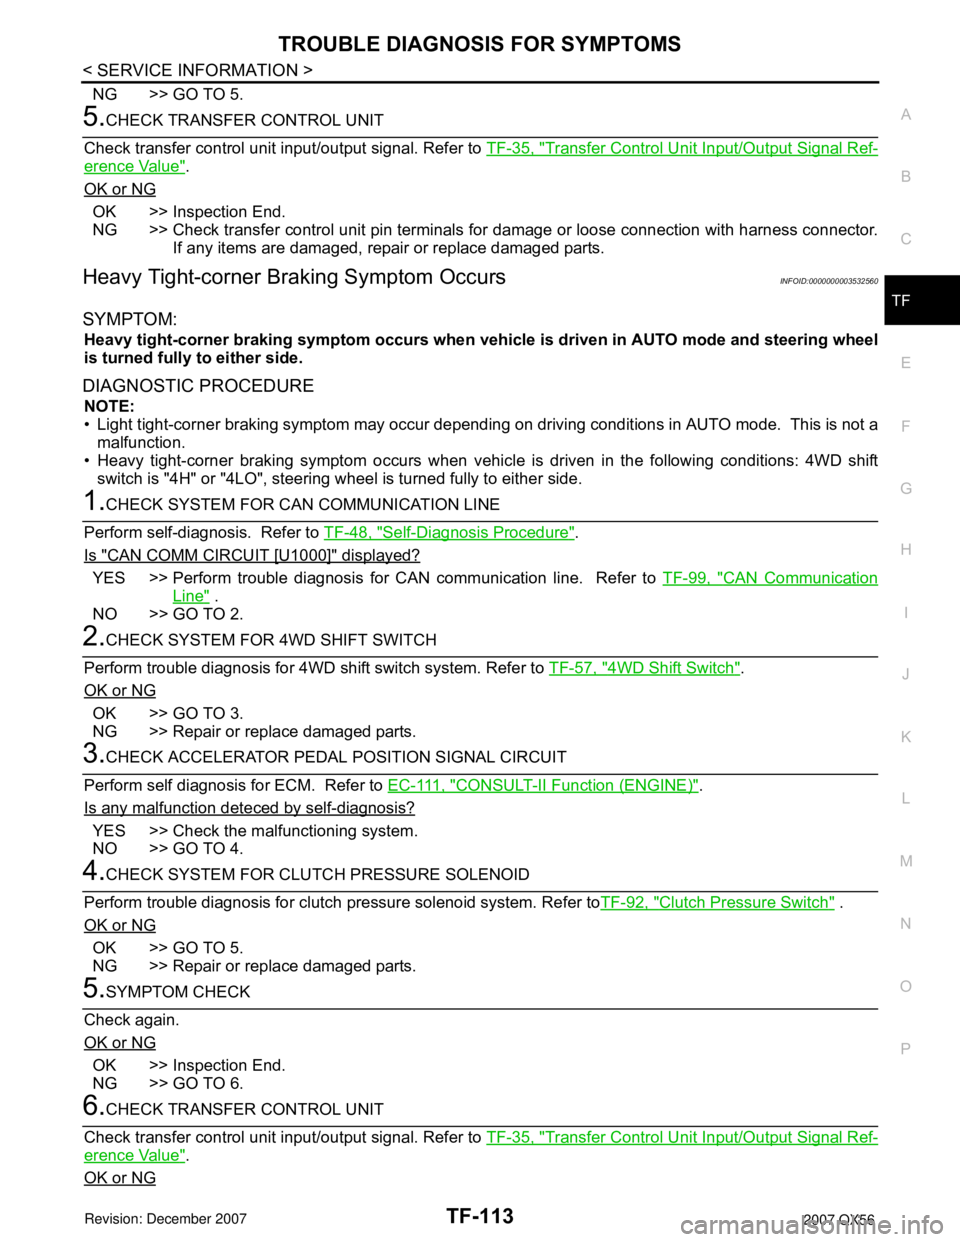
NG >> GO TO 5.
5.CHECK TRANSFER CONTROL UNIT
Check transfer control unit input/output signal. Refer to TF-35, "
Transfer Control Unit Input/Output Signal Ref-
erence Value".
OK or NG
OK >> Inspection End.
NG >> Check transfer control unit pin terminals for damage or loose connection with harness connector.
If any items are damaged, repair or replace damaged parts.
Heavy Tight-corner Braking Symptom OccursINFOID:0000000003532560
SYMPTOM:
Heavy tight-corner braking symptom occurs when vehicle is driven in AUTO mode and steering wheel
is turned fully to either side.
DIAGNOSTIC PROCEDURE
NOTE:
• Light tight-corner braking symptom may occur depending on driving conditions in AUTO mode. This is not a
malfunction.
• Heavy tight-corner braking symptom occurs when vehicle is driven in the following conditions: 4WD shift
switch is "4H" or "4LO", steering wheel is turned fully to either side.
1.CHECK SYSTEM FOR CAN COMMUNICATION LINE
Perform self-diagnosis. Refer to TF-48, "
Self-Diagnosis Procedure".
Is "CAN COMM CIRCUIT [U1000]" displayed?
YES >> Perform trouble diagnosis for CAN communication line. Refer to TF-99, "CAN Communication
Line" .
NO >> GO TO 2.
2.CHECK SYSTEM FOR 4WD SHIFT SWITCH
Perform trouble diagnosis for 4WD shift switch system. Refer to TF-57, "
4WD Shift Switch".
OK or NG
OK >> GO TO 3.
NG >> Repair or replace damaged parts.
3.CHECK ACCELERATOR PEDAL POSITION SIGNAL CIRCUIT
Perform self diagnosis for ECM. Refer to E C - 111 , "
CONSULT-II Function (ENGINE)".
Is any malfunction deteced by self-diagnosis?
YES >> Check the malfunctioning system.
NO >> GO TO 4.
4.CHECK SYSTEM FOR CLUTCH PRESSURE SOLENOID
Perform trouble diagnosis for clutch pressure solenoid system. Refer toTF-92, "
Clutch Pressure Switch" .
OK or NG
OK >> GO TO 5.
NG >> Repair or replace damaged parts.
5.SYMPTOM CHECK
Check again.
OK or NG
OK >> Inspection End.
NG >> GO TO 6.
6.CHECK TRANSFER CONTROL UNIT
Check transfer control unit input/output signal. Refer to TF-35, "
Transfer Control Unit Input/Output Signal Ref-
erence Value".
OK or NG
Page 2990 of 3061

WT-1
SUSPENSION
C
D
F
G
H
I
J
K
L
M
SECTION WT
A
B
WT
N
O
PCONTENTS
ROAD WHEELS & TIRES
SERVICE INFORMATION ............................2
PRECAUTIONS ...................................................2
Precaution for Supplemental Restraint System
(SRS) "AIR BAG" and "SEAT BELT PRE-TEN-
SIONER" ...................................................................
2
PREPARATION ...................................................3
Special Service Tool .................................................3
Commercial Service Tool ..........................................3
NOISE, VIBRATION AND HARSHNESS
(NVH) TROUBLESHOOTING .............................
4
NVH Troubleshooting Chart ......................................4
WHEEL ................................................................5
Inspection ..................................................................5
WHEEL AND TIRE ASSEMBLY .........................6
Balancing Wheels .....................................................6
Rotation .....................................................................7
LOW TIRE PRESSURE WARNING SYSTEM .....8
System Component ...................................................8
System Description ...................................................8
CAN COMMUNICATION ....................................10
System Description .................................................10
TROUBLE DIAGNOSIS .....................................11
Wiring Diagram- T/WARN - .....................................11
Terminal and Reference Value (BCM) ....................12
ID Registration Procedure .......................................12
Transmitter Wake Up Operation .............................14
CONSULT-II Function (BCM) ..................................15
Self-Diagnosis .........................................................15
How to Perform Trouble Diagnosis for Quick and
Accurate Repair .......................................................
17
Preliminary Check ...................................................18
Flash Code/Symptom Chart ....................................18
TROUBLE DIAGNOSIS FOR SELF-DIAG-
NOSTIC ITEMS .................................................
20
Data from Transmitter Not Being Received .............20
Transmitter Malfunction ...........................................20
Transmitter Pressure Malfunction ............................21
Vehicle Speed Signal ..............................................21
Ignition Signal ..........................................................22
TROUBLE DIAGNOSIS FOR SYMPTOMS ......23
Low Tire Pressure Warning Lamp Does Not Come
On When Ignition Switch Is Turned On ...................
23
Low Tire Pressure Warning Lamp Stays On When
Ignition Switch Is Turned On ...................................
23
Low Tire Pressure Warning Lamp Flashes When
Ignition Switch Is Turned On ...................................
24
Hazard Warning Lamps Flash When Ignition
Switch Is Turned On ................................................
25
"TIRE PRESSURE" Information in Display Unit
Does Not Exist .........................................................
25
ID Registration Cannot Be Completed ....................25
REMOVAL AND INSTALLATION .....................26
Transmitter (Pressure Sensor) ................................26
SERVICE DATA AND SPECIFICATIONS
(SDS) .................................................................
28
Road Wheel .............................................................28
Tire ..........................................................................28
Page 2992 of 3061

PREPARATION
WT-3
< SERVICE INFORMATION >
C
D
F
G
H
I
J
K
L
MA
B
WT
N
O
P
PREPARATION
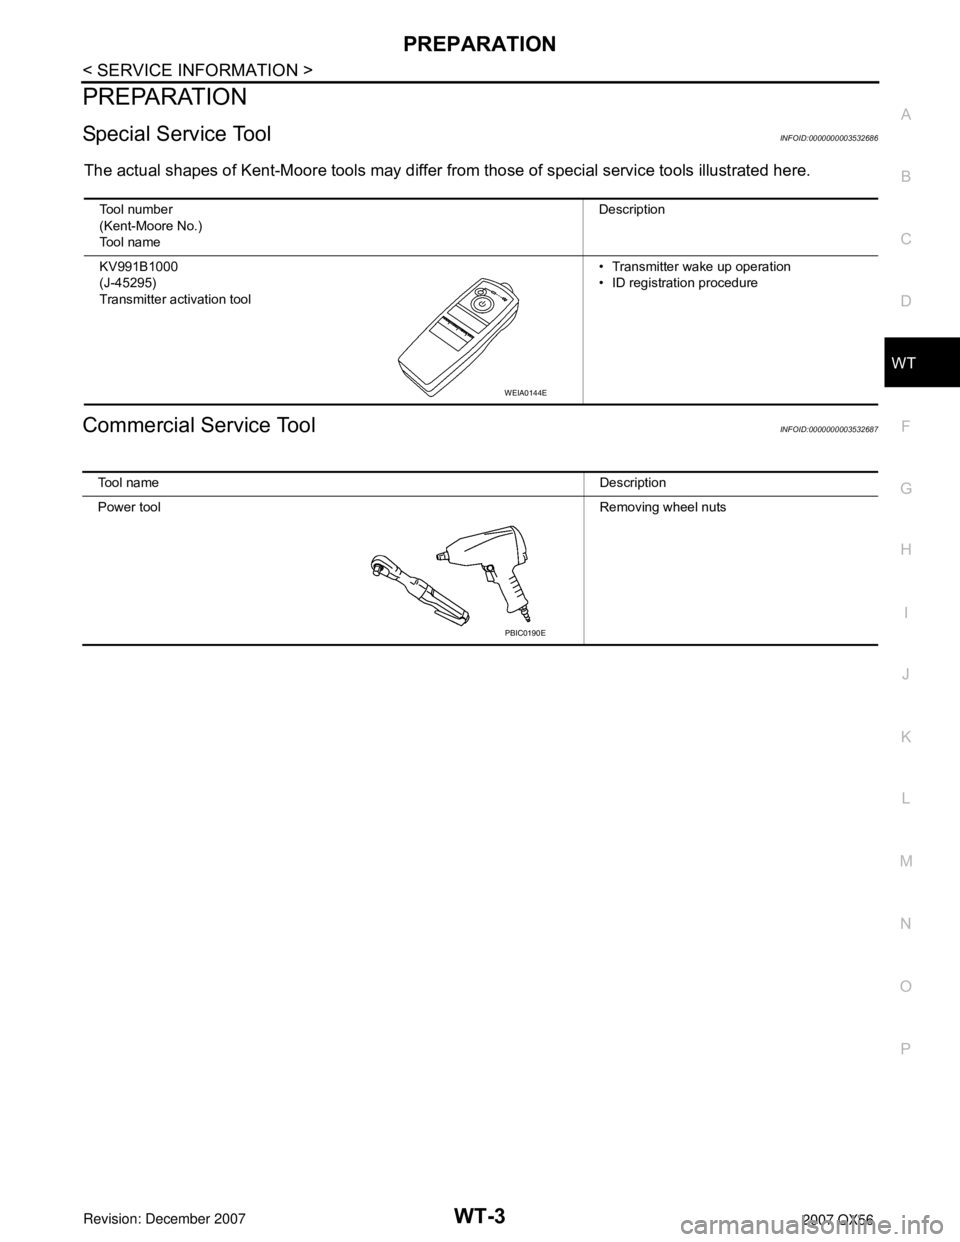
Special Service ToolINFOID:0000000003532686
The actual shapes of Kent-Moore tools may differ from those of special service tools illustrated here.
Commercial Service ToolINFOID:0000000003532687
Tool number
(Kent-Moore No.)
Tool nameDescription
KV991B1000
(J-45295)
Transmitter activation tool• Transmitter wake up operation
• ID registration procedure
WEIA0144E
Tool nameDescription
Power toolRemoving wheel nuts
PBIC0190E
Page 2993 of 3061

WT-4
< SERVICE INFORMATION >
NOISE, VIBRATION AND HARSHNESS (NVH) TROUBLESHOOTING
NOISE, VIBRATION AND HARSHNESS (NVH) TROUBLESHOOTING
NVH Troubleshooting ChartINFOID:0000000003532688
Use the chart below to help you find the cause of the symptom. If necessary, repair or replace these parts.
×: ApplicableReference page
WT-5WT-6WT-28WT-7—
—
WT-28
FFD-6, "
NVH Troubleshooting Chart
" (FFD),
RFD-7, "
NVH Troubleshooting Chart
" (RFD)
FA X - 4 , "
NVH Troubleshooting Chart
" (FAX),
FSU-4, "
NVH Troubleshooting Chart
" (FSU)
RAX-4, "
NVH Troubleshooting Chart
" (RAX),
RSU-4, "
NVH Troubleshooting Chart
" (RSU)
Refer to TIRES in this chart.
Refer to ROAD WHEEL in this chart.
BR-4, "
NVH Troubleshooting Chart
"
PS-5, "
NVH Troubleshooting Chart
"
Possible cause and SUSPECTED PARTS
Out-of-round
Imbalance
Incorrect tire pressure
Uneven tire wear
Deformation or damage
Non-uniformity
Incorrect tire size
DIFFERENTIAL
FRONT AXLE AND FRONT SUSPENSION
REAR AXLE AND REAR SUSPENSION
TIRES
ROAD WHEEL
BRAKE
STEERING
SymptomTIRESNoise× ××××× × × × × ××
Shake× ×××× × × × × ××
Vibration××××××
Shimmy× ×××××× × × × ××
Shudder× ×××× × × × × ××
Poor quality ride or
handling× ×××× × × × ×
ROAD
WHEELNoise×× × ××× ×××
Shake×× × ×× ×××
Shimmy, shudder×× × ×× ×××
Poor quality ride or
handling×× × ×× ×
Page 2994 of 3061

WHEEL
WT-5
< SERVICE INFORMATION >
C
D
F
G
H
I
J
K
L
MA
B
WT
N
O
P
WHEEL
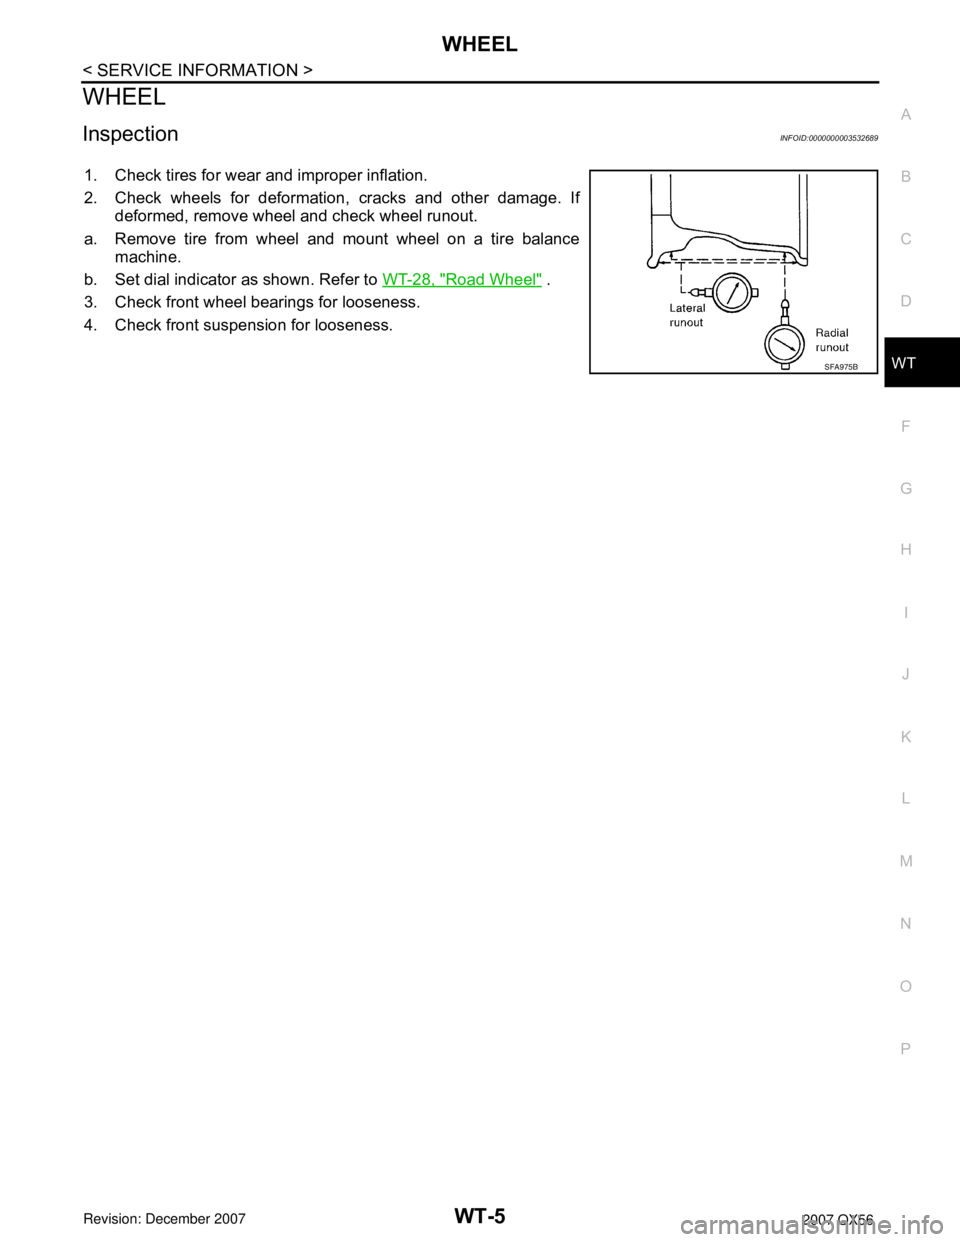
InspectionINFOID:0000000003532689
1. Check tires for wear and improper inflation.
2. Check wheels for deformation, cracks and other damage. If
deformed, remove wheel and check wheel runout.
a. Remove tire from wheel and mount wheel on a tire balance
machine.
b. Set dial indicator as shown. Refer to WT-28, "
Road Wheel" .
3. Check front wheel bearings for looseness.
4. Check front suspension for looseness.
SFA975B
Page 2995 of 3061

WT-6
< SERVICE INFORMATION >
WHEEL AND TIRE ASSEMBLY
WHEEL AND TIRE ASSEMBLY
Balancing WheelsINFOID:0000000003532690
Removal
1. Using releasing agent, remove double-faced adhesive tape from the wheel.
CAUTION:
• Be careful not to scratch the wheel during removal.
• After removing double-faced adhesive tape, wipe clean traces of releasing agent from the wheel.
Wheel Balance Adjustment
• If a tire balance machine has adhesion balance weight mode settings and drive-in weight mode setting,
select and adjust a drive-in weight mode suitable for wheels.
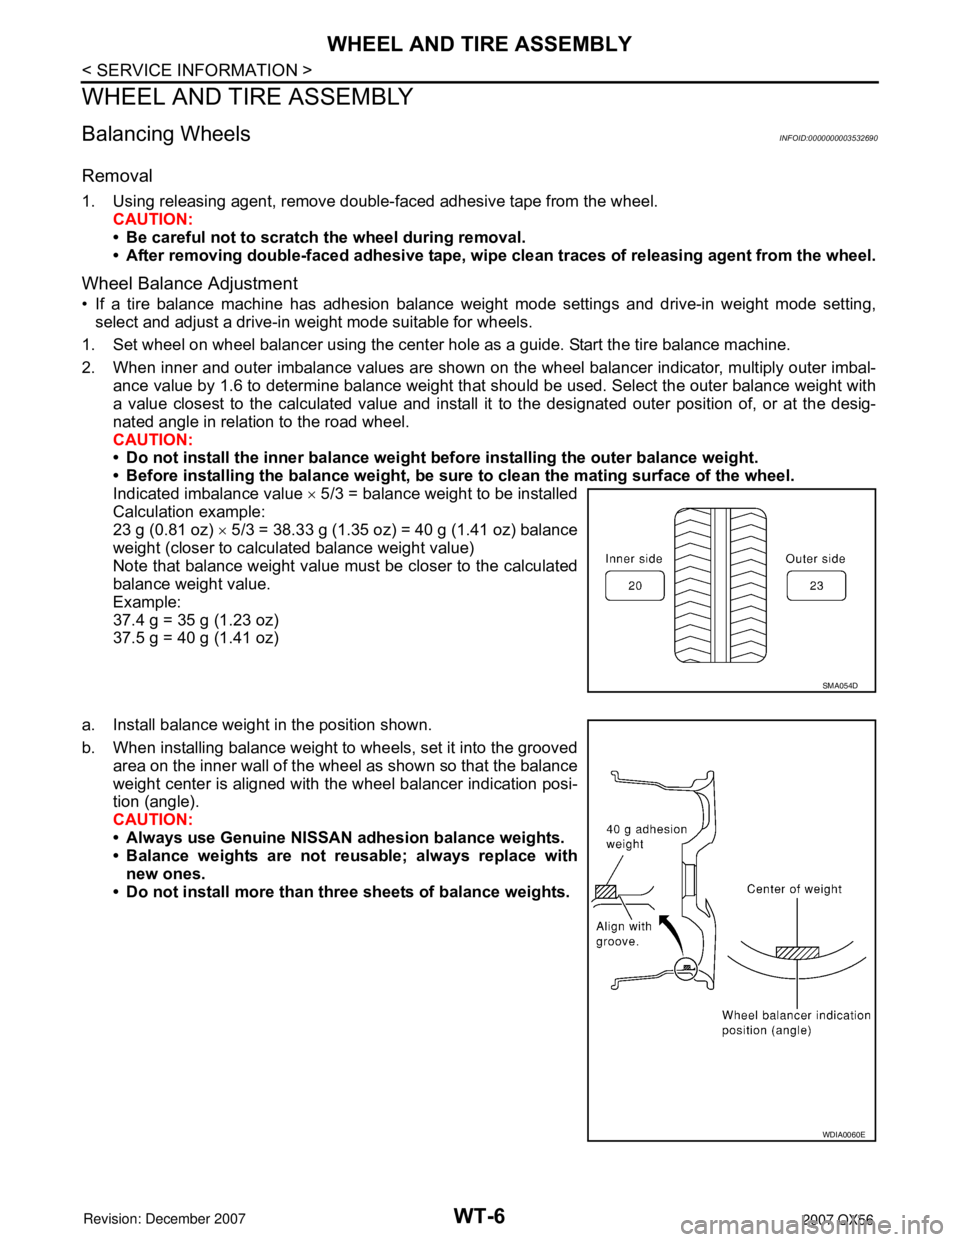
1. Set wheel on wheel balancer using the center hole as a guide. Start the tire balance machine.
2. When inner and outer imbalance values are shown on the wheel balancer indicator, multiply outer imbal-
ance value by 1.6 to determine balance weight that should be used. Select the outer balance weight with
a value closest to the calculated value and install it to the designated outer position of, or at the desig-
nated angle in relation to the road wheel.
CAUTION:
• Do not install the inner balance weight before installing the outer balance weight.
• Before installing the balance weight, be sure to clean the mating surface of the wheel.
Indicated imbalance value × 5/3 = balance weight to be installed
Calculation example:
23 g (0.81 oz) × 5/3 = 38.33 g (1.35 oz) = 40 g (1.41 oz) balance
weight (closer to calculated balance weight value)
Note that balance weight value must be closer to the calculated
balance weight value.
Example:
37.4 g = 35 g (1.23 oz)
37.5 g = 40 g (1.41 oz)
a. Install balance weight in the position shown.
b. When installing balance weight to wheels, set it into the grooved
area on the inner wall of the wheel as shown so that the balance
weight center is aligned with the wheel balancer indication posi-
tion (angle).
CAUTION:
• Always use Genuine NISSAN adhesion balance weights.
• Balance weights are not reusable; always replace with
new ones.
• Do not install more than three sheets of balance weights.
SMA054D
WDIA0060E