2007 INFINITI QX56 fuse
[x] Cancel search: fusePage 2888 of 3061
TF-66
< SERVICE INFORMATION >
TROUBLE DIAGNOSIS FOR SYSTEM
OK or NG
OK >> GO TO 7.
NG >> GO TO 2.
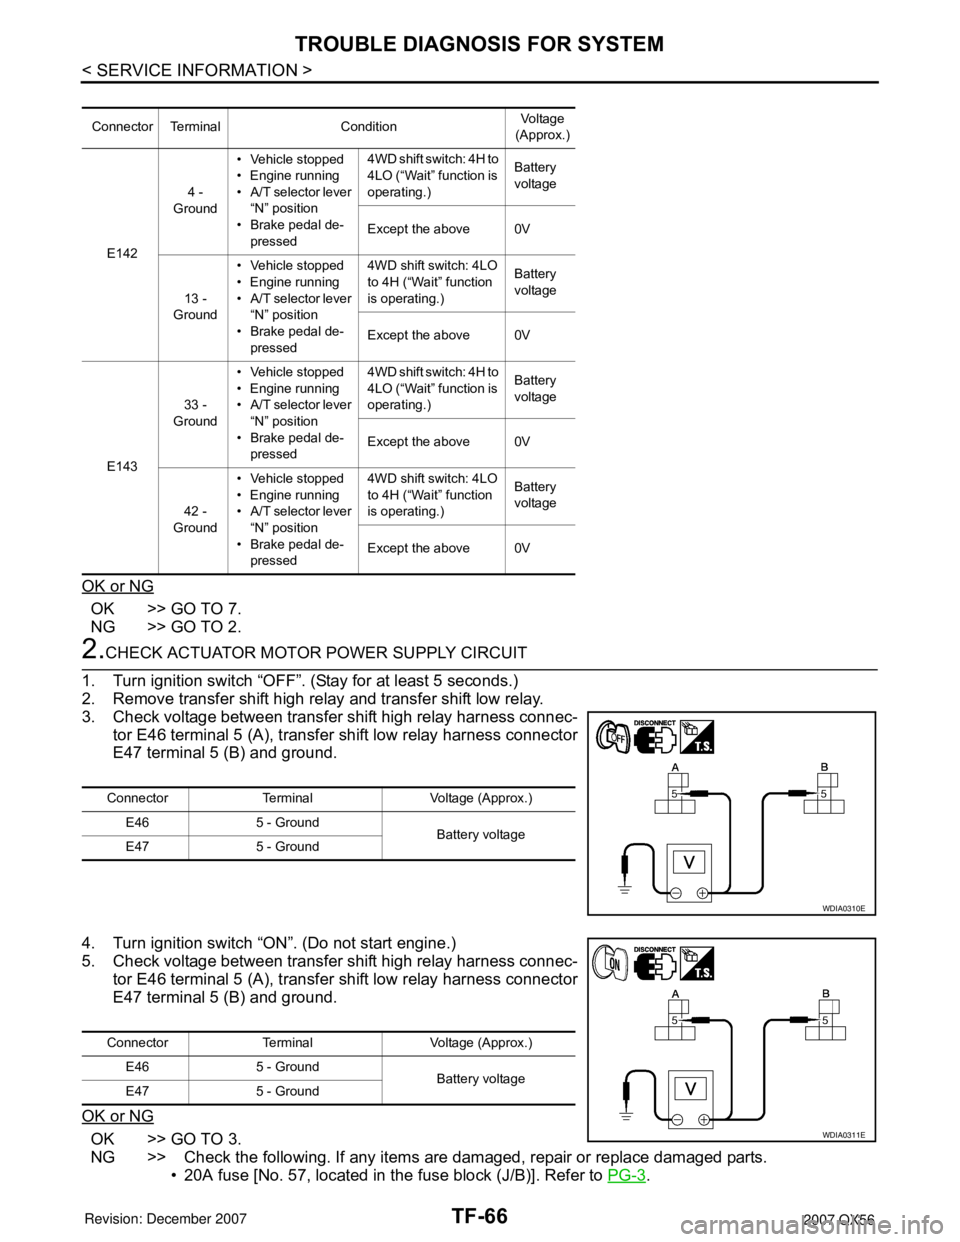
2.CHECK ACTUATOR MOTOR POWER SUPPLY CIRCUIT
1. Turn ignition switch “OFF”. (Stay for at least 5 seconds.)
2. Remove transfer shift high relay and transfer shift low relay.
3. Check voltage between transfer shift high relay harness connec-
tor E46 terminal 5 (A), transfer shift low relay harness connector
E47 terminal 5 (B) and ground.
4. Turn ignition switch “ON”. (Do not start engine.)
5. Check voltage between transfer shift high relay harness connec-
tor E46 terminal 5 (A), transfer shift low relay harness connector
E47 terminal 5 (B) and ground.
OK or NG
OK >> GO TO 3.
NG >> Check the following. If any items are damaged, repair or replace damaged parts.
• 20A fuse [No. 57, located in the fuse block (J/B)]. Refer to PG-3
.
Connector Terminal ConditionVoltage
(Approx.)
E1424 -
Ground• Vehicle stopped
• Engine running
• A/T selector lever
“N” position
• Brake pedal de-
pressed4WD shift switch: 4H to
4LO (“Wait” function is
operating.)Battery
voltage
Except the above 0V
13 -
Ground• Vehicle stopped
• Engine running
• A/T selector lever
“N” position
• Brake pedal de-
pressed4WD shift switch: 4LO
to 4H (“Wait” function
is operating.)Battery
voltage
Except the above 0V
E14333 -
Ground• Vehicle stopped
• Engine running
• A/T selector lever
“N” position
• Brake pedal de-
pressed4WD shift switch: 4H to
4LO (“Wait” function is
operating.)Battery
voltage
Except the above 0V
42 -
Ground• Vehicle stopped
• Engine running
• A/T selector lever
“N” position
• Brake pedal de-
pressed4WD shift switch: 4LO
to 4H (“Wait” function
is operating.)Battery
voltage
Except the above 0V
Connector Terminal Voltage (Approx.)
E46 5 - Ground
Battery voltage
E47 5 - Ground
WDIA0310E
Connector Terminal Voltage (Approx.)
E46 5 - Ground
Battery voltage
E47 5 - Ground
WDIA0311E
Page 2896 of 3061
TF-74
< SERVICE INFORMATION >
TROUBLE DIAGNOSIS FOR SYSTEM
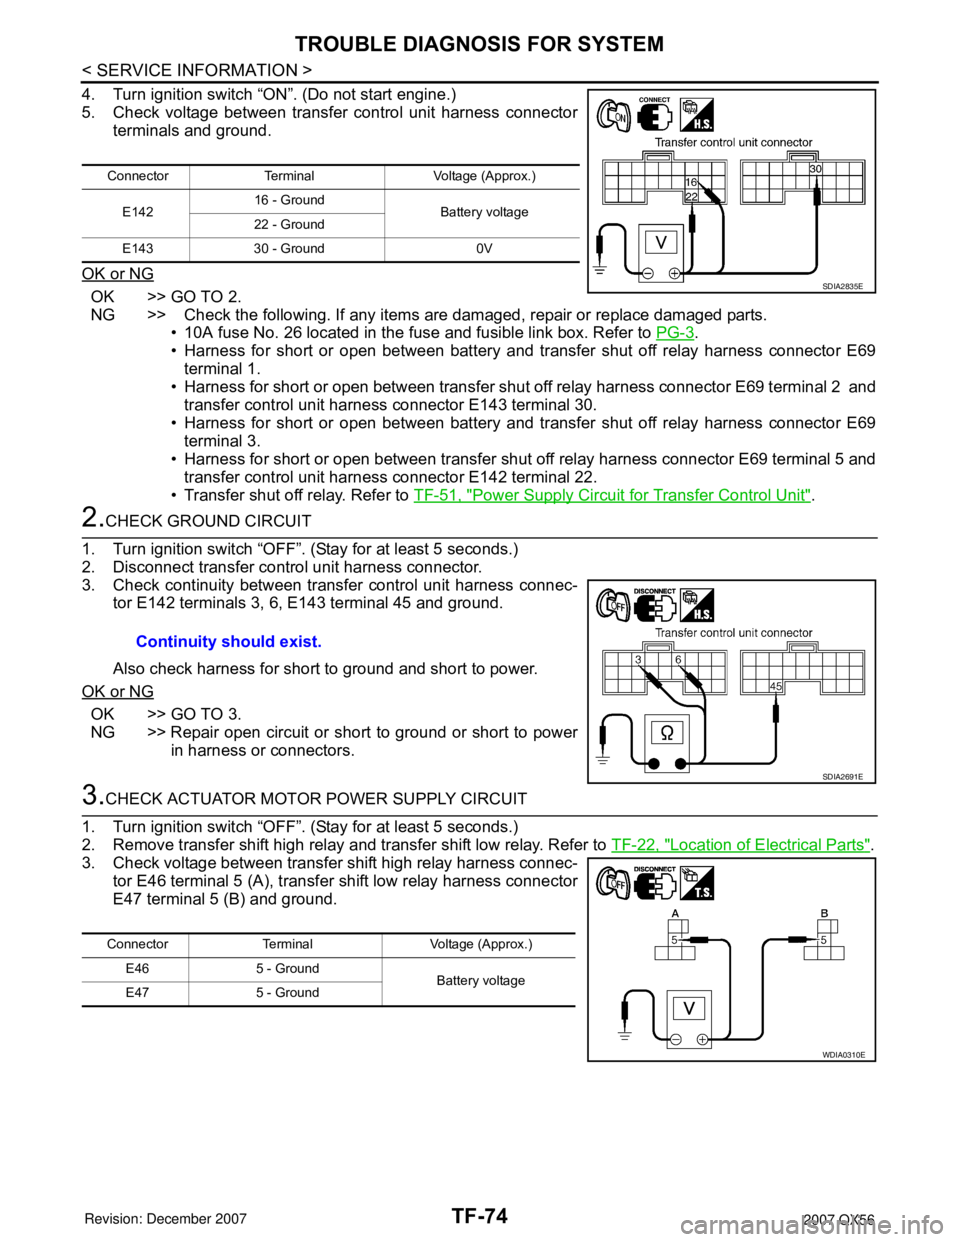
4. Turn ignition switch “ON”. (Do not start engine.)
5. Check voltage between transfer control unit harness connector
terminals and ground.
OK or NG
OK >> GO TO 2.
NG >> Check the following. If any items are damaged, repair or replace damaged parts.
• 10A fuse No. 26 located in the fuse and fusible link box. Refer to PG-3
.
• Harness for short or open between battery and transfer shut off relay harness connector E69
terminal 1.
• Harness for short or open between transfer shut off relay harness connector E69 terminal 2 and
transfer control unit harness connector E143 terminal 30.
• Harness for short or open between battery and transfer shut off relay harness connector E69
terminal 3.
• Harness for short or open between transfer shut off relay harness connector E69 terminal 5 and
transfer control unit harness connector E142 terminal 22.
• Transfer shut off relay. Refer to TF-51, "
Power Supply Circuit for Transfer Control Unit".
2.CHECK GROUND CIRCUIT
1. Turn ignition switch “OFF”. (Stay for at least 5 seconds.)
2. Disconnect transfer control unit harness connector.
3. Check continuity between transfer control unit harness connec-
tor E142 terminals 3, 6, E143 terminal 45 and ground.
Also check harness for short to ground and short to power.
OK or NG
OK >> GO TO 3.
NG >> Repair open circuit or short to ground or short to power
in harness or connectors.
3.CHECK ACTUATOR MOTOR POWER SUPPLY CIRCUIT
1. Turn ignition switch “OFF”. (Stay for at least 5 seconds.)
2. Remove transfer shift high relay and transfer shift low relay. Refer to TF-22, "
Location of Electrical Parts".
3. Check voltage between transfer shift high relay harness connec-
tor E46 terminal 5 (A), transfer shift low relay harness connector
E47 terminal 5 (B) and ground.
Connector Terminal Voltage (Approx.)
E14216 - Ground
Battery voltage
22 - Ground
E143 30 - Ground 0V
SDIA2835E
Continuity should exist.
SDIA2691E
Connector Terminal Voltage (Approx.)
E46 5 - Ground
Battery voltage
E47 5 - Ground
WDIA0310E
Page 2897 of 3061
TROUBLE DIAGNOSIS FOR SYSTEM
TF-75
< SERVICE INFORMATION >
C
E
F
G
H
I
J
K
L
MA
B
TF
N
O
P
4. Turn ignition switch “ON”. (Do not start engine.)
5. Check voltage between transfer shift high relay harness connec-
tor E46 terminal 5 (A), transfer shift low relay harness connector
E47 terminal 5 (B) and ground.
OK or NG
OK >> GO TO 4.
NG >> Check the following. If any items are damaged, repair or replace damaged parts.
• 20A fuse No. 57 located in the fuse and relay box. Refer to PG-3
.
• Harness for short or open between battery, transfer shift high relay harness connector E46 ter-
minal 5 and transfer shift low relay harness connector E47 terminal 5.
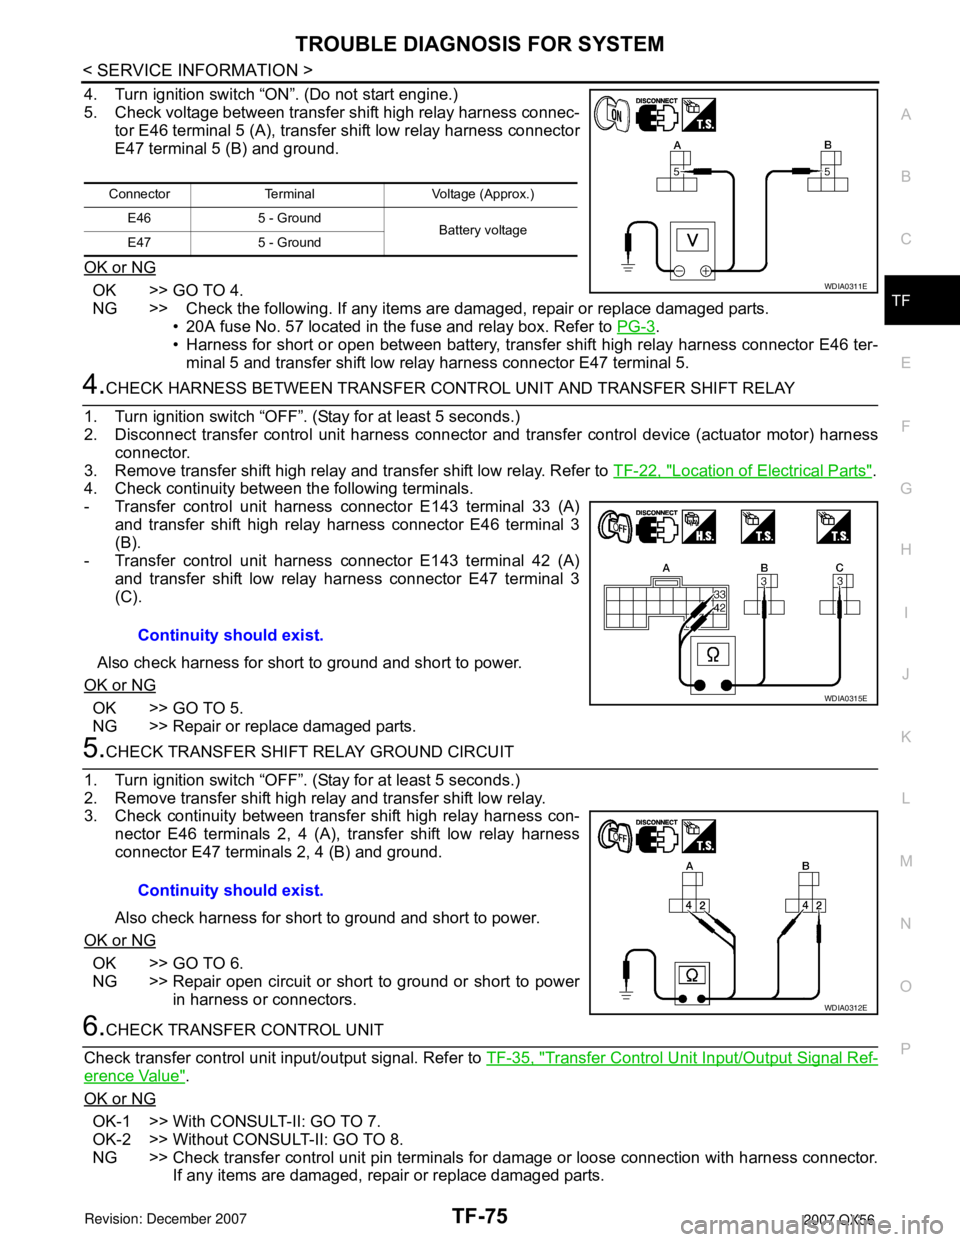
4.CHECK HARNESS BETWEEN TRANSFER CONTROL UNIT AND TRANSFER SHIFT RELAY
1. Turn ignition switch “OFF”. (Stay for at least 5 seconds.)
2. Disconnect transfer control unit harness connector and transfer control device (actuator motor) harness
connector.
3. Remove transfer shift high relay and transfer shift low relay. Refer to TF-22, "
Location of Electrical Parts".
4. Check continuity between the following terminals.
- Transfer control unit harness connector E143 terminal 33 (A)
and transfer shift high relay harness connector E46 terminal 3
(B).
- Transfer control unit harness connector E143 terminal 42 (A)
and transfer shift low relay harness connector E47 terminal 3
(C).
Also check harness for short to ground and short to power.
OK or NG
OK >> GO TO 5.
NG >> Repair or replace damaged parts.
5.CHECK TRANSFER SHIFT RELAY GROUND CIRCUIT
1. Turn ignition switch “OFF”. (Stay for at least 5 seconds.)
2. Remove transfer shift high relay and transfer shift low relay.
3. Check continuity between transfer shift high relay harness con-
nector E46 terminals 2, 4 (A), transfer shift low relay harness
connector E47 terminals 2, 4 (B) and ground.
Also check harness for short to ground and short to power.
OK or NG
OK >> GO TO 6.
NG >> Repair open circuit or short to ground or short to power
in harness or connectors.
6.CHECK TRANSFER CONTROL UNIT
Check transfer control unit input/output signal. Refer to TF-35, "
Transfer Control Unit Input/Output Signal Ref-
erence Value".
OK or NG
OK-1 >> With CONSULT-II: GO TO 7.
OK-2 >> Without CONSULT-II: GO TO 8.
NG >> Check transfer control unit pin terminals for damage or loose connection with harness connector.
If any items are damaged, repair or replace damaged parts.
Connector Terminal Voltage (Approx.)
E46 5 - Ground
Battery voltage
E47 5 - Ground
WDIA0311E
Continuity should exist.
WDIA0315E
Continuity should exist.
WDIA0312E
Page 2909 of 3061
TROUBLE DIAGNOSIS FOR SYSTEM
TF-87
< SERVICE INFORMATION >
C
E
F
G
H
I
J
K
L
MA
B
TF
N
O
P
OK or NG
OK >> GO TO 7.
NG >> GO TO 2.
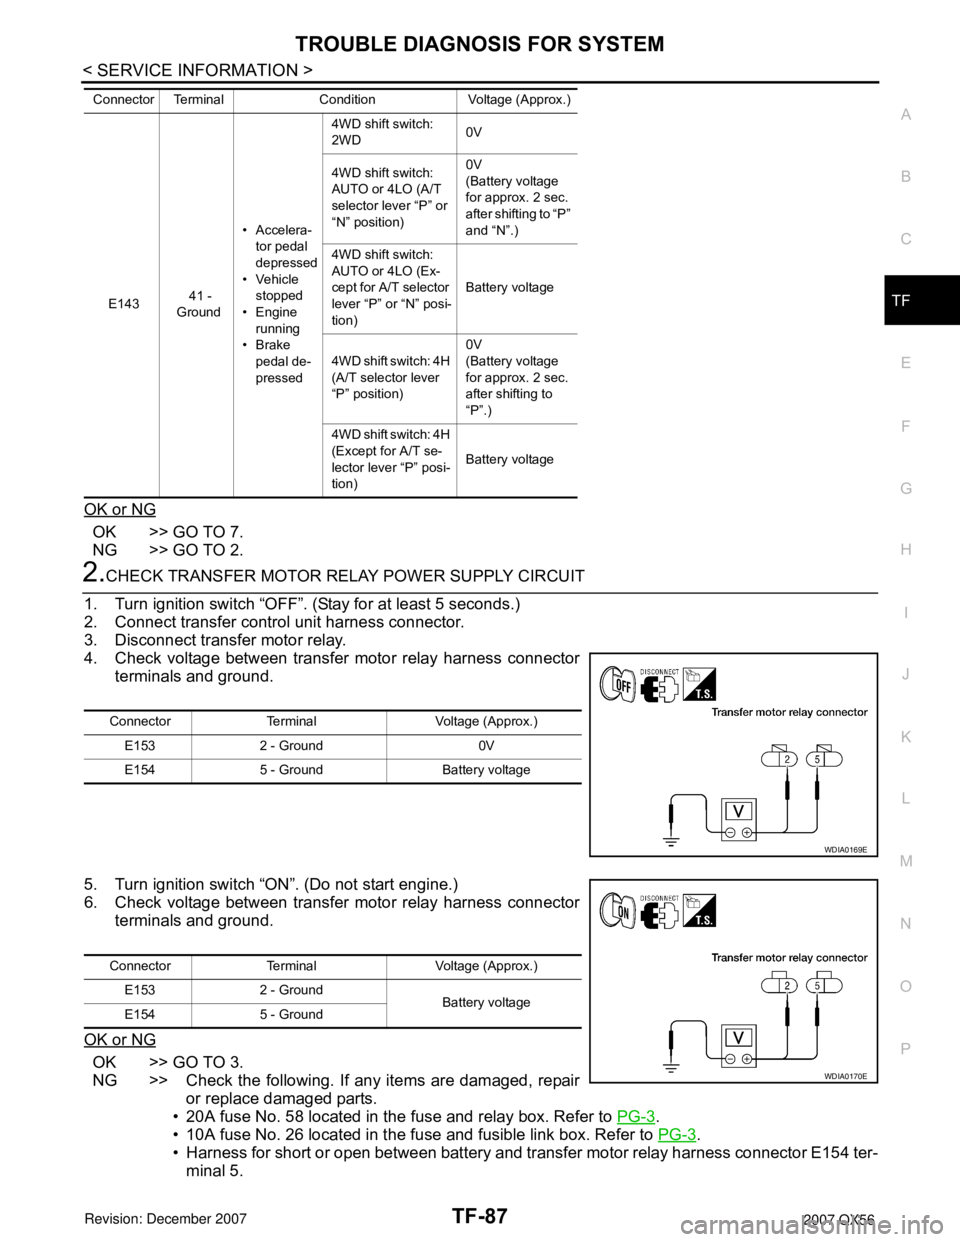
2.CHECK TRANSFER MOTOR RELAY POWER SUPPLY CIRCUIT
1. Turn ignition switch “OFF”. (Stay for at least 5 seconds.)
2. Connect transfer control unit harness connector.
3. Disconnect transfer motor relay.
4. Check voltage between transfer motor relay harness connector
terminals and ground.
5. Turn ignition switch “ON”. (Do not start engine.)
6. Check voltage between transfer motor relay harness connector
terminals and ground.
OK or NG
OK >> GO TO 3.
NG >> Check the following. If any items are damaged, repair
or replace damaged parts.
• 20A fuse No. 58 located in the fuse and relay box. Refer to PG-3
.
• 10A fuse No. 26 located in the fuse and fusible link box. Refer to PG-3
.
• Harness for short or open between battery and transfer motor relay harness connector E154 ter-
minal 5.
E143 41 -
Ground• Accelera-
tor pedal
depressed
• Vehicle
stopped
•Engine
running
•Brake
pedal de-
pressed4WD shift switch:
2WD0V
4WD shift switch:
AUTO or 4LO (A/T
selector lever “P” or
“N” position)0V
(Battery voltage
for approx. 2 sec.
after shifting to “P”
and “N”.)
4WD shift switch:
AUTO or 4LO (Ex-
cept for A/T selector
lever “P” or “N” posi-
tion)Battery voltage
4WD shift switch: 4H
(A/T selector lever
“P” position)0V
(Battery voltage
for approx. 2 sec.
after shifting to
“P”.)
4WD shift switch: 4H
(Except for A/T se-
lector lever “P” posi-
tion)Battery voltage Connector Terminal Condition Voltage (Approx.)
Connector Terminal Voltage (Approx.)
E153 2 - Ground 0V
E154 5 - Ground Battery voltage
WDIA0169E
Connector Terminal Voltage (Approx.)
E153 2 - Ground
Battery voltage
E154 5 - Ground
WDIA0170E
Page 2924 of 3061
TF-102
< SERVICE INFORMATION >
TROUBLE DIAGNOSIS FOR SYMPTOMS
TROUBLE DIAGNOSIS FOR SYMPTOMS
4WD Shift Indicator Lamp and 4LO Indicator Lamp Do Not Turn ONINFOID:0000000003532553
SYMPTOM:
4WD shift indicator lamp and 4LO indicator lamp do not turn ON for approx. 1 second when turning
ignition switch to “ON”.
DIAGNOSTIC PROCEDURE
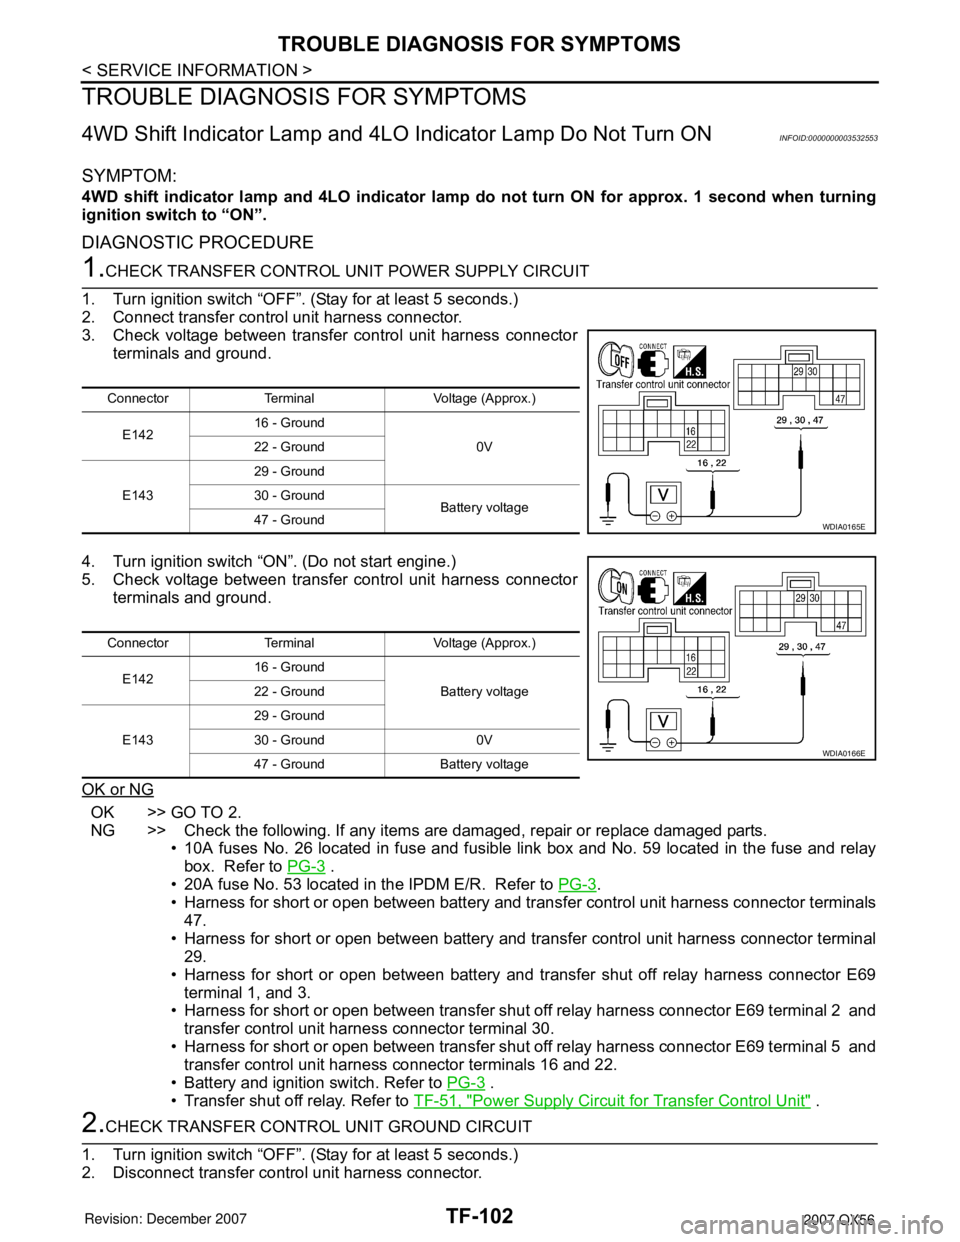
1.CHECK TRANSFER CONTROL UNIT POWER SUPPLY CIRCUIT
1. Turn ignition switch “OFF”. (Stay for at least 5 seconds.)
2. Connect transfer control unit harness connector.
3. Check voltage between transfer control unit harness connector
terminals and ground.
4. Turn ignition switch “ON”. (Do not start engine.)
5. Check voltage between transfer control unit harness connector
terminals and ground.
OK or NG
OK >> GO TO 2.
NG >> Check the following. If any items are damaged, repair or replace damaged parts.
• 10A fuses No. 26 located in fuse and fusible link box and No. 59 located in the fuse and relay
box. Refer to PG-3
.
• 20A fuse No. 53 located in the IPDM E/R. Refer to PG-3
.
• Harness for short or open between battery and transfer control unit harness connector terminals
47.
• Harness for short or open between battery and transfer control unit harness connector terminal
29.
• Harness for short or open between battery and transfer shut off relay harness connector E69
terminal 1, and 3.
• Harness for short or open between transfer shut off relay harness connector E69 terminal 2 and
transfer control unit harness connector terminal 30.
• Harness for short or open between transfer shut off relay harness connector E69 terminal 5 and
transfer control unit harness connector terminals 16 and 22.
• Battery and ignition switch. Refer to PG-3
.
• Transfer shut off relay. Refer to TF-51, "
Power Supply Circuit for Transfer Control Unit" .
2.CHECK TRANSFER CONTROL UNIT GROUND CIRCUIT
1. Turn ignition switch “OFF”. (Stay for at least 5 seconds.)
2. Disconnect transfer control unit harness connector.
Connector Terminal Voltage (Approx.)
E14216 - Ground
0V 22 - Ground
E14329 - Ground
30 - Ground
Battery voltage
47 - Ground
WDIA0165E
Connector Terminal Voltage (Approx.)
E14216 - Ground
Battery voltage 22 - Ground
E14329 - Ground
30 - Ground 0V
47 - Ground Battery voltage
WDIA0166E
Page 2925 of 3061
TROUBLE DIAGNOSIS FOR SYMPTOMS
TF-103
< SERVICE INFORMATION >
C
E
F
G
H
I
J
K
L
MA
B
TF
N
O
P
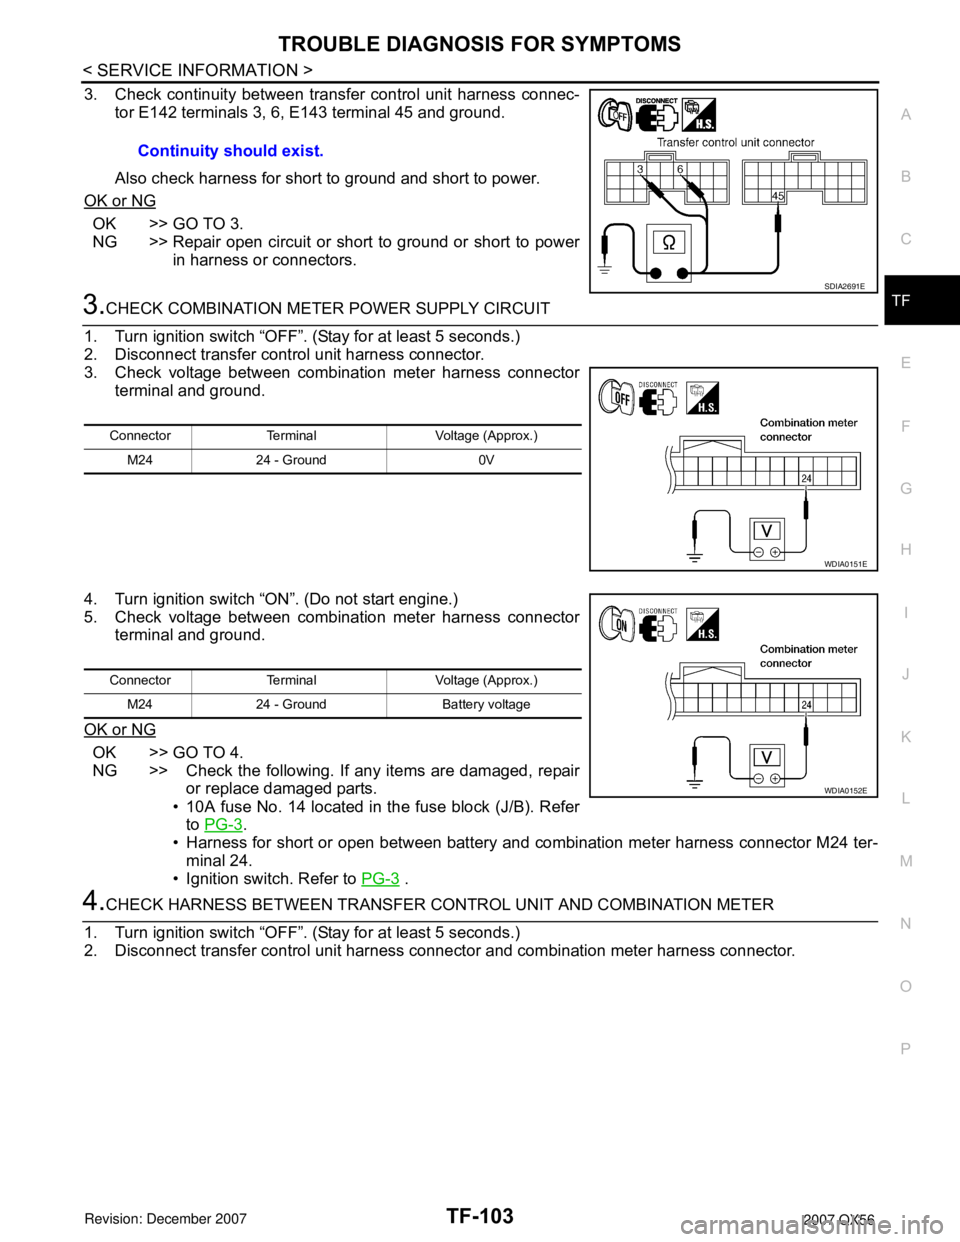
3. Check continuity between transfer control unit harness connec-
tor E142 terminals 3, 6, E143 terminal 45 and ground.
Also check harness for short to ground and short to power.
OK or NG
OK >> GO TO 3.
NG >> Repair open circuit or short to ground or short to power
in harness or connectors.
3.CHECK COMBINATION METER POWER SUPPLY CIRCUIT
1. Turn ignition switch “OFF”. (Stay for at least 5 seconds.)
2. Disconnect transfer control unit harness connector.
3. Check voltage between combination meter harness connector
terminal and ground.
4. Turn ignition switch “ON”. (Do not start engine.)
5. Check voltage between combination meter harness connector
terminal and ground.
OK or NG
OK >> GO TO 4.
NG >> Check the following. If any items are damaged, repair
or replace damaged parts.
• 10A fuse No. 14 located in the fuse block (J/B). Refer
to PG-3
.
• Harness for short or open between battery and combination meter harness connector M24 ter-
minal 24.
• Ignition switch. Refer to PG-3
.
4.CHECK HARNESS BETWEEN TRANSFER CONTROL UNIT AND COMBINATION METER
1. Turn ignition switch “OFF”. (Stay for at least 5 seconds.)
2. Disconnect transfer control unit harness connector and combination meter harness connector.Continuity should exist.
SDIA2691E
Connector Terminal Voltage (Approx.)
M24 24 - Ground 0V
WDIA0151E
Connector Terminal Voltage (Approx.)
M24 24 - Ground Battery voltage
WDIA0152E
Page 2927 of 3061
TROUBLE DIAGNOSIS FOR SYMPTOMS
TF-105
< SERVICE INFORMATION >
C
E
F
G
H
I
J
K
L
MA
B
TF
N
O
P
4WD warning lamp does not turn ON when turning ignition switch to “ON”.
DIAGNOSTIC PROCEDURE
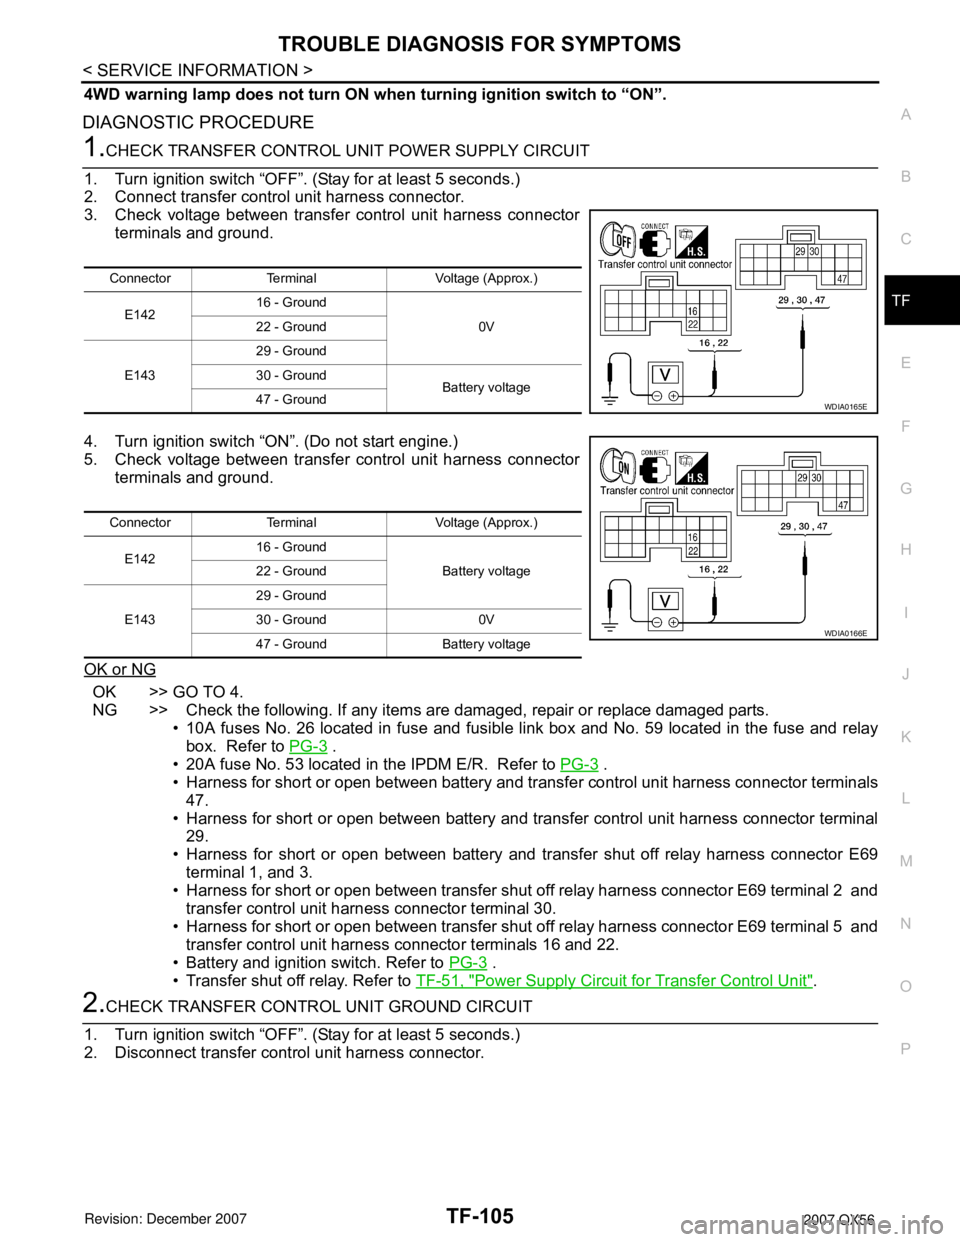
1.CHECK TRANSFER CONTROL UNIT POWER SUPPLY CIRCUIT
1. Turn ignition switch “OFF”. (Stay for at least 5 seconds.)
2. Connect transfer control unit harness connector.
3. Check voltage between transfer control unit harness connector
terminals and ground.
4. Turn ignition switch “ON”. (Do not start engine.)
5. Check voltage between transfer control unit harness connector
terminals and ground.
OK or NG
OK >> GO TO 4.
NG >> Check the following. If any items are damaged, repair or replace damaged parts.
• 10A fuses No. 26 located in fuse and fusible link box and No. 59 located in the fuse and relay
box. Refer to PG-3
.
• 20A fuse No. 53 located in the IPDM E/R. Refer to PG-3
.
• Harness for short or open between battery and transfer control unit harness connector terminals
47.
• Harness for short or open between battery and transfer control unit harness connector terminal
29.
• Harness for short or open between battery and transfer shut off relay harness connector E69
terminal 1, and 3.
• Harness for short or open between transfer shut off relay harness connector E69 terminal 2 and
transfer control unit harness connector terminal 30.
• Harness for short or open between transfer shut off relay harness connector E69 terminal 5 and
transfer control unit harness connector terminals 16 and 22.
• Battery and ignition switch. Refer to PG-3
.
• Transfer shut off relay. Refer to TF-51, "
Power Supply Circuit for Transfer Control Unit".
2.CHECK TRANSFER CONTROL UNIT GROUND CIRCUIT
1. Turn ignition switch “OFF”. (Stay for at least 5 seconds.)
2. Disconnect transfer control unit harness connector.
Connector Terminal Voltage (Approx.)
E14216 - Ground
0V 22 - Ground
E14329 - Ground
30 - Ground
Battery voltage
47 - Ground
WDIA0165E
Connector Terminal Voltage (Approx.)
E14216 - Ground
Battery voltage 22 - Ground
E14329 - Ground
30 - Ground 0V
47 - Ground Battery voltage
WDIA0166E
Page 2928 of 3061
TF-106
< SERVICE INFORMATION >
TROUBLE DIAGNOSIS FOR SYMPTOMS
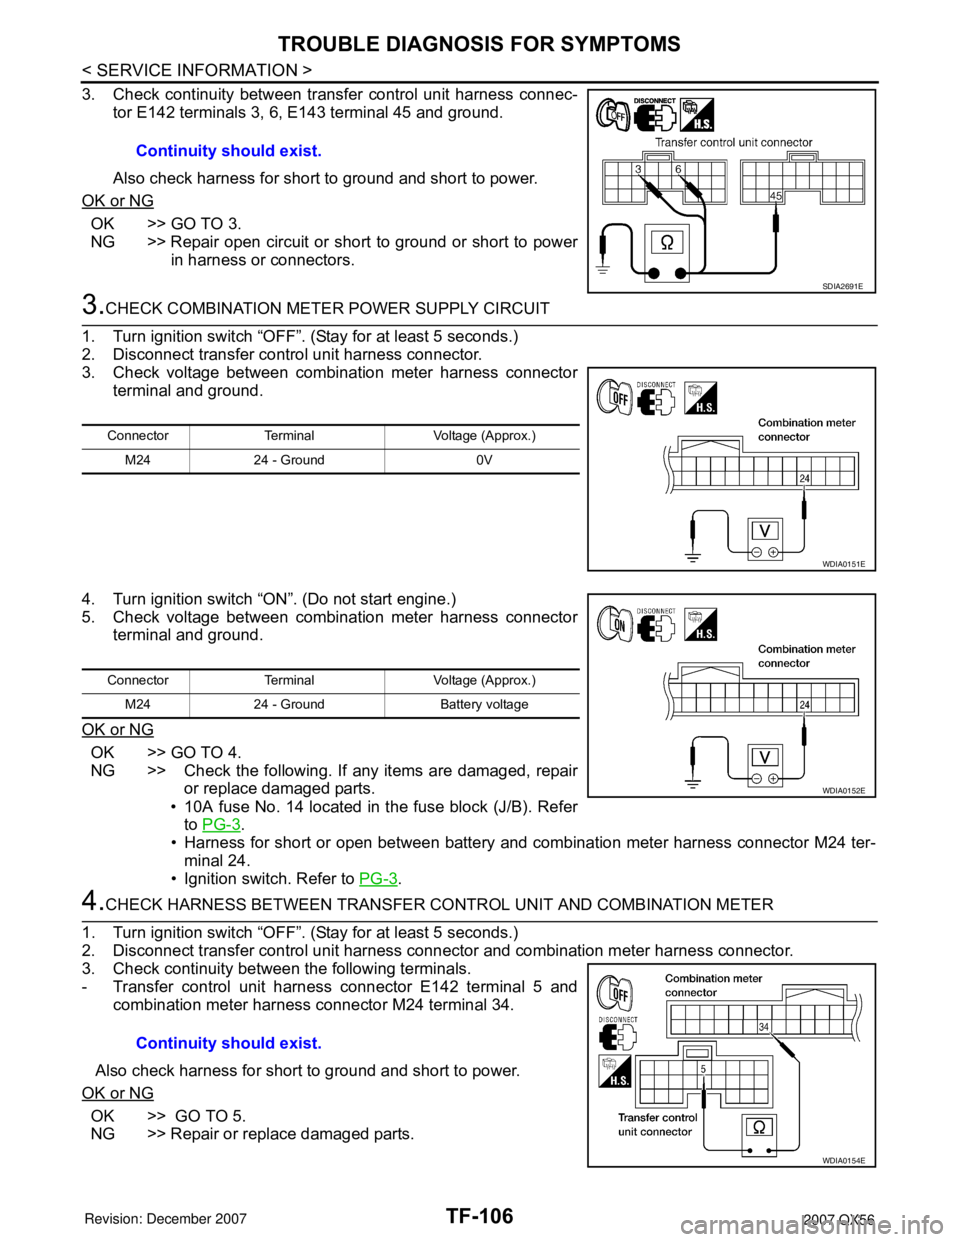
3. Check continuity between transfer control unit harness connec-
tor E142 terminals 3, 6, E143 terminal 45 and ground.
Also check harness for short to ground and short to power.
OK or NG
OK >> GO TO 3.
NG >> Repair open circuit or short to ground or short to power
in harness or connectors.
3.CHECK COMBINATION METER POWER SUPPLY CIRCUIT
1. Turn ignition switch “OFF”. (Stay for at least 5 seconds.)
2. Disconnect transfer control unit harness connector.
3. Check voltage between combination meter harness connector
terminal and ground.
4. Turn ignition switch “ON”. (Do not start engine.)
5. Check voltage between combination meter harness connector
terminal and ground.
OK or NG
OK >> GO TO 4.
NG >> Check the following. If any items are damaged, repair
or replace damaged parts.
• 10A fuse No. 14 located in the fuse block (J/B). Refer
to PG-3
.
• Harness for short or open between battery and combination meter harness connector M24 ter-
minal 24.
• Ignition switch. Refer to PG-3
.
4.CHECK HARNESS BETWEEN TRANSFER CONTROL UNIT AND COMBINATION METER
1. Turn ignition switch “OFF”. (Stay for at least 5 seconds.)
2. Disconnect transfer control unit harness connector and combination meter harness connector.
3. Check continuity between the following terminals.
- Transfer control unit harness connector E142 terminal 5 and
combination meter harness connector M24 terminal 34.
Also check harness for short to ground and short to power.
OK or NG
OK >> GO TO 5.
NG >> Repair or replace damaged parts.Continuity should exist.
SDIA2691E
Connector Terminal Voltage (Approx.)
M24 24 - Ground 0V
WDIA0151E
Connector Terminal Voltage (Approx.)
M24 24 - Ground Battery voltage
WDIA0152E
Continuity should exist.
WDIA0154E