2007 INFINITI QX56 ECU
[x] Cancel search: ECUPage 960 of 3061
![INFINITI QX56 2007 Factory Service Manual BRC-32
< SERVICE INFORMATION >[VDC/TCS/ABS]
TROUBLE DIAGNOSIS
×: Applicable
–: Not applicable
ACTIVE TEST
CAUTION:
• Do not perform active test while driving.
• Make sure to completely bleed ai INFINITI QX56 2007 Factory Service Manual BRC-32
< SERVICE INFORMATION >[VDC/TCS/ABS]
TROUBLE DIAGNOSIS
×: Applicable
–: Not applicable
ACTIVE TEST
CAUTION:
• Do not perform active test while driving.
• Make sure to completely bleed ai](/manual-img/42/57029/w960_57029-959.png)
BRC-32
< SERVICE INFORMATION >[VDC/TCS/ABS]
TROUBLE DIAGNOSIS
×: Applicable
–: Not applicable
ACTIVE TEST
CAUTION:
• Do not perform active test while driving.
• Make sure to completely bleed air from the brake system.
• The ABS and brake (EBD) warning lamps turn on during the active test.
Solenoid Valve Operation Chart
BST OPER SIG – –×Active booster operation (ON/OFF)
status is displayed.
PRESS SENSOR×–×Brake pressure detected by pres-
sure sensor is displayed.
CRANKING SIG – –×The input state of the key SW
START position signal is displayed.
PRESS SEN 2 – –×Brake pressure detected by pres-
sure sensor is displayed.
DELTA S SEN – –×The amount of stroke sensor move-
ments in the active booster detected
by DELTA S SEN is displayed.
RELEASE SW NO – –×Release switch signal (ON/OFF)
status is displayed. "ON" indicates
that the brake pedal is depressed.
"OFF" is that the brake pedal is re-
leased.
RELEASE SW NC – –×Release switch signal (ON/OFF)
status is displayed. "OFF" indicates
that the brake pedal is depressed
on. "ON" is that the brake pedal is
released.
OHB FAIL – –×OHB fail status is displayed.
HBA FAIL – –×HBA fail status is displayed.
OHB SIG – –×OHB operation (ON/OFF) status is
displayed.
HBA SIG – –×HBA operation (ON/OFF) status is
displayed.
PRES CTRL ACC – –×Pressure control state (ON/OFF) is
displayed. It is applied only to an
ICC vehicle.
PRES FAIL ACC – –×Pressure control fail state (ON/OFF)
is displayed. It is applied only to an
ICC vehicle.
STP OFF RLY – –×Stop lamp relay signal (ON/OFF)
status is displayed. Item
(Unit)Data monitor item selection
Remarks
ECU INPUT
SIGNALSMAIN
SIGNALSSELECTION
FROM MENU
OperationABS solenoid valve ABS solenoid valve (ACT)
UP KEEP DOWN UPACTUA-
TOR UPACTUA-
TOR KEEP
FR RH SOL
FR RH ABS SOLE-
NOID (ACT)FR RH IN SOL OFF ON ON OFF OFF OFF
FR RH OUT SOL OFF OFF ON* OFF OFF OFF
Page 1010 of 3061
THERMOSTAT AND WATER PIPING
CO-21
< SERVICE INFORMATION >
C
D
E
F
G
H
I
J
K
L
MA
CO
N
P O
3. Remove the engine room cover using power tool.
4. Disconnect the heater hose (heater core side).
5. Remove the heater hose bracket.
6. Disconnect the water cut valve connector.
7. Remove the water cut valve.
INSPECTION AFTER REMOVAL
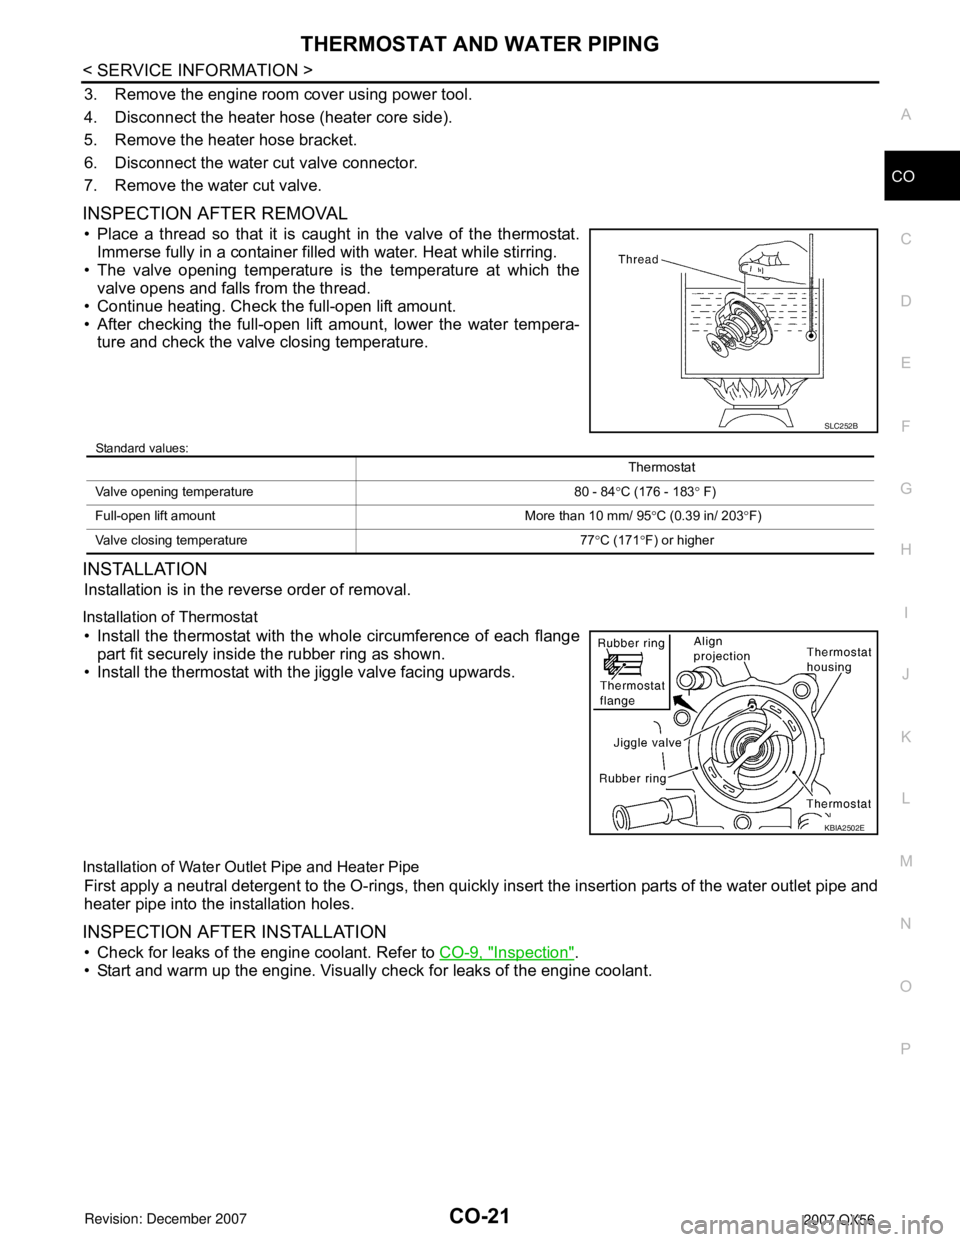
• Place a thread so that it is caught in the valve of the thermostat.
Immerse fully in a container filled with water. Heat while stirring.
• The valve opening temperature is the temperature at which the
valve opens and falls from the thread.
• Continue heating. Check the full-open lift amount.
• After checking the full-open lift amount, lower the water tempera-
ture and check the valve closing temperature.
Standard values:
INSTALLATION
Installation is in the reverse order of removal.
Installation of Thermostat
• Install the thermostat with the whole circumference of each flange
part fit securely inside the rubber ring as shown.
• Install the thermostat with the jiggle valve facing upwards.
Installation of Water Outlet Pipe and Heater Pipe
First apply a neutral detergent to the O-rings, then quickly insert the insertion parts of the water outlet pipe and
heater pipe into the installation holes.
INSPECTION AFTER INSTALLATION
• Check for leaks of the engine coolant. Refer to CO-9, "Inspection".
• Start and warm up the engine. Visually check for leaks of the engine coolant.
SLC252B
Thermostat
Valve opening temperature 80 - 84°C (176 - 183° F)
Full-open lift amount More than 10 mm/ 95°C (0.39 in/ 203°F)
Valve closing temperature 77°C (171°F) or higher
KBIA2502E
Page 1022 of 3061
COMBINATION METERSDI-11
< SERVICE INFORMATION >
C
DE
F
G H
I
J
L
M A
B
DI
N
O P
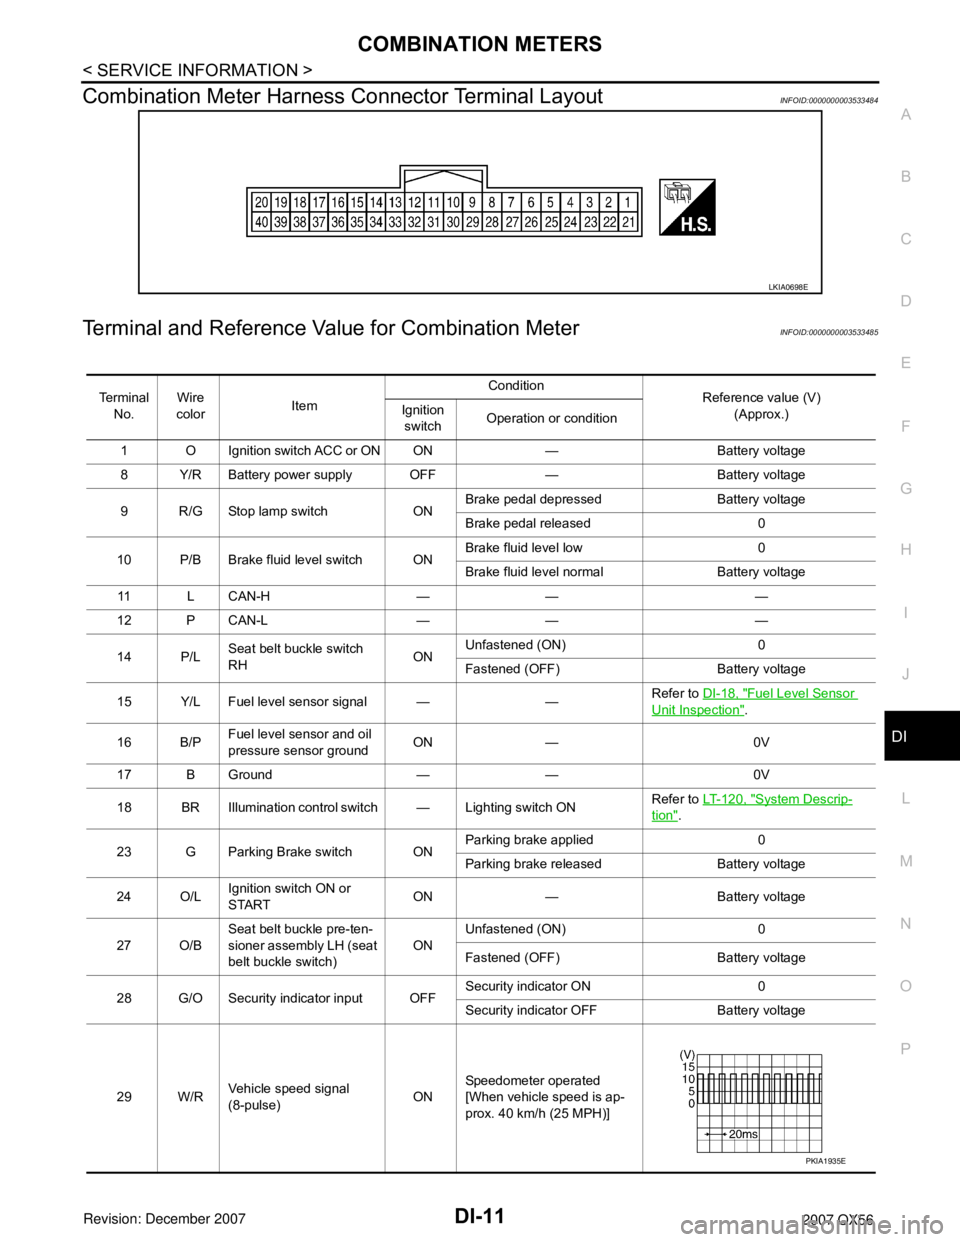
Combination Meter Harness Connector Terminal LayoutINFOID:0000000003533484
Terminal and Reference Va lue for Combination MeterINFOID:0000000003533485
LKIA0698E
Te r m i n a l
No. Wire
color Item Condition
Reference value (V)
(Approx.)
Ignition
switch Operation or condition
1 O Ignition switch ACC or ON ON — Battery voltage
8 Y/R Battery power supply OFF — Battery voltage
9 R/G Stop lamp switch ON Brake pedal depressed Battery voltage
Brake pedal released 0
10 P/B Brake fluid level switch ON Brake fluid level low 0
Brake fluid level normal Battery voltage
11 L C A N - H — — —
12 P CAN-L — — —
14 P/L Seat belt buckle switch
RH ONUnfastened (ON) 0
Fastened (OFF) Battery voltage
15 Y/L Fuel level sensor signal — — Refer to
DI-18, "
Fuel Level Sensor
Unit Inspection".
16 B/P Fuel level sensor and oil
pressure sensor ground ON — 0V
17 B Ground — — 0V
18 BR Illumination control switch — Lighting switch ON Refer to
LT- 1 2 0 , "
System Descrip-
tion".
23 G Parking Brake switch ON Parking brake applied 0
Parking brake released Battery voltage
24 O/L Ignition switch ON or
START ON — Battery voltage
27 O/B Seat belt buckle pre-ten-
sioner assembly LH (seat
belt buckle switch) ON
Unfastened (ON) 0
Fastened (OFF) Battery voltage
28 G/O Security indicator input OFF Security indicator ON 0
Security indicator
OFF Battery voltage
29 W/R Vehicle speed signal
(8-pulse) ONSpeedometer operated
[When vehicle speed is ap-
prox. 40 km/h (25 MPH)]
PKIA1935E
Page 1051 of 3061
DI-40
< SERVICE INFORMATION >
WARNING CHIME
How to Proceed with Trouble Diagnosis
INFOID:0000000003533516
1. Confirm the symptom or customer complaint.
2. Understand operation description and function description. Refer to DI-36, "
System Description".
3. Perform the preliminary check. Refer to DI-40, "
Preliminary Check".
4. Check symptom and repair or replace the cause of malfunction.
5. Does the warning chime operate properly? If so, go to 6. If not, go to 3.
6. Inspection End.
Preliminary CheckINFOID:0000000003533517
INSPECTION FOR POWER SUPPLY AND GROUND CIRCUIT
Refer to BCS-15, "BCM Power Supply and Ground Circuit Inspection".
CONSULT-II Function (BCM)INFOID:0000000003533518
CONSULT-II can display each diagnostic item using the diagnostic test modes shown following.
CONSULT-II START PROCEDURE
Refer to GI-36, "CONSULT-II Start Procedure".
DATA MONITOR
Display Item List
ACTIVE TEST
Display Item List
SELF-DIAGNOSTIC RESULTS
BCM
diagnostic test itemDiagnostic mode Description
Inspection by partWORK SUPPORTSupports inspections and adjustments. Commands are transmitted to the BCM
for setting the status suitable for required operation, input/output signals are re-
ceived from the BCM and received data is displayed.
DATA MONITOR Displays BCM input/output data in real time.
ACTIVE TEST Operation of electrical loads can be checked by sending drive signal to them.
SELF-DIAG RESULTS Displays BCM self-diagnosis results.
CAN DIAG SUPPORT MNTR The result of transmit/receive diagnosis of CAN communication can be read.
ECU PART NUMBER BCM part number can be read.
CONFIGURATION Performs BCM configuration read/write functions.
Monitored item Description
IGN ON SW Indicates [ON/OFF] condition of ignition switch.
KEY ON SW Indicates [ON/OFF] condition of key switch.
DOOR SW-DR Indicates [ON/OFF] condition of front door switch (driver side).
LIGHT SW 1ST Indicates [ON/OFF] condition of lighting switch.
Test item Malfunction is detected when
LIGHT WARN ALMThis test is able to check light warning chime operation. Light warning chime sounds for 2 seconds
after touching “ON” on CONSULT-II screen.
IGN KEY WARN ALMThis test is able to check key warning chime operation. Key warning chime sounds for 2 seconds
after touching “ON” on CONSULT-II screen.
SEAT BELT WARN TESTThis test is able to check seat belt warning chime operation. Seat belt warning chime sounds for 2
seconds after touching “ON” on CONSULT-II screen.
Page 1076 of 3061
REAR VIEW MONITOR
DI-65
< SERVICE INFORMATION >
C
D
E
F
G
H
I
J
L
MA
B
DI
N
O
P
CONSULT-II START PROCEDURE
Refer to GI-36, "CONSULT-II Start Procedure".
WORK SUPPORT
Refer to DI-65, "Side Distance Guideline Correction" for details.
DATA MONITOR
Display Item List
Side Distance Guideline CorrectionINFOID:0000000003533545
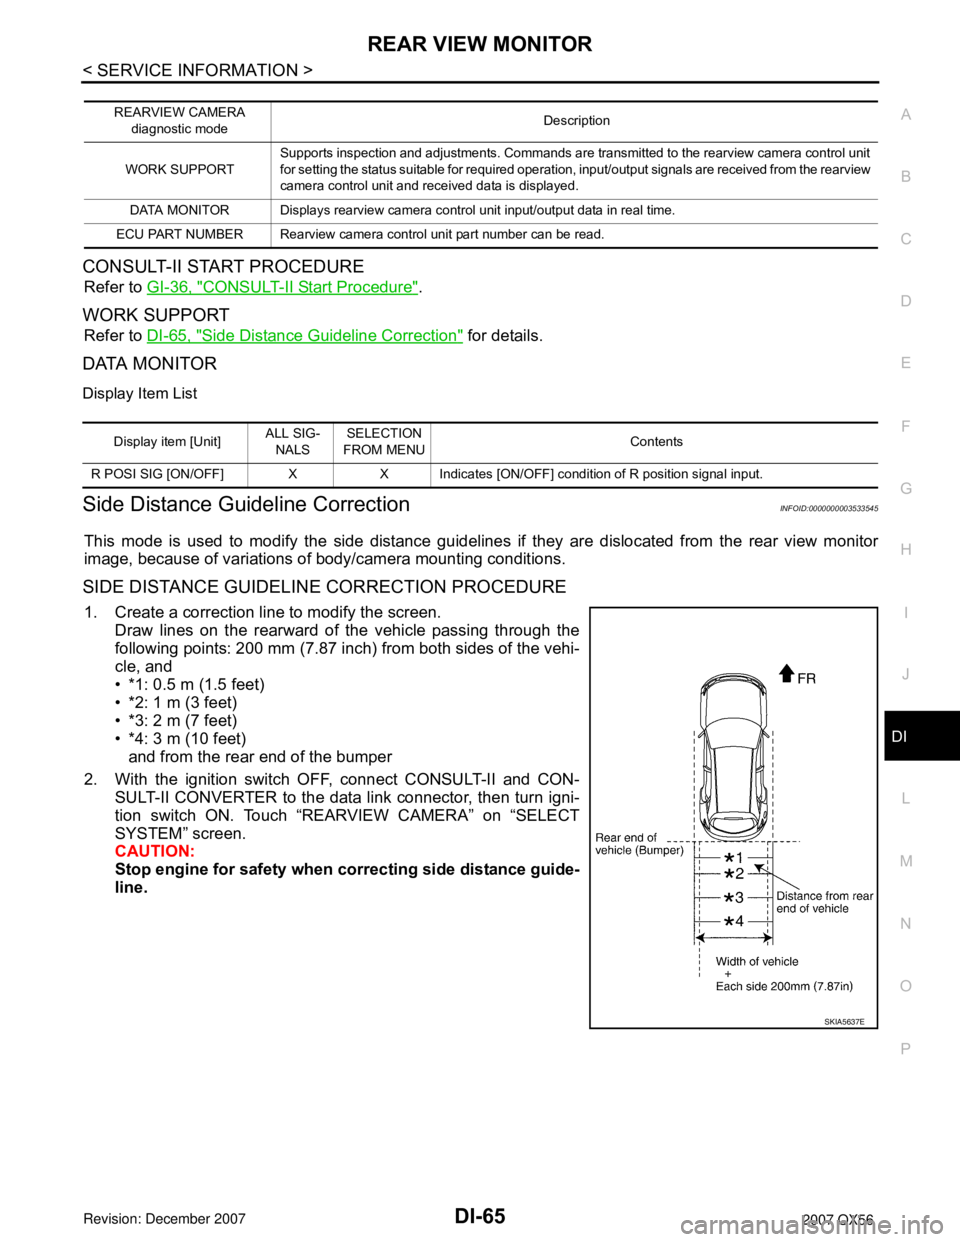
This mode is used to modify the side distance guidelines if they are dislocated from the rear view monitor
image, because of variations of body/camera mounting conditions.
SIDE DISTANCE GUIDELINE CORRECTION PROCEDURE
1. Create a correction line to modify the screen.
Draw lines on the rearward of the vehicle passing through the
following points: 200 mm (7.87 inch) from both sides of the vehi-
cle, and
• *1: 0.5 m (1.5 feet)
• *2: 1 m (3 feet)
• *3: 2 m (7 feet)
• *4: 3 m (10 feet)
and from the rear end of the bumper
2. With the ignition switch OFF, connect CONSULT-II and CON-
SULT-II CONVERTER to the data link connector, then turn igni-
tion switch ON. Touch “REARVIEW CAMERA” on “SELECT
SYSTEM” screen.
CAUTION:
Stop engine for safety when correcting side distance guide-
line.
REARVIEW CAMERA
diagnostic modeDescription
WORK SUPPORTSupports inspection and adjustments. Commands are transmitted to the rearview camera control unit
for setting the status suitable for required operation, input/output signals are received from the rearview
camera control unit and received data is displayed.
DATA MONITOR Displays rearview camera control unit input/output data in real time.
ECU PART NUMBER Rearview camera control unit part number can be read.
Display item [Unit]ALL SIG-
NALSSELECTION
FROM MENUContents
R POSI SIG [ON/OFF] X X Indicates [ON/OFF] condition of R position signal input.
SKIA5637E
Page 1100 of 3061
PRECAUTIONS
EC-17
< SERVICE INFORMATION >
C
D
E
F
G
H
I
J
K
L
MA
EC
N
P O
PRECAUTIONS
Precaution for Supplemental Restraint System (SRS) "AIR BAG" and "SEAT BELT
PRE-TENSIONER"
INFOID:0000000003531580
The Supplemental Restraint System such as “AIR BAG” and “SEAT BELT PRE-TENSIONER”, used along
with a front seat belt, helps to reduce the risk or severity of injury to the driver and front passenger for certain
types of collision. This system includes seat belt switch inputs and dual stage front air bag modules. The SRS
system uses the seat belt switches to determine the front air bag deployment, and may only deploy one front
air bag, depending on the severity of a collision and whether the front occupants are belted or unbelted.
Information necessary to service the system safely is included in the SRS and SB section of this Service Man-
ual.
WARNING:
• To avoid rendering the SRS inoperative, which could increase the risk of personal injury or death in
the event of a collision which would result in air bag inflation, all maintenance must be performed by
an authorized NISSAN/INFINITI dealer.
• Improper maintenance, including incorrect removal and installation of the SRS, can lead to personal
injury caused by unintentional activation of the system. For removal of Spiral Cable and Air Bag
Module, see the SRS section.
• Do not use electrical test equipment on any circuit related to the SRS unless instructed to in this
Service Manual. SRS wiring harnesses can be identified by yellow and/or orange harnesses or har-
ness connectors.
On Board Diagnosis (OBD) System of Engine and A/TINFOID:0000000003531581
The ECM has an on board diagnostic system. It will light up the malfunction indicator lamp (MIL) to warn the
driver of a malfunction causing emission deterioration.
CAUTION:
• Be sure to turn the ignition switch OFF and disconnect the negative battery cable before any repair
or inspection work. The open/short circuit of related switches, sensors, solenoid valves, etc. will
cause the MIL to light up.
• Be sure to connect and lock the connectors securely after work. A loose (unlocked) connector will
cause the MIL to light up due to the open circuit. (Be sure the connector is free from water, grease,
dirt, bent terminals, etc.)
• Certain systems and components, especially those related to OBD, may use a new style slide-lock-
ing type harness connector. For description and how to disconnect, refer to PG-66
.
• Be sure to route and secure the harnesses properly after work. The interference of the harness with
a bracket, etc. may cause the MIL to light up due to the short circuit.
• Be sure to connect rubber tubes properly after work. A misconnected or disconnected rubber tube
may cause the MIL to light up due to the malfunction of the EVAP system or fuel injection system,
etc.
• Be sure to erase the unnecessary malfunction information (repairs completed) from the ECM and
TCM (Transmission control module) before returning the vehicle to the customer.
PrecautionINFOID:0000000003531582
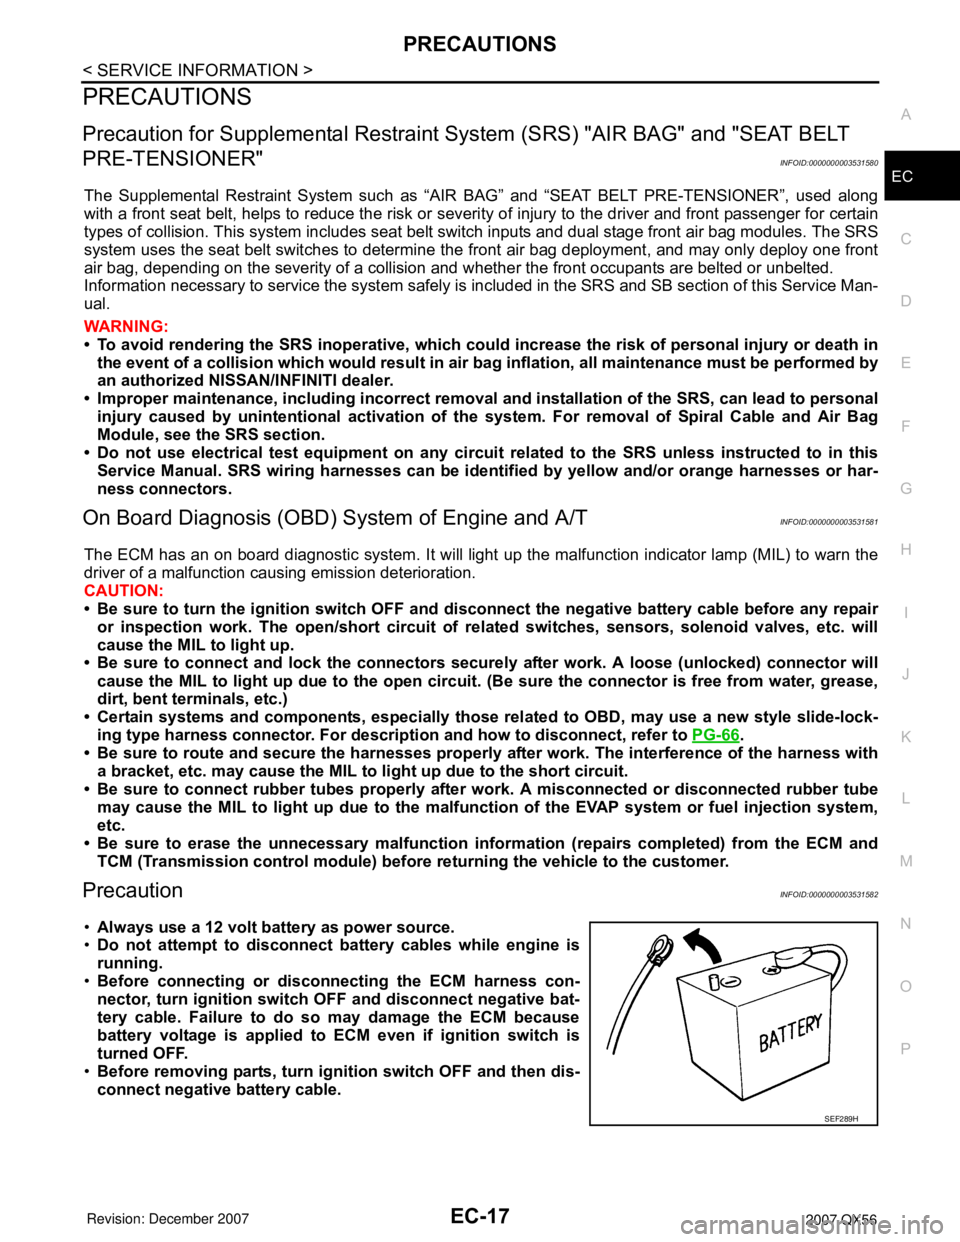
•Always use a 12 volt battery as power source.
•Do not attempt to disconnect battery cables while engine is
running.
•Before connecting or disconnecting the ECM harness con-
nector, turn ignition switch OFF and disconnect negative bat-
tery cable. Failure to do so may damage the ECM because
battery voltage is applied to ECM even if ignition switch is
turned OFF.
•Before removing parts, turn ignition switch OFF and then dis-
connect negative battery cable.
SEF289H
Page 1101 of 3061
EC-18
< SERVICE INFORMATION >
PRECAUTIONS
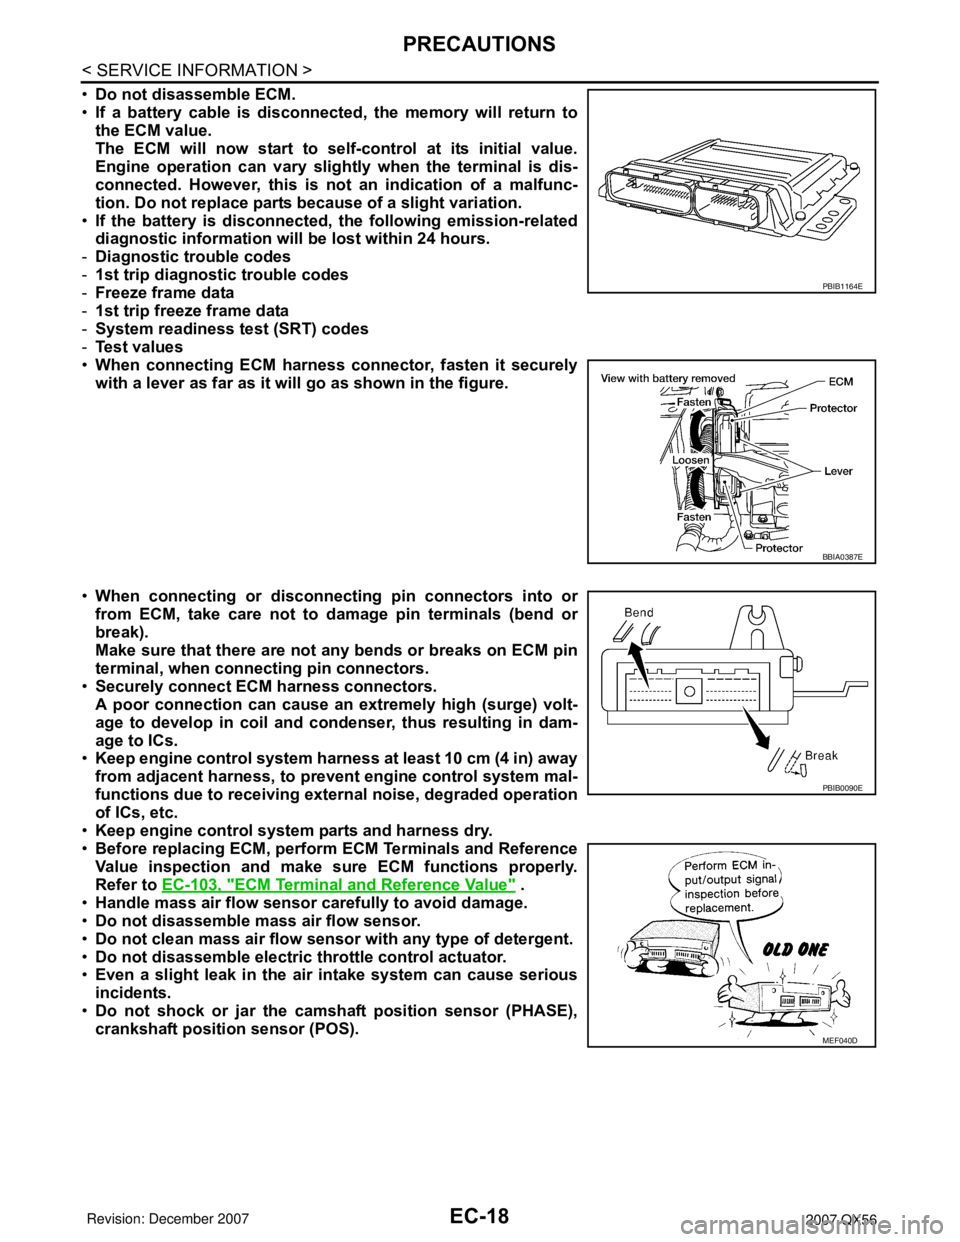
•Do not disassemble ECM.
•If a battery cable is disconnected, the memory will return to
the ECM value.
The ECM will now start to self-control at its initial value.
Engine operation can vary slightly when the terminal is dis-
connected. However, this is not an indication of a malfunc-
tion. Do not replace parts because of a slight variation.
•If the battery is disconnected, the following emission-related
diagnostic information will be lost within 24 hours.
-Diagnostic trouble codes
-1st trip diagnostic trouble codes
-Freeze frame data
-1st trip freeze frame data
-System readiness test (SRT) codes
-Test values
•When connecting ECM harness connector, fasten it securely
with a lever as far as it will go as shown in the figure.
•When connecting or disconnecting pin connectors into or
from ECM, take care not to damage pin terminals (bend or
break).
Make sure that there are not any bends or breaks on ECM pin
terminal, when connecting pin connectors.
•Securely connect ECM harness connectors.
A poor connection can cause an extremely high (surge) volt-
age to develop in coil and condenser, thus resulting in dam-
age to ICs.
•Keep engine control system harness at least 10 cm (4 in) away
from adjacent harness, to prevent engine control system mal-
functions due to receiving external noise, degraded operation
of ICs, etc.
•Keep engine control system parts and harness dry.
•Before replacing ECM, perform ECM Terminals and Reference
Value inspection and make sure ECM functions properly.
Refer to EC-103, "
ECM Terminal and Reference Value" .
•Handle mass air flow sensor carefully to avoid damage.
•Do not disassemble mass air flow sensor.
•Do not clean mass air flow sensor with any type of detergent.
•Do not disassemble electric throttle control actuator.
•Even a slight leak in the air intake system can cause serious
incidents.
•Do not shock or jar the camshaft position sensor (PHASE),
crankshaft position sensor (POS).
PBIB1164E
BBIA0387E
PBIB0090E
MEF040D
Page 1121 of 3061
EC-38
< SERVICE INFORMATION >
EVAPORATIVE EMISSION SYSTEM
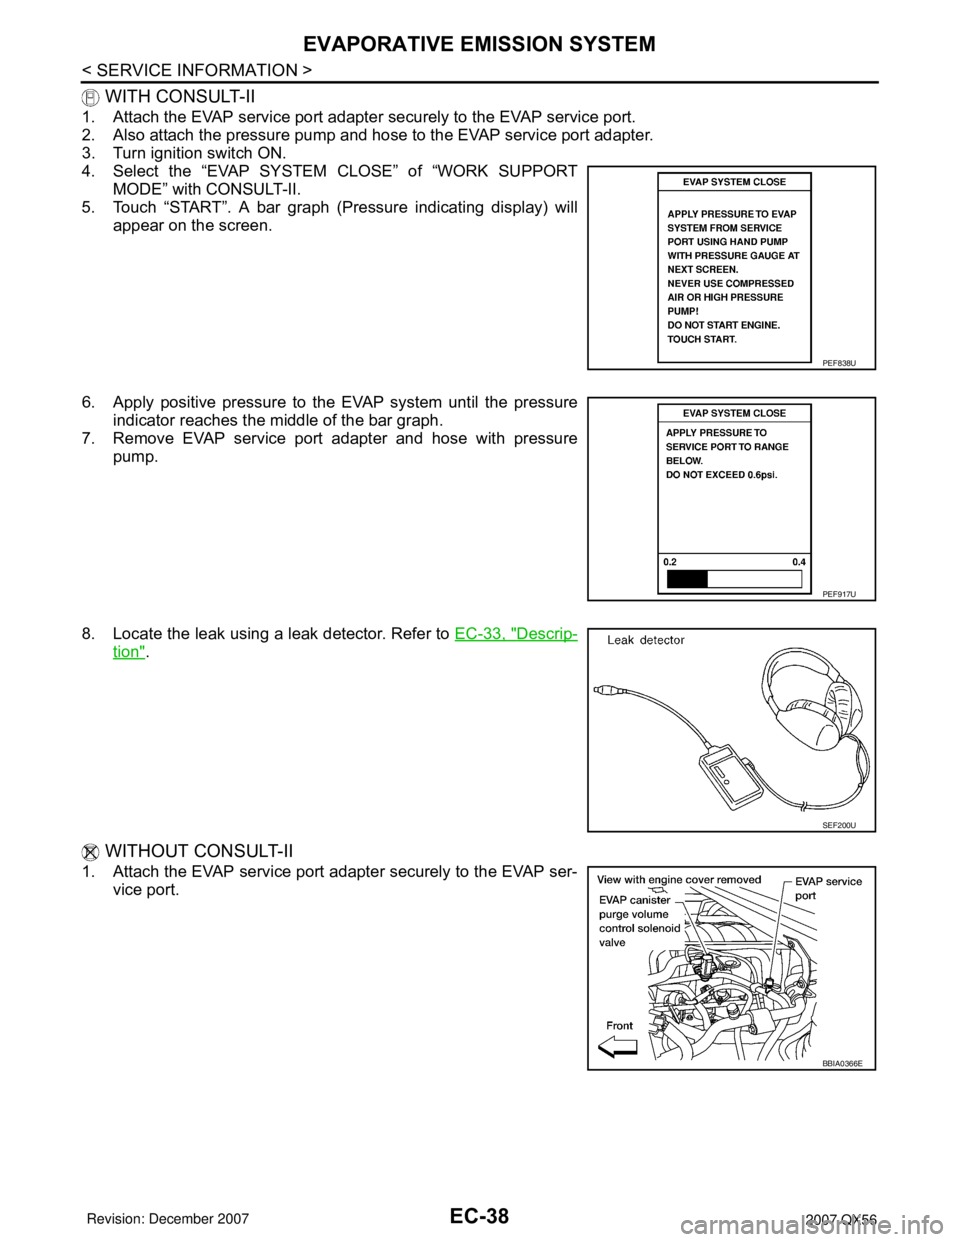
WITH CONSULT-II
1. Attach the EVAP service port adapter securely to the EVAP service port.
2. Also attach the pressure pump and hose to the EVAP service port adapter.
3. Turn ignition switch ON.
4. Select the “EVAP SYSTEM CLOSE” of “WORK SUPPORT
MODE” with CONSULT-II.
5. Touch “START”. A bar graph (Pressure indicating display) will
appear on the screen.
6. Apply positive pressure to the EVAP system until the pressure
indicator reaches the middle of the bar graph.
7. Remove EVAP service port adapter and hose with pressure
pump.
8. Locate the leak using a leak detector. Refer to EC-33, "
Descrip-
tion".
WITHOUT CONSULT-II
1. Attach the EVAP service port adapter securely to the EVAP ser-
vice port.
PEF838U
PEF917U
SEF200U
BBIA0366E