Page 3521 of 4647
LT-70
HEADLAMP (FOR USA) - XENON TYPE -
Revision: 2007 April2007 M35/M45
Headlamps Do Not Turn OFFNKS003P1
1. CHECK HEADLAMP TURN OFF
Make sure that lighting switch is OFF. And make sure headlamp turns off when ignition switch is turned OFF.
OK or NG
OK >> GO TO 3.
NG >> GO TO 2.
2. CHECK COMBINATION SWITCH INPUT SIGNAL
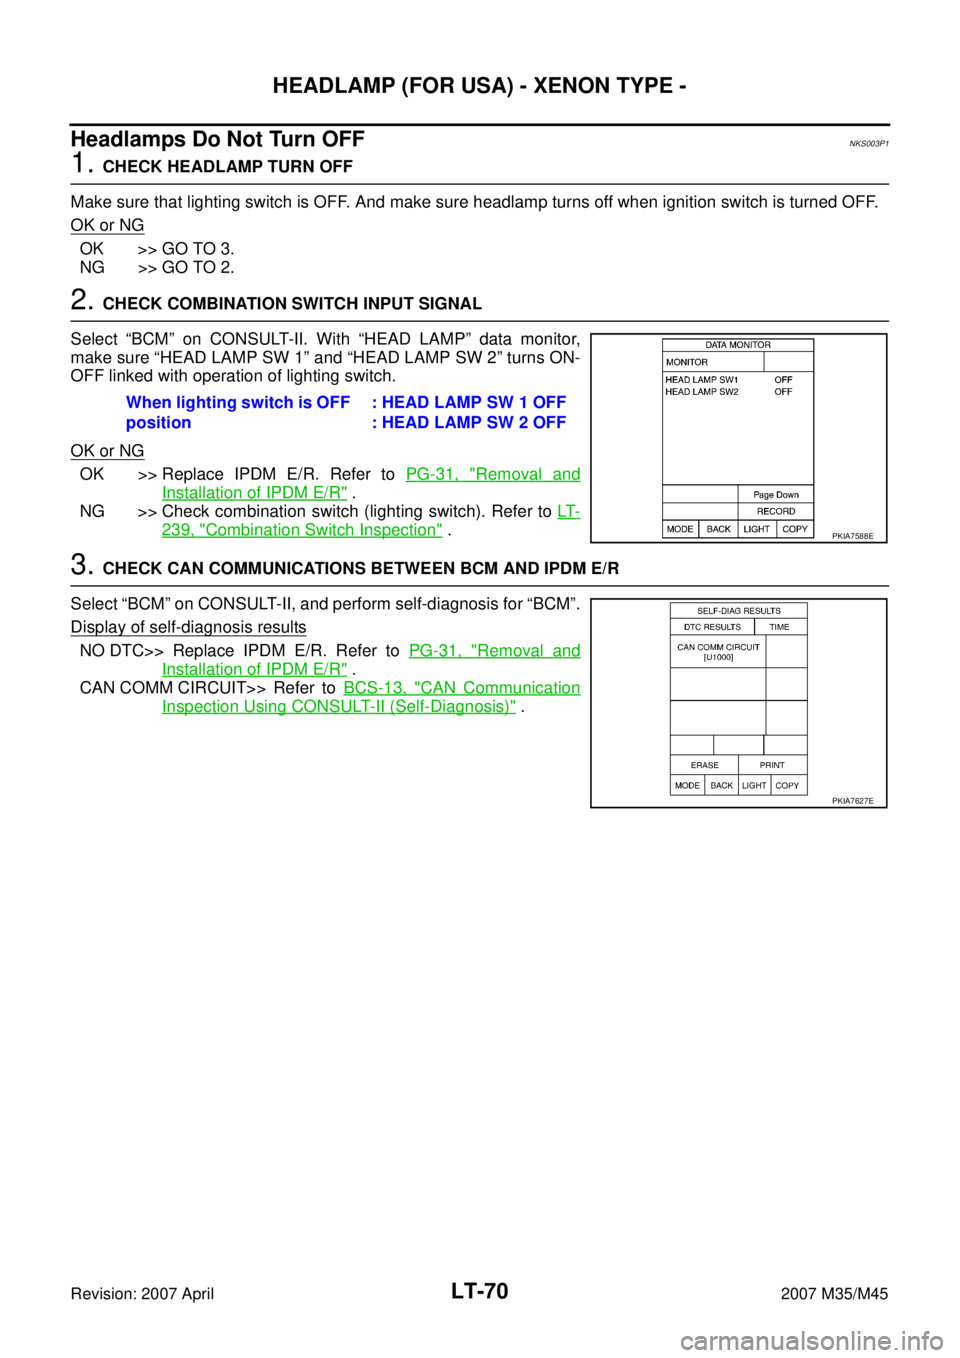
Select “BCM” on CONSULT-II. With “HEAD LAMP” data monitor,
make sure “HEAD LAMP SW 1” and “HEAD LAMP SW 2” turns ON-
OFF linked with operation of lighting switch.
OK or NG
OK >> Replace IPDM E/R. Refer to PG-31, "Removal and
Installation of IPDM E/R" .
NG >> Check combination switch (lighting switch). Refer to LT-
239, "Combination Switch Inspection" .
3. CHECK CAN COMMUNICATIONS BETWEEN BCM AND IPDM E/R
Select “BCM” on CONSULT-II, and perform self-diagnosis for “BCM”.
Display of self-diagnosis results
NO DTC>> Replace IPDM E/R. Refer to PG-31, "Removal and
Installation of IPDM E/R" .
CAN COMM CIRCUIT>> Refer to BCS-13, "
CAN Communication
Inspection Using CONSULT-II (Self-Diagnosis)" . When lighting switch is OFF
position: HEAD LAMP SW 1 OFF
: HEAD LAMP SW 2 OFF
PKIA7588E
PKIA7627E
Page 3525 of 4647
LT-74
HEADLAMP (FOR USA) - XENON TYPE -
Revision: 2007 April2007 M35/M45
HEADLAMP (OUTER) LOW BEAM
1. Turn lighting switch OFF.
2. Disconnect negative battery cable or remove circuit fuse.
3. Remove fender protector (front). Refer toEI-20, "
Removal and Installation" .
4. Turn plastic cap counterclockwise and unlock it.
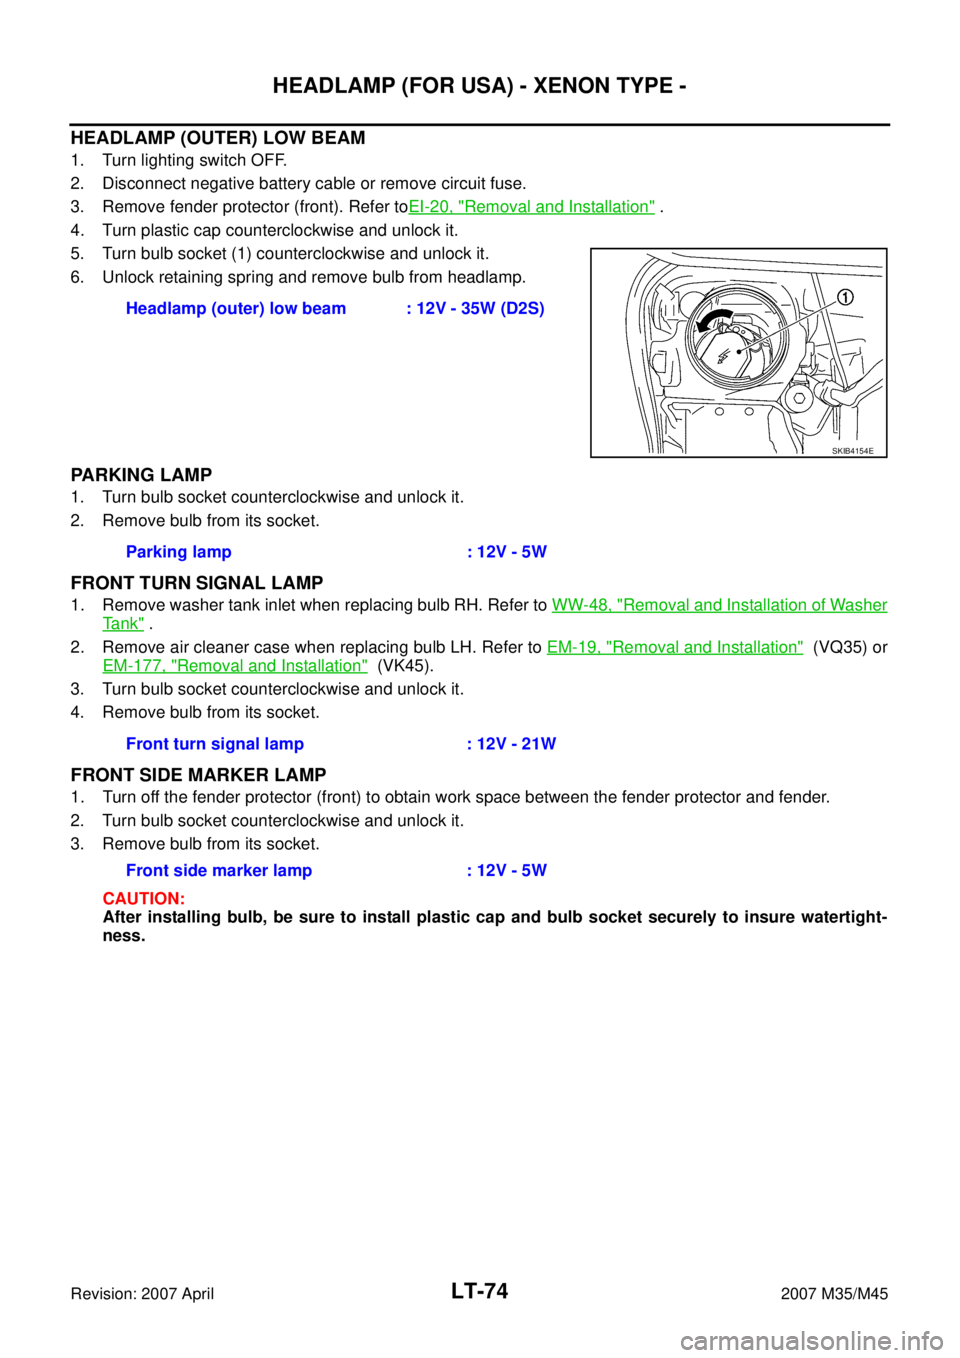
5. Turn bulb socket (1) counterclockwise and unlock it.
6. Unlock retaining spring and remove bulb from headlamp.
PARKING LAMP
1. Turn bulb socket counterclockwise and unlock it.
2. Remove bulb from its socket.
FRONT TURN SIGNAL LAMP
1. Remove washer tank inlet when replacing bulb RH. Refer to WW-48, "Removal and Installation of Washer
Ta n k" .
2. Remove air cleaner case when replacing bulb LH. Refer to EM-19, "
Removal and Installation" (VQ35) or
EM-177, "
Removal and Installation" (VK45).
3. Turn bulb socket counterclockwise and unlock it.
4. Remove bulb from its socket.
FRONT SIDE MARKER LAMP
1. Turn off the fender protector (front) to obtain work space between the fender protector and fender.
2. Turn bulb socket counterclockwise and unlock it.
3. Remove bulb from its socket.
CAUTION:
After installing bulb, be sure to install plastic cap and bulb socket securely to insure watertight-
ness.Headlamp (outer) low beam : 12V - 35W (D2S)
SKIB4154E
Parking lamp : 12V - 5W
Front turn signal lamp : 12V - 21W
Front side marker lamp : 12V - 5W
Page 3527 of 4647
LT-76
HEADLAMP (FOR USA) - XENON TYPE -
Revision: 2007 April2007 M35/M45
Disassembly and Assembly NKS003P8
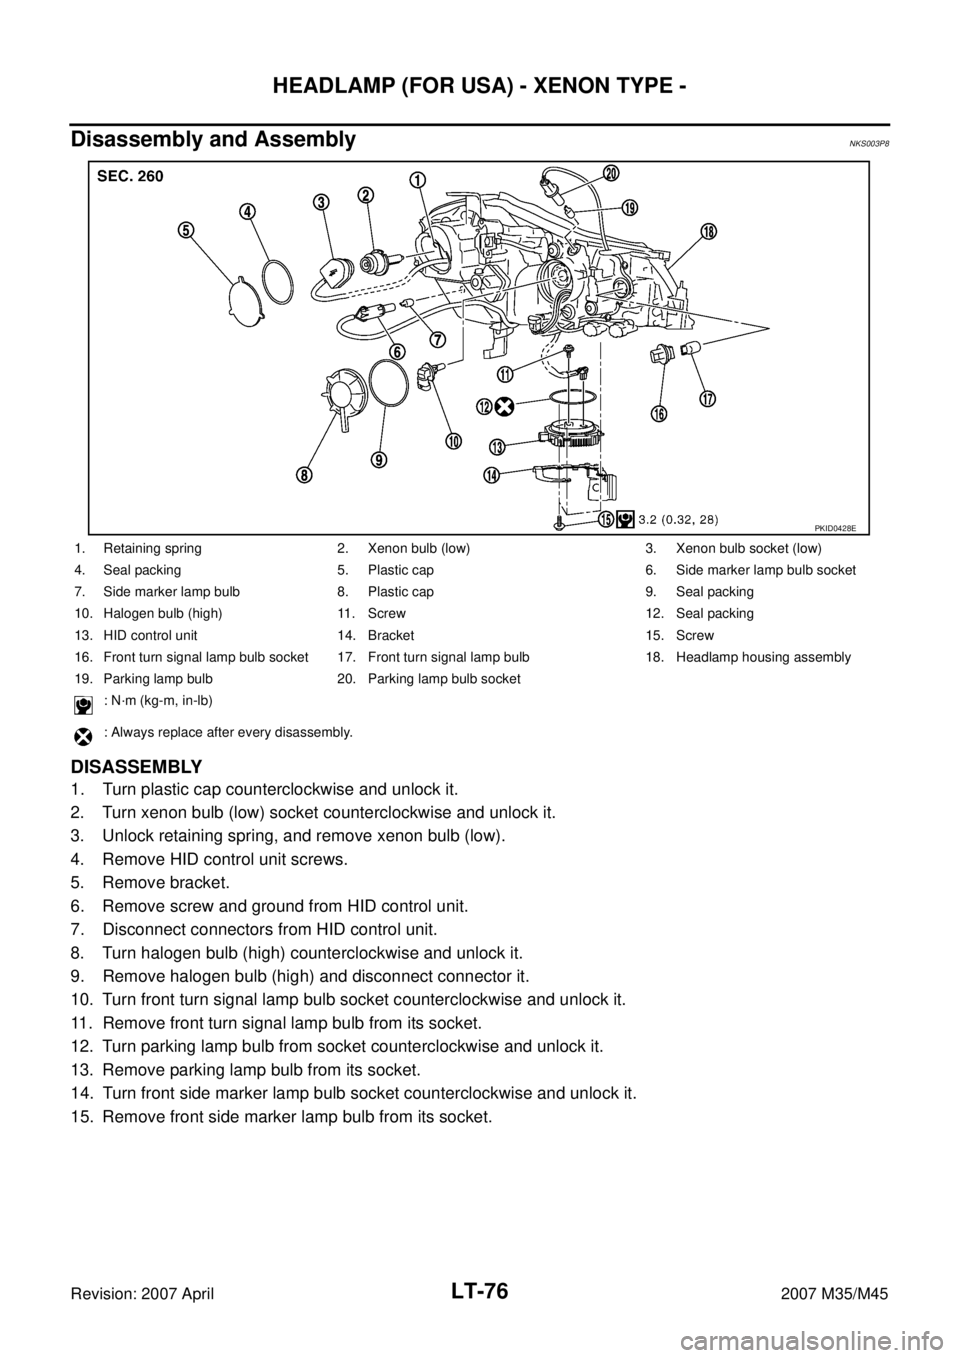
DISASSEMBLY
1. Turn plastic cap counterclockwise and unlock it.
2. Turn xenon bulb (low) socket counterclockwise and unlock it.
3. Unlock retaining spring, and remove xenon bulb (low).
4. Remove HID control unit screws.
5. Remove bracket.
6. Remove screw and ground from HID control unit.
7. Disconnect connectors from HID control unit.
8. Turn halogen bulb (high) counterclockwise and unlock it.
9. Remove halogen bulb (high) and disconnect connector it.
10. Turn front turn signal lamp bulb socket counterclockwise and unlock it.
11. Remove front turn signal lamp bulb from its socket.
12. Turn parking lamp bulb from socket counterclockwise and unlock it.
13. Remove parking lamp bulb from its socket.
14. Turn front side marker lamp bulb socket counterclockwise and unlock it.
15. Remove front side marker lamp bulb from its socket.
PKID0428E
1. Retaining spring 2. Xenon bulb (low) 3. Xenon bulb socket (low)
4. Seal packing 5. Plastic cap 6. Side marker lamp bulb socket
7. Side marker lamp bulb 8. Plastic cap 9. Seal packing
10. Halogen bulb (high) 11. Screw 12. Seal packing
13. HID control unit 14. Bracket 15. Screw
16. Front turn signal lamp bulb socket 17. Front turn signal lamp bulb 18. Headlamp housing assembly
19. Parking lamp bulb 20. Parking lamp bulb socket
: N·m (kg-m, in-lb)
: Always replace after every disassembly.
Page 3529 of 4647
LT-78
HEADLAMP (FOR CANADA) - DAYTIME LIGHT SYSTEM -
Revision: 2007 April2007 M35/M45
HEADLAMP (FOR CANADA) - DAYTIME LIGHT SYSTEM -PFP:26010
Component Parts and Harness Connector LocationNKS003P9
System DescriptionNKS003PA
DAYTIME LIGHT SYSTEM turns on daytime light lamps while driving. Daytime light lamps are not turned on if
engine is activated with parking brake on. Take off parking brake to turn on daytime light lamps. The lamps
turn off when lighting switch is in the 2ND position or AUTO position (Head lamp is “ON”) and when lighting
switch is in the PASSING position. (Daytime light lamps are not turned off only by parking brake itself.)
A parking brake signal and engine run or stop signal are sent to BCM (body control module) by CAN commu-
nication line, and control daytime light system.
PKID0500E
Page 3532 of 4647

HEADLAMP (FOR CANADA) - DAYTIME LIGHT SYSTEM -
LT-81
C
D
E
F
G
H
I
J
L
MA
B
LT
Revision: 2007 April2007 M35/M45
DAYTIME LIGHT OPERATION
With the engine running, the lighting switch in the OFF or AUTO position (headlamp is not illuminate) and
parking brake released, the IPDM E/R receives input request signal from BCM to turn on daytime light. This
input is communicated across the CAN communication lines. The CPU of the IPDM E/R controls the daytime
light relay coil. When energized, this relay directs power
�through daytime light relay terminals 5 and 3
�through front combination lamp RH terminal 2
�through front combination lamp RH terminal 6
�through IPDM E/R terminal 27
�through 10A fuse (No. 72, located in IPDM E/R)
�through 10A fuse (No. 74, located in IPDM E/R)
�through IPDM E/R terminal 28
�to front combination lamp LH terminal 6.
Ground is supplied
�to combination lamp LH terminal 2
�through grounds E22 and E43.
With power and grounds supplied, the daytime lights illuminate. The high beam headlamps are now wired in
series and illuminate at a reduced intensity.
COMBINATION SWITCH READING FUNCTION
Refer to BCS-3, "COMBINATION SWITCH READING FUNCTION" .
AUTO LIGHT OPERATION
For auto light operation, refer to LT- 11 5 , "System Description" .
CAN Communication System DescriptionNKS004HQ
CAN (Controller Area Network) is a serial communication line for real time application. It is an on-vehicle mul-
tiplex communication line with high data communication speed and excellent error detection ability. Many elec-
tronic control units are equipped onto a vehicle, and each control unit shares information and links with other
control units during operation (not independent). In CAN communication, control units are connected with 2
communication lines (CAN H line, CAN L line) allowing a high rate of information transmission with less wiring.
Each control unit transmits/receives data but selectively reads required data only.
CAN Communication UnitNKS004HR
Refer to LAN-50, "CAN System Specification Chart" .
Page 3540 of 4647
HEADLAMP (FOR CANADA) - DAYTIME LIGHT SYSTEM -
LT-89
C
D
E
F
G
H
I
J
L
MA
B
LT
Revision: 2007 April2007 M35/M45
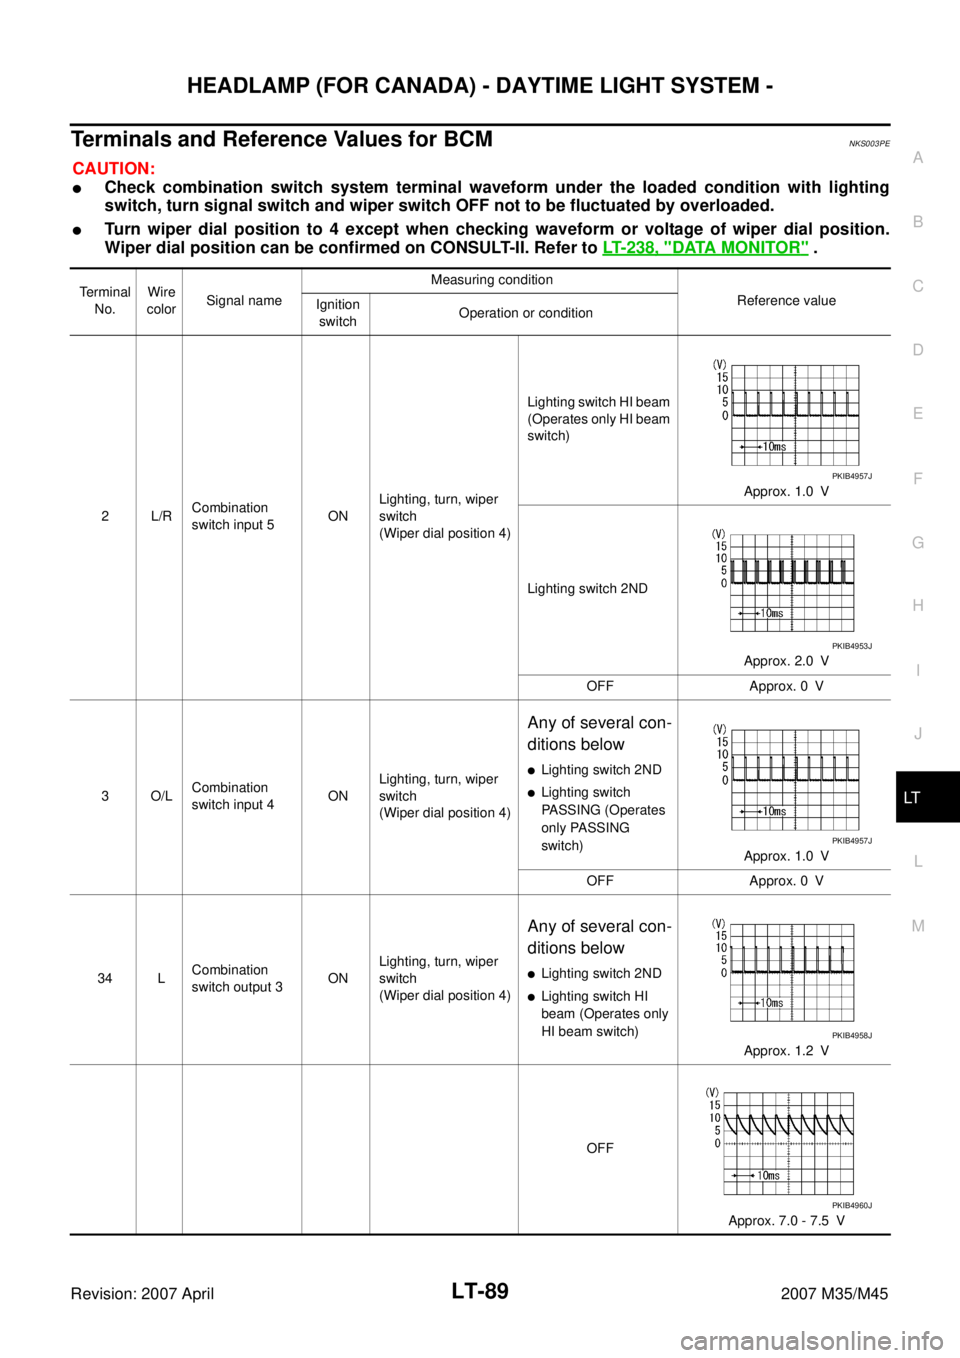
Terminals and Reference Values for BCMNKS003PE
CAUTION:
�Check combination switch system terminal waveform under the loaded condition with lighting
switch, turn signal switch and wiper switch OFF not to be fluctuated by overloaded.
�Turn wiper dial position to 4 except when checking waveform or voltage of wiper dial position.
Wiper dial position can be confirmed on CONSULT-II. Refer to LT- 2 3 8 , "
DATA MONITOR" .
Te r m i n a l
No.Wire
colorSignal nameMeasuring condition
Reference value
Ignition
switchOperation or condition
2L/RCombination
switch input 5ONLighting, turn, wiper
switch
(Wiper dial position 4)Lighting switch HI beam
(Operates only HI beam
switch)
Approx. 1.0 V
Lighting switch 2ND
Approx. 2.0 V
OFF Approx. 0 V
3 O/LCombination
switch input 4ONLighting, turn, wiper
switch
(Wiper dial position 4)
Any of several con-
ditions below
�Lighting switch 2ND
�Lighting switch
PASSING (Operates
only PASSING
switch)
Approx. 1.0 V
OFF Approx. 0 V
34 LCombination
switch output 3ONLighting, turn, wiper
switch
(Wiper dial position 4)
Any of several con-
ditions below
�Lighting switch 2ND
�Lighting switch HI
beam (Operates only
HI beam switch)
Approx. 1.2 V
OFF
Approx. 7.0 - 7.5 V
PKIB4957J
PKIB4953J
PKIB4957J
PKIB4958J
PKIB4960J
Page 3541 of 4647
LT-90
HEADLAMP (FOR CANADA) - DAYTIME LIGHT SYSTEM -
Revision: 2007 April2007 M35/M45
35 SBCombination
switch output 2ONLighting, turn, wiper
switch
(Wiper dial position 4)
Any of several con-
ditions below
�Lighting switch 2ND
�Lighting switch
PASSING (Operates
only PASSING
switch)
Approx. 1.2 V
OFF
Approx. 7.0 - 7.5 V
37 LG Key switch signal OFFIntelligent Key is inserted into key slot. Battery voltage
Intelligent Key is removed from key slot. Approx. 0 V
38 WIgnition switch
(ON) ON — Battery voltage
39 L CAN − H— — —
40 P CAN − L— — —
42 PBattery power
supplyOFF — Battery voltage
52 B Ground ON — Approx. 0 V
55 WBattery power
supplyOFF — Battery voltage
62 VFront door switch
driver side signalOFFFront door switch
driver sideON (open) Approx. 0 V
OFF (closed)
Approx. 7.5 - 8.0 V Terminal
No.Wire
colorSignal nameMeasuring condition
Reference value
Ignition
switchOperation or condition
PKIB4958J
PKIB4960J
PKIB4960J
Page 3544 of 4647
HEADLAMP (FOR CANADA) - DAYTIME LIGHT SYSTEM -
LT-93
C
D
E
F
G
H
I
J
L
MA
B
LT
Revision: 2007 April2007 M35/M45
INSPECTION FOR PARKING BRAKE SWITCH CIRCUIT
1. CHECK BRAKE INDICATOR
1. Turn ignition switch ON.
2. When parking brake is switched ON/OFF, it checks whether the brake indicator lamp of combination meter
lights up / puts out the light.
OK or NG
OK >> INSPECTION END
NG >> GO TO 2.
2. CHECK PARKING BRAKE SWITCH SIGNAL
1. Turn ignition switch OFF.
2. Disconnect parking brake switch connector.
3. Turn ignition switch ON.
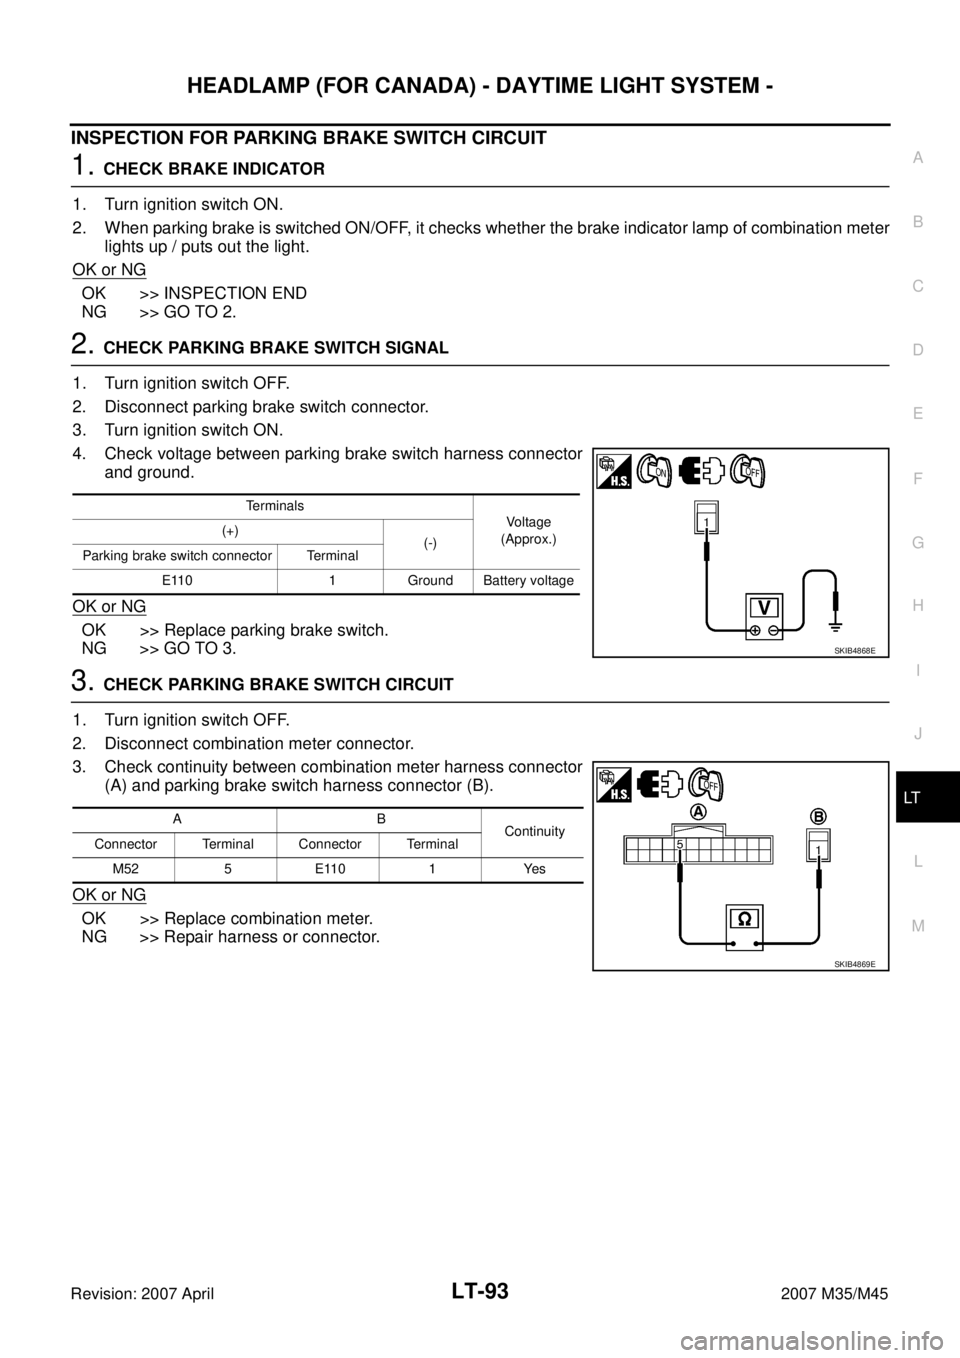
4. Check voltage between parking brake switch harness connector
and ground.
OK or NG
OK >> Replace parking brake switch.
NG >> GO TO 3.
3. CHECK PARKING BRAKE SWITCH CIRCUIT
1. Turn ignition switch OFF.
2. Disconnect combination meter connector.
3. Check continuity between combination meter harness connector
(A) and parking brake switch harness connector (B).
OK or NG
OK >> Replace combination meter.
NG >> Repair harness or connector.
Terminals
Voltage
(Approx.) (+)
(-)
Parking brake switch connector Terminal
E110 1 Ground Battery voltage
SKIB4868E
AB
Continuity
Connector Terminal Connector Terminal
M52 5 E110 1 Yes
SKIB4869E