Page 3821 of 4647

MA-22
ENGINE MAINTENANCE (VK45DE ENGINE)
Revision: 2007 April2007 M35/M45
ENGINE MAINTENANCE (VK45DE ENGINE)PFP:10001
Checking Drive BeltsNLS0007Q
WARNING:
Be sure to perform when the engine is stopped.
�Remove air duct (inlet) when inspecting drive belt for alternator, water pump and A/C compressor.
�Remove front engine undercover with power tool when inspecting power steering oil pump belt.
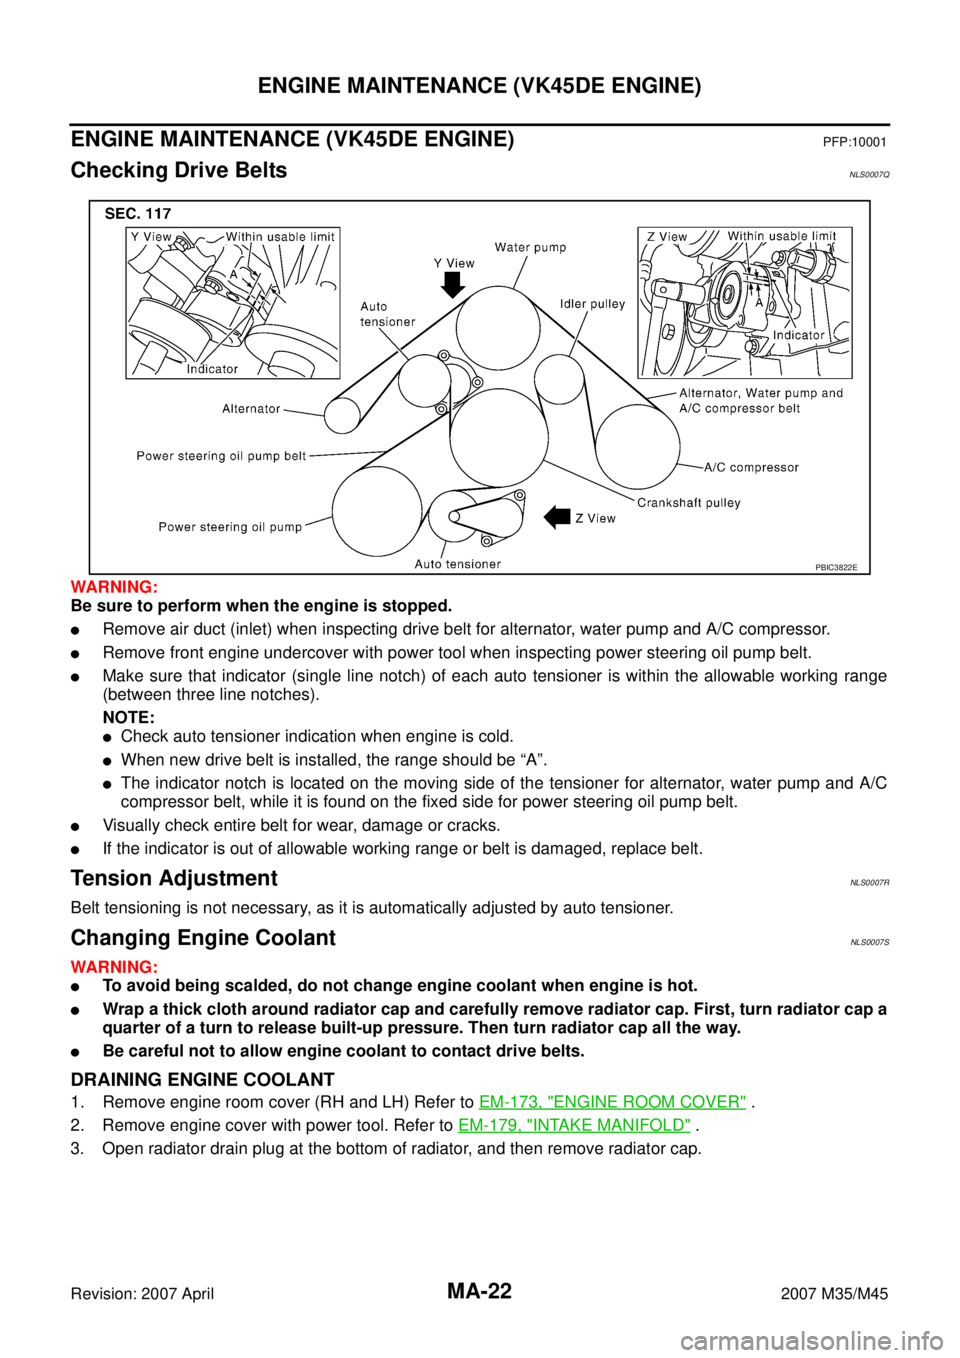
�Make sure that indicator (single line notch) of each auto tensioner is within the allowable working range
(between three line notches).
NOTE:
�Check auto tensioner indication when engine is cold.
�When new drive belt is installed, the range should be “A”.
�The indicator notch is located on the moving side of the tensioner for alternator, water pump and A/C
compressor belt, while it is found on the fixed side for power steering oil pump belt.
�Visually check entire belt for wear, damage or cracks.
�If the indicator is out of allowable working range or belt is damaged, replace belt.
Tension AdjustmentNLS0007R
Belt tensioning is not necessary, as it is automatically adjusted by auto tensioner.
Changing Engine CoolantNLS0007S
WARNING:
�To avoid being scalded, do not change engine coolant when engine is hot.
�Wrap a thick cloth around radiator cap and carefully remove radiator cap. First, turn radiator cap a
quarter of a turn to release built-up pressure. Then turn radiator cap all the way.
�Be careful not to allow engine coolant to contact drive belts.
DRAINING ENGINE COOLANT
1. Remove engine room cover (RH and LH) Refer to EM-173, "ENGINE ROOM COVER" .
2. Remove engine cover with power tool. Refer to EM-179, "
INTAKE MANIFOLD" .
3. Open radiator drain plug at the bottom of radiator, and then remove radiator cap.
PBIC3822E
Page 3836 of 4647

CHASSIS AND BODY MAINTENANCE
MA-37
C
D
E
F
G
H
I
J
K
MA
B
MA
Revision: 2007 April2007 M35/M45
Checking Power Steering Fluid and LinesNLS0008E
Check fluid level in reservoir tank with engine off.
Use “HOT” range at fluid temperatures of 50 to 80°C (122 to 176°F)
or “COLD” range at fluid temperatures of 0 to 30°C (32 to 86°F).
CAUTION:
�Do not overfill.
�Recommended fluid is genuine NISSAN PSF or equivalent.
Refer to MA-12, "
RECOMMENDED FLUIDS AND LUBRI-
CANTS" .
�Check lines for improper attachment, leaks, cracks, dam-
age, loose connections, chafing and deterioration.
�Check rack boots for accumulation of power steering fluid.
Axle and Suspension PartsNLS0008F
Check front and rear axle and suspension parts for excessive play,
cracks, wear or other damage.
�Shake each wheel to check for excessive play.
�Check wheel bearings for smooth operation.
�Check axle and suspension nuts and bolts for looseness.
�Check strut (shock absorber) for oil leakage or other damage.
�Check suspension ball joint for grease leakage and ball joint
dust cover for cracks or other damage.
SST850C
SST851C
SMA525A
SFA392B
Page 3970 of 4647
NOISE, VIBRATION AND HARSHNESS (NVH) TROUBLESHOOTING
PR-3
C
E
F
G
H
I
J
K
L
MA
B
PR
Revision: 2007 April2007 M35/M45
NOISE, VIBRATION AND HARSHNESS (NVH) TROUBLESHOOTINGPFP:00003
NVH Troubleshooting ChartNDS000E9
Use the chart below to help you find the cause of the symptom. If necessary, repair or replace these parts.
×: Applicable Reference pageFront
PR-4—
—
—
—
PR-4PR-5
NVH in FFD and RFD section
NVH in FAX, RAX, FSU and RSU section
NVH in WT section
NVH in WT section
NVH in RAX section
NVH in BR section
NVH in PS section
RearPR-6PR-10—
PR-7—
PR-6PR-9
Possible cause and SUSPECTED PARTS
Uneven rotating torque
Center bearing improper installation
Excessive center bearing axial end play
Center bearing mounting (insulator) cracks, damage or deterioration
Excessive joint angle
Rotation imbalance
Excessive runout
DIFFERENTIAL
AXLE AND SUSPENSION
TIRES
ROAD WHEEL
DRIVE SHAFT
BRAKES
STEERING
SymptomNoise××××××××××××××
Shake× × ××××××
Vibration××××××× ×× × ×
Page 3983 of 4647

PS-2Revision: 2007 April2007 M35/M45 ASSEMBLY ......................................................... 33
Disassembly and Assembly (Models with VQ35DE) ... 35
COMPONENTS ................................................... 35
INSPECTION BEFORE DISASSEMBLY ............. 35
DISASSEMBLY ................................................... 36
INSPECTION AFTER DISASSEMBLY ................ 36
ASSEMBLY ......................................................... 37
HYDRAULIC LINE .................................................... 39
Removal and Installation ........................................ 39
COMPONENTS (VQ35DE 2WD MODELS) ........ 39
COMPONENTS (VQ35DE AWD MODELS) ........ 41
COMPONENTS (VK45DE MODELS) ................. 43
Removal and Installation ........................................ 44
SERVICE DATA AND SPECIFICATIONS (SDS) ...... 45Steering Wheel ........................................................ 45
Steering Angle ......................................................... 45
Steering Column ..................................................... 45
STEERING COLUMN LENGTH ........................... 45
TILT AND TELESCOPIC MECHANISM OPER-
ATING RANGE .................................................... 45
Steering Gear .......................................................... 46
STEERING OUTER SOCKET AND INNER
SOCKET .............................................................. 46
RACK STROKE ................................................... 46
RACK SLIDING FORCE ...................................... 46
Oil Pump ................................................................. 46
Steering Fluid .......................................................... 46
Page 3985 of 4647
PS-4
PRECAUTIONS
Revision: 2007 April2007 M35/M45
Precautions for Steering SystemNGS000D1
�In case of removing steering gear assembly, make the final tightening with grounded and unloaded vehi-
cle condition, and then check wheel alignment.
�Observe the following precautions when disassembling.
–Before disassembly, thoroughly clean the outside of the unit.
–Disassembly should be done in a clean work area. It is important to prevent the internal parts from becom-
ing contaminated by dirt or other foreign matter.
–For easier and proper assembly, place disassembled parts in order on a parts rack.
–Use nylon cloth or paper towels to clean the parts; common shop rags can leave lint that might interfere
with their operation.
–Do not reuse non-reusable parts.
–Before assembling, apply the specified grease to the directed parts.
Page 3986 of 4647
PREPARATION
PS-5
C
D
E
F
H
I
J
K
L
MA
B
PS
Revision: 2007 April2007 M35/M45
PREPARATIONPFP:00002
Special Service ToolsNGS000D2
The actual shapes of Kent-Moore tools may differ from those of special service tools illustrated here.
Tool number
(Kent-Moore No.)
Tool nameDescription
ST27180001
(J-25726-A)
Steering wheel pullerRemoving steering wheel
ST3127S000
(See J-25765-A)
Preload gauge
1. GG9103000
(J-25765-A)
Torque wrench
2. HT62940000
(–)
Socket adapter
3. HT62900000
(–)
Socket adapterInspecting sliding torque, steering torque, and
rotating torque for ball joint
KV48104400
(–)
Teflon ring correcting tool
a: 50 mm (1.97 in) dia.
b: 36 mm (1.42 in) dia.
c: 100 mm (3.94 in)Installing rack Teflon ring
KV48103400
(–)
Preload adapterInspecting rotating torque
KV48103500
(J-26357)
Oil pressure gaugeMeasuring oil pump relief pressure
S-NT544
S-NT541
S-NT550
ZZA0824D
S-NT547
Page 3988 of 4647

NOISE, VIBRATION AND HARSHNESS (NVH) TROUBLESHOOTING
PS-7
C
D
E
F
H
I
J
K
L
MA
B
PS
Revision: 2007 April2007 M35/M45
NOISE, VIBRATION AND HARSHNESS (NVH) TROUBLESHOOTINGPFP:00003
NVH Trouble Shooting ChartNGS000D4
Use chart below to help you find the cause of the symptom. If necessary, repair or replace these parts.
×: ApplicableReference page
PS-8PS-8PS-24PS-24PS-24PS-8PS-10PS-10
EM-16
,EM-174PS-10—
PS-23PS-16PS-13PS-21
NVH in PR section
NVH in RFD section
NVH in FAX, RAX, FSU, RSU section
NVH in WT section
NVH in WT section
NVH in FAX section
NVH in BR section
Possible cause and SUSPECTED PARTS
Fluid level
Air in hydraulic system
Outer socket ball joint swinging torque
Outer socket ball joint rotating torque
Outer socket ball joint end play
Steering fluid leakage
Steering wheel play
Steering gear rack sliding force
Drive belt looseness
Improper steering wheel
Improper installation or looseness of tilt lock lever
Mounting rubber deterioration
Steering column deformation or damage
Improper installation or looseness of steering column
Steering linkage looseness
PROPELLER SHAFT
DIFFERENTIAL
AXLE and SUSPENSION
TIRES
ROAD WHEEL
DRIVE SHAFT
BRAKES
Symptom SteeringNoise× × ××××× × × ×××××× ×
Shake×× ××××××
Vibration×××× ××××
Shimmy× × × ××× ×
Judder× × ××× ×
Page 3989 of 4647

PS-8
POWER STEERING FLUID
Revision: 2007 April2007 M35/M45
POWER STEERING FLUIDPFP:KLF20
Checking Fluid LevelNGS000D5
�Check fluid level with engine stopped.
�Make sure that fluid level is between MIN and MAX.
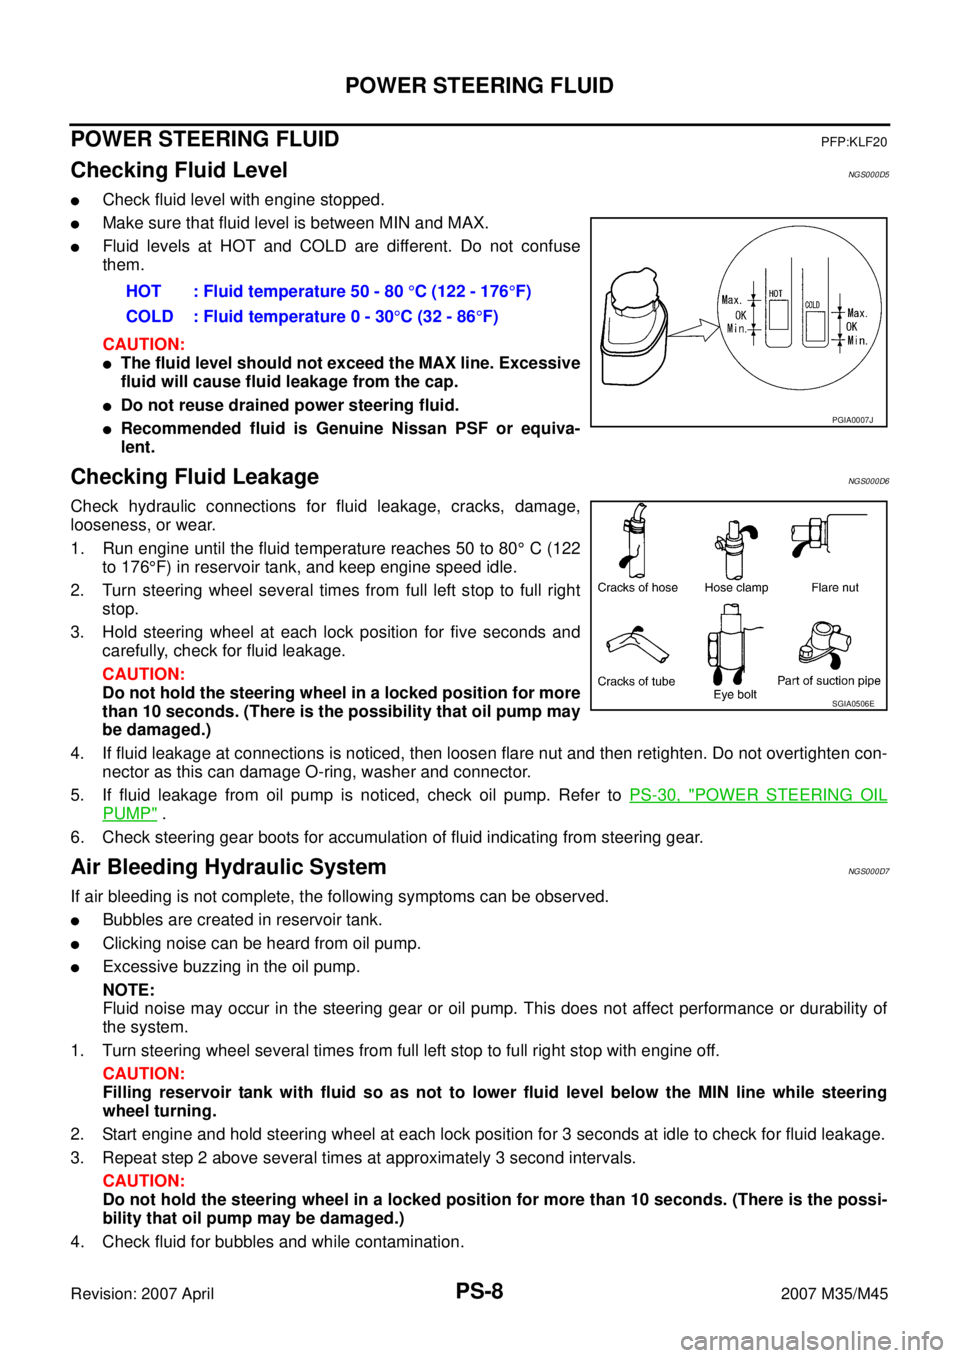
�Fluid levels at HOT and COLD are different. Do not confuse
them.
CAUTION:
�The fluid level should not exceed the MAX line. Excessive
fluid will cause fluid leakage from the cap.
�Do not reuse drained power steering fluid.
�Recommended fluid is Genuine Nissan PSF or equiva-
lent.
Checking Fluid LeakageNGS000D6
Check hydraulic connections for fluid leakage, cracks, damage,
looseness, or wear.
1. Run engine until the fluid temperature reaches 50 to 80° C (122
to 176°F) in reservoir tank, and keep engine speed idle.
2. Turn steering wheel several times from full left stop to full right
stop.
3. Hold steering wheel at each lock position for five seconds and
carefully, check for fluid leakage.
CAUTION:
Do not hold the steering wheel in a locked position for more
than 10 seconds. (There is the possibility that oil pump may
be damaged.)
4. If fluid leakage at connections is noticed, then loosen flare nut and then retighten. Do not overtighten con-
nector as this can damage O-ring, washer and connector.
5. If fluid leakage from oil pump is noticed, check oil pump. Refer to PS-30, "
POWER STEERING OIL
PUMP" .
6. Check steering gear boots for accumulation of fluid indicating from steering gear.
Air Bleeding Hydraulic SystemNGS000D7
If air bleeding is not complete, the following symptoms can be observed.
�Bubbles are created in reservoir tank.
�Clicking noise can be heard from oil pump.
�Excessive buzzing in the oil pump.
NOTE:
Fluid noise may occur in the steering gear or oil pump. This does not affect performance or durability of
the system.
1. Turn steering wheel several times from full left stop to full right stop with engine off.
CAUTION:
Filling reservoir tank with fluid so as not to lower fluid level below the MIN line while steering
wheel turning.
2. Start engine and hold steering wheel at each lock position for 3 seconds at idle to check for fluid leakage.
3. Repeat step 2 above several times at approximately 3 second intervals.
CAUTION:
Do not hold the steering wheel in a locked position for more than 10 seconds. (There is the possi-
bility that oil pump may be damaged.)
4. Check fluid for bubbles and while contamination.HOT : Fluid temperature 50 - 80 °C (122 - 176°F)
COLD : Fluid temperature 0 - 30°C (32 - 86°F)
PGIA0007J
SGIA0506E