Page 4573 of 4647

WT-24
TROUBLE DIAGNOSES
Revision: 2007 April2007 M35/M45
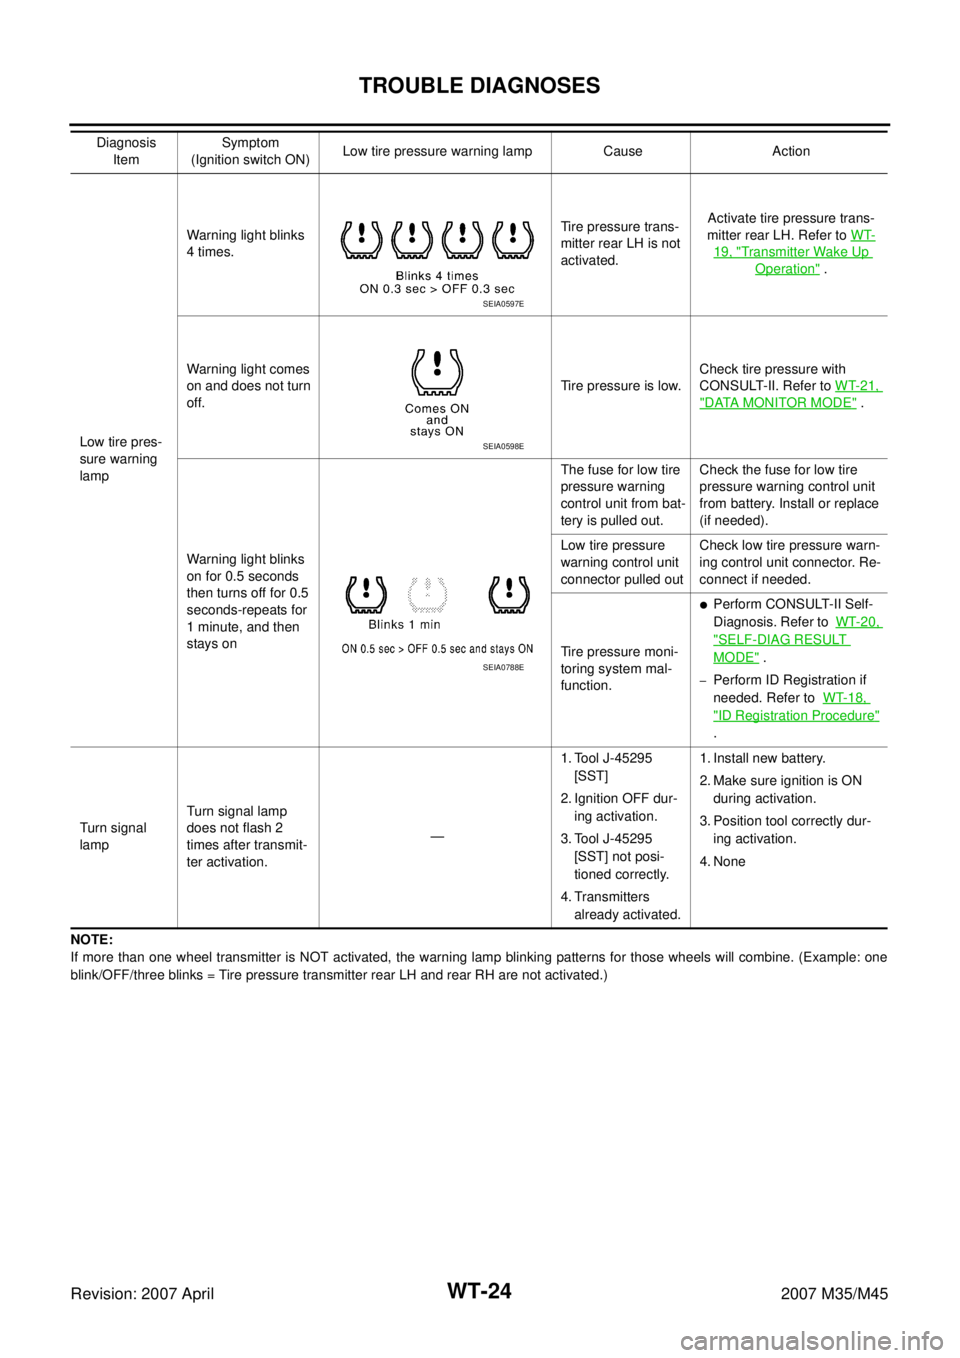
NOTE:
If more than one wheel transmitter is NOT activated, the warning lamp blinking patterns for those wheels will combine. (Example: one
blink/OFF/three blinks = Tire pressure transmitter rear LH and rear RH are not activated.)Low tire pres-
sure warning
lampWarning light blinks
4 times.Tire pressure trans-
mitter rear LH is not
activated.Activate tire pressure trans-
mitter rear LH. Refer to WT-
19, "Transmitter Wake Up
Operation" .
Warning light comes
on and does not turn
off.Tire pressure is low.Check tire pressure with
CONSULT-II. Refer to WT-21,
"DATA MONITOR MODE" .
Warning light blinks
on for 0.5 seconds
then turns off for 0.5
seconds-repeats for
1 minute, and then
stays onThe fuse for low tire
pressure warning
control unit from bat-
tery is pulled out.Check the fuse for low tire
pressure warning control unit
from battery. Install or replace
(if needed).
Low tire pressure
warning control unit
connector pulled outCheck low tire pressure warn-
ing control unit connector. Re-
connect if needed.
Tire pressure moni-
toring system mal-
function.
�Perform CONSULT-II Self-
Diagnosis. Refer to WT-20,
"SELF-DIAG RESULT
MODE" .
–Perform ID Registration if
needed. Refer to WT-18,
"ID Registration Procedure"
.
Turn signal
lampTurn signal lamp
does not flash 2
times after transmit-
ter activation.—1. Tool J-45295
[SST]
2. Ignition OFF dur-
ing activation.
3. Tool J-45295
[SST] not posi-
tioned correctly.
4. Transmitters
already activated.1. Install new battery.
2. Make sure ignition is ON
during activation.
3. Position tool correctly dur-
ing activation.
4. None Diagnosis
ItemSymptom
(Ignition switch ON)Low tire pressure warning lamp Cause Action
SEIA0597E
SEIA0598E
SEIA0788E
Page 4589 of 4647

WT-40
REMOVAL AND INSTALLATION
Revision: 2007 April2007 M35/M45
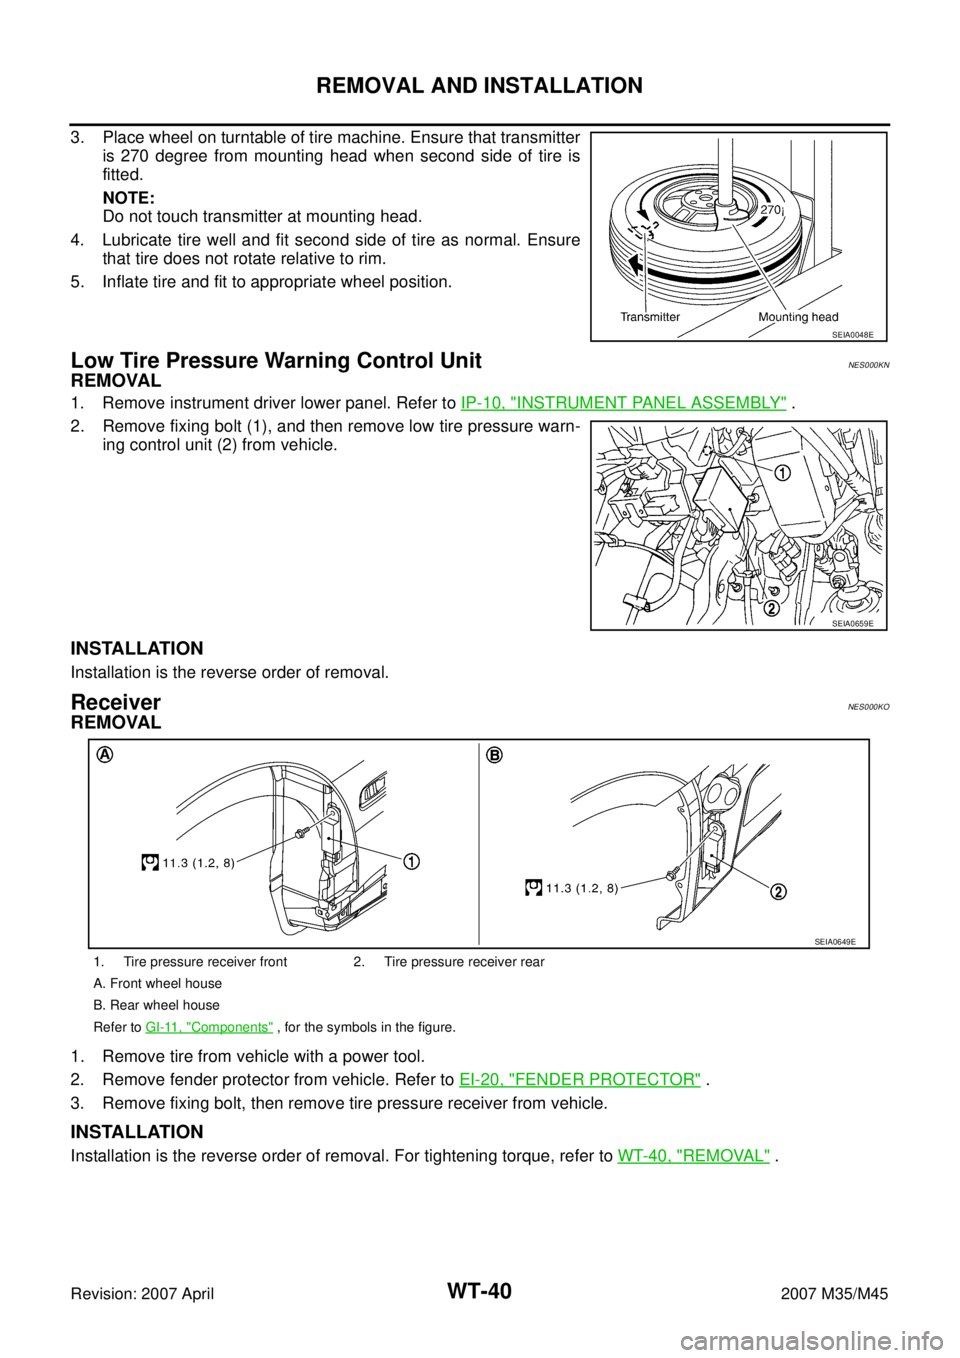
3. Place wheel on turntable of tire machine. Ensure that transmitter
is 270 degree from mounting head when second side of tire is
fitted.
NOTE:
Do not touch transmitter at mounting head.
4. Lubricate tire well and fit second side of tire as normal. Ensure
that tire does not rotate relative to rim.
5. Inflate tire and fit to appropriate wheel position.
Low Tire Pressure Warning Control UnitNES000KN
REMOVAL
1. Remove instrument driver lower panel. Refer to IP-10, "INSTRUMENT PANEL ASSEMBLY" .
2. Remove fixing bolt (1), and then remove low tire pressure warn-
ing control unit (2) from vehicle.
INSTALLATION
Installation is the reverse order of removal.
ReceiverNES000KO
REMOVAL
1. Remove tire from vehicle with a power tool.
2. Remove fender protector from vehicle. Refer to EI-20, "
FENDER PROTECTOR" .
3. Remove fixing bolt, then remove tire pressure receiver from vehicle.
INSTALLATION
Installation is the reverse order of removal. For tightening torque, refer to WT-40, "REMOVAL" .
SEIA0048E
SEIA0659E
1. Tire pressure receiver front 2. Tire pressure receiver rear
A. Front wheel house
B. Rear wheel house
Refer to GI-11, "
Components" , for the symbols in the figure.
SEIA0649E
Page 4590 of 4647
SERVICE DATA AND SPECIFICATIONS (SDS)
WT-41
C
D
F
G
H
I
J
K
L
MA
B
WT
Revision: 2007 April2007 M35/M45
SERVICE DATA AND SPECIFICATIONS (SDS)PFP:00030
Road WheelNES000KP
TireNES000KQ
Unit: kPa (kg/cm2 , psi) Kind of wheel Aluminum For temporary use
Maximum radial runout limitLateral deflection Less than 0.3 mm (0.012 in) Less than 1.5 mm (0.059 in)
Vertical deflection Less than 0.3 mm (0.012 in) Less than 1.5 mm (0.059 in)
Maximum allowable unbalanceDynamic (At rim flange) Less than 7 g (0.25 oz) (one side)
Static (At rim flange) Less than 14 g (0.49 oz)
Tire sizeAir pressure
Front Rear
245/40R19 94W 230 (2.3, 33) 230 (2.3, 33)
P245/45R18 96V 230 (2.3, 33) 230 (2.3, 33)
T145/80D17 107M 420 (4.2, 61) 420 (4.2, 61)