Page 3527 of 4647
LT-76
HEADLAMP (FOR USA) - XENON TYPE -
Revision: 2007 April2007 M35/M45
Disassembly and Assembly NKS003P8
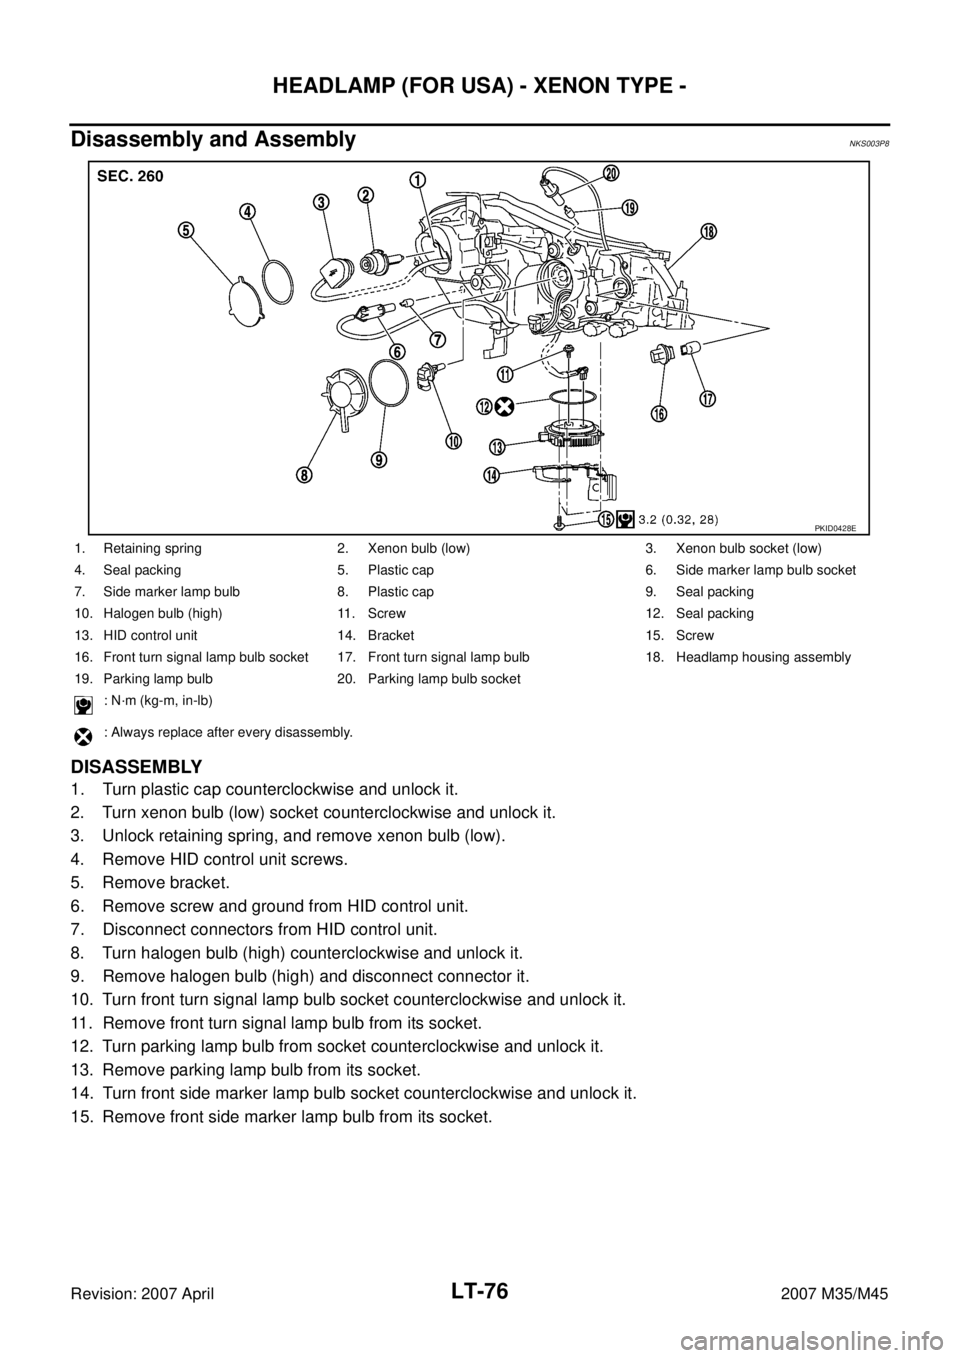
DISASSEMBLY
1. Turn plastic cap counterclockwise and unlock it.
2. Turn xenon bulb (low) socket counterclockwise and unlock it.
3. Unlock retaining spring, and remove xenon bulb (low).
4. Remove HID control unit screws.
5. Remove bracket.
6. Remove screw and ground from HID control unit.
7. Disconnect connectors from HID control unit.
8. Turn halogen bulb (high) counterclockwise and unlock it.
9. Remove halogen bulb (high) and disconnect connector it.
10. Turn front turn signal lamp bulb socket counterclockwise and unlock it.
11. Remove front turn signal lamp bulb from its socket.
12. Turn parking lamp bulb from socket counterclockwise and unlock it.
13. Remove parking lamp bulb from its socket.
14. Turn front side marker lamp bulb socket counterclockwise and unlock it.
15. Remove front side marker lamp bulb from its socket.
PKID0428E
1. Retaining spring 2. Xenon bulb (low) 3. Xenon bulb socket (low)
4. Seal packing 5. Plastic cap 6. Side marker lamp bulb socket
7. Side marker lamp bulb 8. Plastic cap 9. Seal packing
10. Halogen bulb (high) 11. Screw 12. Seal packing
13. HID control unit 14. Bracket 15. Screw
16. Front turn signal lamp bulb socket 17. Front turn signal lamp bulb 18. Headlamp housing assembly
19. Parking lamp bulb 20. Parking lamp bulb socket
: N·m (kg-m, in-lb)
: Always replace after every disassembly.
Page 3528 of 4647
HEADLAMP (FOR USA) - XENON TYPE -
LT-77
C
D
E
F
G
H
I
J
L
MA
B
LT
Revision: 2007 April2007 M35/M45
ASSEMBLY
Note the following, and installation is the reverse order of removal.
CAUTION:
�When HID control unit is removed, reinstall it securely and avoid any looseness.
�After installing bulb, be sure to install plastic cap and bulb socket securely to insure watertight-
ness HID control unit mounting screw : 3.2 N·m (0.32 kg-m, 28 in-lb)
Page 3565 of 4647
LT-114
HEADLAMP (FOR CANADA) - DAYTIME LIGHT SYSTEM -
Revision: 2007 April2007 M35/M45
General Information for Xenon Headlamp Trouble DiagnosisNKS003PR
In most cases, malfunction of xenon headlamp - “does not illuminate”, “flickers” or “dark” - is caused by a mal-
functioning xenon bulb. A HID control unit or lamp housing, however, may be a cause of malfunction. Be sure
to perform trouble diagnosis following the steps described below.
CAUTION:NKS003PS
�Installation or removal of connector must be done with lighting switch OFF.
�When lamp is illuminated (when lighting switch is ON), do not touch harness, HID control unit, inside of
lamp, or lamp metal parts.
�To check illumination, temporarily install lamp in the vehicle. Be sure to connect power at the vehicle-side
connector.
�If the error can be traced directly to the electrical system, first check for items such as burned-out fuses
and fusible links, broken wires or loose connectors, pulled-out terminals, and improper connections.
�Do not work with wet hands.
�Using a tester for HID control unit circuit trouble diagnosis is prohibited.
�Disassembling the HID control unit or harnesses (bulb socket harness, ECM harness) is prohibited.
�Immediately after illumination, the light intensity and color will fluctuate, but there is nothing wrong.
�When the bulb has reached the end of its lifetime, the brightness may drop significantly, it may flash
repeatedly, or the light may turn a reddish color.
Xenon Headlamp Trouble DiagnosisNKS003PT
1. CHECK 1: XENON HEADLAMP LIGHTING
Install normal xenon bulb to corresponding xenon bulb headlamp, and check if lamp lights up.
OK or NG
OK >> Replace xenon bulb.
NG >> GO TO 2.
2. CHECK 2: XENON HEADLAMP LIGHTING
Install normal HID control unit to corresponding xenon headlamp, and check if lamp lights up.
OK or NG
OK >> Replace HID control unit.
NG >> GO TO 3.
3. CHECK 3: XENON HEADLAMP LIGHTING
Install normal xenon lamp housing assembly to corresponding xenon headlamp, and check if lamp lights up.
OK or NG
OK >> Replace xenon headlamp housing assembly.
NG >> INSPECTION END
Aiming AdjustmentNKS003PU
Refer to LT- 7 2 , "Aiming Adjustment" .
Bulb ReplacementNKS003PV
Refer to LT- 7 3 , "Bulb Replacement" .
Removal and InstallationNKS003PW
Refer to LT- 7 5 , "Removal and Installation" .
Disassembly and AssemblyNKS003PX
Refer to LT- 7 6 , "Disassembly and Assembly" .
Page 3680 of 4647
TURN SIGNAL AND HAZARD WARNING LAMPS
LT-229
C
D
E
F
G
H
I
J
L
MA
B
LT
Revision: 2007 April2007 M35/M45
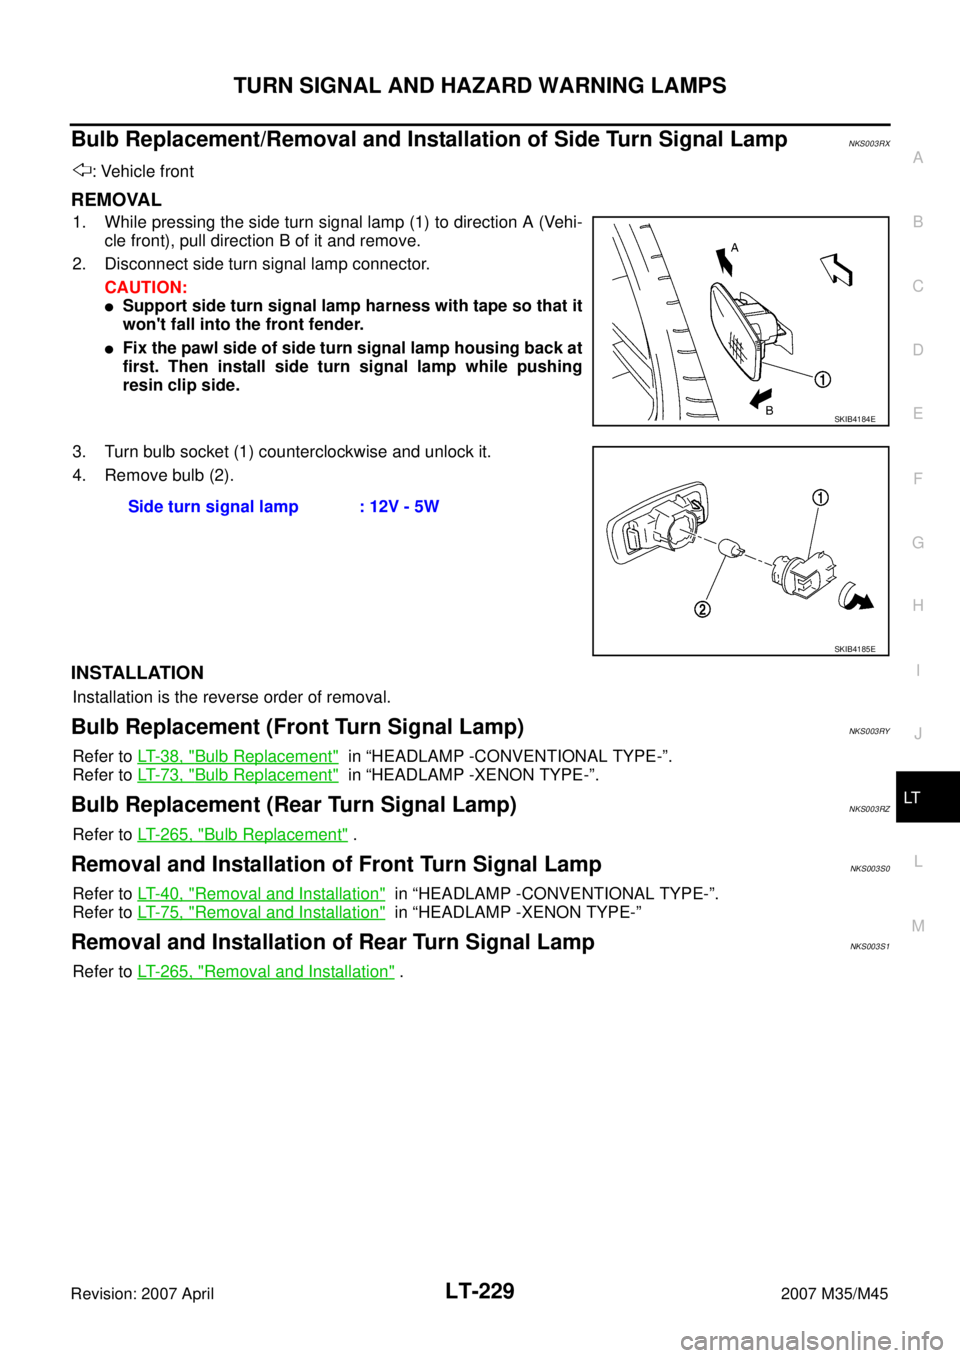
Bulb Replacement/Removal and Installation of Side Turn Signal LampNKS003RX
: Vehicle front
REMOVAL
1. While pressing the side turn signal lamp (1) to direction A (Vehi-
cle front), pull direction B of it and remove.
2. Disconnect side turn signal lamp connector.
CAUTION:
�Support side turn signal lamp harness with tape so that it
won't fall into the front fender.
�Fix the pawl side of side turn signal lamp housing back at
first. Then install side turn signal lamp while pushing
resin clip side.
3. Turn bulb socket (1) counterclockwise and unlock it.
4. Remove bulb (2).
INSTALLATION
Installation is the reverse order of removal.
Bulb Replacement (Front Turn Signal Lamp)NKS003RY
Refer to LT- 3 8 , "Bulb Replacement" in “HEADLAMP -CONVENTIONAL TYPE-”.
Refer to LT- 7 3 , "
Bulb Replacement" in “HEADLAMP -XENON TYPE-”.
Bulb Replacement (Rear Turn Signal Lamp)NKS003RZ
Refer to LT- 2 6 5 , "Bulb Replacement" .
Removal and Installation of Front Turn Signal LampNKS003S0
Refer to LT- 4 0 , "Removal and Installation" in “HEADLAMP -CONVENTIONAL TYPE-”.
Refer to LT- 7 5 , "
Removal and Installation" in “HEADLAMP -XENON TYPE-”
Removal and Installation of Rear Turn Signal Lamp NKS003S1
Refer to LT- 2 6 5 , "Removal and Installation" .
SKIB4184E
Side turn signal lamp : 12V - 5W
SKIB4185E
Page 3697 of 4647
LT-246
BACK-UP LAMP
Revision: 2007 April2007 M35/M45
Bulb ReplacementNKS003SF
1. Remove trunk lid finisher inner. Refer to EI-33, "TRUNK LID FINISHER" .
2. Turn bulb socket (1) counterclockwise and unlock it.
3. Remove bulb (2) from its socket.
Back-up lamp : 12V-18W
SKIB4189E
Page 3715 of 4647
LT-264
PARKING, LICENSE PLATE AND TAIL LAMPS
Revision: 2007 April2007 M35/M45
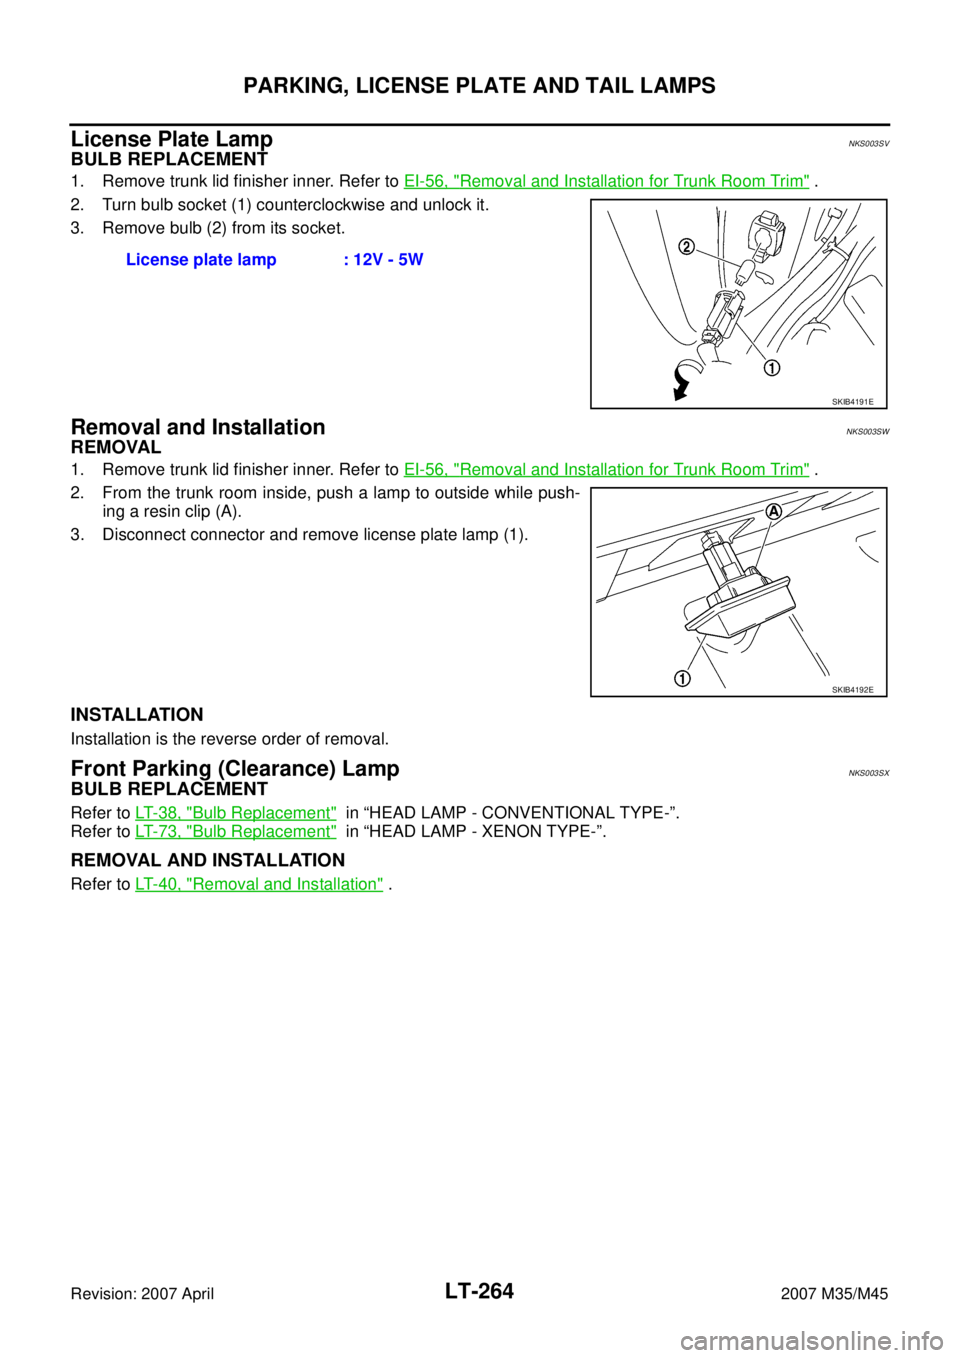
License Plate LampNKS003SV
BULB REPLACEMENT
1. Remove trunk lid finisher inner. Refer to EI-56, "Removal and Installation for Trunk Room Trim" .
2. Turn bulb socket (1) counterclockwise and unlock it.
3. Remove bulb (2) from its socket.
Removal and InstallationNKS003SW
REMOVAL
1. Remove trunk lid finisher inner. Refer to EI-56, "Removal and Installation for Trunk Room Trim" .
2. From the trunk room inside, push a lamp to outside while push-
ing a resin clip (A).
3. Disconnect connector and remove license plate lamp (1).
INSTALLATION
Installation is the reverse order of removal.
Front Parking (Clearance) LampNKS003SX
BULB REPLACEMENT
Refer to LT- 3 8 , "Bulb Replacement" in “HEAD LAMP - CONVENTIONAL TYPE-”.
Refer to LT- 7 3 , "
Bulb Replacement" in “HEAD LAMP - XENON TYPE-”.
REMOVAL AND INSTALLATION
Refer to LT- 4 0 , "Removal and Installation" . License plate lamp : 12V - 5W
SKIB4191E
SKIB4192E
Page 3716 of 4647
REAR COMBINATION LAMP
LT-265
C
D
E
F
G
H
I
J
L
MA
B
LT
Revision: 2007 April2007 M35/M45
REAR COMBINATION LAMPPFP:26554
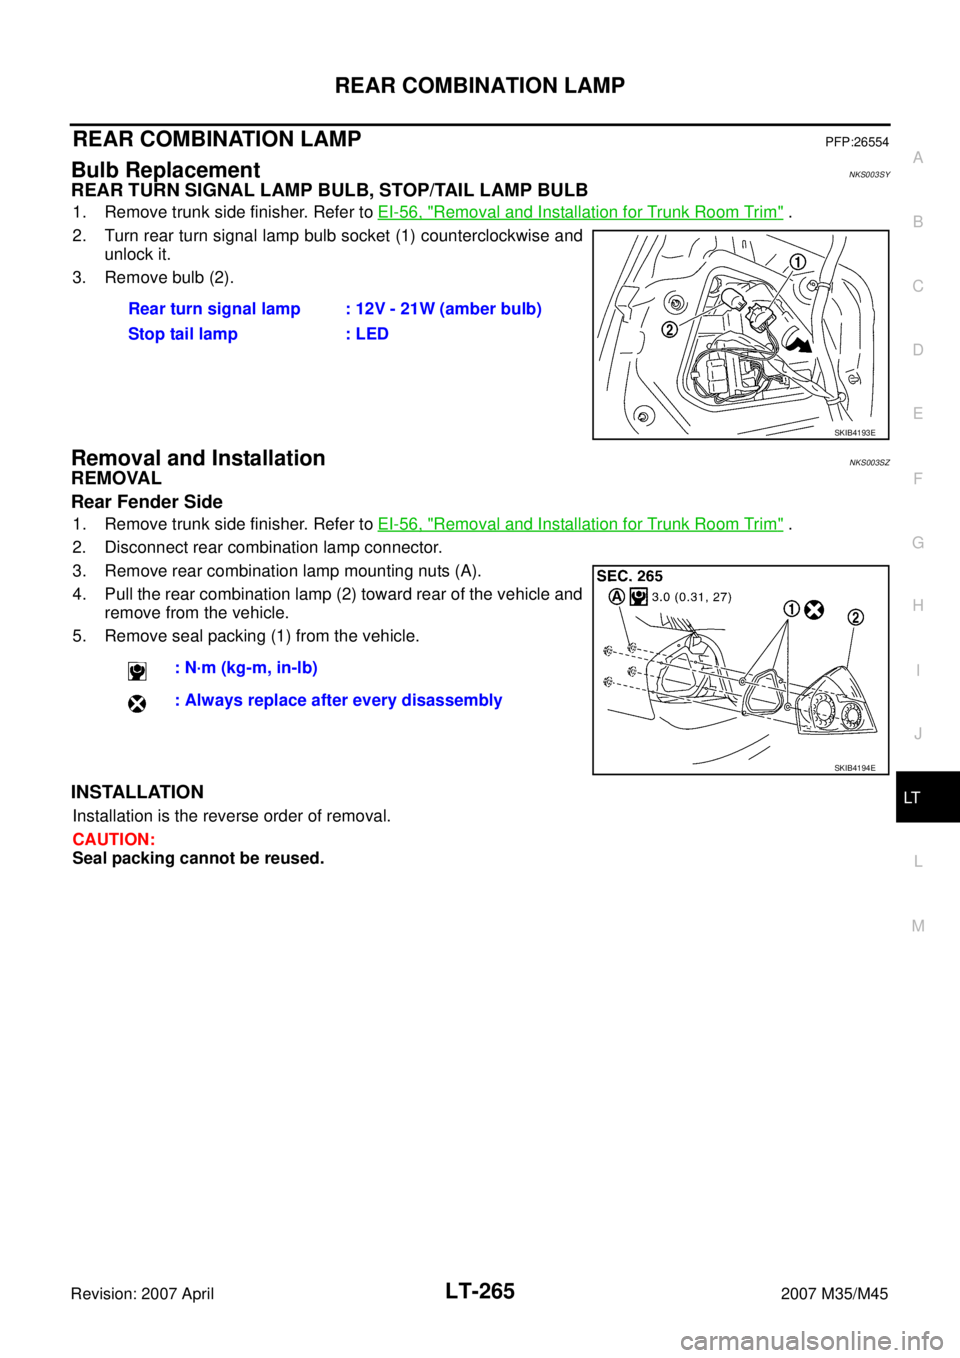
Bulb ReplacementNKS003SY
REAR TURN SIGNAL LAMP BULB, STOP/TAIL LAMP BULB
1. Remove trunk side finisher. Refer to EI-56, "Removal and Installation for Trunk Room Trim" .
2. Turn rear turn signal lamp bulb socket (1) counterclockwise and
unlock it.
3. Remove bulb (2).
Removal and InstallationNKS003SZ
REMOVAL
Rear Fender Side
1. Remove trunk side finisher. Refer to EI-56, "Removal and Installation for Trunk Room Trim" .
2. Disconnect rear combination lamp connector.
3. Remove rear combination lamp mounting nuts (A).
4. Pull the rear combination lamp (2) toward rear of the vehicle and
remove from the vehicle.
5. Remove seal packing (1) from the vehicle.
INSTALLATION
Installation is the reverse order of removal.
CAUTION:
Seal packing cannot be reused.Rear turn signal lamp : 12V - 21W (amber bulb)
Stop tail lamp : LED
SKIB4193E
: N·m (kg-m, in-lb)
: Always replace after every disassembly
SKIB4194E
Page 3745 of 4647

LT-294
ILLUMINATION
Revision: 2007 April2007 M35/M45
ILLUMINATION OPERATION BY LIGHTING SWITCH
With the lighting switch in the 1ST or 2ND position (or if the auto light system is activated), the BCM receives
input signal requesting the illumination lamps to illuminate. This input signal is communicated to the IPDM E/R
across the CAN communication lines. The CPU located in the IPDM E/R controls the tail lamp relay coil,
which, when energized, directs power
�through IPDM E/R terminal 21
�to combination meter terminal 13
�to LDW switch (illumination) terminal 5 (with lane departure warning)
�to VDC off switch (illumination) terminal 3
�to trunk lid opener switch (illumination) terminal 3
�to combination switch (spiral cable) terminal 24
�to door mirror remote control switch (illumination) terminal 16
�to AFS switch (illumination) terminal 5 (with AFS)
�to rear sunshade front switch (illumination) terminal 5 (with rear control switch)
�to A/T illumination terminal 1
�to snow mode switch (illumination) terminal 5 (AWD models)
�to rear control cancel switch (illumination) terminal 4 (with rear control switch)
�to clock terminal 3
�to multifunction switch terminal 3
�to audio unit terminal 9
�to DVD player terminal 18 (with DVD player)
�to NAVI control unit terminal 61 (with navigation system)
�to AV control unit terminal 61 (without navigation system)
�to climate controlled seat switch driver side (illumination) terminal 7 (with climate controlled seat)
�to climate controlled seat switch passenger side (illumination) terminal 7 (with climate controlled seat)
�to ashtray illumination (rear LH) terminal 1
�to ashtray illumination (rear RH) terminal 1
�to illumination control switch terminal 1
�to cigarette lighter socket (illumination) terminal 2
�to map lamp (illumination) terminal 8
�to power window main switch illumination terminal 1
�to glove box lamp terminal 1
�to rear control switch terminal 2
�to rear power seat switch RH (illumination) terminal 4 (with rear control switch)
�to rear heated seat switch RH (illumination) terminal 7 (with rear control switch)
�to rear sunshade cancel relay terminal 6 (with rear control switch)
�to automatic return cancel switch (illumination) terminal 4 (with rear control switch)
�to rear power seat switch LH (illumination) terminal 4 (with rear control switch) and
�to rear heated seat switch LH (illumination) terminal 7 (with rear control switch),
�through Intelligent Key unit terminal 12
�to push button ignition switch (illumination) terminal 3.
Ground is supplied
�to combination meter terminal 14
�to combination meter terminal 9, 10 and 11
�to push button ignition switch (illumination) terminal 2
�to LDW switch (illumination) terminal 4 (with lane departure warning)
�to VDC off switch (illumination) terminal 4
�to trunk lid opener switch (illumination) terminal 4
�to combination switch (spiral cable) terminal 25