BR-20
FRONT DISC BRAKE
Revision: 2006 July 2007 FX35/FX45
�It is not necessary to remove bolts on torque member and brake hose except for disassembly or
replacement of caliper assembly. In this case, suspend cylinder body with wire so as not to stretch
brake hose.
�Do not damage piston boot.
�If any shim is subject to serious corrosion, replace it with a new one.
�Always replace shims and shim covers as a set when replacing brake pads.
�Keep rotor clean, from brake fluid.
�Burnish brake contact surface after refinishing or replacing rotors, after replacing pads, or it a soft
pedal occurs at very low mileage. Refer to BR-24, "
Brake Burnishing Procedure" .
Removal and Installation of Brake PadNFS000MB
REMOVAL
1. Remove tires from vehicle with power tool.
2. Remove lower sliding pin bolt.
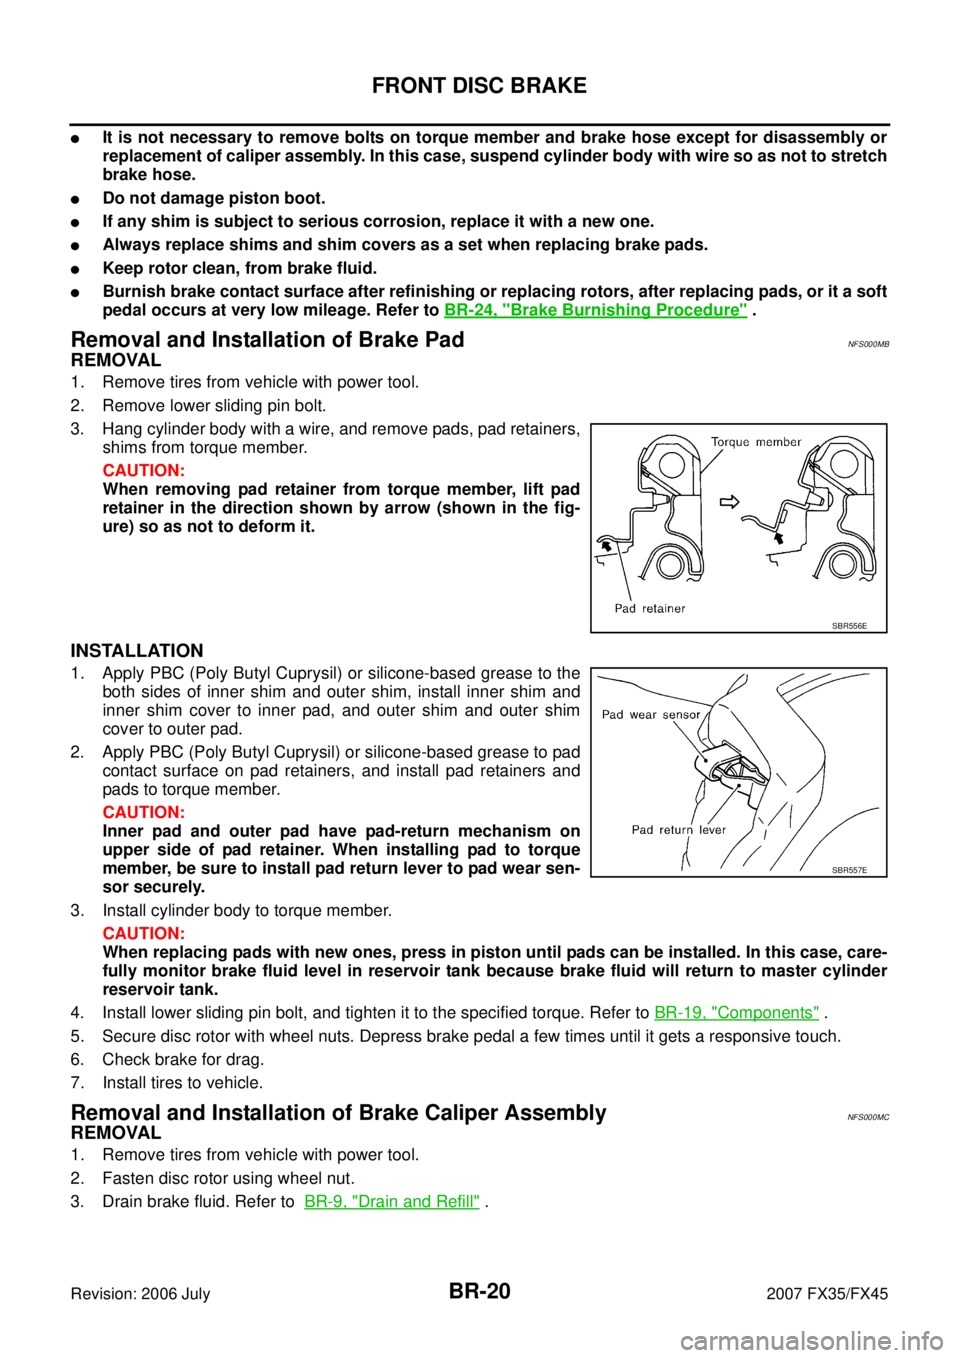
3. Hang cylinder body with a wire, and remove pads, pad retainers, shims from torque member.
CAUTION:
When removing pad retainer from torque member, lift pad
retainer in the direction shown by arrow (shown in the fig-
ure) so as not to deform it.
INSTALLATION
1. Apply PBC (Poly Butyl Cuprysil) or silicone-based grease to the
both sides of inner shim and outer shim, install inner shim and
inner shim cover to inner pad, and outer shim and outer shim
cover to outer pad.
2. Apply PBC (Poly Butyl Cuprysil) or silicone-based grease to pad contact surface on pad retainers, and install pad retainers and
pads to torque member.
CAUTION:
Inner pad and outer pad have pad-return mechanism on
upper side of pad retainer. When installing pad to torque
member, be sure to install pad return lever to pad wear sen-
sor securely.
3. Install cylinder body to torque member. CAUTION:
When replacing pads with new ones, press in piston until pads can be installed. In this case, care-
fully monitor brake fluid level in reservoir tank because brake fluid will return to master cylinder
reservoir tank.
4. Install lower sliding pin bolt, and tighten it to the specified torque. Refer to BR-19, "
Components" .
5. Secure disc rotor with wheel nuts. Depress brake pedal a few times until it gets a responsive touch.
6. Check brake for drag.
7. Install tires to vehicle.
Removal and Installation of Brake Caliper AssemblyNFS000MC
REMOVAL
1. Remove tires from vehicle with power tool.
2. Fasten disc rotor using wheel nut.
3. Drain brake fluid. Refer to BR-9, "
Drain and Refill" .
SBR556E
SBR557E
BR-26
REAR DISC BRAKE
Revision: 2006 July 2007 FX35/FX45
WARNING:
Clean dust on caliper and brake pad with a vacuum dust collector to minimize the hazard of airborne
particles or other materials.
CAUTION:
�While removing cylinder body, never depress brake pedal because piston will pop out.
�It is not necessary to remove bolts on torque member and brake hose except for disassembly or
replacement of caliper assembly. In this case, hang cylinder body with a wire so as not to stretch
brake hose.
�Do not damage piston boot.
�If any shim is subject to serious corrosion, replace it with a new one.
�Always replace shims and shim covers as a set when replacing brake pads.
�Keep rotor clean, from brake fluid.
�Burnish brake contact surface after refinishing or replacing rotors, after replacing pads, or if a soft
pedal occurs at very low mileage. Refer to BR-30, "
Brake Burnishing Procedure" .
Removal and Installation of Brake PadNFS000MG
REMOVAL
1. Remove tires from vehicle with power tool.
2. Remove sliding pin bolt (one on top).
3. Suspend cylinder body with a wire, and remove pads, pad retainers, shim from torque member.
INSTALLATION
1. Apply PBC (Poly Butyl Cuprysil) grease or silicone-based grease to the backside of pad and to both sides of shim, and install inner shim and shim cover to inner pad, and install the outer shim to outer pad.
2. Install pad retainer and mount pad assemblies to torque member.
3. Push piston in so that pad is firmly installed and mount cylinder body to torque member. CAUTION:
When replacing pads with new ones, press in piston until pads can be installed. In this case, care-
fully monitor brake fluid level in reservoir tank because brake fluid will return to master cylinder
reservoir tank.
4. Install sliding pin bolt (one on top) and tighten to the specified torque. Refer to BR-25, "
Components" .
5. Check brake for drag.
6. Install tires to the vehicle.
Removal and Installation of Brake Caliper AssemblyNFS000MH
REMOVAL
1. Remove tires from vehicle with power tool.
2. Fasten disc rotor using wheel nut.
3. Drain brake fluid. Refer to BR-9, "
Drain and Refill" .
4. Remove union bolt and torque member bolts, and remove brake caliper assembly from the vehicle.
5. Remove disc rotor.
CAUTION:
Put matching marks on both disc rotor and wheel hub when
removing disc rotor.
INSTALLATION
CAUTION:
�Refill with new brake fluid “DOT 3”.
1: Apply rubber grease.
2: Apply PBC (Poly Butyl Cuprysil) grease or silicone-based grease.
3: Apply polyglycol ether based lubricant.
: Apply brake fluid.
PFIA0413E