Page 3281 of 4366
POWER WINDOW SYSTEM GW-43
C
D E
F
G H
J
K L
M A
B
GW
Revision: 2006 July 2007 FX35/FX45
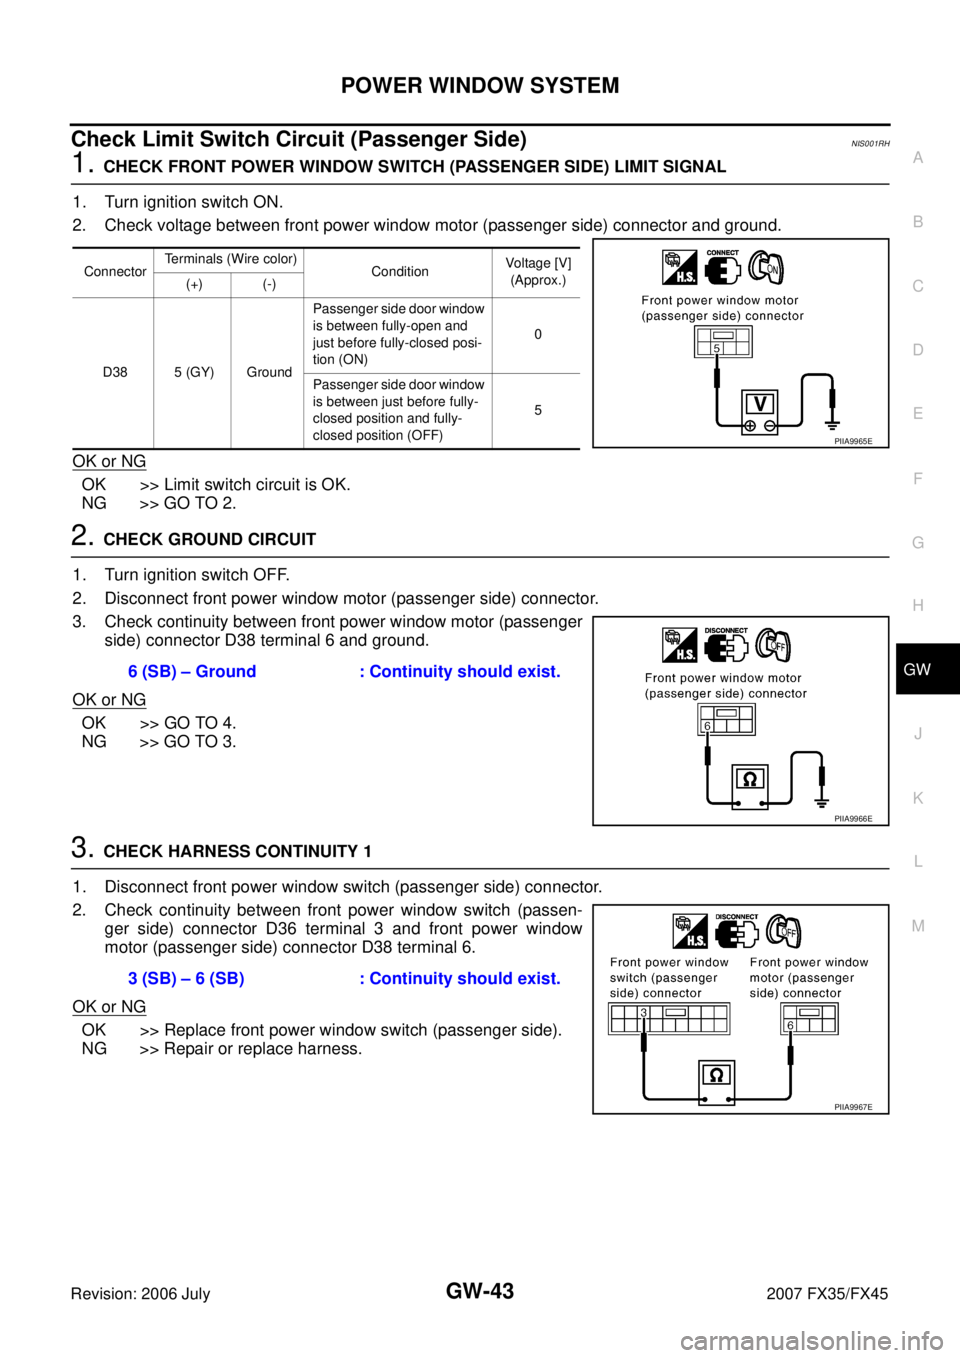
Check Limit Switch Circuit (Passenger Side)NIS001RH
1. CHECK FRONT POWER WINDOW SWITCH (PASSENGER SIDE) LIMIT SIGNAL
1. Turn ignition switch ON.
2. Check voltage between front power window motor (passenger side) connector and ground.
OK or NG
OK >> Limit switch circuit is OK.
NG >> GO TO 2.
2. CHECK GROUND CIRCUIT
1. Turn ignition switch OFF.
2. Disconnect front power window motor (passenger side) connector.
3. Check continuity between front power window motor (passenger side) connector D38 terminal 6 and ground.
OK or NG
OK >> GO TO 4.
NG >> GO TO 3.
3. CHECK HARNESS CONTINUITY 1
1. Disconnect front power window switch (passenger side) connector.
2. Check continuity between front power window switch (passen- ger side) connector D36 terminal 3 and front power window
motor (passenger side) connector D38 terminal 6.
OK or NG
OK >> Replace front power window switch (passenger side).
NG >> Repair or replace harness.
Connector Terminals (Wire color)
Condition Voltage [V]
(Approx.)
(+) (-)
D38 5 (GY) Ground Passenger side door window
is between fully-open and
just before fully-closed posi-
tion (ON) 0
Passenger side door window
is between just before fully-
closed position and fully-
closed position (OFF) 5
PIIA9965E
6 (SB) – Ground : Continuity should exist.
PIIA9966E
3 (SB) – 6 (SB) : Continuity should exist.
PIIA9967E
Page 3284 of 4366
GW-46
POWER WINDOW SYSTEM
Revision: 2006 July 2007 FX35/FX45
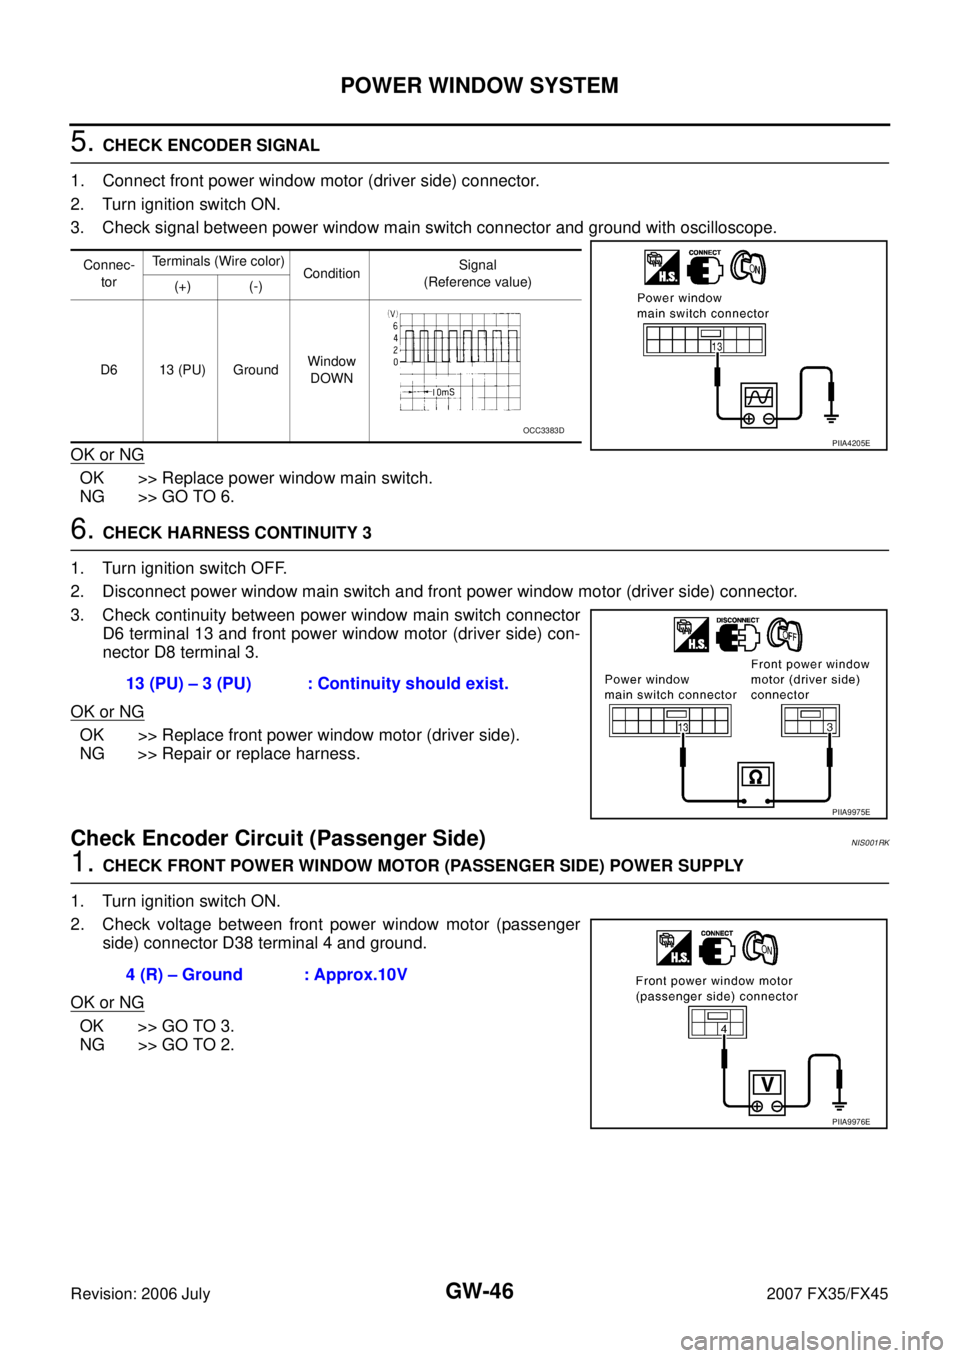
5. CHECK ENCODER SIGNAL
1. Connect front power window motor (driver side) connector.
2. Turn ignition switch ON.
3. Check signal between power window main switch connector and ground with oscilloscope.
OK or NG
OK >> Replace power window main switch.
NG >> GO TO 6.
6. CHECK HARNESS CONTINUITY 3
1. Turn ignition switch OFF.
2. Disconnect power window main switch and front power window motor (driver side) connector.
3. Check continuity between power window main switch connector D6 terminal 13 and front power window motor (driver side) con-
nector D8 terminal 3.
OK or NG
OK >> Replace front power window motor (driver side).
NG >> Repair or replace harness.
Check Encoder Circuit (Passenger Side)NIS001RK
1. CHECK FRONT POWER WINDOW MOTOR (PASSENGER SIDE) POWER SUPPLY
1. Turn ignition switch ON.
2. Check voltage between front power window motor (passenger side) connector D38 terminal 4 and ground.
OK or NG
OK >> GO TO 3.
NG >> GO TO 2.
Connec-
tor Terminals (Wire color)
Condition Signal
(Reference value)
(+) (-)
D6 13 (PU) Ground Window
DOWN
PIIA4205EOCC3383D
13 (PU) – 3 (PU) : Continuity should exist.
PIIA9975E
4 (R) – Ground : Approx.10V
PIIA9976E
Page 3286 of 4366
GW-48
POWER WINDOW SYSTEM
Revision: 2006 July 2007 FX35/FX45
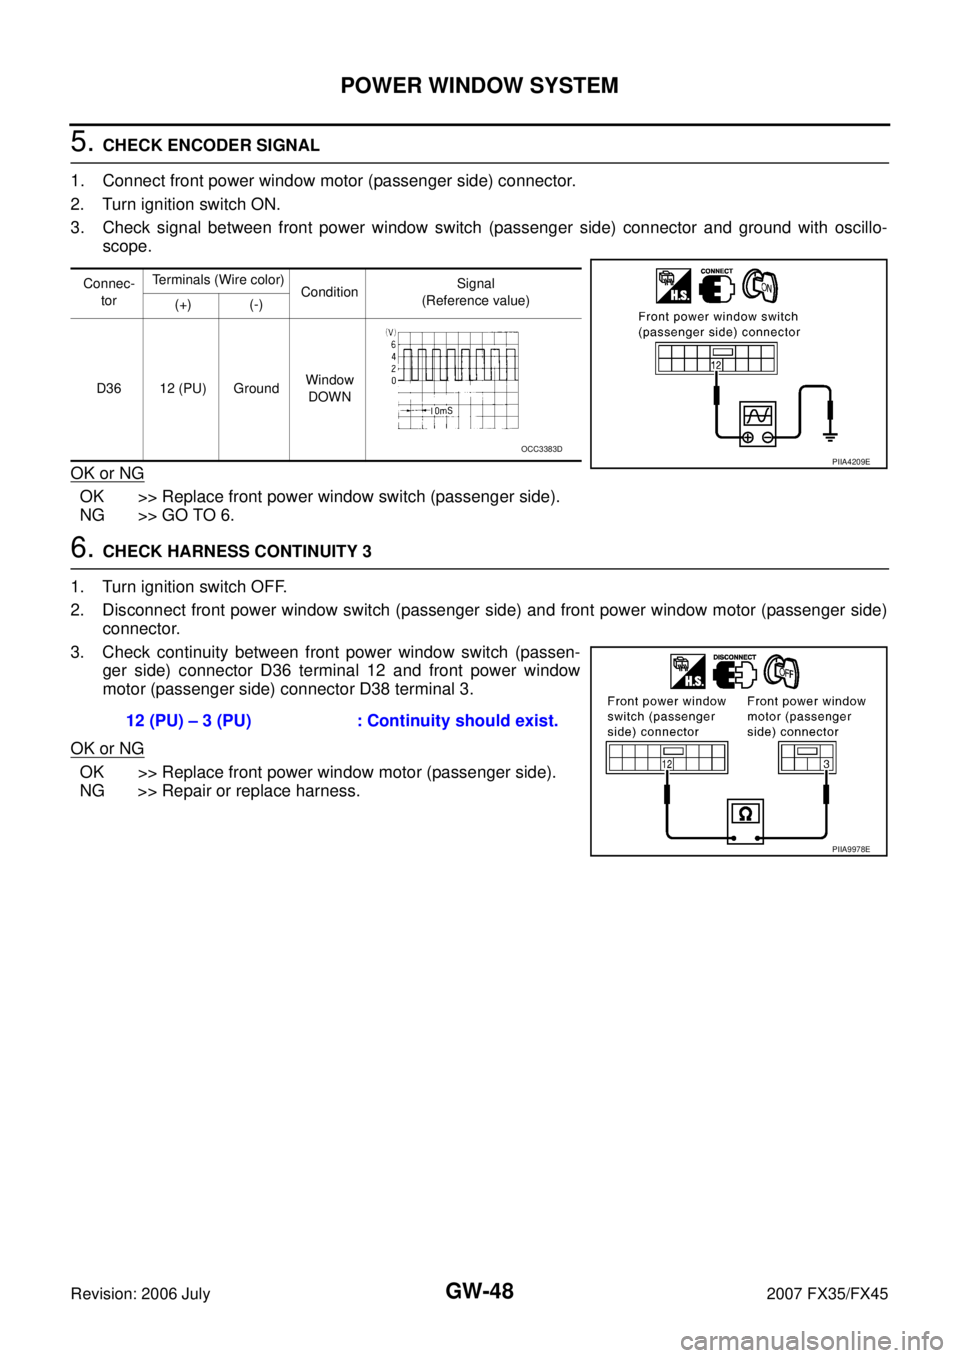
5. CHECK ENCODER SIGNAL
1. Connect front power window motor (passenger side) connector.
2. Turn ignition switch ON.
3. Check signal between front power window switch (passenger side) connector and ground with oscillo- scope.
OK or NG
OK >> Replace front power window switch (passenger side).
NG >> GO TO 6.
6. CHECK HARNESS CONTINUITY 3
1. Turn ignition switch OFF.
2. Disconnect front power window switch (passenger side) and front power window motor (passenger side) connector.
3. Check continuity between front power window switch (passen- ger side) connector D36 terminal 12 and front power window
motor (passenger side) connector D38 terminal 3.
OK or NG
OK >> Replace front power window motor (passenger side).
NG >> Repair or replace harness.
Connec-
tor Terminals (Wire color)
Condition Signal
(Reference value)
(+) (-)
D36 12 (PU) Ground Window
DOWN
PIIA4209EOCC3383D
12 (PU) – 3 (PU) : Continuity should exist.
PIIA9978E
Page 3289 of 4366
POWER WINDOW SYSTEM GW-51
C
D E
F
G H
J
K L
M A
B
GW
Revision: 2006 July 2007 FX35/FX45
Check Front Door Key Cylinder Switch NIS001RN
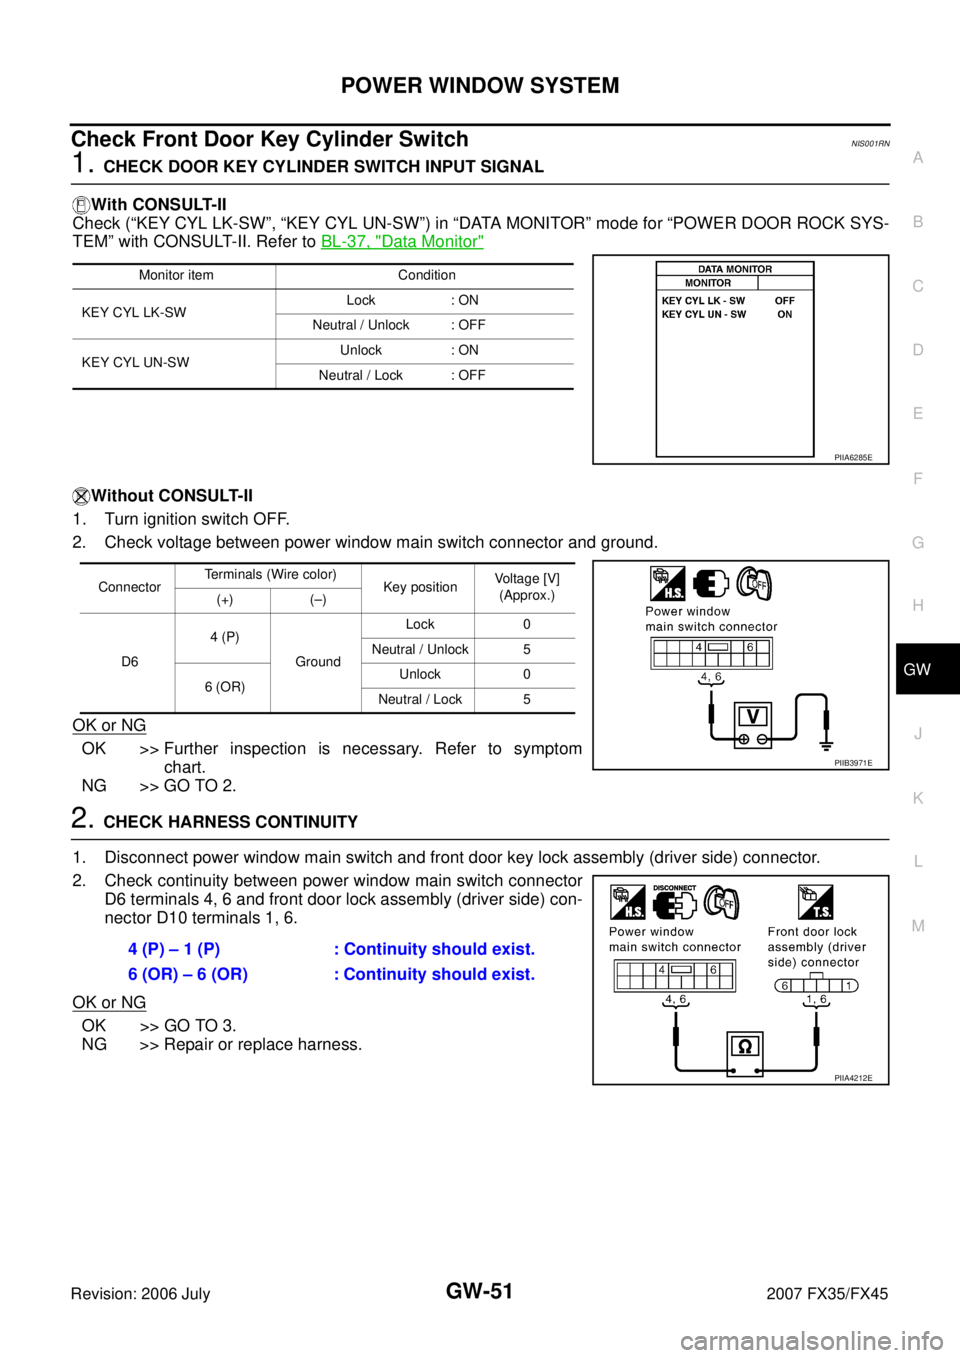
1. CHECK DOOR KEY CYLINDER SWITCH INPUT SIGNAL
With CONSULT-II
Check (“KEY CYL LK-SW”, “KEY CYL UN-SW”) in “DATA MONITOR” mode for “POWER DOOR ROCK SYS-
TEM” with CONSULT-II. Refer to BL-37, "
Data Monitor"
Without CONSULT-II
1. Turn ignition switch OFF.
2. Check voltage between power window main switch connector and ground.
OK or NG
OK >> Further inspection is necessary. Refer to symptom chart.
NG >> GO TO 2.
2. CHECK HARNESS CONTINUITY
1. Disconnect power window main switch and front door key lock assembly (driver side) connector.
2. Check continuity between power window main switch connector D6 terminals 4, 6 and front door lock assembly (driver side) con-
nector D10 terminals 1, 6.
OK or NG
OK >> GO TO 3.
NG >> Repair or replace harness.
Monitor item Condition
KEY CYL LK-SW Lock : ON
Neutral / Unlock : OFF
KEY CYL UN-SW Unlock : ON
Neutral / Lock : OFF
PIIA6285E
Connector Terminals (Wire color)
Key position Voltage [V]
(Approx.)
(+) (–)
D6 4 (P)
Ground Lock 0
Neutral / Unlock 5
6 (OR) Unlock 0
Neutral / Lock 5
PIIB3971E
4 (P) – 1 (P) : Continuity should exist.
6 (OR) – 6 (OR) : Continuity should exist.
PIIA4212E
Page 3316 of 4366
GW-78
REAR WINDOW DEFOGGER
Revision: 2006 July 2007 FX35/FX45
Check Rear Window Defogger Switch Circuit NIS001SC
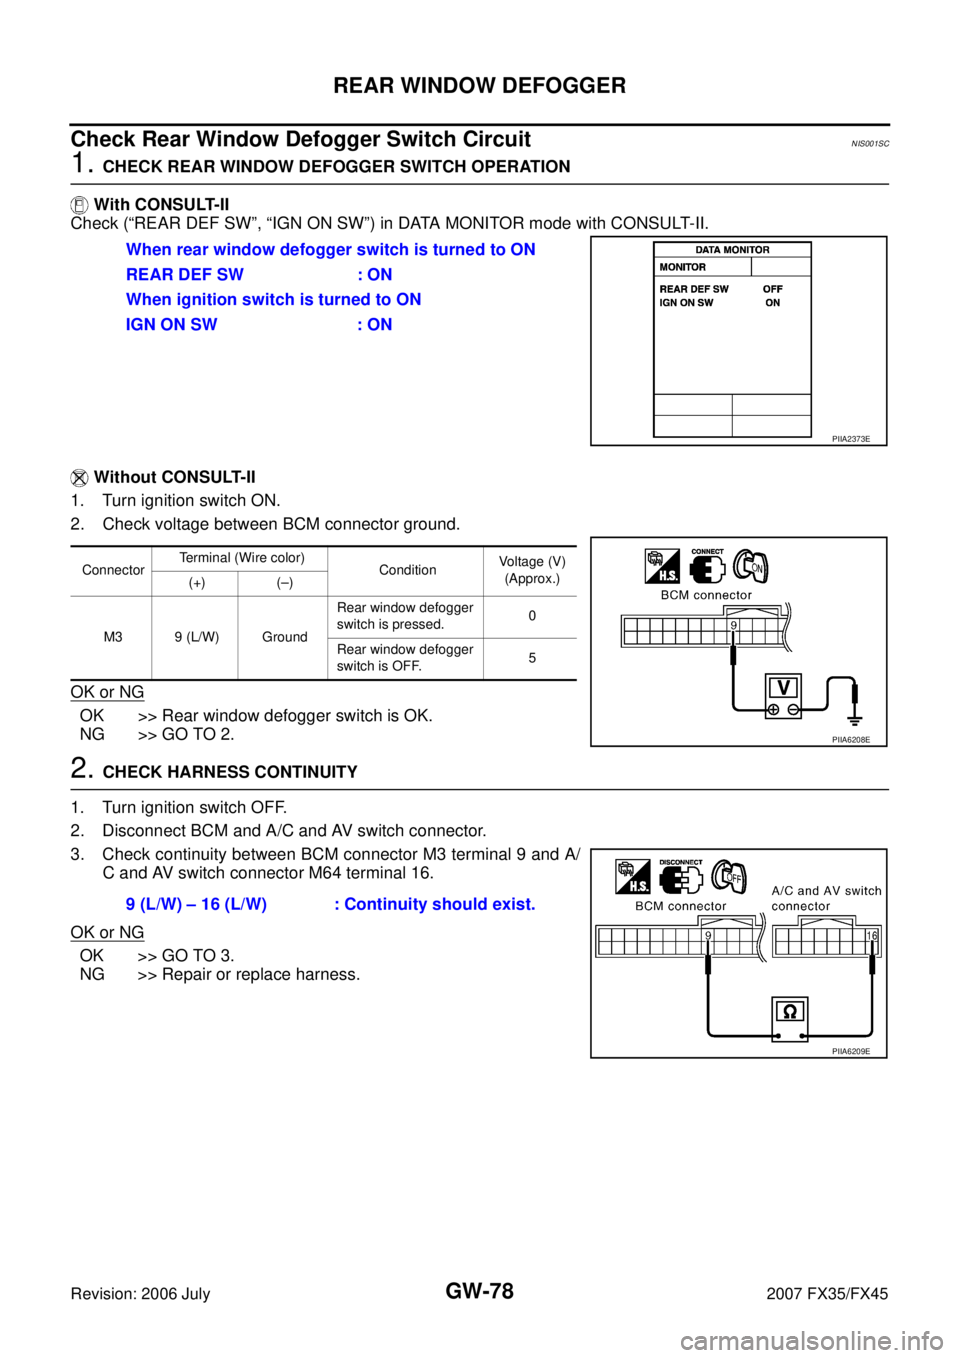
1. CHECK REAR WINDOW DEFOGGER SWITCH OPERATION
With CONSULT-II
Check (“REAR DEF SW”, “IGN ON SW”) in DATA MONITOR mode with CONSULT-II.
Without CONSULT-II
1. Turn ignition switch ON.
2. Check voltage between BCM connector ground.
OK or NG
OK >> Rear window defogger switch is OK.
NG >> GO TO 2.
2. CHECK HARNESS CONTINUITY
1. Turn ignition switch OFF.
2. Disconnect BCM and A/C and AV switch connector.
3. Check continuity between BCM connector M3 terminal 9 and A/ C and AV switch connector M64 terminal 16.
OK or NG
OK >> GO TO 3.
NG >> Repair or replace harness. When rear window defogger switch is turned to ON
REAR DEF SW : ON
When ignition switch is turned to ON
IGN ON SW : ON
PIIA2373E
Connector Terminal (Wire color)
Condition Voltage (V)
(Approx.)
(+) (–)
M3 9 (L/W) Ground Rear window defogger
switch is pressed. 0
Rear window defogger
switch is OFF. 5
PIIA6208E
9 (L/W) – 16 (L/W) : Continuity should exist.
PIIA6209E
Page 3318 of 4366
GW-80
REAR WINDOW DEFOGGER
Revision: 2006 July 2007 FX35/FX45
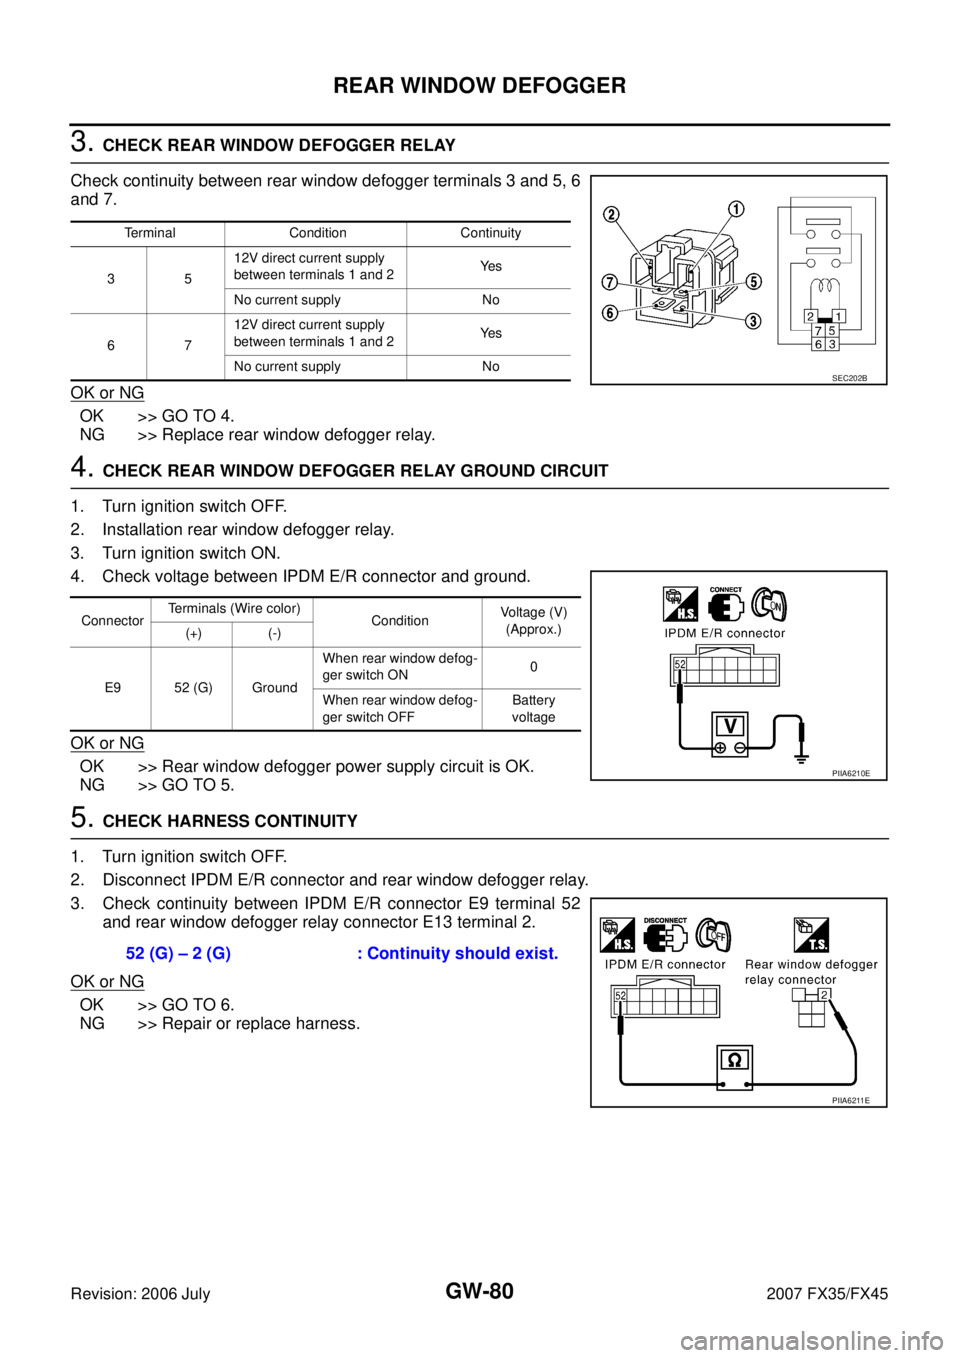
3. CHECK REAR WINDOW DEFOGGER RELAY
Check continuity between rear window defogger terminals 3 and 5, 6
and 7.
OK or NG
OK >> GO TO 4.
NG >> Replace rear window defogger relay.
4. CHECK REAR WINDOW DEFOGGER RELAY GROUND CIRCUIT
1. Turn ignition switch OFF.
2. Installation rear window defogger relay.
3. Turn ignition switch ON.
4. Check voltage between IPDM E/R connector and ground.
OK or NG
OK >> Rear window defogger power supply circuit is OK.
NG >> GO TO 5.
5. CHECK HARNESS CONTINUITY
1. Turn ignition switch OFF.
2. Disconnect IPDM E/R connector and rear window defogger relay.
3. Check continuity between IPDM E/R connector E9 terminal 52 and rear window defogger relay connector E13 terminal 2.
OK or NG
OK >> GO TO 6.
NG >> Repair or replace harness.
Terminal Condition Continuity
35 12V direct current supply
between terminals 1 and 2 Ye s
No current supply No
67 12V direct current supply
between terminals 1 and 2 Ye s
No current supply No
SEC202B
Connector Terminals (Wire color)
Condition Voltage (V)
(Approx.)
(+) (-)
E9 52 (G) Ground When rear window defog-
ger switch ON 0
When rear window defog-
ger switch OFF Battery
voltage
PIIA6210E
52 (G) – 2 (G) : Continuity should exist.
PIIA6211E
Page 3319 of 4366
REAR WINDOW DEFOGGER GW-81
C
D E
F
G H
J
K L
M A
B
GW
Revision: 2006 July 2007 FX35/FX45
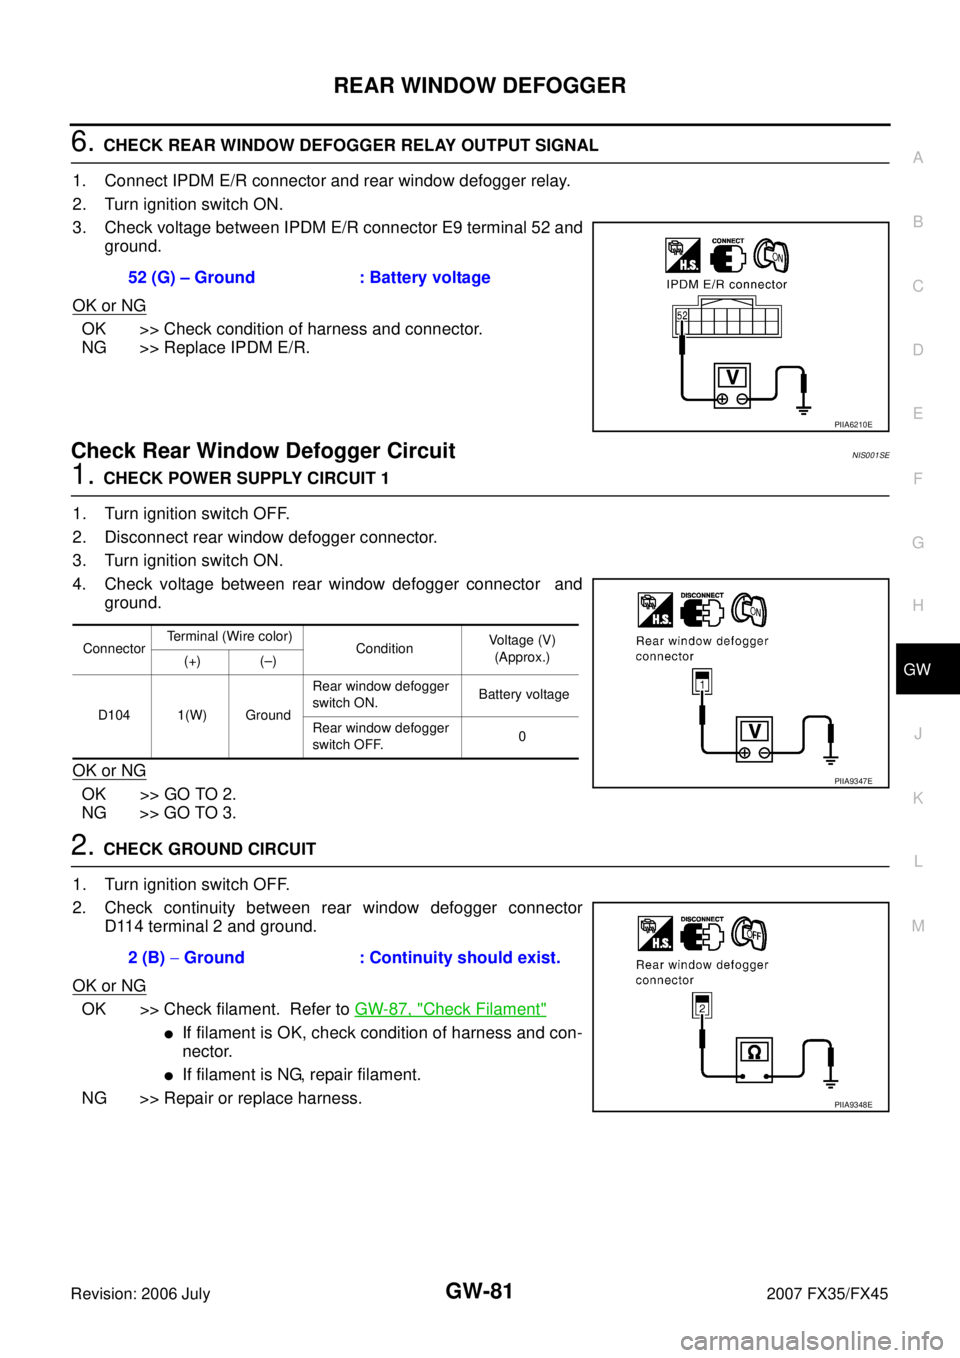
6. CHECK REAR WINDOW DEFOGGER RELAY OUTPUT SIGNAL
1. Connect IPDM E/R connector and rear window defogger relay.
2. Turn ignition switch ON.
3. Check voltage between IPDM E/R connector E9 terminal 52 and ground.
OK or NG
OK >> Check condition of harness and connector.
NG >> Replace IPDM E/R.
Check Rear Window Defogger Circuit NIS001SE
1. CHECK POWER SUPPLY CIRCUIT 1
1. Turn ignition switch OFF.
2. Disconnect rear window defogger connector.
3. Turn ignition switch ON.
4. Check voltage between rear window defogger connector and ground.
OK or NG
OK >> GO TO 2.
NG >> GO TO 3.
2. CHECK GROUND CIRCUIT
1. Turn ignition switch OFF.
2. Check continuity between rear window defogger connector D114 terminal 2 and ground.
OK or NG
OK >> Check filament. Refer to GW-87, "Check Filament"
�If filament is OK, check condition of harness and con-
nector.
�If filament is NG, repair filament.
NG >> Repair or replace harness. 52 (G) – Ground : Battery voltage
PIIA6210E
Connector
Terminal (Wire color)
Condition Voltage (V)
(Approx.)
(+) (–)
D104 1(W) Ground Rear window defogger
switch ON. Battery voltage
Rear window defogger
switch OFF. 0
PIIA9347E
2 (B)
− Ground : Continuity should exist.
PIIA9348E
Page 3320 of 4366
GW-82
REAR WINDOW DEFOGGER
Revision: 2006 July 2007 FX35/FX45
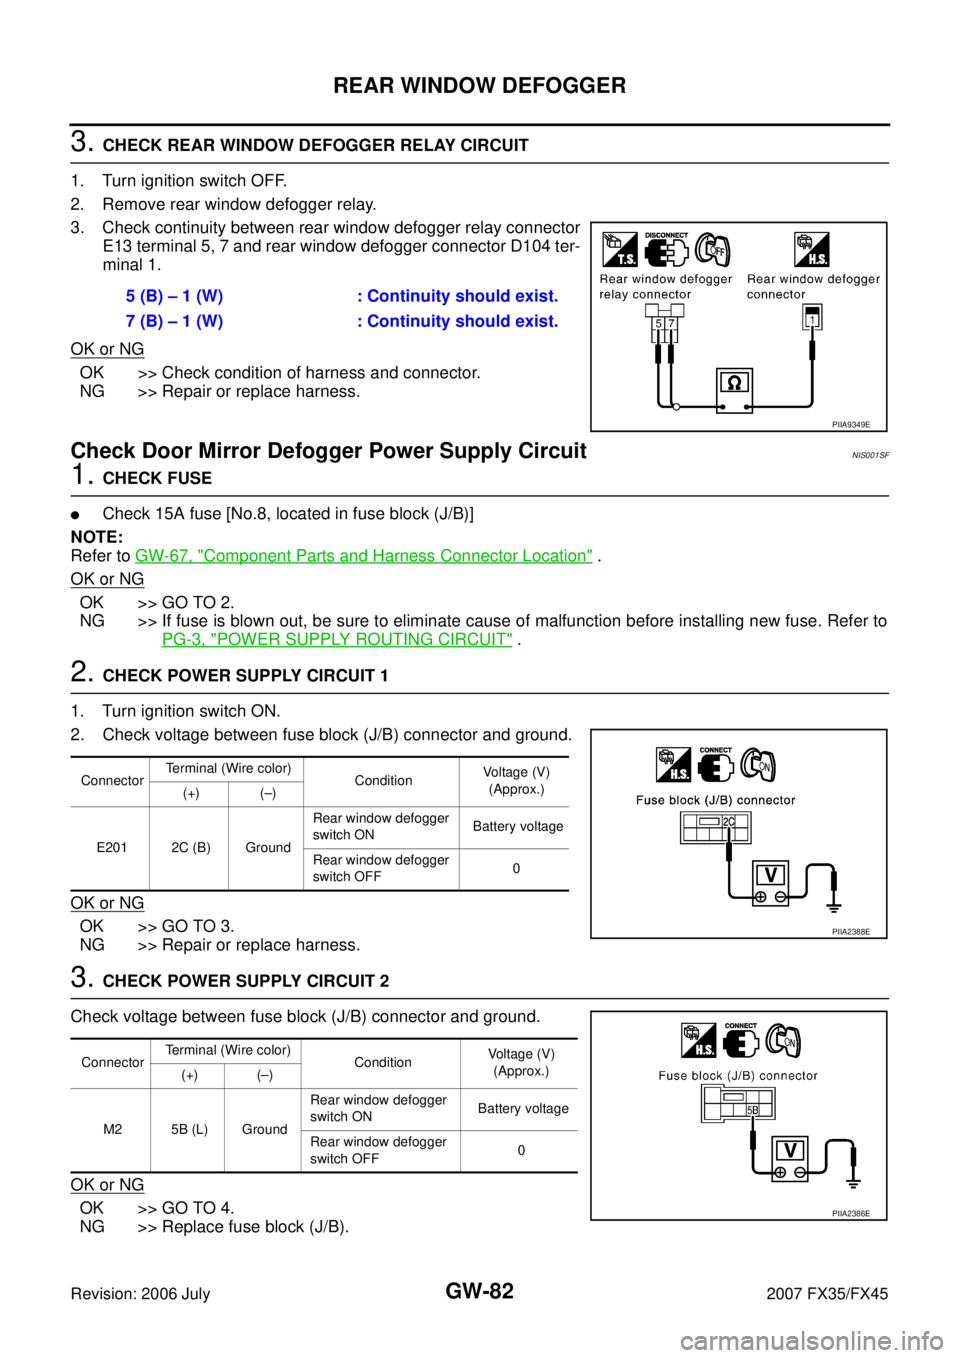
3. CHECK REAR WINDOW DEFOGGER RELAY CIRCUIT
1. Turn ignition switch OFF.
2. Remove rear window defogger relay.
3. Check continuity between rear window defogger relay connector E13 terminal 5, 7 and rear window defogger connector D104 ter-
minal 1.
OK or NG
OK >> Check condition of harness and connector.
NG >> Repair or replace harness.
Check Door Mirror Defogger Power Supply Circuit NIS001SF
1. CHECK FUSE
�Check 15A fuse [No.8, located in fuse block (J/B)]
NOTE:
Refer to GW-67, "
Component Parts and Harness Connector Location" .
OK or NG
OK >> GO TO 2.
NG >> If fuse is blown out, be sure to eliminate cause of malfunction before installing new fuse. Refer to
PG-3, "
POWER SUPPLY ROUTING CIRCUIT" .
2. CHECK POWER SUPPLY CIRCUIT 1
1. Turn ignition switch ON.
2. Check voltage between fuse block (J/B) connector and ground.
OK or NG
OK >> GO TO 3.
NG >> Repair or replace harness.
3. CHECK POWER SUPPLY CIRCUIT 2
Check voltage between fuse block (J/B) connector and ground.
OK or NG
OK >> GO TO 4.
NG >> Replace fuse block (J/B). 5 (B) – 1 (W) : Continuity should exist.
7 (B) – 1 (W) : Continuity should exist.
PIIA9349E
Connector Terminal (Wire color)
Condition Voltage (V)
(Approx.)
(+) (–)
E201 2C (B) Ground Rear window defogger
switch ON Battery voltage
Rear window defogger
switch OFF 0
PIIA2388E
Connector Terminal (Wire color)
Condition Voltage (V)
(Approx.)
(+) (–)
M2 5B (L) Ground Rear window defogger
switch ON Battery voltage
Rear window defogger
switch OFF 0
PIIA2386E