Page 3808 of 4366

PG-64
HARNESS
Revision: 2006 July 2007 FX35/FX45
Wiring Diagram Codes (Cell Codes) NKS003GO
Use the chart below to find out what each wiring diagram code stands for.
Refer to the wiring diagram code in the alphabetical index to find the location (page number) of each wiring
diagram.
Code Section Wiring Diagram Name
A/C ATC Air Conditioner
AF1B1 EC Air Fuel Ratio Sensor 1 Bank 1
AF1B2 EC Air Fuel Ratio Sensor 1 Bank 2
AF1HB1 EC Air Fuel Ratio Sensor 1 Heater Bank 1
AF1HB2 EC Air Fuel Ratio Sensor 1 Heater Bank 2
APPS1 EC Accelerator Pedal Position Sensor
APPS2 EC Accelerator Pedal Position Sensor
APPS3 EC Accelerator Pedal Position Sensor
ASC/BS EC Automatic Speed Control Device (ASCD) Brake Switch
ASC/SW EC Automatic Speed Control Device (ASCD) Steering Switch
ASCBOF EC Automatic Speed Control Device (ASCD) Brake Switch
ASCIND EC Automatic Speed Control Device (ASCD) Indicator
AT/IND DI A/T Indicator Lamp
AUDIO AV Audio
AUT/DP SE Automatic Drive Positioner
AUTO/L LT Automatic Light System
AWD TF AWD Control System
B/CLOS BL Back Door Closure System
BACK/L LT Back-Up Lamp
BRK/SW EC Brake Switch
CAN AT CAN Communication Line
CAN EC CAN Communication Line
CAN LAN CAN System
CHARGE SC Charging System
CHIME DI Warning Chime
CLOCK DI Clock
COMBSW LT Combination Switch
COMM AV Audio Visual Communication Line
COMPAS DI Compass
COOL/F EC Cooling Fan Control
D/LOCK BL Power Door Lock
DEF GW Rear Window Defogger
DTRL LT Headlamp - With Daytime Light System
ECM/PW EC ECM Power Supply for Back-Up
ECTS EC Engine Coolant Temperature Sensor
ETC1 EC Electric Throttle Control Function
ETC2 EC Electric Throttle Control Motor Relay
ETC3 EC Electric Throttle Control Motor
F/FOG LT Front Fog Lamp
F/PUMP EC Fuel Pump
FTS AT A/T Fluid Temperature Sensor Circuit
Page 3822 of 4366
PG-78
STANDARDIZED RELAY
Revision: 2006 July 2007 FX35/FX45
STANDARDIZED RELAY PFP:00011
Description NKS003GT
NORMAL OPEN, NORMAL CLOSED AND MIXED TYPE RELAYS
Relays can mainly be divided into three types: normal open, normal closed and mixed type relays.
TYPE OF STANDARDIZED RELAYS
SEL881H
1M ···················· 1 Make 2M ···················· 2 Make
1T ···················· 1 Transfer 1M·1B ···················· 1 Make 1 Break
SEL882H
Page 3823 of 4366
STANDARDIZED RELAY PG-79
C
D E
F
G H
I
J
L
M A
B
PG
Revision: 2006 July 2007 FX35/FX45
CKIM0221E
Page 3825 of 4366
FUSE, FUSIBLE LINK AND RELAY BOX PG-81
C
D E
F
G H
I
J
L
M A
B
PG
Revision: 2006 July 2007 FX35/FX45
FUSE, FUSIBLE LINK AND RELAY BOXPFP:24382
Terminal ArrangementNKS003GV
CKIM0223E
Page 3826 of 4366
PG-82
FUSE, FUSIBLE LINK AND RELAY BOX
Revision: 2006 July 2007 FX35/FX45
Page 4008 of 4366
SC-10
BATTERY
Revision: 2006 July 2007 FX35/FX45
Removal and Installation NKS002UP
REMOVAL
1. Remove hoodledge cover (right).
2. Disconnect both battery cables from terminals. CAUTION:
When disconnecting, disconnect the battery cable from the
negative terminal first.
3. Remove battery fix frame mounting nuts and battery fix frame.
4. Remove relay box from bracket.
5. Remove battery.
INSTALLATION
Installation is the reverse order of removal.
CAUTION:
When connecting, connect the battery cable to the positive terminal first.
PKIA2805E
PKIA2806E
Battery fix frame mounting nut
: 3.9 N·m (0.4 kg-m, 35 in-lb)
Battery terminal nut
: 5.4 N·m (0.55 kg-m, 48 in-lb)
Page 4009 of 4366

STARTING SYSTEM SC-11
C
D E
F
G H
I
J
L
M A
B
SC
Revision: 2006 July 2007 FX35/FX45
STARTING SYSTEMPFP:23300
System Description NKS002UQ
Power is supplied at all times
�through 40A fusible link (letter F, located in the fuse and fusible link block)
�to ignition switch terminal 1,
�through 15A fuse (No. 78, located in the IPDM E/R)
�to CPU of IPDM E/R,
�through 10A fuse (No. 71, located in the IPDM E/R)
�to CPU of IPDM E/R.
When the selector lever in the P or N position, power is supplied
�from TCM, and through A/T assembly terminal 9
�to IPDM E/R terminal 53.
Ground is supplied
�to IPDM E/R terminals 38, 50 and 60
�from grounds E21, E50 and E51.
With the ignition switch in the START position, and provided that the IPDM E/R receives a starter relay ON sig-
nal from the CAN lines, the IPDM E/R is energized and power is supplied
�from ignition switch terminal 5
�to IPDM E/R terminal 4 and
�through IPDM E/R terminal 3
�to starter motor terminal 1.
The starter motor plunger closes and provides a closed circuit between the battery and starter motor. The
starter motor is grounded to the engine block. With power and ground supplied, cranking occurs and the
engine starts.
Page 4015 of 4366

STARTING SYSTEM SC-17
C
D E
F
G H
I
J
L
M A
B
SC
Revision: 2006 July 2007 FX35/FX45
DIAGNOSTIC PROCEDURE 2
Check “S” Connector Circuit
1. CHECK POWER SUPPLY FOR STARTER MOTOR “S” TERMINAL
1. Remove fuel pump fuse.
2. Crank or start the engine (where possible) until the fuel pressure is released.
3. Turn ignition switch OFF.
4. Disconnect starter motor connector.
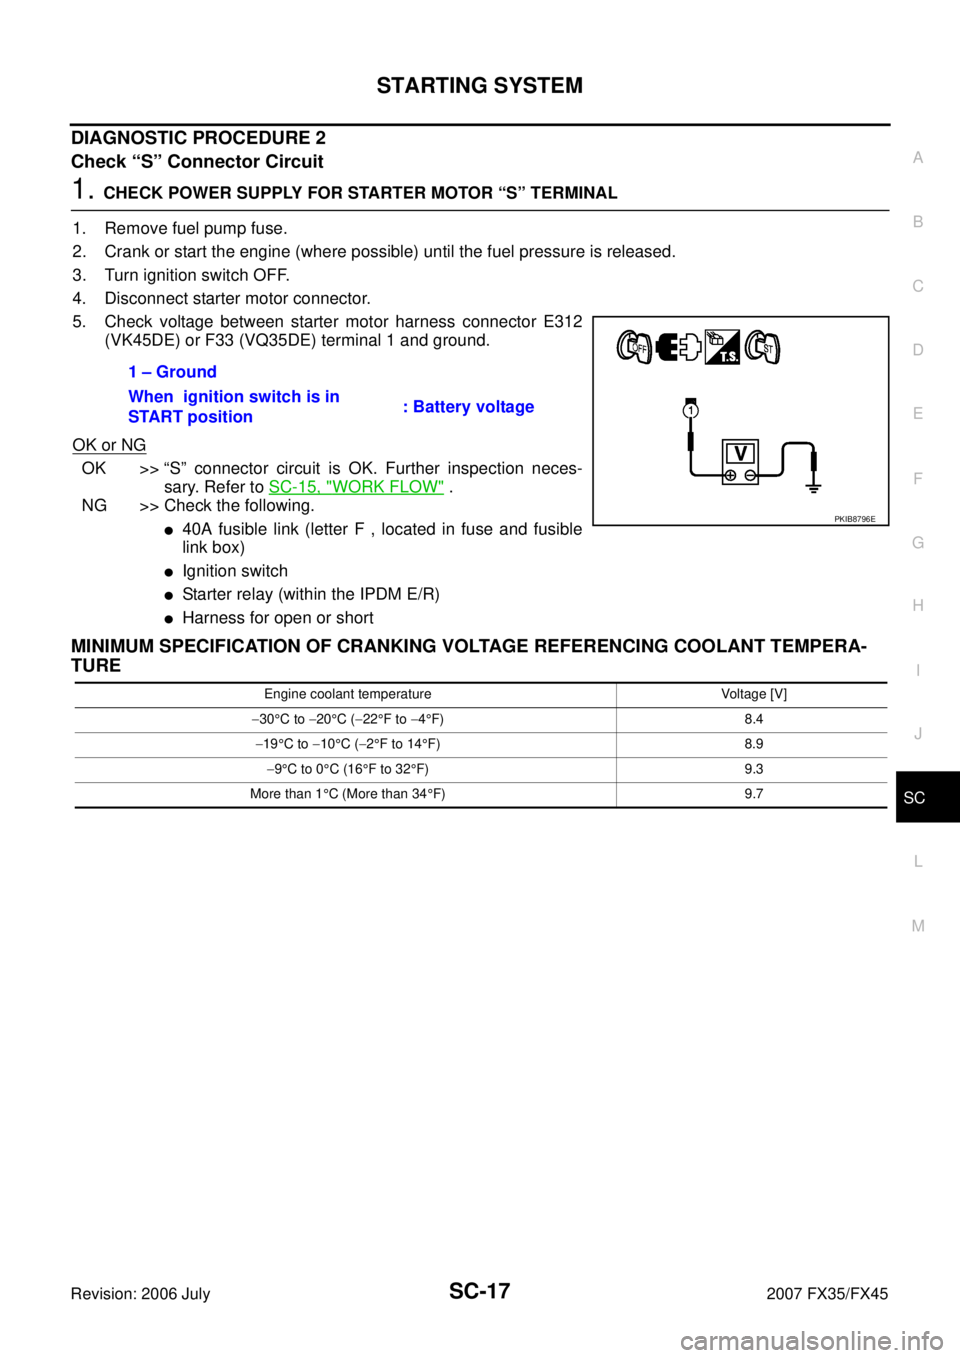
5. Check voltage between starter motor harness connector E312 (VK45DE) or F33 (VQ35DE) terminal 1 and ground.
OK or NG
OK >> “S” connector circuit is OK. Further inspection neces- sary. Refer to SC-15, "
WORK FLOW" .
NG >> Check the following.
�40A fusible link (letter F , located in fuse and fusible
link box)
�Ignition switch
�Starter relay (within the IPDM E/R)
�Harness for open or short
MINIMUM SPECIFICATION OF CRANKING VOLTAGE REFERENCING COOLANT TEMPERA-
TURE
1 – Ground
When ignition switch is in
START position : Battery voltage
PKIB8796E
Engine coolant temperature Voltage [V]
− 30 °C to −20 °C ( −22 °F to −4°F) 8.4
− 19 °C to −10 °C ( −2°F to 14 °F) 8.9
− 9°C to 0 °C (16 °F to 32 °F) 9.3
More than 1 °C (More than 34 °F) 9.7