2007 INFINITI FX35 battery
[x] Cancel search: batteryPage 1314 of 4366
DI-68
WARNING CHIME
Revision: 2006 July 2007 FX35/FX45
PRELIMINARY INSPECTION
1. CHECK BCM (CONSULT-II)
Perform self-diagnosis of BCM. Refer to DI-66, "
CONSULT-II Function (BCM)" .
Self
-diagnosis results
No malfunction detected >> GO TO 2.
Malfunction detected >> Check applicable parts, and repair or replace corresponding parts.
2. CHECK UNIFIED METER AND A/C AMP. (CONSULT-II)
Perform self-diagnosis of unified meter and A/C amp. Refer to DI-31, "
CONSULT-II Function (METER A/C
AMP)" .
Self
-diagnosis results
No malfunction detected >> INSPECTION END
Malfunction detected >> Check applicable parts, and repair or replace corresponding parts.
Symptom ChartNKS003I2
Power Supply and Ground Circuit InspectionNKS003I3
1. CHECK FUSE AND FUSIBLE LINK
Check for blown BCM fuses and fusible link.
OK or NG
OK >> GO TO 2.
NG >> Be sure to eliminate cause of malfunction before installing new fuse or fusible link. Refer to PG-3,
"POWER SUPPLY ROUTING CIRCUIT" .
Symptom Diagnoses/Service procedure
All warning chimes do not activate. Perform the following inspections.
1. DI-69, "
Combination Meter Buzzer Circuit Inspection".
2. DI-68, "
Power Supply and Ground Circuit Inspection".
Replace BCM, found normal function in the above inspections.
Ignition key
warning chime
does not acti-
vate. Without Intelligent Key.
Perform the following inspections.
1. DI-71, "
Front Door Switch (Driver Side) Signal Inspection".
2. DI-72, "
Key Switch Signal Inspection (Without Intelligent Key)".
Replace BCM, found normal function in the above inspections.
With Intelligent Key, when mechan-
ical key is used. Perform the following inspections.
1. DI-71, "
Front Door Switch (Driver Side) Signal Inspection".
2. DI-73, "
Key Switch and Ignition Knob Switch Signal Inspection (With Intelli-
gent Key, When Mechanical Key Is Used)".
Replace BCM, found normal function in the above inspections.
With Intelligent Key, when Intelli-
gent Key is carried with the driver. Refer to
BL-121, "
WARNING CHIME FUNCTION MALFUNCTION" .
Light warning chime does not activate. Perform the following inspections.
1. DI-71, "
Front Door Switch (Driver Side) Signal Inspection".
2. LT- 11 8 , "
Combination Switch Inspection".
Replace BCM, found normal function in the above inspections.
Seat belt warning chime does not activate. Perform
DI-75, "
Seat Belt Buckle Switch (Driver Side) Signal Inspection" .
Replace BCM, found normal function in the above inspection.
Power source Fuse and fusible link No.
Battery power supply M
22
Ignition power supply 1
Page 1315 of 4366
WARNING CHIME DI-69
C
D E
F
G H
I
J
L
M A
B
DI
Revision: 2006 July 2007 FX35/FX45
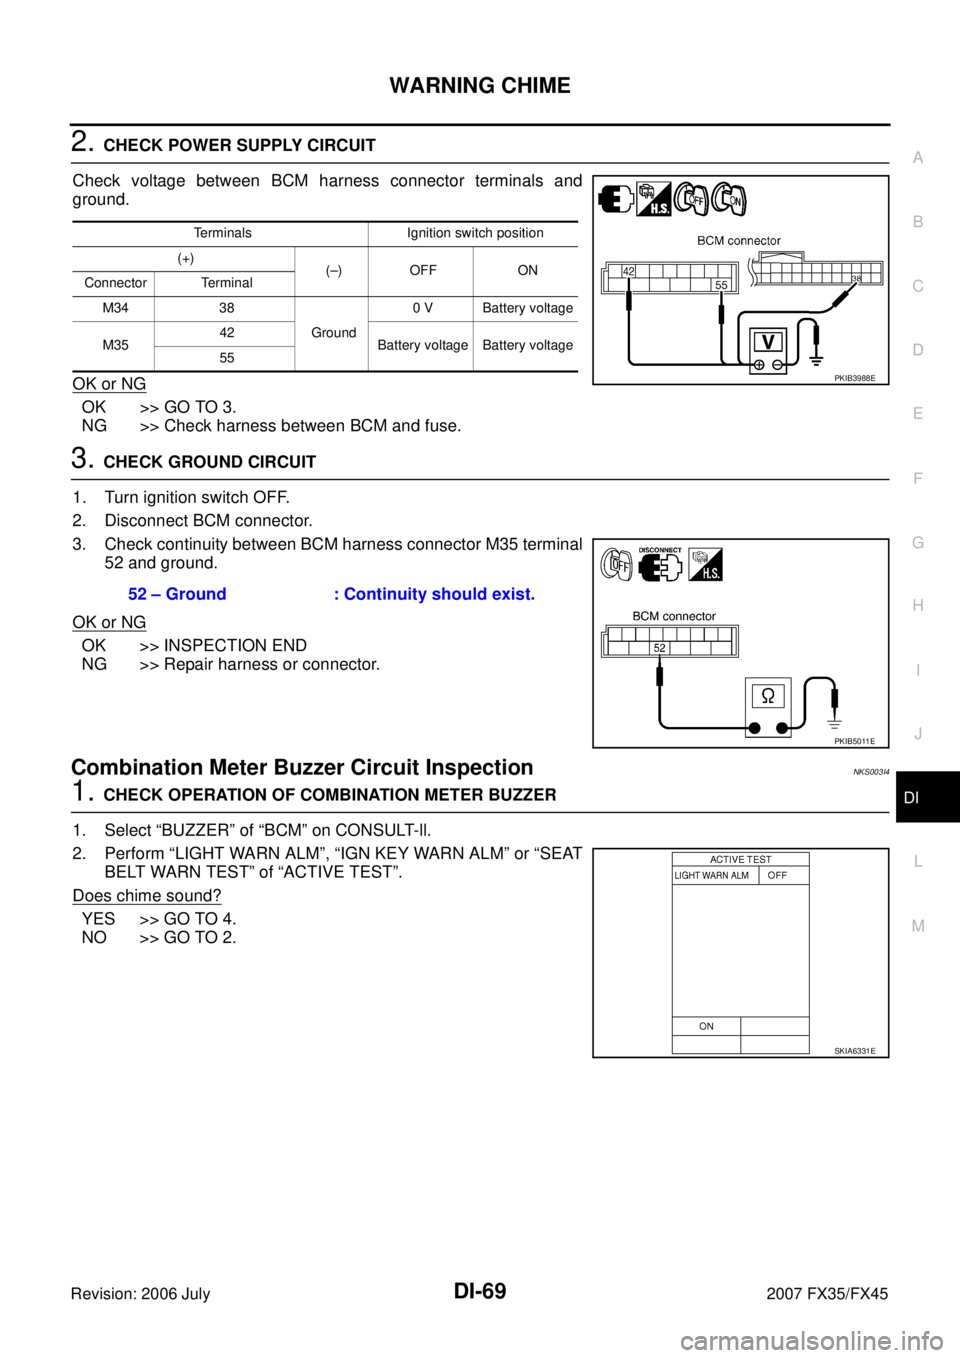
2. CHECK POWER SUPPLY CIRCUIT
Check voltage between BCM harness connector terminals and
ground.
OK or NG
OK >> GO TO 3.
NG >> Check harness between BCM and fuse.
3. CHECK GROUND CIRCUIT
1. Turn ignition switch OFF.
2. Disconnect BCM connector.
3. Check continuity between BCM harness connector M35 terminal 52 and ground.
OK or NG
OK >> INSPECTION END
NG >> Repair harness or connector.
Combination Meter Buzzer Circuit InspectionNKS003I4
1. CHECK OPERATION OF COMBINATION METER BUZZER
1. Select “BUZZER” of “BCM” on CONSULT-ll.
2. Perform “LIGHT WARN ALM”, “IGN KEY WARN ALM” or “SEAT BELT WARN TEST” of “ACTIVE TEST”.
Does chime sound?
YES >> GO TO 4.
NO >> GO TO 2.
Terminals Ignition switch position
(+) (–) OFF ON
Connector Terminal
M34 38 Ground 0 V Battery voltage
M35 42
Battery voltage Battery voltage
55
PKIB3988E
52 – Ground : Continuity should exist.
PKIB5011E
SKIA6331E
Page 1316 of 4366
DI-70
WARNING CHIME
Revision: 2006 July 2007 FX35/FX45
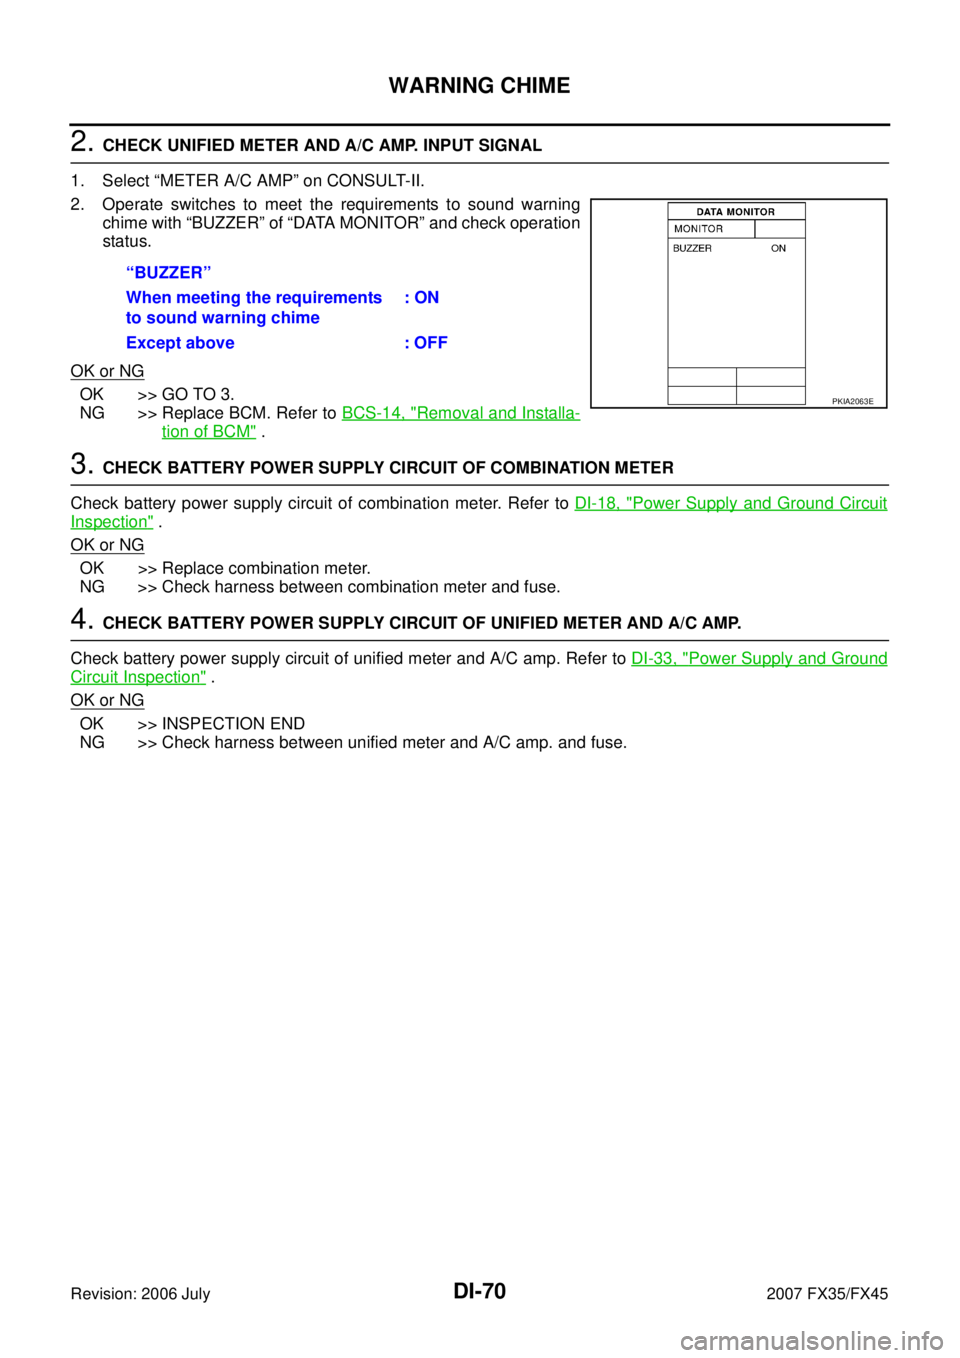
2. CHECK UNIFIED METER AND A/C AMP. INPUT SIGNAL
1. Select “METER A/C AMP” on CONSULT-II.
2. Operate switches to meet the requirements to sound warning chime with “BUZZER” of “DATA MONITOR” and check operation
status.
OK or NG
OK >> GO TO 3.
NG >> Replace BCM. Refer to BCS-14, "
Removal and Installa-
tion of BCM" .
3. CHECK BATTERY POWER SUPPLY CIRCUIT OF COMBINATION METER
Check battery power supply circuit of combination meter. Refer to DI-18, "
Power Supply and Ground Circuit
Inspection" .
OK or NG
OK >> Replace combination meter.
NG >> Check harness between combination meter and fuse.
4. CHECK BATTERY POWER SUPPLY CIRCUIT OF UNIFIED METER AND A/C AMP.
Check battery power supply circuit of unified meter and A/C amp. Refer to DI-33, "
Power Supply and Ground
Circuit Inspection" .
OK or NG
OK >> INSPECTION END
NG >> Check harness between unified meter and A/C amp. and fuse. “BUZZER”
When meeting the requirements
to sound warning chime : ON
Except above : OFF
PKIA2063E
Page 1319 of 4366
WARNING CHIME DI-73
C
D E
F
G H
I
J
L
M A
B
DI
Revision: 2006 July 2007 FX35/FX45
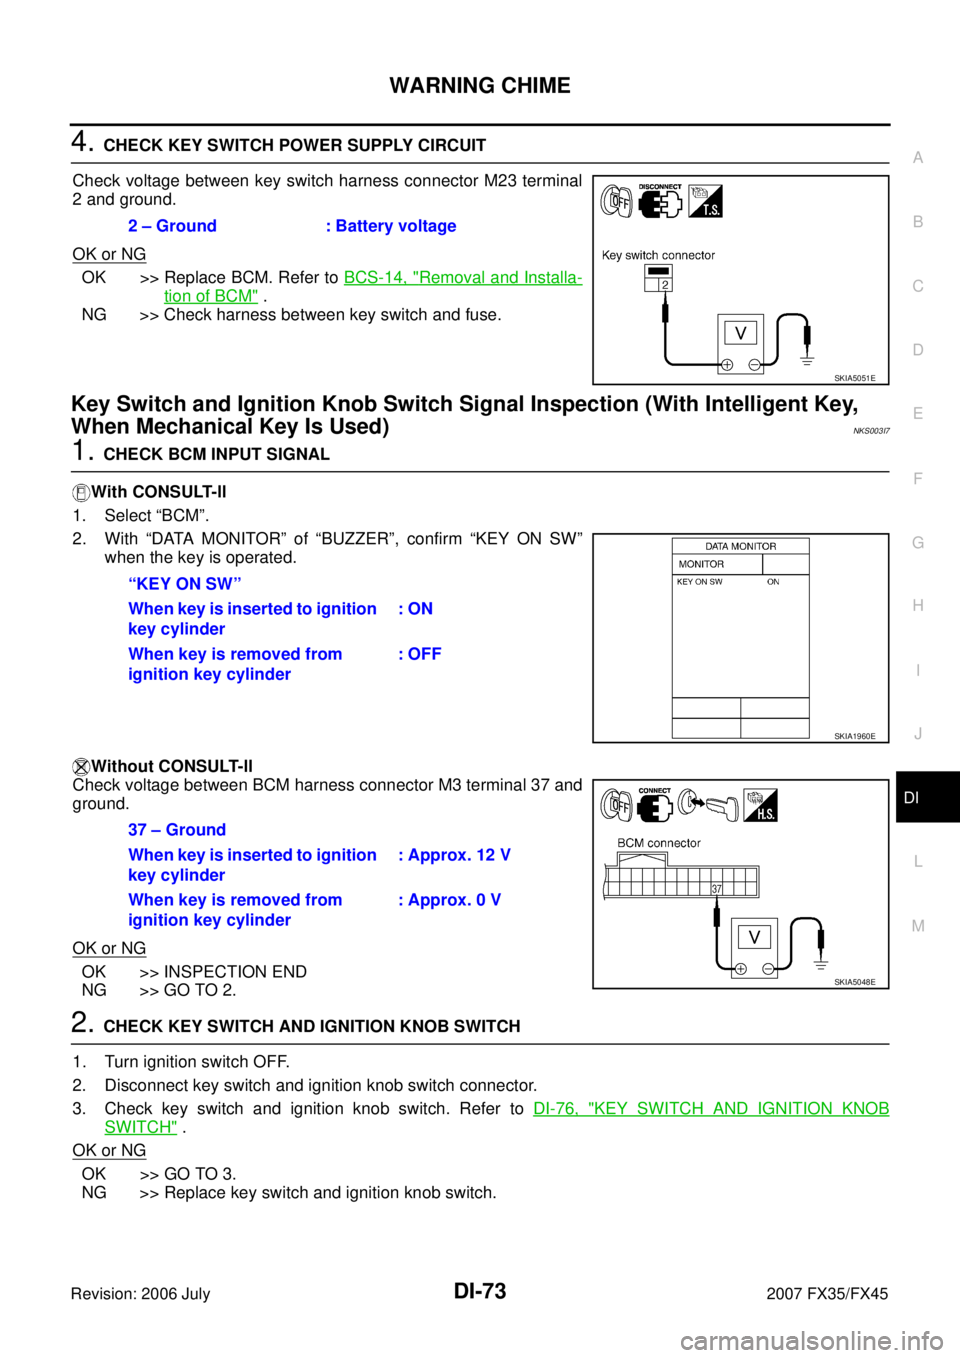
4. CHECK KEY SWITCH POWER SUPPLY CIRCUIT
Check voltage between key switch harness connector M23 terminal
2 and ground.
OK or NG
OK >> Replace BCM. Refer to BCS-14, "Removal and Installa-
tion of BCM" .
NG >> Check harness between key switch and fuse.
Key Switch and Ignition Knob Switch Signal Inspection (With Intelligent Key,
When Mechanical Key Is Used)
NKS003I7
1. CHECK BCM INPUT SIGNAL
With CONSULT-ll
1. Select “BCM”.
2. With “DATA MONITOR” of “BUZZER”, confirm “KEY ON SW” when the key is operated.
Without CONSULT-ll
Check voltage between BCM harness connector M3 terminal 37 and
ground.
OK or NG
OK >> INSPECTION END
NG >> GO TO 2.
2. CHECK KEY SWITCH AND IGNITION KNOB SWITCH
1. Turn ignition switch OFF.
2. Disconnect key switch and ignition knob switch connector.
3. Check key switch and ignition knob switch. Refer to DI-76, "
KEY SWITCH AND IGNITION KNOB
SWITCH" .
OK or NG
OK >> GO TO 3.
NG >> Replace key switch and ignition knob switch. 2 – Ground : Battery voltage
SKIA5051E
“KEY ON SW”
When key is inserted to ignition
key cylinder : ON
When key is removed from
ignition key cylinder : OFF
SKIA1960E
37 – Ground
When key is inserted to ignition
key cylinder : Approx. 12 V
When key is removed from
ignition key cylinder : Approx. 0 V
SKIA5048E
Page 1320 of 4366
DI-74
WARNING CHIME
Revision: 2006 July 2007 FX35/FX45
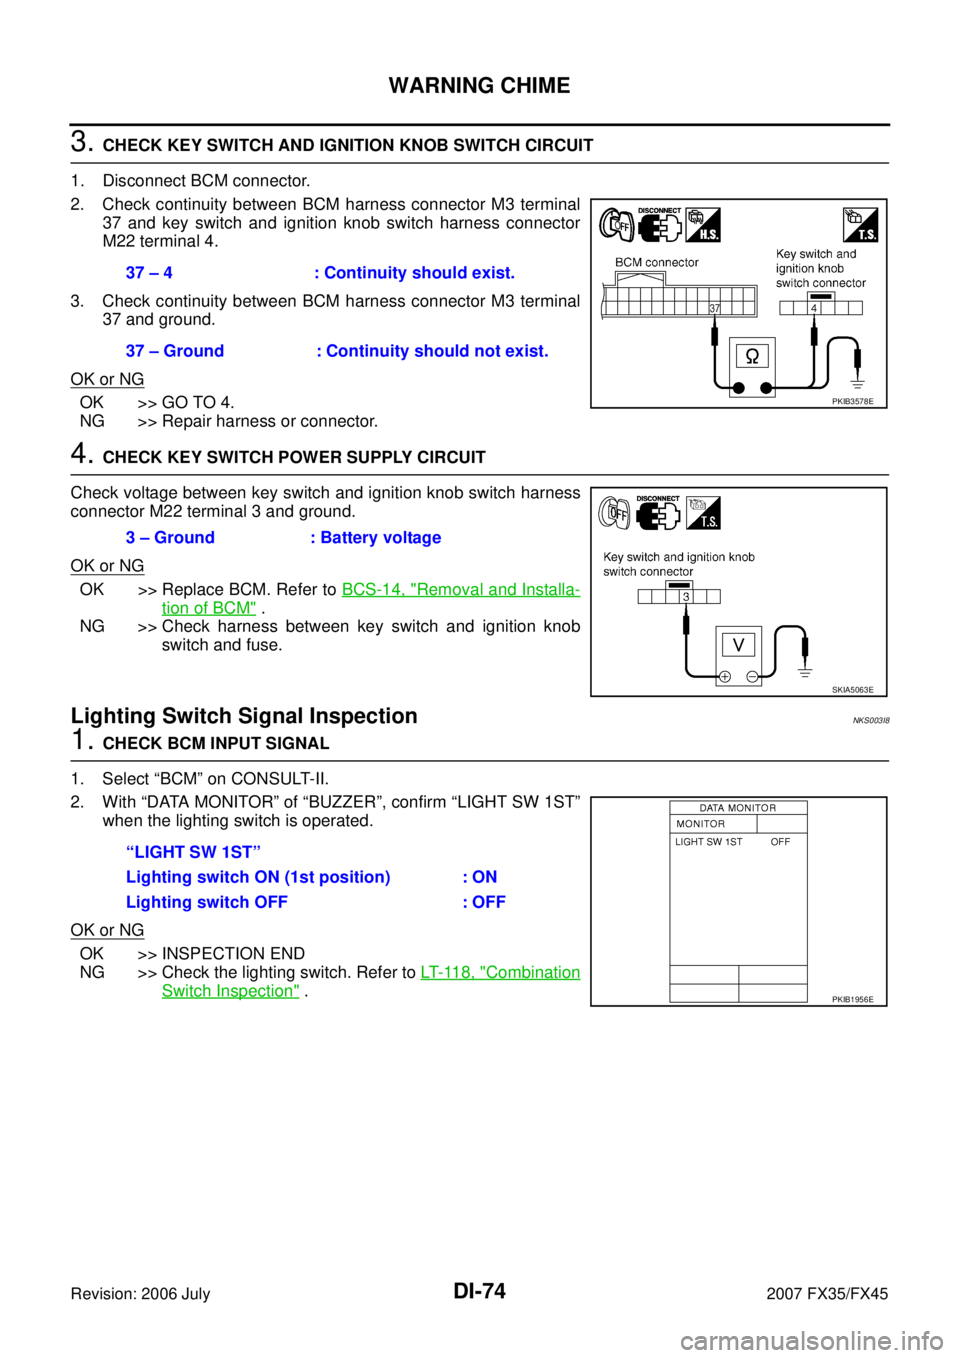
3. CHECK KEY SWITCH AND IGNITION KNOB SWITCH CIRCUIT
1. Disconnect BCM connector.
2. Check continuity between BCM harness connector M3 terminal 37 and key switch and ignition knob switch harness connector
M22 terminal 4.
3. Check continuity between BCM harness connector M3 terminal 37 and ground.
OK or NG
OK >> GO TO 4.
NG >> Repair harness or connector.
4. CHECK KEY SWITCH POWER SUPPLY CIRCUIT
Check voltage between key switch and ignition knob switch harness
connector M22 terminal 3 and ground.
OK or NG
OK >> Replace BCM. Refer to BCS-14, "Removal and Installa-
tion of BCM" .
NG >> Check harness between key switch and ignition knob
switch and fuse.
Lighting Switch Signal InspectionNKS003I8
1. CHECK BCM INPUT SIGNAL
1. Select “BCM” on CONSULT-II.
2. With “DATA MONITOR” of “BUZZER”, confirm “LIGHT SW 1ST” when the lighting switch is operated.
OK or NG
OK >> INSPECTION END
NG >> Check the lighting switch. Refer to LT- 11 8 , "
Combination
Switch Inspection" .
37 – 4 : Continuity should exist.
37 – Ground : Continuity should not exist.
PKIB3578E
3 – Ground : Battery voltage
SKIA5063E
“LIGHT SW 1ST”
Lighting switch ON (1st position) : ON
Lighting switch OFF : OFF
PKIB1956E
Page 1338 of 4366
DI-92
LANE DEPARTURE WARNING SYSTEM
Revision: 2006 July 2007 FX35/FX45
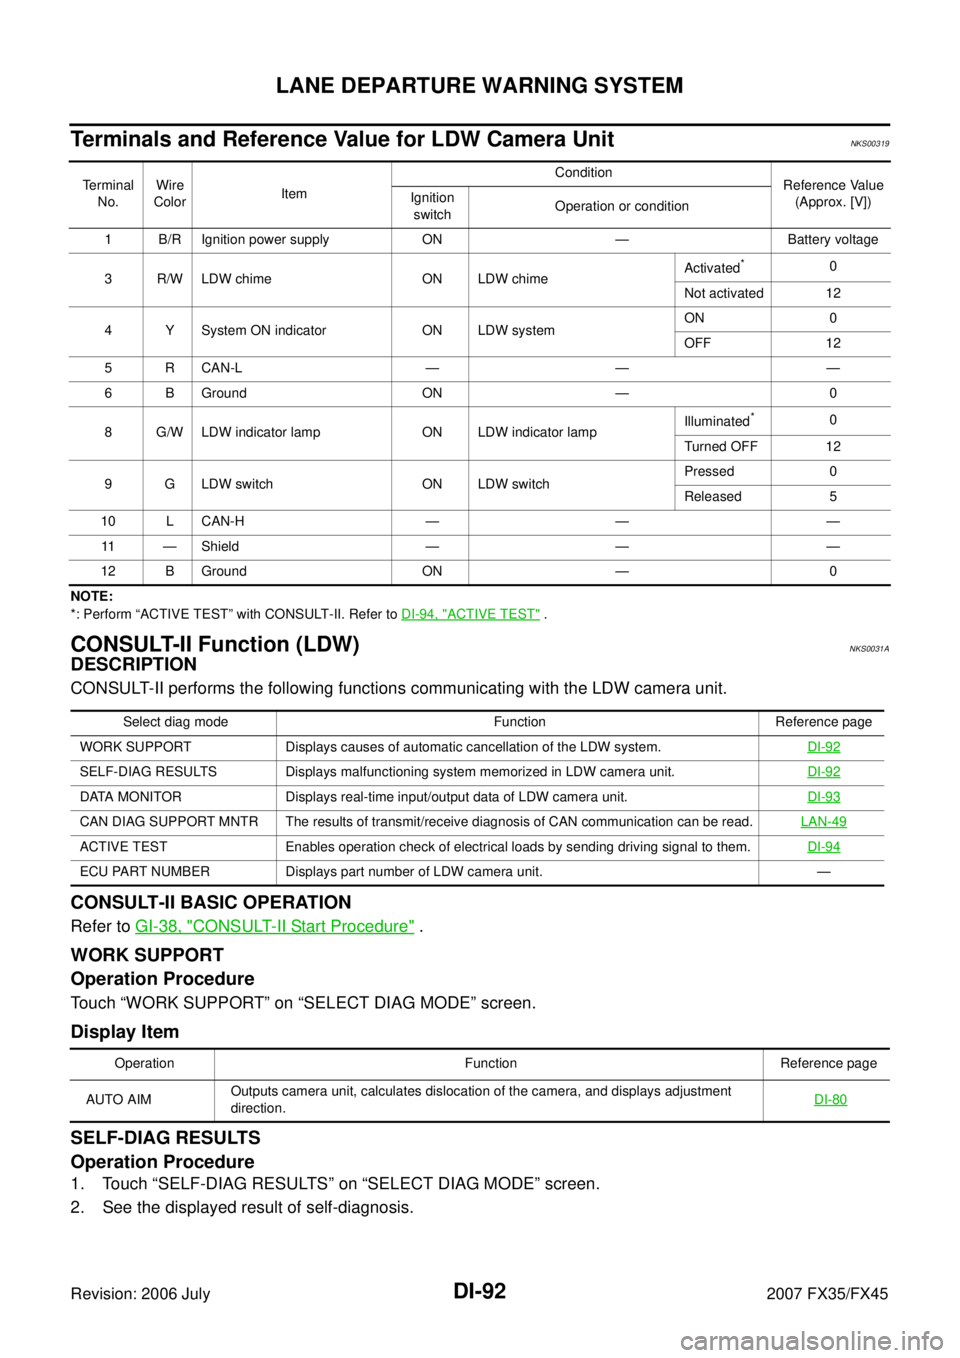
Terminals and Reference Value for LDW Camera UnitNKS00319
NOTE:
*: Perform “ACTIVE TEST” with CONSULT-II. Refer to DI-94, "
ACTIVE TEST" .
CONSULT-II Function (LDW)NKS0031A
DESCRIPTION
CONSULT-II performs the following functions communicating with the LDW camera unit.
CONSULT-II BASIC OPERATION
Refer to GI-38, "CONSULT-II Start Procedure" .
WORK SUPPORT
Operation Procedure
Touch “WORK SUPPORT” on “SELECT DIAG MODE” screen.
Display Item
SELF-DIAG RESULTS
Operation Procedure
1. Touch “SELF-DIAG RESULTS” on “SELECT DIAG MODE” screen.
2. See the displayed result of self-diagnosis.
Te r m i n a l No. Wire
Color Item Condition
Reference Value
(Approx. [V])
Ignition
switch Operation or condition
1 B/R Ignition power supply ON — Battery voltage
3 R/W LDW chime ON LDW chime Activated
*0
Not activated 12
4 Y System ON indicator ON LDW system ON 0
OFF 12
5 R CAN-L — — —
6 B Ground ON — 0
8 G/W LDW indicator lamp ON LDW indicator lamp Illuminated
*0
Turned OFF 12
9 G LDW switch ON LDW switch Pressed 0
Released 5
10 L CAN-H — — — 11 — Shield — — —
12 B Ground ON — 0
Select diag mode Function Reference page
WORK SUPPORT Displays causes of automatic cancellation of the LDW system. DI-92
SELF-DIAG RESULTS Displays malfunctioning system memorized in LDW camera unit.DI-92
DATA MONITOR Displays real-time input/output data of LDW camera unit.DI-93
CAN DIAG SUPPORT MNTR The results of transmit/receive diagnosis of CAN communication can be read.LAN-49
ACTIVE TEST Enables operation check of electrical loads by sending driving signal to them. DI-94
ECU PART NUMBER Displays part number of LDW camera unit. —
Operation Function Reference page
AUTO AIM Outputs camera unit, calculates dislocation of the camera, and displays adjustment
direction.
DI-80
Page 1342 of 4366
DI-96
LANE DEPARTURE WARNING SYSTEM
Revision: 2006 July 2007 FX35/FX45
2. CHECK CAMERA UNIT INSTALLATION CONDITION
Check camera unit installation condition (installation position, properly tightened, a bent bracket).
OK or NG
OK >> GO TO 3.
NG >> Install camera unit properly, and adjust camera aiming. Refer to DI-80, "
Camera Aiming Adjust-
ment" .
3. CHECK VEHICLE HEIGHT
Check vehicle height. Refer to GI-51, "
Dimensions" .
Is vehicle height appropriate?
OK >> GO TO 4.
NG >> Repair vehicle to appropriate height.
4. CHECK LDW CAMERA UNIT (CONSULT-II)
Perform self-diagnosis of LDW camera unit. Refer to DI-92, "
CONSULT-II Function (LDW)" .
Self
-diagnosis results
No malfunction detected >> GO TO 5.
Malfunction detected >> Check applicable parts, and repair or replace corresponding parts.
5. CHECK COMBINATION METER
Check combination meter function.
Do speedometer and turn signal indicator normal function?
YES >> INSPECTION END
NO >> Check combination meter. Refer to DI-16, "
Trouble Diagnosis" .
Power Supply and Ground Circuit InspectionNKS0031D
1. CHECK FUSE
Check for blown LDW camera unit fuse.
OK or NG
OK >> GO TO 2.
NG >> Be sure to eliminate cause of malfunction before installing new fuse. Refer to PG-80, "
FUSE
BLOCK - JUNCTION BOX (J/B)" .
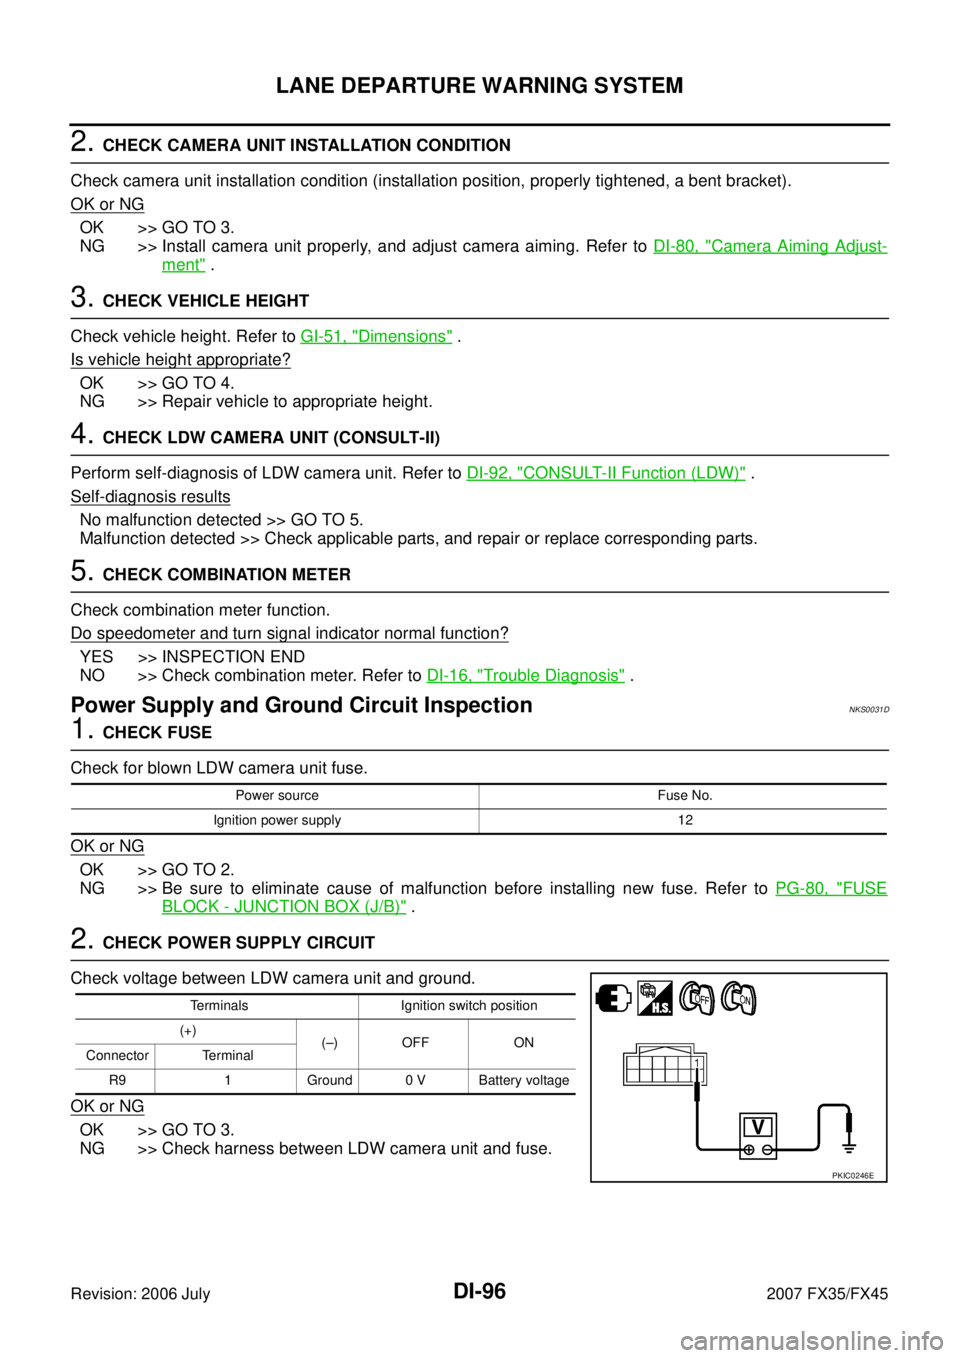
2. CHECK POWER SUPPLY CIRCUIT
Check voltage between LDW camera unit and ground.
OK or NG
OK >> GO TO 3.
NG >> Check harness between LDW camera unit and fuse.
Power source Fuse No.
Ignition power supply 12
Terminals Ignition switch position
(+) (–) OFF ON
Connector Terminal
R9 1 Ground 0 V Battery voltage
PKIC0246E
Page 1344 of 4366
![INFINITI FX35 2007 Service Manual DI-98
LANE DEPARTURE WARNING SYSTEM
Revision: 2006 July 2007 FX35/FX45
DTC [C1B03] ABNRML TEMP DETECTNKS0031H
1. COOLING CAMERA UNIT
1. Cooling camera unit.
2. Erase DTC and perform the LDW camera u INFINITI FX35 2007 Service Manual DI-98
LANE DEPARTURE WARNING SYSTEM
Revision: 2006 July 2007 FX35/FX45
DTC [C1B03] ABNRML TEMP DETECTNKS0031H
1. COOLING CAMERA UNIT
1. Cooling camera unit.
2. Erase DTC and perform the LDW camera u](/manual-img/42/57018/w960_57018-1343.png)
DI-98
LANE DEPARTURE WARNING SYSTEM
Revision: 2006 July 2007 FX35/FX45
DTC [C1B03] ABNRML TEMP DETECTNKS0031H
1. COOLING CAMERA UNIT
1. Cooling camera unit.
2. Erase DTC and perform the LDW camera unit self-diagnosis.
Self
-diagnosis results
No malfunction detected >> INSPECTION END
Malfunction detected >> Replace LDW camera unit.
DTC [U1000] CAN COMM CIRCUITNKS0031I
1. CHECK CAN COMMUNICATION
1. Select “SELF-DIAG RESULTS” mode for “LDW” with CONSULT-II.
2. Print out CONSULT-II screen.
>> Go to “LAN SYSTEM”. Refer to LAN-49, "
CAN System Specification Chart" .
DTC [U1010] CONTROL UNIT (CAN)NKS0031J
Replace LDW camera unit, when “[U1010] CONTROL UNIT (CAN)” is displayed on self-diagnosis display.
LDW Chime Circuit InspectionNKS0031K
1. CHECK LDW CHIME OPERATION
Check LDW chime operation “BUZZER DRIVE” in “ACTIVE TEST”
mode with CONSULT-II.
OK or NG
OK >> INSPECTION END
NG >> GO TO 2.
2. CHECK LDW CHIME POWER SUPPLY CIRCUIT
1. Turn ignition switch OFF.
2. Disconnect LDW chime connector.
3. Turn ignition switch ON.
4. Check voltage between warning chime harness connector M97 terminal 1 and ground.
OK or NG
OK >> GO TO 3.
NG >> Check harness between fuse and LDW chime. “BUZZER DRIVE”
Touch “ON” : LDW chime is activated.
Touch “OFF” : LDW chime is not activated.
SKIB1787E
1 – Ground : Battery voltage
PKIC0248E