Page 1315 of 4366
WARNING CHIME DI-69
C
D E
F
G H
I
J
L
M A
B
DI
Revision: 2006 July 2007 FX35/FX45
2. CHECK POWER SUPPLY CIRCUIT
Check voltage between BCM harness connector terminals and
ground.
OK or NG
OK >> GO TO 3.
NG >> Check harness between BCM and fuse.
3. CHECK GROUND CIRCUIT
1. Turn ignition switch OFF.
2. Disconnect BCM connector.
3. Check continuity between BCM harness connector M35 terminal 52 and ground.
OK or NG
OK >> INSPECTION END
NG >> Repair harness or connector.
Combination Meter Buzzer Circuit InspectionNKS003I4
1. CHECK OPERATION OF COMBINATION METER BUZZER
1. Select “BUZZER” of “BCM” on CONSULT-ll.
2. Perform “LIGHT WARN ALM”, “IGN KEY WARN ALM” or “SEAT BELT WARN TEST” of “ACTIVE TEST”.
Does chime sound?
YES >> GO TO 4.
NO >> GO TO 2.
Terminals Ignition switch position
(+) (–) OFF ON
Connector Terminal
M34 38 Ground 0 V Battery voltage
M35 42
Battery voltage Battery voltage
55
PKIB3988E
52 – Ground : Continuity should exist.
PKIB5011E
SKIA6331E
Page 1316 of 4366
DI-70
WARNING CHIME
Revision: 2006 July 2007 FX35/FX45
2. CHECK UNIFIED METER AND A/C AMP. INPUT SIGNAL
1. Select “METER A/C AMP” on CONSULT-II.
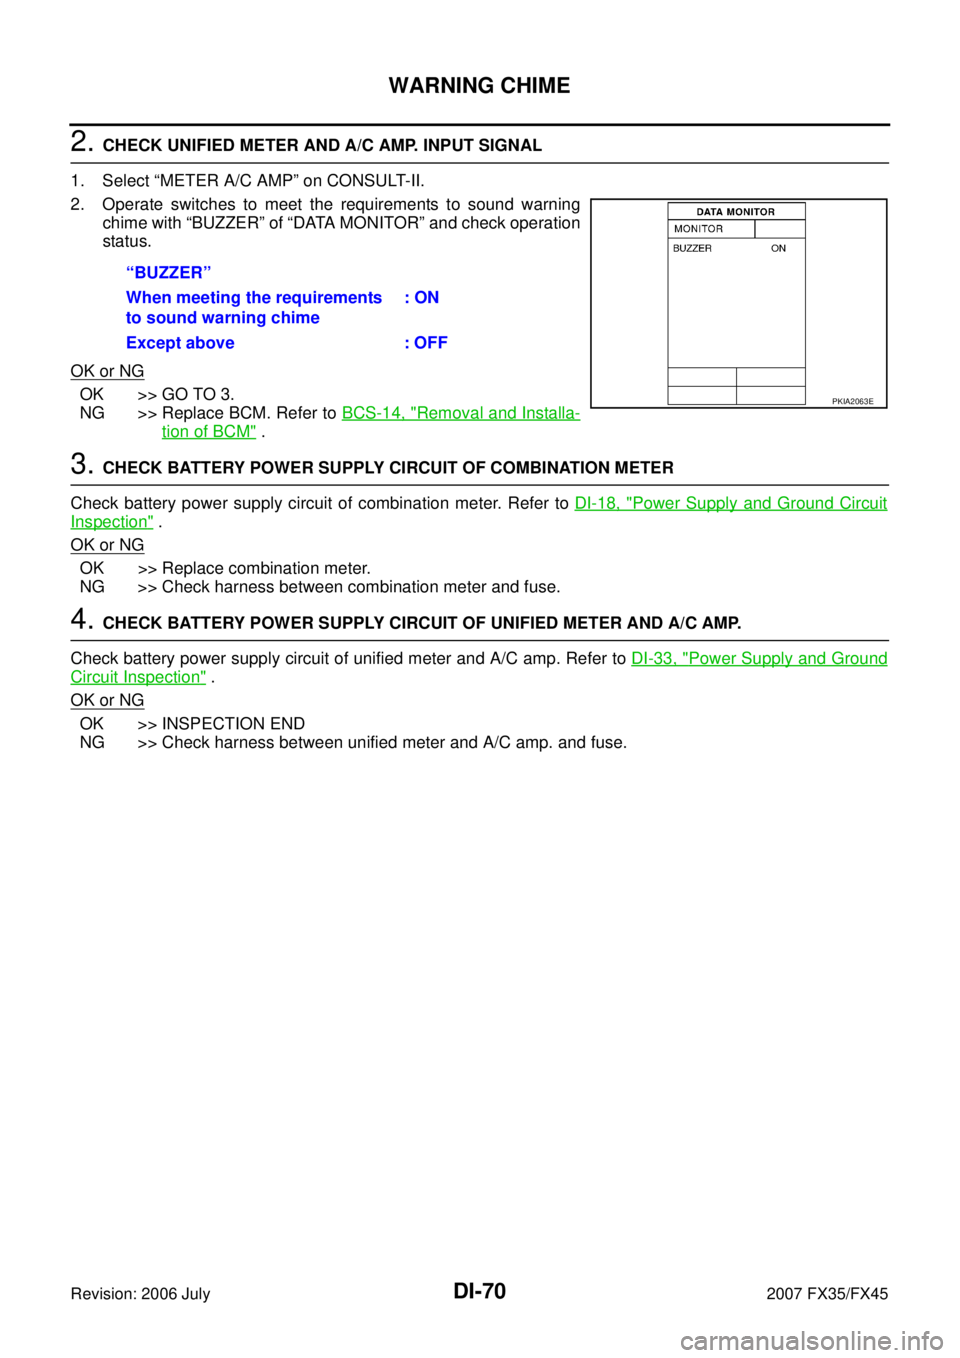
2. Operate switches to meet the requirements to sound warning chime with “BUZZER” of “DATA MONITOR” and check operation
status.
OK or NG
OK >> GO TO 3.
NG >> Replace BCM. Refer to BCS-14, "
Removal and Installa-
tion of BCM" .
3. CHECK BATTERY POWER SUPPLY CIRCUIT OF COMBINATION METER
Check battery power supply circuit of combination meter. Refer to DI-18, "
Power Supply and Ground Circuit
Inspection" .
OK or NG
OK >> Replace combination meter.
NG >> Check harness between combination meter and fuse.
4. CHECK BATTERY POWER SUPPLY CIRCUIT OF UNIFIED METER AND A/C AMP.
Check battery power supply circuit of unified meter and A/C amp. Refer to DI-33, "
Power Supply and Ground
Circuit Inspection" .
OK or NG
OK >> INSPECTION END
NG >> Check harness between unified meter and A/C amp. and fuse. “BUZZER”
When meeting the requirements
to sound warning chime : ON
Except above : OFF
PKIA2063E
Page 1317 of 4366
WARNING CHIME DI-71
C
D E
F
G H
I
J
L
M A
B
DI
Revision: 2006 July 2007 FX35/FX45
Front Door Switch (Driver Side) Signal InspectionNKS003I5
1. CHECK BCM INPUT SIGNAL
With CONSULT-ll
1. Select “BCM”.
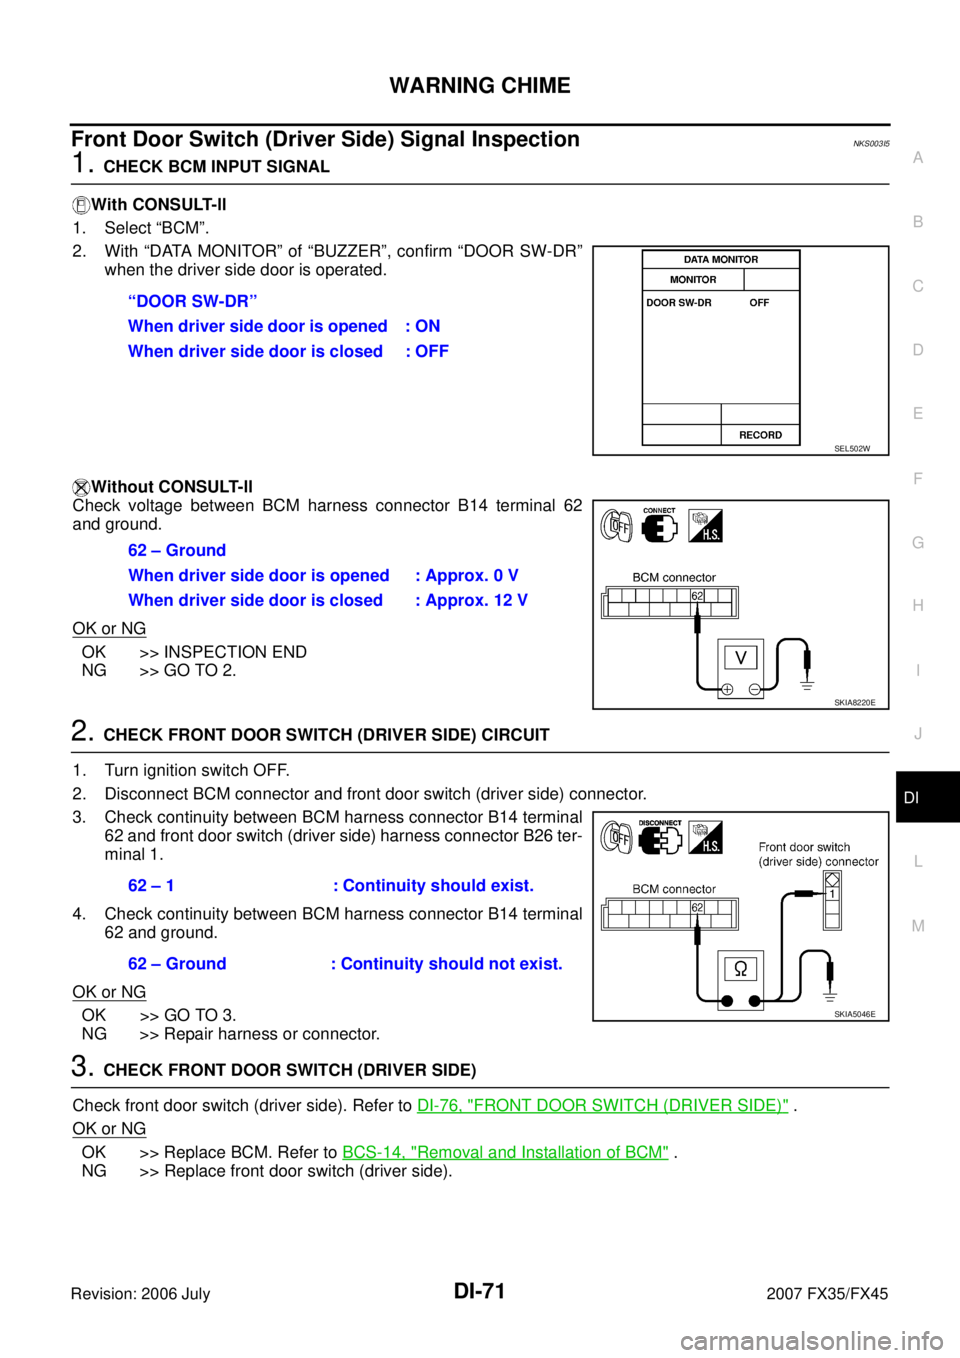
2. With “DATA MONITOR” of “BUZZER”, confirm “DOOR SW-DR” when the driver side door is operated.
Without CONSULT-ll
Check voltage between BCM harness connector B14 terminal 62
and ground.
OK or NG
OK >> INSPECTION END
NG >> GO TO 2.
2. CHECK FRONT DOOR SWITCH (DRIVER SIDE) CIRCUIT
1. Turn ignition switch OFF.
2. Disconnect BCM connector and front door switch (driver side) connector.
3. Check continuity between BCM harness connector B14 terminal 62 and front door switch (driver side) harness connector B26 ter-
minal 1.
4. Check continuity between BCM harness connector B14 terminal 62 and ground.
OK or NG
OK >> GO TO 3.
NG >> Repair harness or connector.
3. CHECK FRONT DOOR SWITCH (DRIVER SIDE)
Check front door switch (driver side). Refer to DI-76, "
FRONT DOOR SWITCH (DRIVER SIDE)" .
OK or NG
OK >> Replace BCM. Refer to BCS-14, "Removal and Installation of BCM" .
NG >> Replace front door switch (driver side). “DOOR SW-DR”
When driver side door is opened : ON
When driver side door is closed : OFF
SEL502W
62 – Ground
When driver side door is opened : Approx. 0 V
When driver side door is closed : Approx. 12 V
SKIA8220E
62 – 1 : Continuity should exist.
62 – Ground : Continuity should not exist.
SKIA5046E
Page 1318 of 4366
DI-72
WARNING CHIME
Revision: 2006 July 2007 FX35/FX45
Key Switch Signal Inspection (Without Intelligent Key)NKS003I6
1. CHECK BCM INPUT SIGNAL
With CONSULT-ll
1. Select “BCM”.
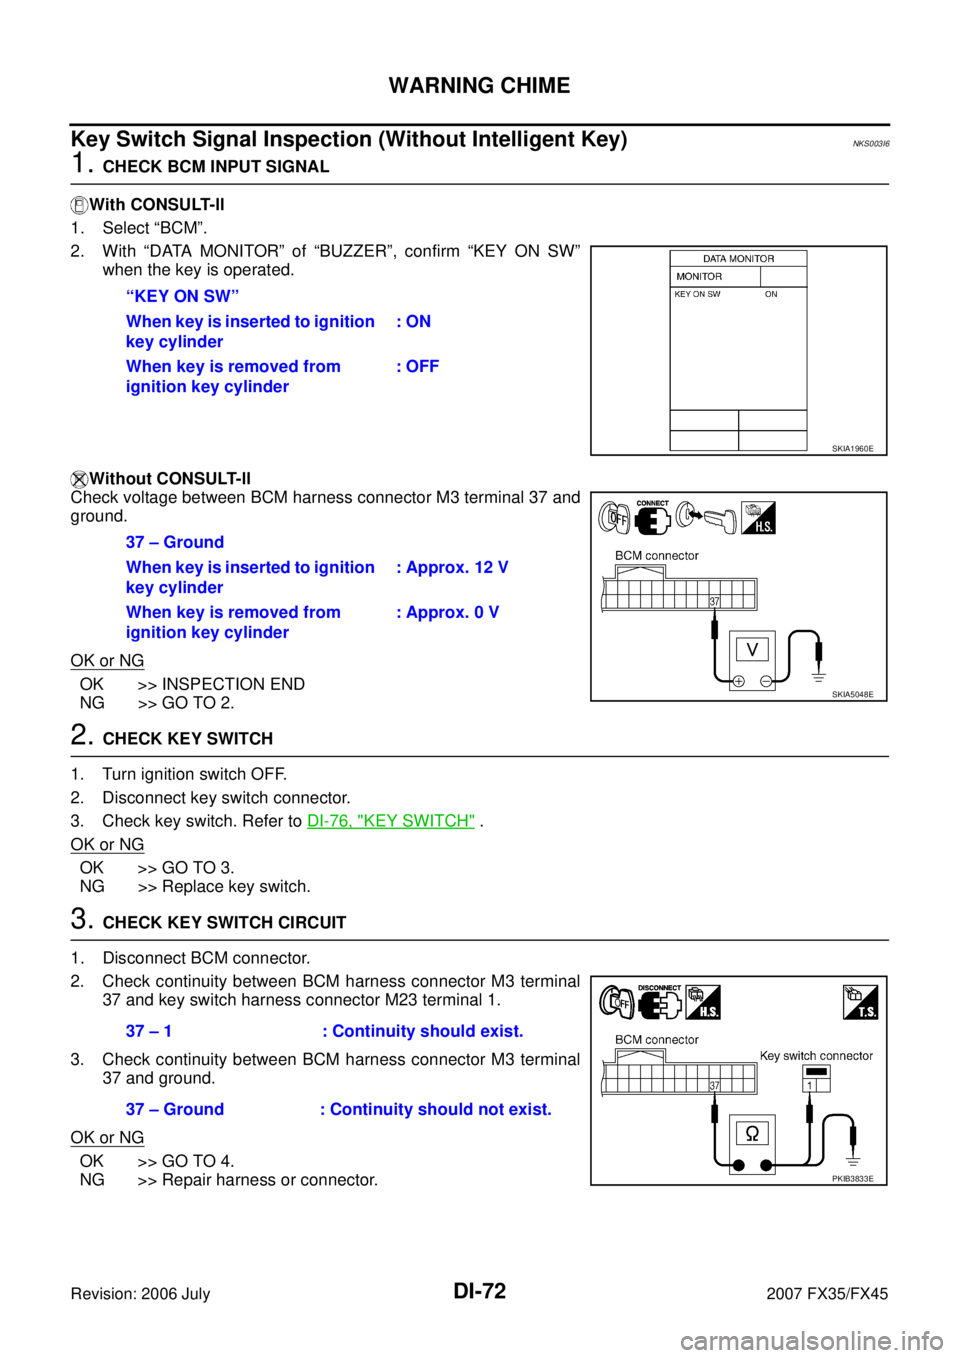
2. With “DATA MONITOR” of “BUZZER”, confirm “KEY ON SW” when the key is operated.
Without CONSULT-ll
Check voltage between BCM harness connector M3 terminal 37 and
ground.
OK or NG
OK >> INSPECTION END
NG >> GO TO 2.
2. CHECK KEY SWITCH
1. Turn ignition switch OFF.
2. Disconnect key switch connector.
3. Check key switch. Refer to DI-76, "
KEY SWITCH" .
OK or NG
OK >> GO TO 3.
NG >> Replace key switch.
3. CHECK KEY SWITCH CIRCUIT
1. Disconnect BCM connector.
2. Check continuity between BCM harness connector M3 terminal 37 and key switch harness connector M23 terminal 1.
3. Check continuity between BCM harness connector M3 terminal 37 and ground.
OK or NG
OK >> GO TO 4.
NG >> Repair harness or connector. “KEY ON SW”
When key is inserted to ignition
key cylinder : ON
When key is removed from
ignition key cylinder : OFF
SKIA1960E
37 – Ground
When key is inserted to ignition
key cylinder : Approx. 12 V
When key is removed from
ignition key cylinder : Approx. 0 V
SKIA5048E
37 – 1 : Continuity should exist.
37 – Ground : Continuity should not exist.
PKIB3833E
Page 1319 of 4366
WARNING CHIME DI-73
C
D E
F
G H
I
J
L
M A
B
DI
Revision: 2006 July 2007 FX35/FX45
4. CHECK KEY SWITCH POWER SUPPLY CIRCUIT
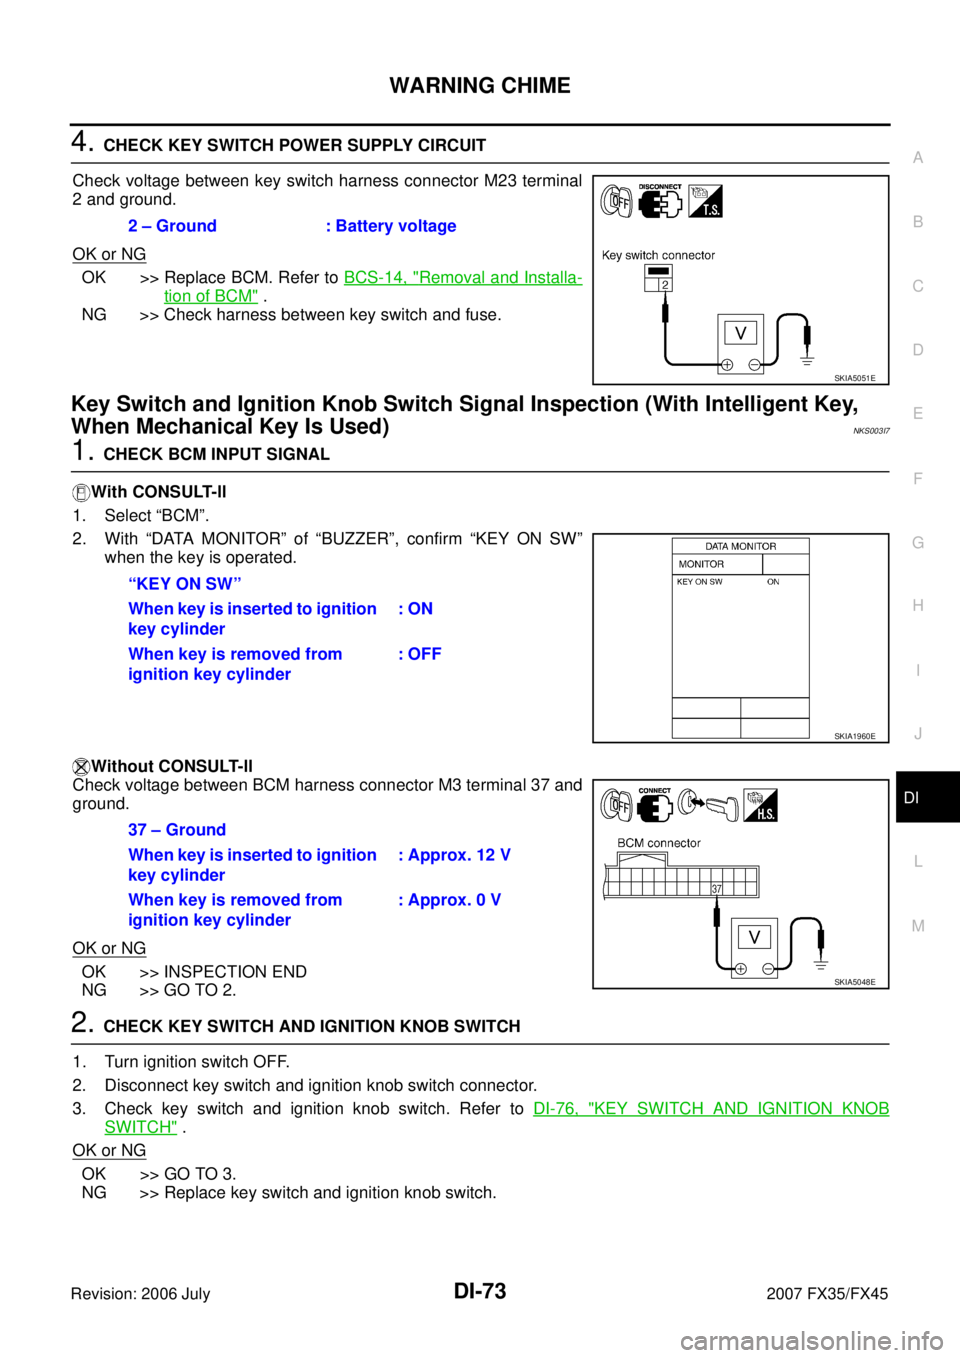
Check voltage between key switch harness connector M23 terminal
2 and ground.
OK or NG
OK >> Replace BCM. Refer to BCS-14, "Removal and Installa-
tion of BCM" .
NG >> Check harness between key switch and fuse.
Key Switch and Ignition Knob Switch Signal Inspection (With Intelligent Key,
When Mechanical Key Is Used)
NKS003I7
1. CHECK BCM INPUT SIGNAL
With CONSULT-ll
1. Select “BCM”.
2. With “DATA MONITOR” of “BUZZER”, confirm “KEY ON SW” when the key is operated.
Without CONSULT-ll
Check voltage between BCM harness connector M3 terminal 37 and
ground.
OK or NG
OK >> INSPECTION END
NG >> GO TO 2.
2. CHECK KEY SWITCH AND IGNITION KNOB SWITCH
1. Turn ignition switch OFF.
2. Disconnect key switch and ignition knob switch connector.
3. Check key switch and ignition knob switch. Refer to DI-76, "
KEY SWITCH AND IGNITION KNOB
SWITCH" .
OK or NG
OK >> GO TO 3.
NG >> Replace key switch and ignition knob switch. 2 – Ground : Battery voltage
SKIA5051E
“KEY ON SW”
When key is inserted to ignition
key cylinder : ON
When key is removed from
ignition key cylinder : OFF
SKIA1960E
37 – Ground
When key is inserted to ignition
key cylinder : Approx. 12 V
When key is removed from
ignition key cylinder : Approx. 0 V
SKIA5048E
Page 1320 of 4366
DI-74
WARNING CHIME
Revision: 2006 July 2007 FX35/FX45
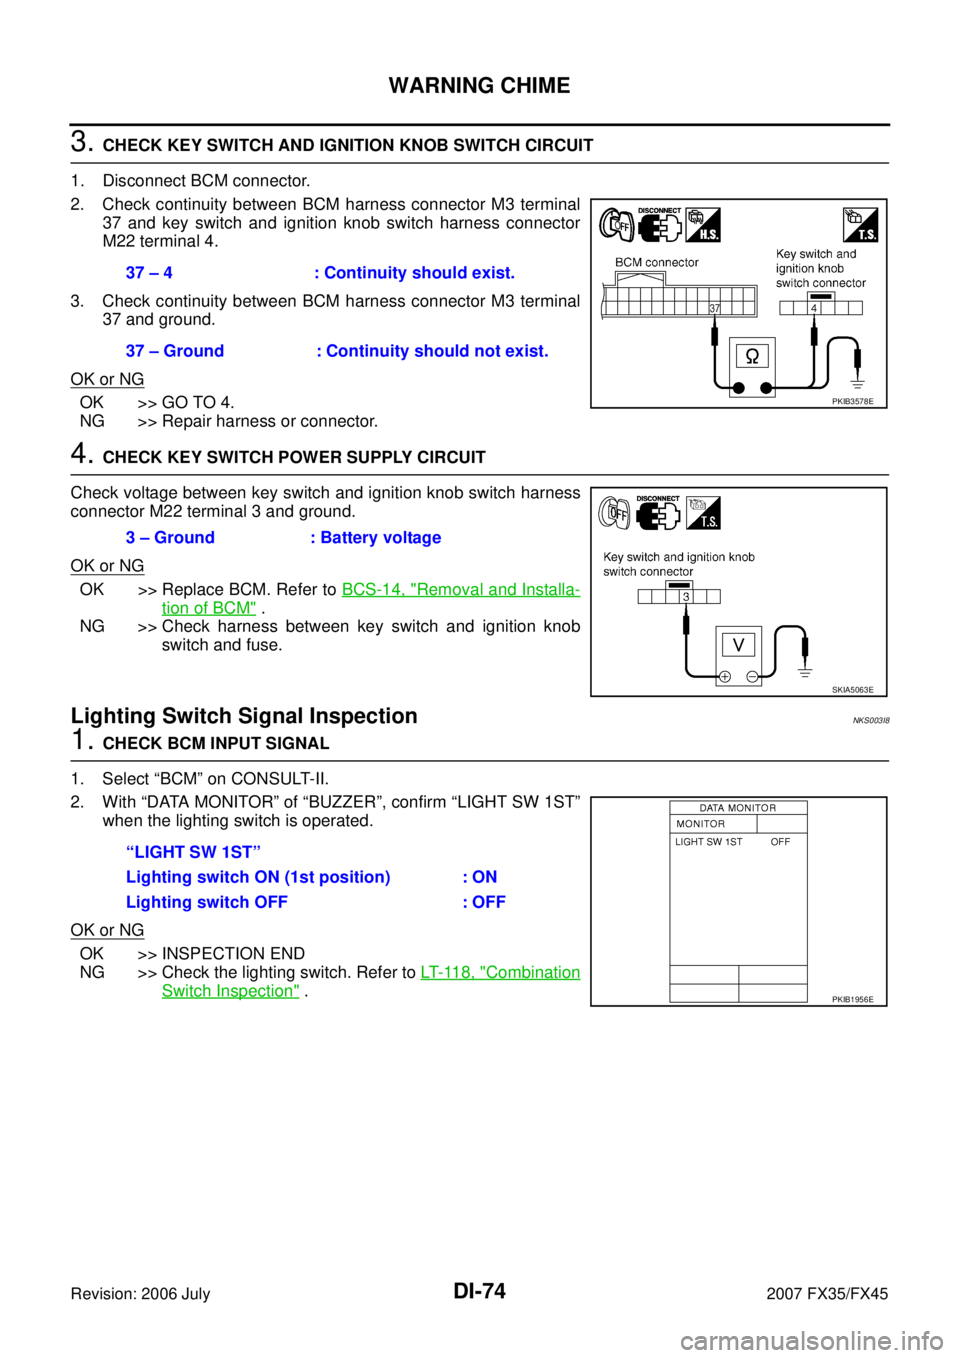
3. CHECK KEY SWITCH AND IGNITION KNOB SWITCH CIRCUIT
1. Disconnect BCM connector.
2. Check continuity between BCM harness connector M3 terminal 37 and key switch and ignition knob switch harness connector
M22 terminal 4.
3. Check continuity between BCM harness connector M3 terminal 37 and ground.
OK or NG
OK >> GO TO 4.
NG >> Repair harness or connector.
4. CHECK KEY SWITCH POWER SUPPLY CIRCUIT
Check voltage between key switch and ignition knob switch harness
connector M22 terminal 3 and ground.
OK or NG
OK >> Replace BCM. Refer to BCS-14, "Removal and Installa-
tion of BCM" .
NG >> Check harness between key switch and ignition knob
switch and fuse.
Lighting Switch Signal InspectionNKS003I8
1. CHECK BCM INPUT SIGNAL
1. Select “BCM” on CONSULT-II.
2. With “DATA MONITOR” of “BUZZER”, confirm “LIGHT SW 1ST” when the lighting switch is operated.
OK or NG
OK >> INSPECTION END
NG >> Check the lighting switch. Refer to LT- 11 8 , "
Combination
Switch Inspection" .
37 – 4 : Continuity should exist.
37 – Ground : Continuity should not exist.
PKIB3578E
3 – Ground : Battery voltage
SKIA5063E
“LIGHT SW 1ST”
Lighting switch ON (1st position) : ON
Lighting switch OFF : OFF
PKIB1956E
Page 1321 of 4366
WARNING CHIME DI-75
C
D E
F
G H
I
J
L
M A
B
DI
Revision: 2006 July 2007 FX35/FX45
Seat Belt Buckle Switch (Driver Side) Signal InspectionNKS003I9
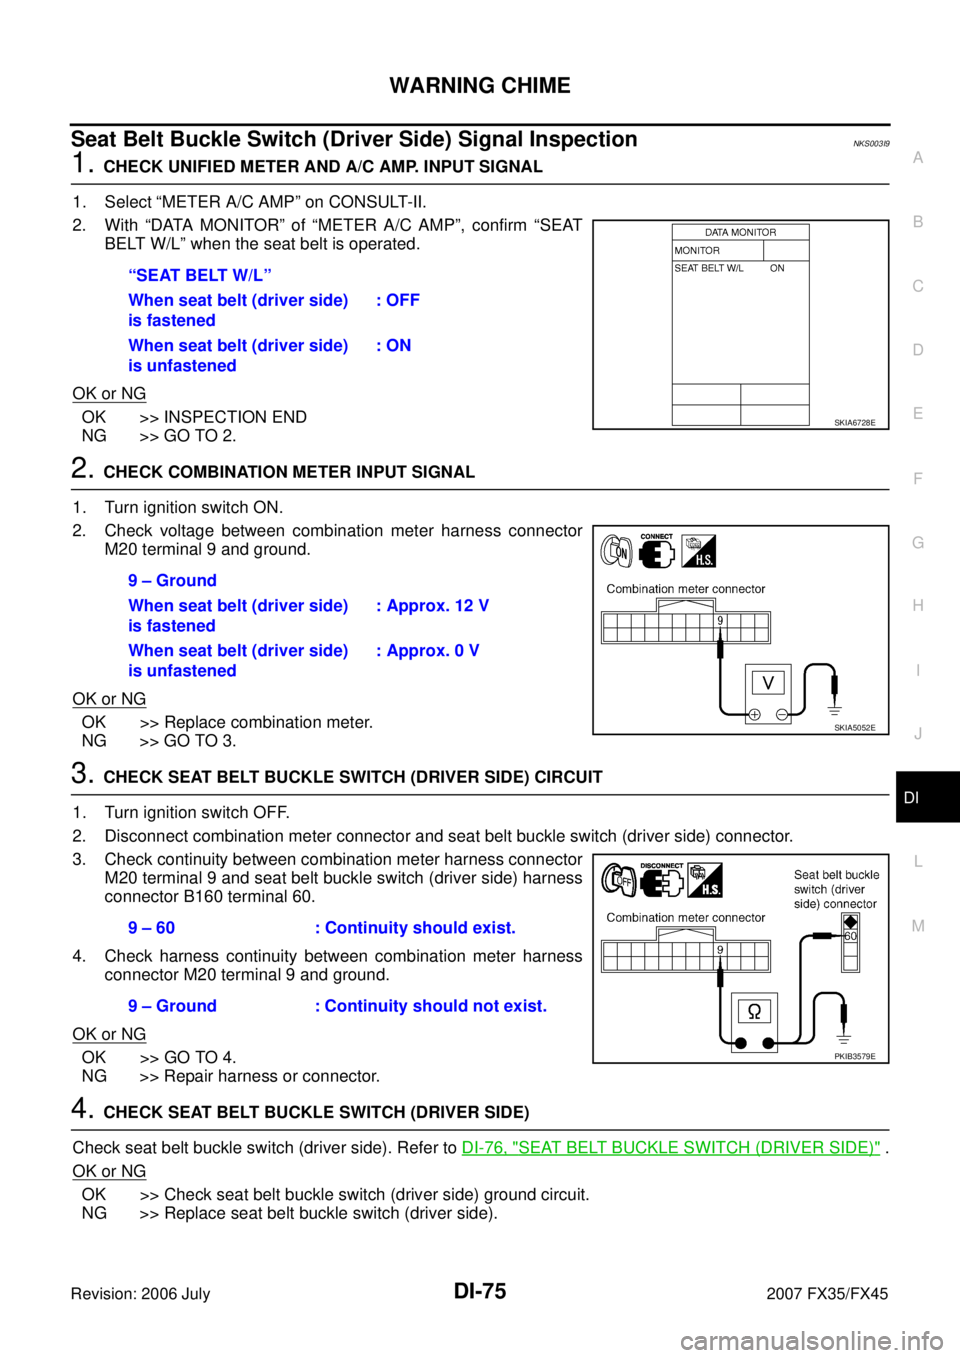
1. CHECK UNIFIED METER AND A/C AMP. INPUT SIGNAL
1. Select “METER A/C AMP” on CONSULT-II.
2. With “DATA MONITOR” of “METER A/C AMP”, confirm “SEAT BELT W/L” when the seat belt is operated.
OK or NG
OK >> INSPECTION END
NG >> GO TO 2.
2. CHECK COMBINATION METER INPUT SIGNAL
1. Turn ignition switch ON.
2. Check voltage between combination meter harness connector M20 terminal 9 and ground.
OK or NG
OK >> Replace combination meter.
NG >> GO TO 3.
3. CHECK SEAT BELT BUCKLE SWITCH (DRIVER SIDE) CIRCUIT
1. Turn ignition switch OFF.
2. Disconnect combination meter connector and seat belt buckle switch (driver side) connector.
3. Check continuity between combination meter harness connector M20 terminal 9 and seat belt buckle switch (driver side) harness
connector B160 terminal 60.
4. Check harness continuity between combination meter harness connector M20 terminal 9 and ground.
OK or NG
OK >> GO TO 4.
NG >> Repair harness or connector.
4. CHECK SEAT BELT BUCKLE SWITCH (DRIVER SIDE)
Check seat belt buckle switch (driver side). Refer to DI-76, "
SEAT BELT BUCKLE SWITCH (DRIVER SIDE)" .
OK or NG
OK >> Check seat belt buckle switch (driver side) ground circuit.
NG >> Replace seat belt buckle switch (driver side). “SEAT BELT W/L”
When seat belt (driver side)
is fastened : OFF
When seat belt (driver side)
is unfastened : ON
SKIA6728E
9 – Ground
When seat belt (driver side)
is fastened : Approx. 12 V
When seat belt (driver side)
is unfastened : Approx. 0 V
SKIA5052E
9 – 60 : Continuity should exist.
9 – Ground : Continuity should not exist.
PKIB3579E
Page 1322 of 4366
DI-76
WARNING CHIME
Revision: 2006 July 2007 FX35/FX45
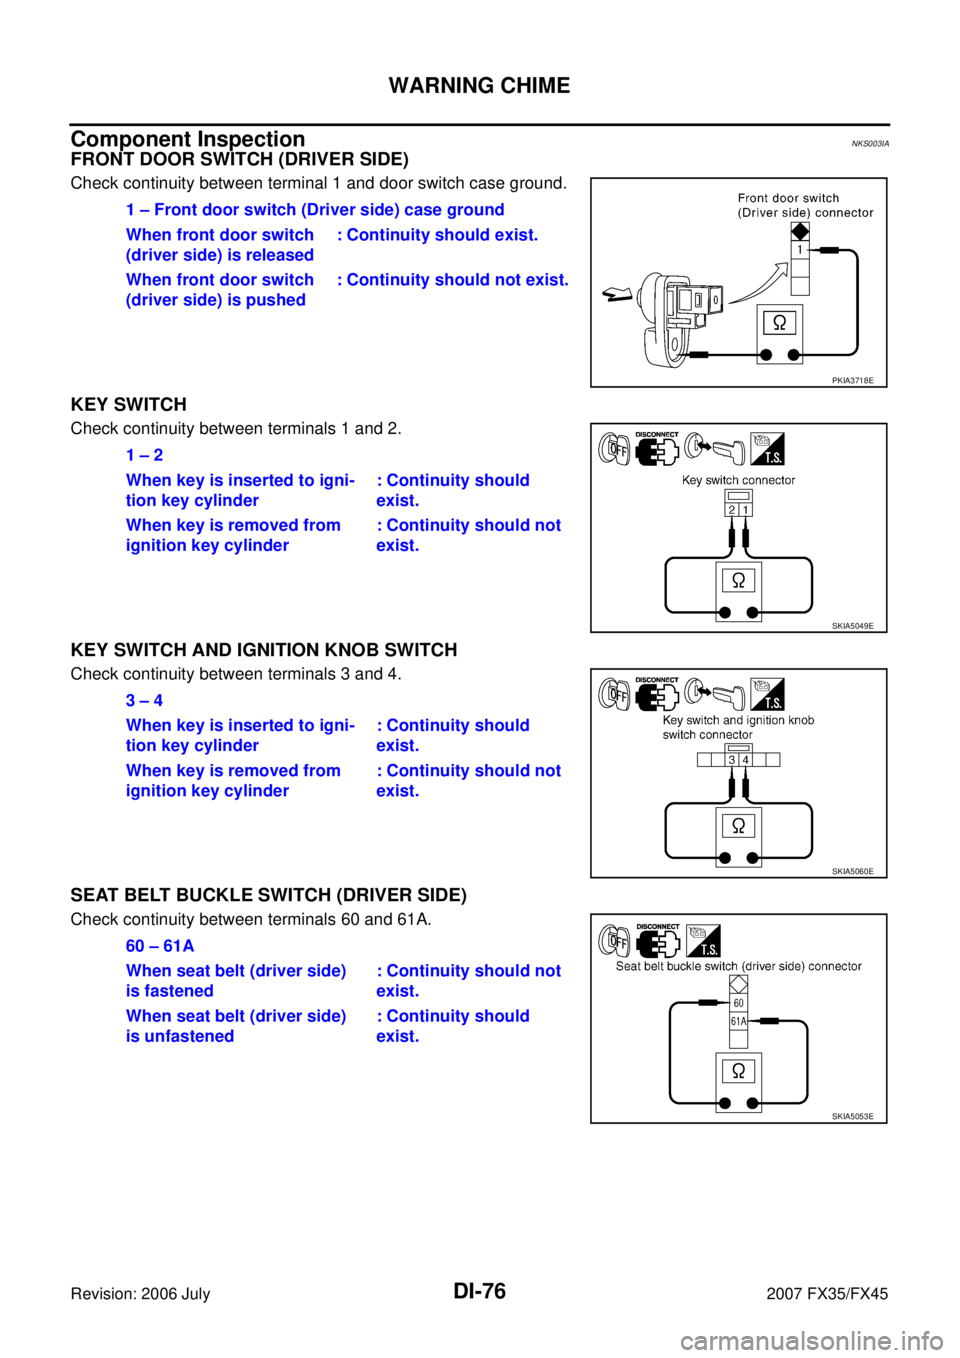
Component InspectionNKS003IA
FRONT DOOR SWITCH (DRIVER SIDE)
Check continuity between terminal 1 and door switch case ground.
KEY SWITCH
Check continuity between terminals 1 and 2.
KEY SWITCH AND IGNITION KNOB SWITCH
Check continuity between terminals 3 and 4.
SEAT BELT BUCKLE SWITCH (DRIVER SIDE)
Check continuity between terminals 60 and 61A. 1 – Front door switch (Driver side) case ground
When front door switch
(driver side) is released : Continuity should exist.
When front door switch
(driver side) is pushed : Continuity should not exist.
PKIA3718E
1 – 2
When key is inserted to igni-
tion key cylinder : Continuity should
exist.
When key is removed from
ignition key cylinder : Continuity should not
exist.
SKIA5049E
3 – 4
When key is inserted to igni-
tion key cylinder : Continuity should
exist.
When key is removed from
ignition key cylinder : Continuity should not
exist.
SKIA5060E
60 – 61A
When seat belt (driver side)
is fastened : Continuity should not
exist.
When seat belt (driver side)
is unfastened : Continuity should
exist.
SKIA5053E