Page 95 of 319
Keeptheinsideandoutsidemirrors
clean and adjusted for best visibility.
Be sure to adjust the mirrors before
you start driving.
The inside mirror has day and night
positions. The night position reduces
glare from headlights behind you.
Flip the tab on the bottom edge of
the mirror to select the day or night
position. Therearviewmirrorhasacompass
function
to indicate the vehicle’s
direction.
Refer to on page . 177
If equippedMirrors
Compass
Mirrors
92
TAB
Page 97 of 319
 position to raise or lower any
window. To open a window, push the
switchdownandholdit.Releasethe
switch when you want the window to
stop. Pull back on the s")
�µ
Turn the ignition switch to the ON
(II) position to raise or lower any
window. To open a window, push the
switchdownandholdit.Releasethe
switch when you want the window to
stop. Pull back on the switch and
hold it to close the window.
The windows will operate f or up to
10 minutes af ter you turn of f the
ignition switch. Opening either f ront
door cancels this f unction. To open the driver’s
window f ully, push the window
switch f irmly down, then release it.
The window automatically goes
down all the way. To stop the
window f rom going all the way down,
pull back on the window switch
brief ly.
To close the driver’s window f ully,
pull back the window switch f irmly,
then release it. The window
automatically goes all the way up. To
stop the window f rom going all the
way up, push down on the window
switch brief ly. To open or close the driver’s window
partially, push down or pull back on
the window switch lightly and hold it.
The window will stop when you
release the switch.
If the MAIN switch is OFF, the
passenger windows cannot be raised
or lowered. Keep the MAIN switch
off whenyouhavechildreninthe
vehicle so they do not injure
themselves by operating the
windows unintentionally.
Power Windows
AUTO
94
DRIVER’S WINDOW
SWITCH
MAIN SWITCH
Closing a power window on
someone’s hands or fingers can
cause serious injury.
Make sure your passengers are
away from the windows before
closing them.
Page 102 of 319

Be caref ul when you are using the
beverage holders. A spilled liquid
that is very hot can scald you or your
passengers. Liquid can also spill
f rom the rear door pocket beverage
holders when you close the rear
doors. Use only resealable
containers in the door pockets. The
f ront beverage holders can be
installed under the slide.
Spilled liquids can damage the
upholstery, carpeting, and electrical
components in the interior.Open the glove box by pulling the
bottom of the handle. Close it with a
f irm push. Lock or unlock the glove
box with the master key.
To open the console compartment,
pull up on the lever, and lif t the lid.
Pivot the door of the console f orward
and you can store a cellular phone, a
small notepad, and business cards in
it. The glove box light comes on when
the parking lights are on.
Interior Convenience Items
Beverage Holders
Console Compartment Glove Box
Inst rument s and Cont rols
99
An open glove box can cause
serious injury to your passenger
inacrash,evenifthe
passenger is wearing the seat
belt.
Always keep the glove box
closed while driving.
Page 104 of 319
Make sure you put the sun visor
back in place when you are getting
into or out of the vehicle. Do not use
the extended sun visor over the rear
view mirror.None of the sockets will power an
automotive type cigarette lighter
element. When both sockets are
being used, the combined power
rating of the accessories should be
120 watts or less (10 amps).
The light comes on when you pull up
the cover.
Whenusingthesunvisorforthe
side window, remove the support rod
f rom the clip and swing it out. Slide
the extension out to get more
coverage on the side window. To use the vanity mirror on the back
of the sun visor, pull up the cover.
The vanity mirror light will not come
on if the sun visor is slid outward.Each socket is intended to supply
power f or 12 volt DC accessories
that are rated 120 watts or less (10
amps).
Sun Visor A ccessory Power Sockets
Vanity Mirror
Interior Convenience Items
Inst rument s and Cont rols
101
SUN VISOR
EXTENSION
Page 105 of 319

Always run the engine when you use
the AC Power Outlet.The maximum capacity f or this
power outlet is 115 volt AC at 100
watts or less. If you use an appliance
which requires more than 100 watts,
it automatically stops supplying the
power. If this happens, turn the
ignition switch of f and turn it on
again.
The AC power outlet is not
designed f or electric appliances
which require high initial peak
wattage such as cathode-ray tube
type televisions, ref rigerators,
electric pumps, etc. It is also not
suitable f or devices that process
precise data such as medical
equipment or measuring instruments.
Any appliances that require an
extremely stable power supply such
as microcomputer-controlled electric
blankets, touch sensor lamps, etc.,
should not be connected to this
outlet. ON
All the individual map lights come
onandstayonaslongasthe
switch remains in the ON position.
The individual map lights in the
f ront can be turned on and of f with
the switches next to the lights. None of the lights come on when a
door or the tailgate is opened.
There is a 115 volt AC power outlet
in the console compartment. To use
the AC power outlet, open the
console compartment lid and open
the outlet cover. Insert the plug into
the receptacle slightly, turn it 90°
clockwise, then push in the plug all
the way.
When this switch is in the position:
If equipped
When the switch is in the OFF position:
Interior Convenience Items, Interior L ights
AC Power OutletLight Control Switch
102
NOTE:
DOOR
ACTIVATED
POSITIONOFF
ON
Page 106 of 319

The individual map lights in the
second and third rows cannot be
turned on.
Door
Activated
The courtesy light between the map
lights comes on when you turn the
parking lights on. To adjust its
brightness, turn the Select/Reset
knob on the instrument panel.
The
individual map lights come on
whenanydoororthetailgateis
opened, or when the remote
transmitter is used to unlock the
doors.
The individual map lights in the
second and third rows can be
tu rn ed on and off by pressing the
lens.
The tailgate light comes on when
you open the tailgate if the light
switch is in the ON position.
The lights go out about 6 seconds
after all the doors and the tailgate
are closed. With any door or the
tailgate left open, the lights stay
on about 3 minutes, then go out. The
light in the tailgate has an on-o ff
switch to control if the light comes
on when the tailgate is opened.
The courtesy lights in the front
doors and around the ignition switch
come on when you open any door.
After you close the door, the ignition
switch light stays on for several
seconds. Turn on the front and rear individual
map lights by pushing the lens of
each light. Push the lens again to
turn it off. You can also operate
these lights with the light control
switch (see page ). 102
When the switch is in the
position:
Interior Lights
Courtesy Lights
Individual Map L ights
Tailgate Light
Individual Interior L ights
Inst rument s and Cont rols
103
Page 117 of 319
�µ
�µ
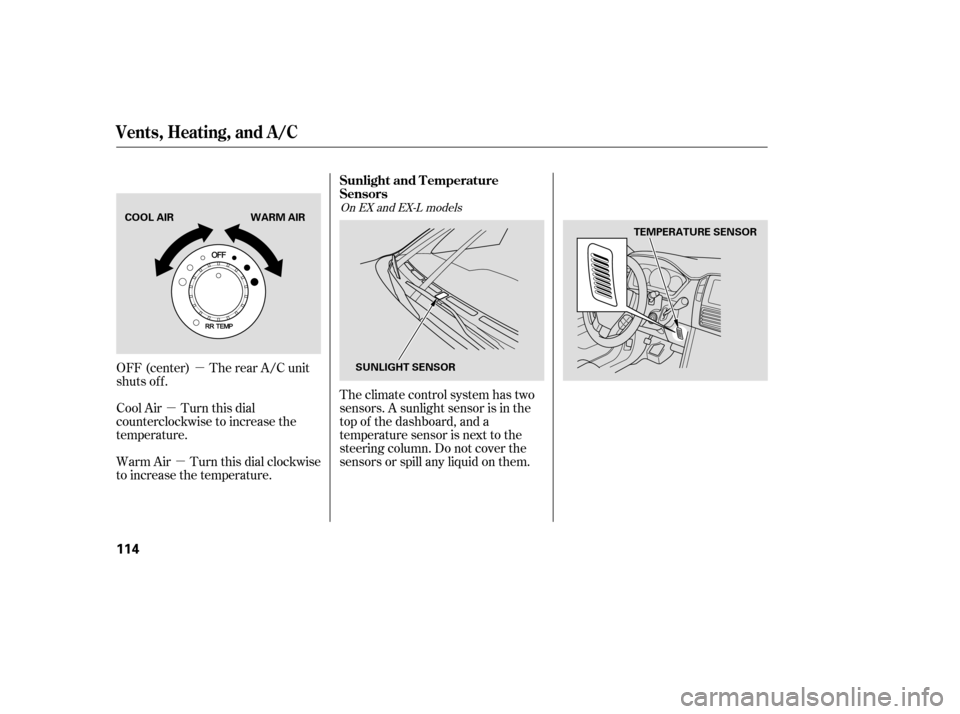
�µ Theclimatecontrolsystemhastwo
sensors. A sunlight sensor is in the
top of the dashboard, and a
temperature sensor is next to the
steering column. Do not cover the
sensors or spill any liquid on them.
OFF (center) The rear A/C unit
shuts off.
Cool Air Turn this dial
counterclockwise to increase the
temperature.
Warm Air Turn this dial clockwise
to increase the temperature.
On EX and EX-L models
Sunlight and T emperature
Sensors
Vents, Heating, and A/C
114
SUNLIGHT SENSOR TEMPERATURE SENSOR
COOL AIR WARM AIR
Page 122 of 319

�µ�µ�µ
If
you are
traveling far from home and can no
longer receive your preset stations,
you can use the auto select feature to
find stations in the local area. Use
the TRE/BAS
modes to adjust the tone to your
liking.
You can use the instrument panel
brightness control knob to adjust the
illumination of the audio system (see
page ). The audio system
illuminates when the parking lights
are on, even if the system is turned
of f .
These two
modes adjust the strength of the
sound coming f rom each speaker.
BAL adjusts the side-to-side strength,
while FAD adjusts the f ront-to-back
strength. ,pressthe
A. SEL (auto select) button. This
restores the presets you originally
set.
Press the A. SEL button. ‘‘A. SEL’’
f lashes in the display, and the system
goes into scan mode f or several
seconds. It stores the f requencies of
six AM and twelve FM stations in
the preset buttons.
You will see a ‘‘0’’ displayed af ter
pressing a preset button if auto
select cannot f ind a strong station f or
every preset button.
If you do not like the stations auto
select has stored, you can store
other f requencies on the preset
buttons as previously described. Press the MODE or SOUND knob
repeatedly to display the Bass (BAS),
Treble (TRE), Fader (FAD), and
Balance (BAL) settings.
Eachmodeisshowninthedisplayas
it changes. Turn the TUNE/SOUND
knob to adjust the setting to your
liking. When the level reaches the
center, you will see ‘‘C’’ in the display.
The system will automatically return
the display to the selected audio
mode about 5 seconds af ter you stop
adjusting a mode.
76To turn of f auto selectAUTO SELECT
A udio System L ighting Treble/Bass
Balance/Fader Adjusting the Sound
Playing the Radio
Features
119