2007 HONDA PILOT spare wheel
[x] Cancel search: spare wheelPage 209 of 319

The appropriate tire indicator and
low tire pressu re indicator comes on
if a tire becomes significantly
underinflated. See
on page .
This indicator comes on and stays on
if there is a problem with the tire
pressure monitoring system.
If you see this message, the system
is off and is not monitoring the tire
pressures. Have the system checked
by your dealer as soon as possible.
If you have a flat tire, the low tire
pressu re and tire monitor indicators
will come on. Replace the indicated
flat tire with the compact spare tire
(see page ). Each wheel is equipped with a tire
pressure sensor mounted inside the
tire behind the valve stem. You must
use TPMS specif ic wheels. It is
recommended that you always have
your tires serviced by your dealer or
qualif ied technician.
Af ter you replace the f lat tire, the
low tire pressure indicator stays on.
This is normal; the system is not
monitoring the spare tire pressure.
Manually check the spare tire
pressure to be sure it is correct.
Never use a puncture-repairing agent
in a f lat tire. If used, you will have to
replace the tire pressure sensor.
Havetheflattirerepairedbyyour
dealer as soon as possible.
266 205
As required by the FCC:
This device complies with Part 15 of theFCC rules. Operation is subject to thef ollowing two conditions: (1) This devicemay not cause harmf ul interf erence, and(2) this device must accept anyinterf erence received, includinginterf erence that may cause undesiredoperation.
Changes or modif ications not expresslyapproved by the party responsible f orcompliance could void the user’sauthority to operate the equipment.
This device complies with IndustryCanada Standard RSS-210.Operation is subject to the f ollowing twoconditions: (1) this device may not causeinterf erence, and (2) this device mustaccept any interf erence that may causeundesired operation of the device.
Tire Pressure Monitoring System (TPMS)
Tire Pressure Monitor
Low Tire
Pressure Indicator
Changing a T ire with T PMS Tire Pressure Monitoring
System (T PMS) Indicator
206
Page 215 of 319

VSA is turned on every time you
start the engine, even if you turn ed it
off the last time you drove the
vehicle.
Driving with varying tire or wheel
sizes may cause the VSA to
malfunction. When replacing tires,
make sure they are of the same size
and type as your original tires (see
page ).
Deactivate the VSA system if you
need to drive with the compact spare
tire installed (see page ).
If you install winter tires, make sure
they are the same size as those that
were originally supplied with your
vehicle. Exercise the same caution
during winter driving as you would if
your vehicle was not equipped with
VSA.
In certain unusual conditions when
your vehicle gets stuck in shallow
mud or f resh snow, it may be easier
to free it with the VSA temporarily
switched of f . When the VSA system
is of f , the traction control system is
alsooff.Youshouldonlyattemptto
f ree your vehicle with the VSA of f if
you are not able to f ree it when the
VSA is on.
Immediately af ter f reeing your
vehicle, be sure to switch the VSA on
again. We do not recommend driving
your vehicle with the VSA and
traction control systems switched off.
When VSA is off, the VSA activation
indicator comes on as a reminder. This switch is under the lef t vent.
Press it to turn the vehicle stability
assist system on and of f . 258
266
VSA and Tire Sizes
VSA Of f Switch
Vehicle Stability Assist (VSA) System
212
Page 221 of 319

Honda requires that any trailer with
a total trailer weight of 1,000 lbs (455
kg) or more has its own brakes.
There are two common types of
trailer brakes: surge and electric.
Surge brakes are common for boat
trailers, since the brakes will get wet.
If you choose electric brakes, be
sure they are electronica lly actuated.
Do not attempt to tap into your
vehicle’s hydraulic system. No
matter how successful it may seem,
any attempt to attach trailer brakes
to your vehicles hydraulic system
will lower braking effectiven ess and
create a potential hazard. Always
use safety chains when you
tow a trailer. Make sure the chains
are secured to the trailer and hitch,
and that they cross under the tongue
and can catch the trailer if it
becomes unhitched. Leave enough
sl ack to allow the trailer to turn
co rners easily, but do not let the
ch ains drag on the ground.
This device is recommended if your
trailer tends to sway. Your trailer
maker can tell you what kind of sway
control you need and how to install it.
Many states and provinces require
special exterior mirrors when towing
a trailer. Even if they don’t, you
should install special mirrors if you
cannot clearly see behind you, or if
the trailer creates a blind spot. When
towing a trailer, we
recommend that you carry a full-size
spare wheel and tire for your vehicle
and trailer. See page for proper
tire size, page for how to store a
full size wheel and tire, and page f or inf ormation on changing a
flat tire.
Remember to unhitch the trailer
bef ore changing a f lat. Ask your
trailer sales or rental agency where
and how to store the trailer’s spare
tire.
Seeyourtrailerdealerorrental
agency f or more inf ormation on
installing electric brakes. 267
258
270
Towing a Trailer
Trailer Brakes Saf ety Chains
Sway Cont rolTrailer Mirrors Spare Tires
218
Page 269 of 319

Use the compact spare tire as a
temporary replacement only. Get
your regular tire repaired or replaced,
and put it back on your vehicle as
soon as you can.
Check the inf lation pressure of the
compact spare tire every time you
check the other tires. It should be
inf lated to:Replace the tire when you can see
the tread wear indicator bars. The
replacement should be the same size
and design tire, mounted on the
same wheel. The spare tire is not
designed to be mounted on a regular
wheel, and the spare wheel is not
designed f or mounting a regular tire.
Follow these precautions:
Never exceed 50 mph (80 km/h).
This tire gives a harsher ride and
less traction on some road
surf aces. Use greater caution
while driving.
Do not mount snow chains on the
compact spare tire.
Do not use your compact spare
tire on another vehicle unless it is
thesamemakeandmodel. Do not use the compact spare tire
if you are towing a trailer.
Compact Spare Tire
266
INDICATOR LOCATION MARK
TREAD WEAR INDICATOR BAR
60 psi (420 kPa , 4.2 kgf/cm)
Page 271 of 319

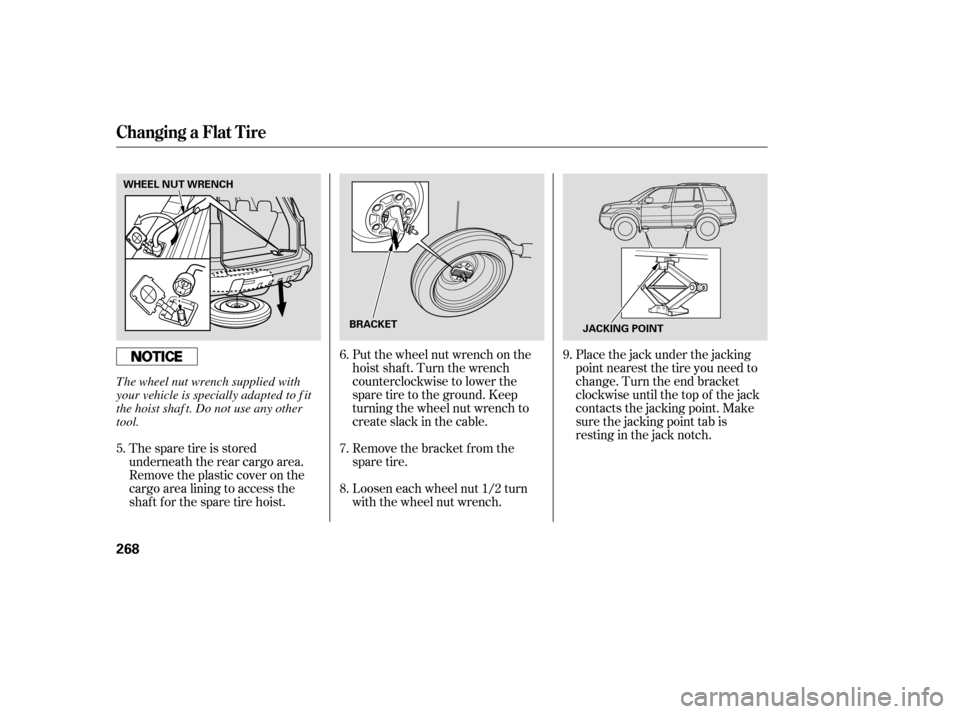
Put the wheel nut wrench on the
hoist shaf t. Turn the wrench
counterclockwise to lower the
spare tire to the ground. Keep
turning the wheel nut wrench to
create slack in the cable.
Remove the bracket from the
spare tire.
The spare tire is stored
underneath the rear cargo area.
Remove the plastic cover on the
cargo area lining to access the
shaft for the spare tire hoist. Loosen each wheel nut 1/2 turn
with the wheel nut wrench.Placethejackunderthejacking
point nearest the tire you need to
change. Turn the end bracket
clockwise until the top of the jack
contacts the jacking point. Make
sure the jacking point tab is
restinginthejacknotch.
8. 7. 6.
5. 9.
Changing a Flat Tire
268
BRACKET
JACKING POINT
WHEEL NUT WRENCH
The wheel nut wrench supplied with
your vehicle is specially adapted to f it
the hoist shaf t. Do not use any other
tool.
Page 272 of 319

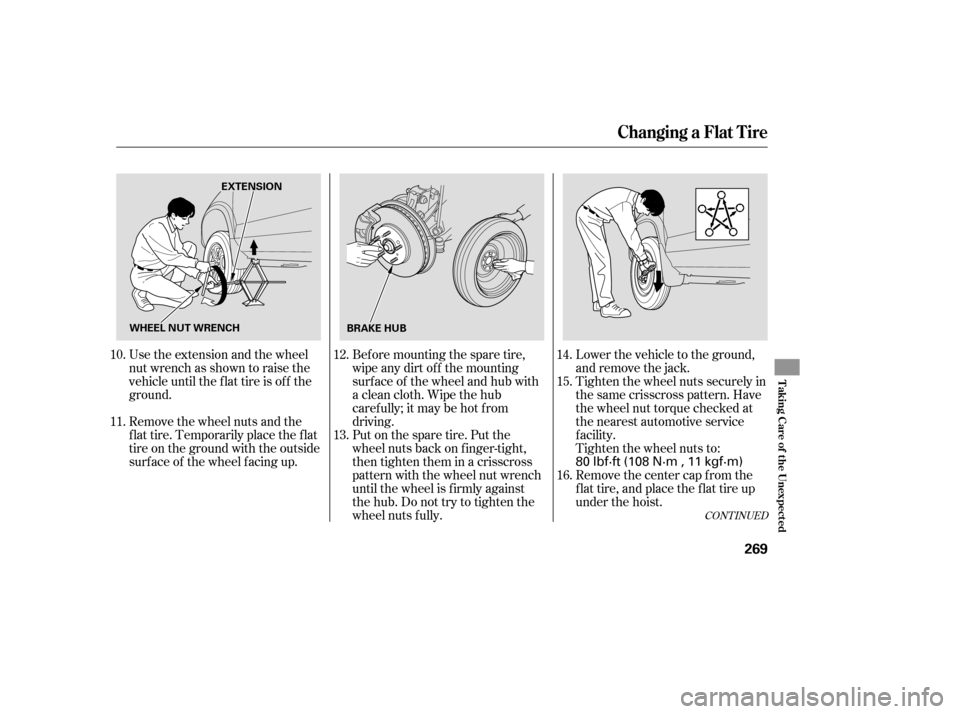
Use the extension and the wheel
nut wrench as shown to raise the
vehicle until the f lat tire is of f the
ground.Bef ore mounting the spare tire,
wipeanydirtoff themounting
surface of the wheel and hub with
a clean cloth. Wipe the hub
carefully;itmaybehotfrom
driving.
Put on the spare tire. Put the
wheel nuts back on f inger-tight,
then tighten them in a crisscross
pattern with the wheel nut wrench
until the wheel is f irmly against
the hub. Do not try to tighten the
wheel nuts f ully.Tighten the wheel nuts securely in
the same crisscross pattern. Have
the wheel nut torque checked at
the nearest automotive service
f acility.
Tighten the wheel nuts to:
Remove the center cap from the
flat tire, and place the flat tire up
under the hoist.
Remove the wheel nuts and the
flat tire. Temporarily place the flat
tire on the ground with the outside
surf ace of the wheel f acing up. Lower the vehicle to the ground,
and remove the jack.
10.
11. 12.
13.14.
15.
16.
CONT INUED
Changing a Flat Tire
T aking Care of t he Unexpect ed
269
EXTENSION
BRAKE HUB
WHEEL NUT WRENCH
80 lbf·ft (108 N·m , 11 kgf·m)
Page 273 of 319

Insert the hoist bracket into the
center hole of the f lat tire.
Slowly turn the wheel nut wrench
clockwisetotakeuptheslackof
the hoist cable. Make sure the
bracketisseatedinthecenter
hole of the f lat tire.Turn the wheel nut wrench
clockwise until the f lat tire rests
against the underbody of the
vehicle and you hear the hoist
click.
Store the jack in its holder. Turn
the jack’s end bracket to lock it in
place. Replace the cover. Store the
tools.
17.
18. 19.
20.
Changing a Flat Tire
270
Loose items can fly around the
interiorinacrashandcould
seriously injure the occupants.
Store the wheel, jack, and tools
securely before driving.
Always raise the spare tire hoist, even
if you are not stowing a tire. If the
hoist is lef t down, it will be damaged
during driving and need to be replaced.
Page 316 of 319

CONT INUED
...............................
Signaling Turns .75
.....................................
Snow Tires .261
................................
Sound System .115
Spare Tire
......................................
Inf lating .266
............................
Specif ications .289
....................
Specif ications Charts .288
................................
Speed Control .175
..........
SRS, Additional Inf ormation .25
...
Additional Safety Precautions .37
.............................
Airbag Service .36
How the Side Airbag Of f
........................
Indicator Work .34
..
How the SRS Indicator Works .33
How Your Front Airbags
.........................................
Work .28
...
How Your Side Airbags Work .31
........................
SRS Components .25
.............................
SRS Indicator . 33, 63
....
START (Ignition Key Position) .81
.......................
Starting the Engine .199
In Cold Weather at High ..................................
Altitude .199
................
With a Dead Battery .272
..............
State Emissions Testing .298
........
Steam Coming f rom Engine .274 Steering Wheel
..................................
Adjustment .78
.............
Anti-theft Column Lock .81
...............................
Buttons . 138, 175
...................
Stereo Sound System .115
....................
Storing Your Vehicle .263
........................
Sunglasses Holder .100
........................................
Sun Visor .101
Supplemental Restraint System
......................................
Servicing .36
.........................
SRS Indicator .33,63
...................
System Components .25
..................................
Synthetic Oil .240
......
Taillights, Changing Bulbs in .252
.
Taking Care of the Unexpected .265
Technical Descriptions
......
DOT Tire Quality Grading .290
.....
Emissions Control Systems .295
..........
State Emissions Testing .298
Three Way Catalytic
...............................
Converter .297
.......................
Temperature Gauge .71
........
Temperature, Inside Sensor .114 ....................
Temperature, Outside .71
...................
Tensioners, Seat Belts .23
........
Testing of Readiness Codes .298
..............
Tether Anchorage Points .51
............................
Thef t Protection .139
..
Three Way Catalytic Converter .297
..........................
Time, Setting the .140
..................
Tilt the Steering Wheel .78
....................................
Timing Belt .245
....................................
Tire Chains .261
.........
Tire, How to Change a Flat .267
Tire Pressure Monitoring
........................
System (TPMS) .205
Index
INDEX
T
VII