2007 CHEVROLET MALIBU MAXX oil dipstick
[x] Cancel search: oil dipstickPage 305 of 510
A cornering skid and an acceleration skid are best
handled by easing your foot off the accelerator
pedal.
If your vehicle starts to slide, ease your foot off
the accelerator pedal and quickly steer the way
you want the vehicle to go. If you start steering
quickly enough, your vehicle may straighten out.
Always be ready for a second skid if it occurs.
Of course, traction is reduced when water, snow,
ice, gravel, or other material is on the road.
For safety, you will want to slow down and adjust
your driving to these conditions. It is important
to slow down on slippery surfaces because
stopping distance will be longer and vehicle
control more limited.
While driving on a surface with reduced traction,
try your best to avoid sudden steering, acceleration,
or braking, including reducing vehicle speed by
shifting to a lower gear. Any sudden changes could
cause the tires to slide. You may not realize the
surface is slippery until your vehicle is skidding.
Learn to recognize warning clues — such as
enough water, ice, or packed snow on the road to
make a mirrored surface — and slow down when
you have any doubt.If you have the Anti-Lock Brake System (ABS),
remember: It helps avoid only the braking skid.
If you do not have ABS, then in a braking
skid, where the wheels are no longer rolling,
release enough pressure on the brakes to get
the wheels rolling again. This restores steering
control. Push the brake pedal down steadily
when you have to stop suddenly. As long as the
wheels are rolling, you will have steering control.
Competitive Driving
See your warranty book before using your vehicle
for competitive driving. After reviewing your
warranty book, please see the GM Performance
Parts website or catalog for parts and equipment
required for competitive driving.
Notice:If you use your vehicle for competitive
driving, the engine may use more oil than it
would with normal use. Low oil levels can
damage the engine. Be sure to check the oil
level often during competitive driving and
keep the level at or near the upper mark that
shows the proper operating range on the
engine oil dipstick. For information on how
to add oil, seeEngine Oil on page 359.
305
Page 355 of 510
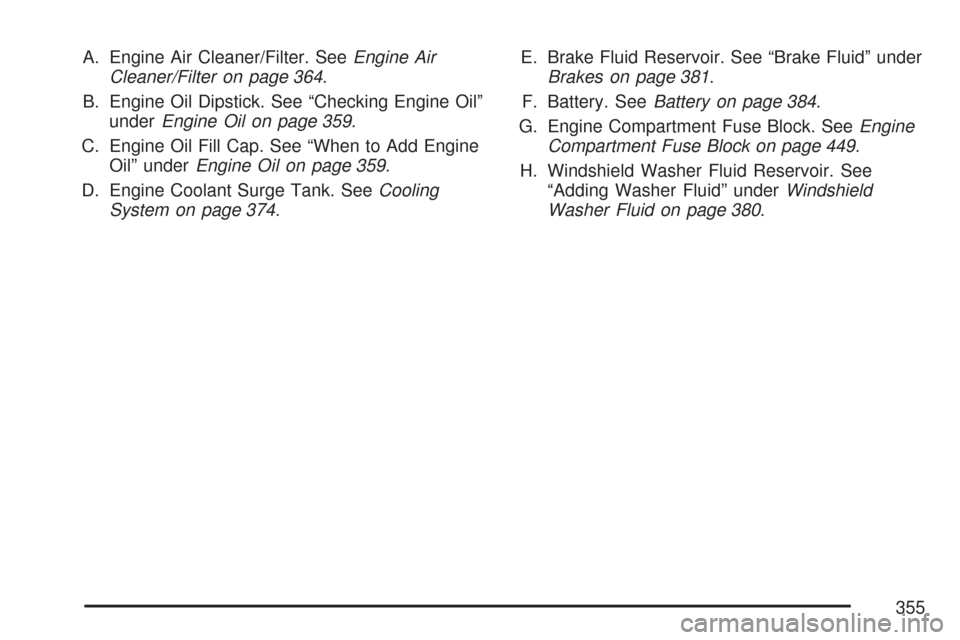
A. Engine Air Cleaner/Filter. SeeEngine Air
Cleaner/Filter on page 364.
B. Engine Oil Dipstick. See “Checking Engine Oil”
underEngine Oil on page 359.
C. Engine Oil Fill Cap. See “When to Add Engine
Oil” underEngine Oil on page 359.
D. Engine Coolant Surge Tank. SeeCooling
System on page 374.E. Brake Fluid Reservoir. See “Brake Fluid” under
Brakes on page 381.
F. Battery. SeeBattery on page 384.
G. Engine Compartment Fuse Block. SeeEngine
Compartment Fuse Block on page 449.
H. Windshield Washer Fluid Reservoir. See
“Adding Washer Fluid” underWindshield
Washer Fluid on page 380.
355
Page 357 of 510
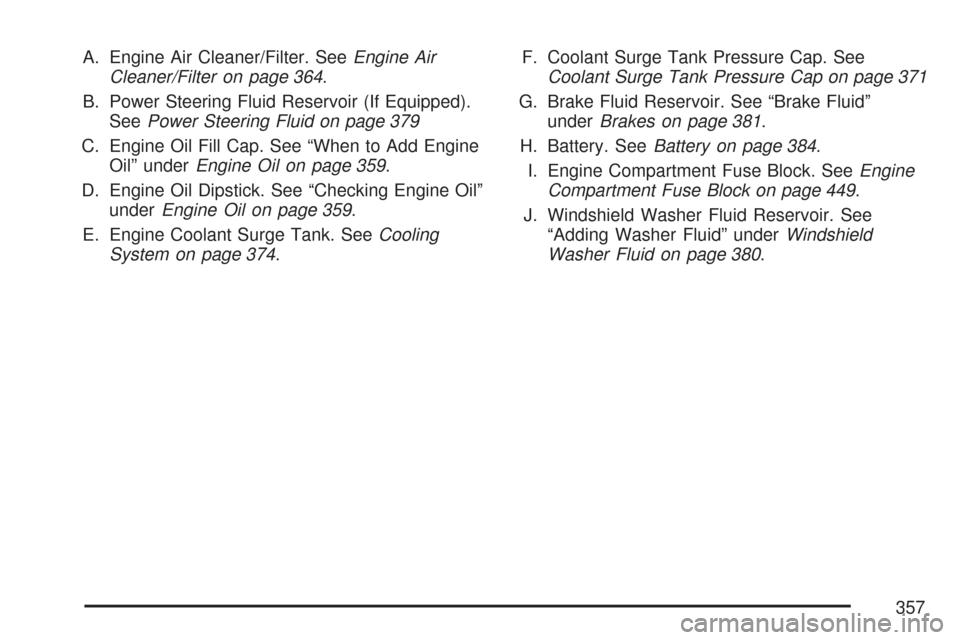
A. Engine Air Cleaner/Filter. SeeEngine Air
Cleaner/Filter on page 364.
B. Power Steering Fluid Reservoir (If Equipped).
SeePower Steering Fluid on page 379
C. Engine Oil Fill Cap. See “When to Add Engine
Oil” underEngine Oil on page 359.
D. Engine Oil Dipstick. See “Checking Engine Oil”
underEngine Oil on page 359.
E. Engine Coolant Surge Tank. SeeCooling
System on page 374.F. Coolant Surge Tank Pressure Cap. See
Coolant Surge Tank Pressure Cap on page 371
G. Brake Fluid Reservoir. See “Brake Fluid”
underBrakes on page 381.
H. Battery. SeeBattery on page 384.
I. Engine Compartment Fuse Block. SeeEngine
Compartment Fuse Block on page 449.
J. Windshield Washer Fluid Reservoir. See
“Adding Washer Fluid” underWindshield
Washer Fluid on page 380.
357
Page 359 of 510
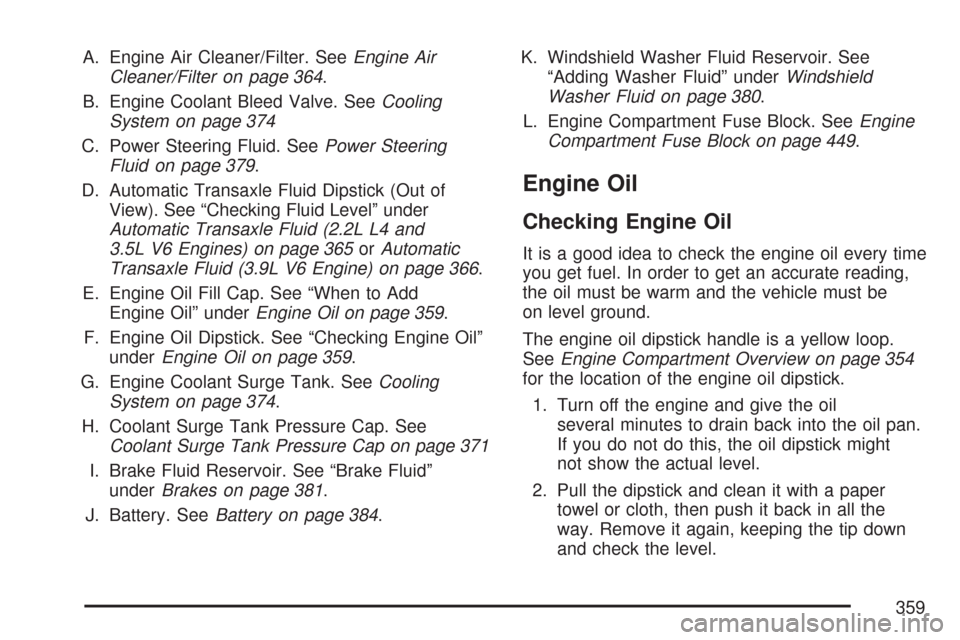
A. Engine Air Cleaner/Filter. SeeEngine Air
Cleaner/Filter on page 364.
B. Engine Coolant Bleed Valve. SeeCooling
System on page 374
C. Power Steering Fluid. SeePower Steering
Fluid on page 379.
D. Automatic Transaxle Fluid Dipstick (Out of
View). See “Checking Fluid Level” under
Automatic Transaxle Fluid (2.2L L4 and
3.5L V6 Engines) on page 365orAutomatic
Transaxle Fluid (3.9L V6 Engine) on page 366.
E. Engine Oil Fill Cap. See “When to Add
Engine Oil” underEngine Oil on page 359.
F. Engine Oil Dipstick. See “Checking Engine Oil”
underEngine Oil on page 359.
G. Engine Coolant Surge Tank. SeeCooling
System on page 374.
H. Coolant Surge Tank Pressure Cap. See
Coolant Surge Tank Pressure Cap on page 371
I. Brake Fluid Reservoir. See “Brake Fluid”
underBrakes on page 381.
J. Battery. SeeBattery on page 384.K. Windshield Washer Fluid Reservoir. See
“Adding Washer Fluid” underWindshield
Washer Fluid on page 380.
L. Engine Compartment Fuse Block. SeeEngine
Compartment Fuse Block on page 449.
Engine Oil
Checking Engine Oil
It is a good idea to check the engine oil every time
you get fuel. In order to get an accurate reading,
the oil must be warm and the vehicle must be
on level ground.
The engine oil dipstick handle is a yellow loop.
SeeEngine Compartment Overview on page 354
for the location of the engine oil dipstick.
1. Turn off the engine and give the oil
several minutes to drain back into the oil pan.
If you do not do this, the oil dipstick might
not show the actual level.
2. Pull the dipstick and clean it with a paper
towel or cloth, then push it back in all the
way. Remove it again, keeping the tip down
and check the level.
359
Page 360 of 510
When to Add Engine Oil
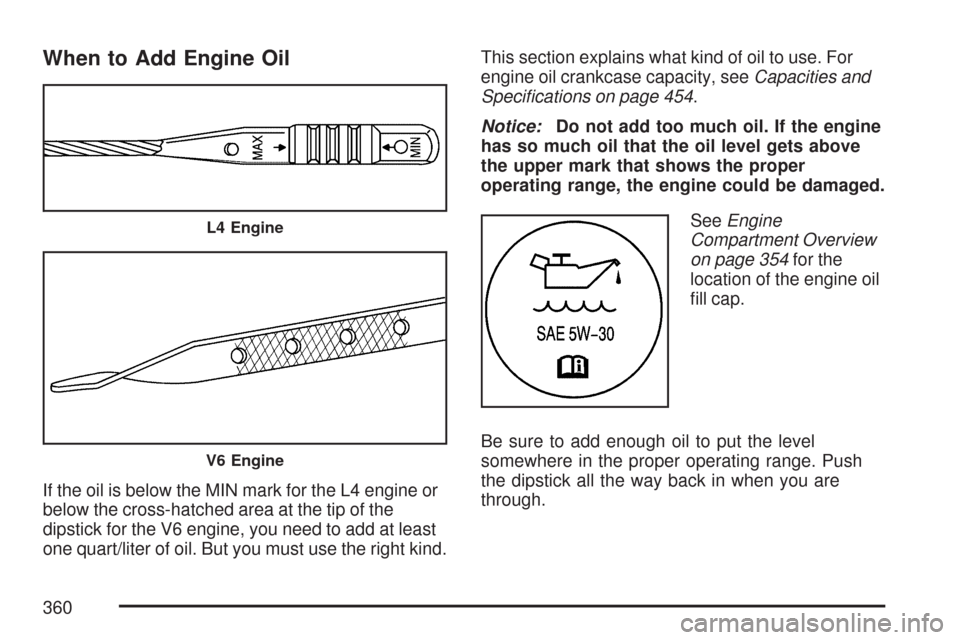
If the oil is below the MIN mark for the L4 engine or
below the cross-hatched area at the tip of the
dipstick for the V6 engine, you need to add at least
one quart/liter of oil. But you must use the right kind.This section explains what kind of oil to use. For
engine oil crankcase capacity, seeCapacities and
Speci�cations on page 454.
Notice:Do not add too much oil. If the engine
has so much oil that the oil level gets above
the upper mark that shows the proper
operating range, the engine could be damaged.
SeeEngine
Compartment Overview
on page 354for the
location of the engine oil
�ll cap.
Be sure to add enough oil to put the level
somewhere in the proper operating range. Push
the dipstick all the way back in when you are
through.
L4 Engine
V6 Engine
360
Page 366 of 510
Automatic Transaxle Fluid
(3.9L V6 Engine)
When to Check and Change Automatic
Transaxle Fluid
A good time to check the automatic transaxle �uid
level is when the engine oil is changed.
Change the �uid and �lter at the intervals listed in
Additional Required Services on page 462, and
be sure to use the transaxle �uid listed in
Recommended Fluids and Lubricants on page 468.
How to Check Automatic Transaxle
Fluid
Because this operation can be a little difficult, you
may choose to have this done at the dealership
service department.
If you do it yourself, be sure to follow all the
instructions here, or you could get a false reading
on the dipstick.Notice:Too much or too little �uid can damage
the transaxle. Too much can mean that some of
the �uid could come out and fall on hot engine
or exhaust system parts, starting a �re. Too
little �uid could cause the transaxle to overheat.
Be sure to get an accurate reading if you check
the transaxle �uid.
Wait at least 30 minutes before checking the
transaxle �uid level if you have been driving:
When outside temperatures are above
90°F (32°C).
At high speed for quite a while.
In heavy traffic — especially in hot weather.
While pulling a trailer.
To get the right reading, the �uid should be at
normal operating temperature, which is 180°F to
200°F (82°C to 93°C).
Get the vehicle warmed up by driving about
15 miles (24 km) when outside temperatures are
above 50°F (10°C). If it is colder than 50°F (10°C),
you may have to drive longer.
366
Page 368 of 510
How to Add Automatic Transaxle Fluid
Refer to the Maintenance Schedule to determine
what kind of transaxle �uid to use. See
Recommended Fluids and Lubricants on page 468.
If the �uid level is low, add only enough of the
proper �uid to bring the level into the crosshatched
area on the dipstick.
1. Pull out the dipstick.
2. Using a long-neck funnel, add enough �uid at
the dipstick hole to bring it to the proper level.
It does not take much �uid, generally less
than one pint (0.5 L). Do not over�ll.
Notice:Use of the incorrect automatic
transaxle �uid may damage your vehicle, and
the damages may not be covered by your
warranty. Always use the automatic transaxle
�uid listed inRecommended Fluids and
Lubricants on page 468.
3. After adding �uid, recheck the �uid level as
described under “How to Check Automatic
Transaxle Fluid,” earlier in this section.
4. When the correct �uid level is obtained, push
the dipstick back in all the way.
Engine Coolant
The cooling system in your vehicle is �lled with
DEX-COOL®engine coolant. This coolant is
designed to remain in your vehicle for �ve years or
150,000 miles (240 000 km), whichever occurs
�rst, if you add only DEX-COOL
®extended
life coolant.
The following explains the cooling system and
how to add coolant when it is low. If there is
a problem with engine overheating, seeEngine
Overheating on page 371.
A 50/50 mixture of clean, drinkable water and
DEX-COOL
®coolant will:
Give freezing protection down to
−34°F (−37°C).
Give boiling protection up to 265°F (129°C).
Protect against rust and corrosion.
Help keep the proper engine temperature.
Let the warning lights and gages work as they
should.
368