2007 CHEVROLET MALIBU MAXX Set time
[x] Cancel search: Set timePage 61 of 510
{CAUTION:
Children can be seriously injured or
strangled if a shoulder belt is wrapped
around their neck and the safety belt
continues to tighten. Secure any unused
safety belts behind the child restraint so
children cannot reach them. Pull the
shoulder belt all the way out of the
retractor to set the lock, if your vehicle
has one, after the child restraint has
been installed. Be sure to follow the
instructions of the child restraint
manufacturer.
Notice:Contact between the child restraint or
the LATCH attachment parts and the vehicle’s
safety belt assembly may cause damage to
these parts. Make sure when securing unused
safety belts behind the child restraint that
there is no contact between the child restraint
or the LATCH attachment parts and the
vehicle’s safety belt assembly.Folding an empty rear seat with the safety
belts secured may cause damage to the safety
belt or the seat. When removing the child
restraint, always remember to return the safety
belts to their normal, stowed position before
folding the rear seat.
If you need to secure more than one child restraint
in the rear seat, seeWhere to Put the Restraint
on page 54. Depending on where you place
the child restraint, you may not be able to
access certain safety belt assemblies or LATCH
anchors for additional passengers or child
restraints.
You cannot secure three child restraints using
the LATCH anchors in the rear seat at the same
time, but you can install two of them. If you want
to do this, install one LATCH child restraint in
the passenger-side position, and install the
other one either in the driver’s-side position or
in the center position. Refer to the following
illustration to learn which anchors to use.
61
Page 101 of 510
Remote Vehicle Start
Your vehicle may have a remote start feature.
This feature allows you to start the engine
from outside the vehicle. It may also start the
vehicle’s heating or air conditioning systems and
rear window defogger. When the remote start
system is active and the vehicle has an automatic
climate control system, it may automatically
regulate the inside temperature. Normal operation
of the system will return after the key is turned
to ON. SeeAutomatic Climate Control System on
page 192for additional information.
Laws in some communities may restrict the use of
remote starters. For example, some laws may
require a person using remote start to have
the vehicle in view when doing so. Check local
regulations for any requirements on remote starting
of vehicles.
Do not use the remote start feature if your vehicle
is low on fuel. Your vehicle may run out of fuel.The remote start feature provides two separate
starts, each with 10 minutes of engine running time.
The remote vehicle start feature needs to be reset
after your vehicle’s engine is started two times
using the transmitter’s remote start button.
The remote start system is reset by inserting the
vehicle’s key into the ignition switch and turning it
to ON. SeeIgnition Positions on page 118for
information regarding the ignition positions on
your vehicle.
You can start your vehicle’s engine from about
197 feet (60 m) away. However, the range may be
less while the vehicle is running, and as a result
you may need to be closer to your vehicle to turn it
off than you were to turn it on.
There are other conditions which may affect the
performance of the transmitter, seeRemote
Keyless Entry (RKE) System on page 96.
101
Page 139 of 510
Automatic Dimming Rearview Mirror
with OnStar
®and Compass
Your vehicle may have an automatic dimming
rearview mirror with a compass and OnStar®
controls. For more information about OnStar®,
seeOnStar®System on page 144.
The automatic dimming feature turns on each time
the vehicle is started. To turn automatic dimming
off or on, press the left button below the mirror.
A green indicator light will be on when automatic
dimming is on.
There are also three OnStar
®buttons located at
the bottom of the mirror. See your dealer/retailer
for more information on the system and how
to subscribe to OnStar
®. SeeOnStar®System
on page 144for more information about the
service OnStar
®provides.
Compass Operation
Press the on/off button once to turn the compass
on or off.
When the ignition and the compass feature are
on, the compass will show two character boxes for
a few seconds. After a few seconds, the mirror
will display the current compass direction.
Compass Calibration
If after a few seconds the display does not show
a compass direction, (N for North for example),
there may be a strong magnetic �eld interfering
with the compass. Such interference may be
caused by a magnetic antenna mount, note pad
holder, or similar object. If the letter C appears
in the compass window, the compass may need
to be reset or calibrated.
The mirror can be calibrated by driving the vehicle
in circles at 5 mph (8 km/h) or less until the
display reads a direction.
139
Page 141 of 510
Automatic Dimming Rearview Mirror
with Compass
Your vehicle may have an automatic dimming
rearview mirror with a compass. This feature
enables the mirror to sense nighttime glare
from vehicle headlamps from behind and
automatically dim to reduce the glare to a
safe level. The automatic dimming feature
turns on each time the vehicle is started.
O(On/Off):This is the on/off button for the
automatic dimming feature.
Automatic Dimming Mirror Operation
The automatic dimming mirror function is turned
on automatically each time the ignition is started.
To operate the automatic dimming mirror, do
the following:
1. Make sure the green indicator light, located
to the left of the on/off button, is on. If it’s
not, press the on/off button until the green
light comes on, indicating that the mirror is
in automatic dimming mode.2. Turn off the automatic dimming mirror function
by pressing the on/off button until the green
indicator light turns off.
Compass Operation
Y
:This is the on/off button for the compass
feature.
Press this button once to turn the compass on
or off.
When the ignition and the compass feature are
on, the compass will show two character boxes
for a few seconds. After a few seconds, the mirror
will display the current compass direction.
Compass Calibration
If after a few seconds the display does not show
a compass direction, (N for North for example),
there may be a strong magnetic �eld interfering
with the compass. Such interference may be
caused by a magnetic antenna mount, note pad
holder, or similar object. If the letter C or CAL
appears in the compass window, the compass
may need to be reset or calibrated.
141
Page 158 of 510
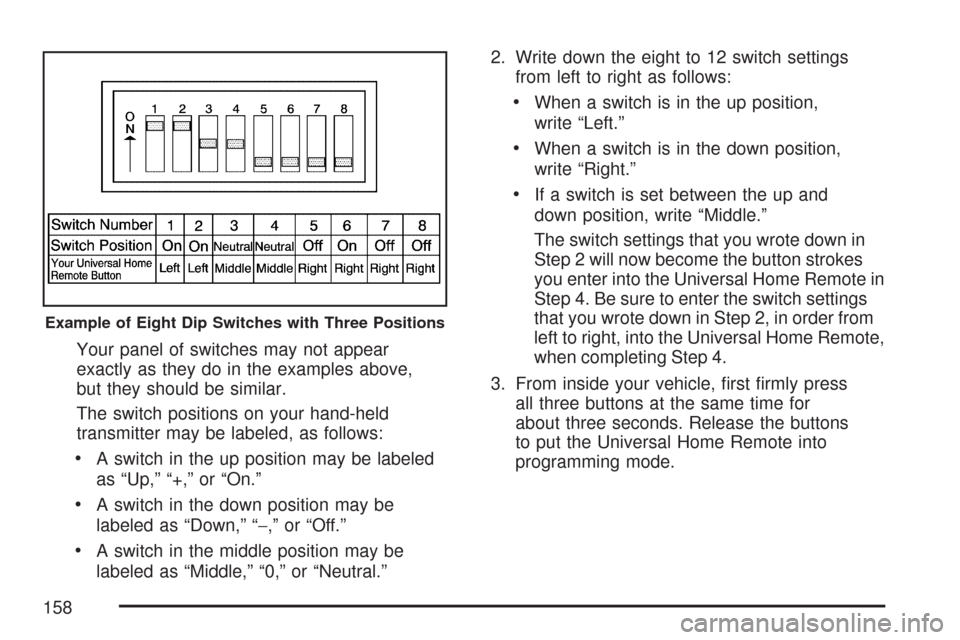
Your panel of switches may not appear
exactly as they do in the examples above,
but they should be similar.
The switch positions on your hand-held
transmitter may be labeled, as follows:
A switch in the up position may be labeled
as “Up,” “+,” or “On.”
A switch in the down position may be
labeled as “Down,” “−,” or “Off.”
A switch in the middle position may be
labeled as “Middle,” “0,” or “Neutral.”2. Write down the eight to 12 switch settings
from left to right as follows:
When a switch is in the up position,
write “Left.”
When a switch is in the down position,
write “Right.”
If a switch is set between the up and
down position, write “Middle.”
The switch settings that you wrote down in
Step 2 will now become the button strokes
you enter into the Universal Home Remote in
Step 4. Be sure to enter the switch settings
that you wrote down in Step 2, in order from
left to right, into the Universal Home Remote,
when completing Step 4.
3. From inside your vehicle, �rst �rmly press
all three buttons at the same time for
about three seconds. Release the buttons
to put the Universal Home Remote into
programming mode.
Example of Eight Dip Switches with Three Positions
158
Page 159 of 510
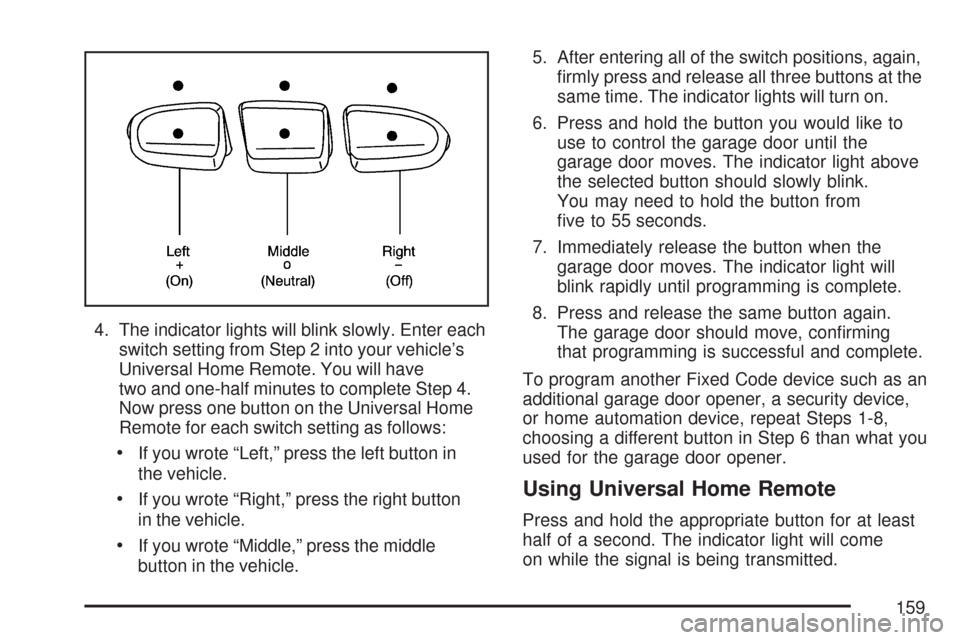
4. The indicator lights will blink slowly. Enter each
switch setting from Step 2 into your vehicle’s
Universal Home Remote. You will have
two and one-half minutes to complete Step 4.
Now press one button on the Universal Home
Remote for each switch setting as follows:
If you wrote “Left,” press the left button in
the vehicle.
If you wrote “Right,” press the right button
in the vehicle.
If you wrote “Middle,” press the middle
button in the vehicle.5. After entering all of the switch positions, again,
�rmly press and release all three buttons at the
same time. The indicator lights will turn on.
6. Press and hold the button you would like to
use to control the garage door until the
garage door moves. The indicator light above
the selected button should slowly blink.
You may need to hold the button from
�ve to 55 seconds.
7. Immediately release the button when the
garage door moves. The indicator light will
blink rapidly until programming is complete.
8. Press and release the same button again.
The garage door should move, con�rming
that programming is successful and complete.
To program another Fixed Code device such as an
additional garage door opener, a security device,
or home automation device, repeat Steps 1-8,
choosing a different button in Step 6 than what you
used for the garage door opener.
Using Universal Home Remote
Press and hold the appropriate button for at least
half of a second. The indicator light will come
on while the signal is being transmitted.
159
Page 166 of 510
Traction Control System (TCS)
Warning Light........................................ 209
Traction Control System Active Light......... 209
Enhanced Traction System Warning Light.... 210
Enhanced Traction System Active Light....... 210
Engine Coolant Temperature
Warning Light........................................ 211
Engine Coolant Temperature Gage............ 211
Malfunction Indicator Lamp........................ 212
Oil Pressure Light..................................... 215
Security Light............................................ 216
Cruise Control Light.................................. 216
Highbeam On Light................................... 216
Fuel Gage................................................. 217
Driver Information Center (DIC).................. 218
DIC Operation and Displays...................... 218
DIC Warnings and Messages.................... 222
DIC Vehicle Personalization....................... 225
Audio System(s)......................................... 228
Setting the Time for Radios without
Radio Data Systems (RDS).................... 229
Setting the Time for Radios with
Radio Data Systems (RDS).................... 230Radio with CD (Base Level)...................... 230
Radio with CD (Uplevel)............................ 236
Radio with Six-Disc CD............................. 246
XM Radio Messages................................. 259
Rear Seat Entertainment System............... 261
Rear Seat Audio (RSA)
(Without Entertainment System)............. 278
Rear Seat Audio (RSA)
(With Entertainment System).................. 280
Theft-Deterrent Feature............................. 281
Audio Steering Wheel Controls
(Three Spoke)........................................ 282
Audio Steering Wheel Controls
(Four Spoke).......................................... 283
Radio Reception........................................ 284
Care of Your CDs and DVDs.................... 285
Care of the CD and DVD Player............... 285
Fixed Mast Antenna (MAXX Only)............. 285
Backglass Antenna (Sedan Only).............. 286
XM™ Satellite Radio Antenna System....... 286
Section 3 Instrument Panel
166
Page 174 of 510
6(Delay/Intermittent Speed Sensitive):When the
lever is in the delay position, move the intermittent
adjust band to set for shorter or longer delay cycles.
To the left of the adjust band are bars that indicate
the frequency of the wipes. Smaller bars mean the
wiper movement is less frequent. Larger bars mean
the wiper movement is more frequent.
During intermittent wiping mode, the delay cycle
time is sensitive to vehicle speed. As the vehicle
speed increases your delay cycle time will decrease
and wiper movement will occur more frequently.
9(Off):Move the lever to this position to turn off
the windshield wipers.
8(Mist):Move the lever all the way down to
mist and release for a single wiping cycle. The
windshield wipers will stop after one wipe and the
lever will return to its original position. If additional
wipes are needed, hold the band on mist longer.
As an added safety feature, if the wipers are on for
more than 15 seconds, the vehicle’s headlamps will
turn on automatically. They will turn off 15 seconds
after the wipers are turned off.
Windshield Washer
To wash your windshield, push in the button at the
end of the stalk until the washers begin.
{CAUTION:
In freezing weather, do not use your
washer until the windshield is warmed.
Otherwise the washer �uid can form ice
on the windshield, blocking your vision.
When you release the button, the washers will
stop, but the wipers will continue to wipe for about
three cycles and will either stop or will resume
the speed you were using before.
174