Page 4 of 166

Table of ContentsYou can also consult the index at
the end of this Rider's Manual if
you want to find a particular topic
or item of information.
1 General instructions . . . . . 5
Overview . . . . . . . . . . . . . . . . . . . . . . 6
Abbreviations and symbols . . . . 6
Equipment . . . . . . . . . . . . . . . . . . . . 7
Technical data . . . . . . . . . . . . . . . . 7
Currency . . . . . . . . . . . . . . . . . . . . . . 7
2 General views . . . . . . . . . . . . . 9
General view, left side . . . . . . . . 11
General view, right side . . . . . . 13
Underneath the seat . . . . . . . . . 14
Handlebar fitting, left . . . . . . . . . 15
Handlebar fitting, right . . . . . . . . 16
Instrument cluster . . . . . . . . . . . . 17
Headlight . . . . . . . . . . . . . . . . . . . . . 183 Status indicators . . . . . . . 19
Standard status
indicators . . . . . . . . . . . . . . . . . . . . . 20
Status indicators with on-
board computer
OE
........... 21
Status indicators with
tyre-pressure monitoring
(RDC)
OE...................... 22
Standard warnings . . . . . . . . . . . 22
Warnings issued by the on-
board computer
OE
........... 27
ABS warnings . . . . . . . . . . . . . . . . 29
ASC warnings
OE
............. 31
RDC warnings
OE
............. 33
Anti-theft alarm
warnings
OE................... 38
4 Operation . . . . . . . . . . . . . . . . 41
Ignition switch and steering
lock . . . . . . . . . . . . . . . . . . . . . . . . . . 42
Electronic immobiliser . . . . . . . . 43
Clock . . . . . . . . . . . . . . . . . . . . . . . . . 44
Odometer and tripmeters . . . . 45
On-board computer
OE
....... 47 Tyre pressure monitoring
RDC
OE
....................... 51
Lights . . . . . . . . . . . . . . . . . . . . . . . . 52
Turn indicators . . . . . . . . . . . . . . . 53
Hazard warning flashers . . . . . . 53
Emergency off switch (kill
switch) . . . . . . . . . . . . . . . . . . . . . . . 54
Grip heating
OE
............... 55
Automatic Stability Control
ASC
OE
....................... 55
Clutch . . . . . . . . . . . . . . . . . . . . . . . . 56
Brakes . . . . . . . . . . . . . . . . . . . . . . . 57
Mirrors . . . . . . . . . . . . . . . . . . . . . . . 58
Spring preload . . . . . . . . . . . . . . . 58
Damping . . . . . . . . . . . . . . . . . . . . . 59
Electronic Suspension Ad-
justment ESA
OE
............. 59
Tyres . . . . . . . . . . . . . . . . . . . . . . . . . 62
Headlight . . . . . . . . . . . . . . . . . . . . . 62
Seat . . . . . . . . . . . . . . . . . . . . . . . . . . 63
Helmet holder . . . . . . . . . . . . . . . . 65
Luggage loops . . . . . . . . . . . . . . . 66
Page 19 of 166
Instrument cluster1Rev. counter
2 Speedometer
3 Telltale lights ( 20)
4 Multifunction display
( 20)
5 Telltale light, anti-theft alarm
(OE) and sensor for instru-
ment lighting
6 Select readings ( 45)
Reset the tripmeter ( 46)
Set the clock ( 44)
The instrument-cluster
lighting has automatic day
and night switchover.
217zGeneral views
Page 22 of 166
Standard status
indicatorsMultifunction display1Clock ( 44)
2 Gear ( 20)
3 Coolant temperature
( 20)
4 Odometer and tripmeters
( 45)
5 Fuel capacity ( 20)
Telltale lights1Flashing turn indicators, left
2 High-beam headlight
3 Idle
4 Flashing turn indicators,
rightFuel capacity
The horizontal bars below
the fuel-pump symbol in-
dicate the remaining quantity of
fuel.
When the fuel in the tank is
topped up the gauge briefly
shows the original level, before
the reading is updated.
Gear
The gear engaged or
N
for neutral appears on the
display.
If no gear is engaged, the
'neutral' telltale light also
lights up.
Coolant temperature
The horizontal bars below
the temperature symbol
indicate the coolant temperature.
Service-due indicatorIf the next service is due in less
than one month, the date for the
320zStatus indicators
Page 24 of 166
Status indicators
with tyre-pressure
monitoring (RDC)
OE
1 Tyre pressures alternate
with the clock; if the motor-
cycle is fitted with an on-
board computer tyre pres-
sures displayed as an ad-
ditional set of readings by
the on-board computer.
OE
( 51)
Standard warningsMode of presentation
Warnings are indicated by the
'General' warning light 1show-
ing in combination with a warning
word, for example 2or in com-
bination with one of the warning
symbols 3. The 'General' warn-
ing light shows red or yellow, de-
pending on the urgency of the
warning. If two or more warn-
ings occur at the same time, all
the appropriate warning lights
and warning symbols appear, al-
ternating with warning words as
applicable. The possible warnings are listed
on the next page.
322zStatus indicators
Page 43 of 166

Operation
Operation
Ignition switch and steering lock..... 42
Electronic immobiliser . . . ............ 43
Clock ................................ 44
Odometer and tripmeters ............ 45
On-board computer
OE
............... 47
Tyre pressure monitoring
RDC
OE
.............................. 51
Lights ................................ 52
Turn indicators ....................... 53
Hazard warning flashers . . ............ 53
Emergency off switch (kill switch) . . . . 54
Grip heating
OE
....................... 55
Automatic Stability Control
ASC
OE
.............................. 55
Clutch ............................... 56 Brakes . .
............................. 57
Mirrors . . ............................. 58
Spring preload ....................... 58
Damping ............................. 59
Electronic Suspension Adjustment
ESA
OE
............................... 59
Tyres . . . ............................. 62
Headlight ............................ 62
Seat ................................. 63
Helmet holder ....................... 65
Luggage loops ....................... 66
441zOperation
Page 46 of 166

Replacement and extra
keysYou can obtain replacement/extra
keys only through an authorised
BMW Motorrad dealer. The keys
are part of an integrated secur-
ity system, so the dealer is un-
der an obligation to check the
legitimacy of all applications for
replacement/extra keys. If you
want to have a lost key barred,
you have to bring with you all
the other keys that belong to
the motorcycle. A key that has
been barred can subsequently be
cleared and reactivated for use.ClockSetting clock
Attempting to set the clock
while riding the motorcycle
can lead to accidents.
Set the clock only when the mo-
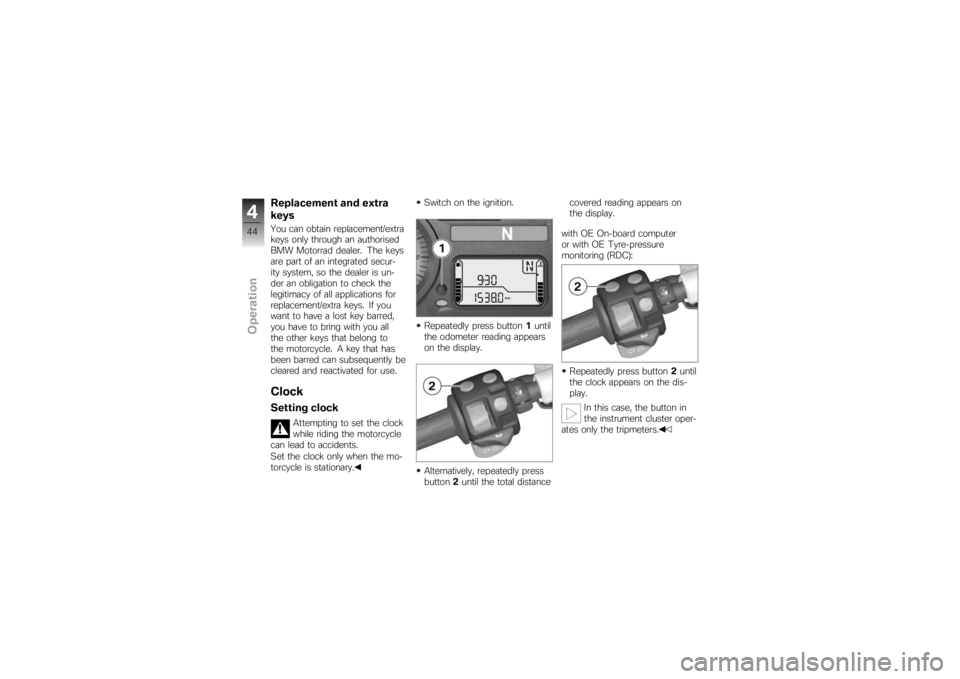
torcycle is stationary. Switch on the ignition.
Repeatedly press button
1until
the odometer reading appears
on the display.
Alternatively, repeatedly press
button 2until the total distance covered reading appears on
the display.
with OE On-board computer
or with OE Tyre-pressure
monitoring (RDC):
Repeatedly press button 2until
the clock appears on the dis-
play.
In this case, the button in
the instrument cluster oper-
ates only the tripmeters.
444zOperation
Page 47 of 166
Hold down the button.
Hours reading3flashes.
Press the button.
The hours reading increments
by one each time you press
the button.
Hold down the button.
Minutes reading 4flashes.
Press the button.
The minutes reading incre-
ments by one each time you
press the button.
Either press and hold down the
button or wait without pressing
a button. The clock is now set and the
time appears on the display.
Odometer and
tripmetersSelecting readingsSwitch on the ignition.
Press button
1. If you prefer, you can use but-
ton
2for this purpose.
The display starts with the cur-
rent value and each time the but-
ton is pressed it moves one step
through the following sequence:
445zOperation
Page 53 of 166

The readings mean:OK
: Oil level is correct.
CHECK
: Check the oil level the
next time you stop for fuel.
---
: Oil level cannot be meas-
ured (conditions as stated above
not satisfied).
If you call up another read-
ing on the on-board com-
puter, this symbol remains visible
until the sensor again registers a
correct oil level.
The most recently measured
level is displayed for 5 seconds
when you next switch on the ig-
nition.
The oil sensor might be
defective if the "Check oil
level" message reappears even
though the oil level shown by the
oil tank's level indicator is correct.
In this case, consult your author-
ised BMW Motorrad dealer.
Tyre pressure
monitoring RDC
OE
Viewing tyre-pressure
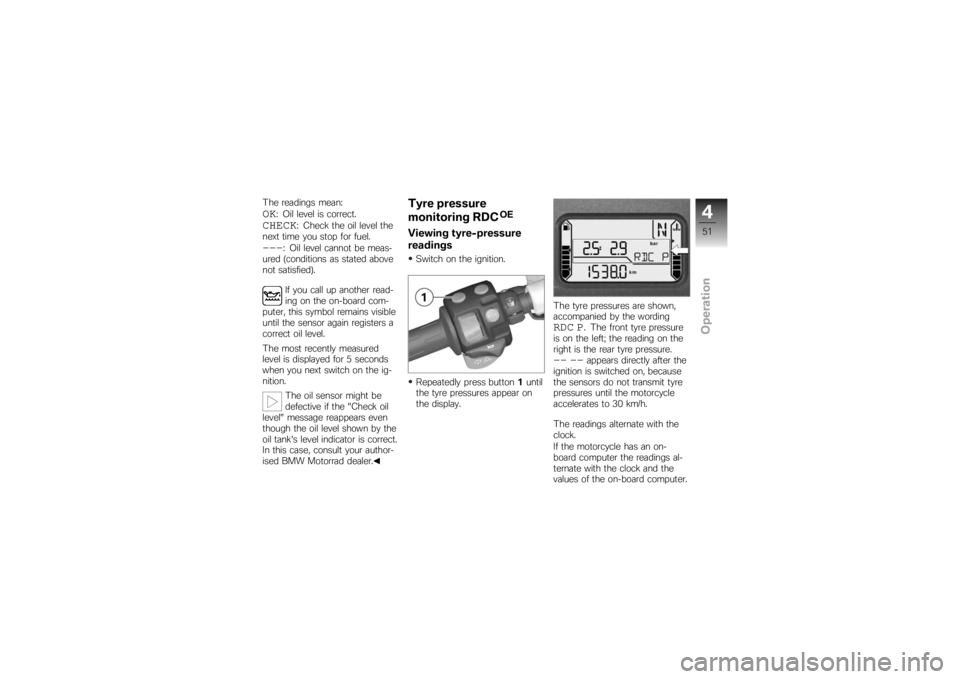
readingsSwitch on the ignition.
Repeatedly press button 1until
the tyre pressures appear on
the display. The tyre pressures are shown,
accompanied by the wording
RDC P
. The front tyre pressure
is on the left; the reading on the
right is the rear tyre pressure.
-- --
appears directly after the
ignition is switched on, because
the sensors do not transmit tyre
pressures until the motorcycle
accelerates to 30 km/h.
The readings alternate with the
clock.
If the motorcycle has an on-
board computer the readings al-
ternate with the clock and the
values of the on-board computer.
451zOperation