Page 118 of 166

indicators in the display tell you
that a bulb defect has occurred.A defective bulb places
your safety at risk because
it is easier for other users to
oversee the motorcycle.
Replace defective bulbs as
soon as possible; always carry a
complete set of spare bulbs if
possible.
The bulb is pressurised and
can cause injury if dam-
aged.
Wear protective goggles and
gloves when changing bulbs.
The types of bulb fitted to
your motorcycle are listed
in the section entitled "Technical
data".
Do not touch the glass of
new bulbs with your fingers.
Use a clean, dry cloth to hold
the bulbs when handling them.
Dirt deposits, in particular oil and
grease, interfere with heat radi- ation from the bulb. This leads
to overheating and shortens the
bulb's operating life.
Replacing low-beam
headlight bulb
If it is not standing firmly,
the motorcycle could topple
in the course of the operations
described below.
Always make sure that the
motorcycle is stable and firmly
supported.
Make sure the ground is level
and firm and place the motor-
cycle on its stand.
Switch off the ignition. Turn the handlebars to the
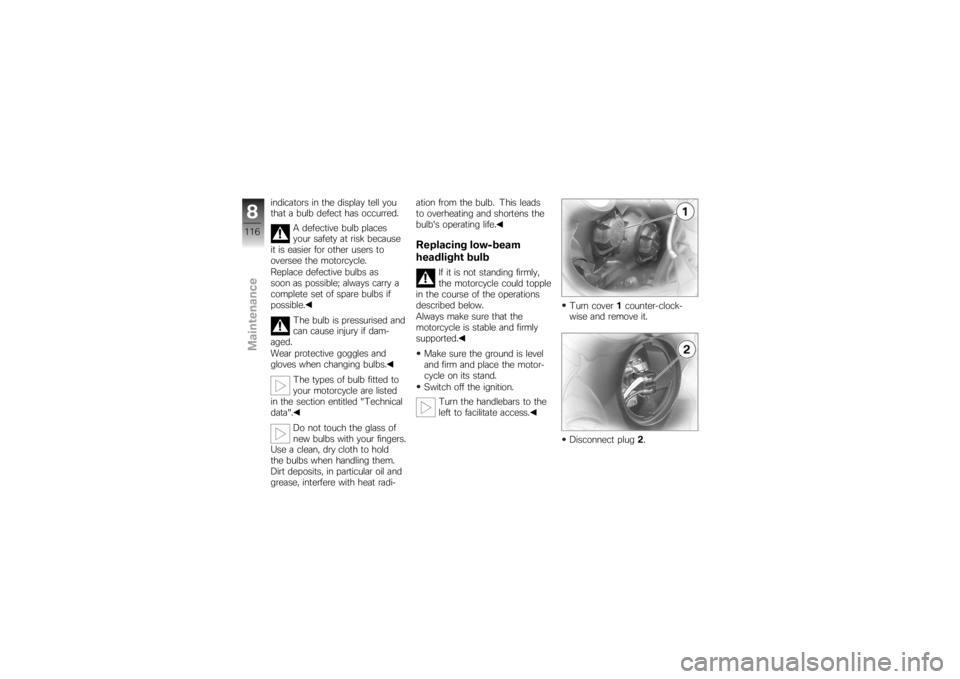
left to facilitate access. Turn cover
1counter-clock-
wise and remove it.
Disconnect plug 2.
8116zMaintenance
Page 120 of 166
Turn cover1clockwise to in-
stall.Replacing high-beam
headlight bulb
If it is not standing firmly,
the motorcycle could topple
in the course of the operations
described below.
Always make sure that the
motorcycle is stable and firmly
supported.
Make sure the ground is level
and firm and place the motor-
cycle on its stand.
Switch off the ignition. Turn the handlebars to the
left to facilitate access.
Turn cover 1counter-clock-
wise and remove it.
Disconnect plug 2. Release spring clip
3at left
and right and swing it up.
Remove bulb 4.
Replace the defective bulb.
8118zMaintenance
Page 121 of 166
Bulb for high-beam
headlight
H7/12V/55W
Install bulb 4; make sure that
tab 5is pointing up. Engage spring retainer
3on
left and right.
Close plug 2. Turn cover
1clockwise to in-
stall.
Replacing parking-light
bulb
If it is not standing firmly,
the motorcycle could topple
in the course of the operations
described below.
Always make sure that the
motorcycle is stable and firmly
supported.
Make sure the ground is level
and firm and place the motor-
cycle on its stand.
8119zMaintenance
Page 122 of 166
Switch off the ignition.
Pull off the connector1be-
neath the headlight.
Remove bulb holder 2from the
headlight housing by turning it
counter-clockwise.
Remove bulb 3from the bulb
holder.
Replace the defective bulb.
Bulb for parking light
W5W / 12 V / 5 W Install bulb
3in bulb socket 2.
Turn the bulb socket clock-
wise to install it in the headlight
housing.
Connect plug 1beneath the
headlight.
Replacing brake light and
rear light bulb
If it is not standing firmly,
the motorcycle could topple
in the course of the operations
described below.
Always make sure that the
motorcycle is stable and firmly
supported. Make sure the ground is level
and firm and place the motor-
cycle on its stand.
Switch off the ignition.
Remove the seat ( 63)
Remove screw
1.
8120zMaintenance
Page 123 of 166
Pull the bulb housing to the
rear until it is clear of holders2.
Turn bulb holder 3counter-
clockwise to remove it from the
bulb housing. Press bulb
4into socket 5and
remove by turning it counter-
clockwise.
Replace the defective bulb.
Bulb for tail light/brake
light
P21W / 12 V / 21 W Press bulb
4into socket 5and
turn it clockwise to install.
Turn bulb socket 3clockwise
to install it in the bulb housing.
8121zMaintenance
Page 125 of 166
Remove the bulb holder2from
the bulb housing by turning it
counter-clockwise.
Remove bulb 3from the bulb
holder.
Replace the defective bulb
Bulbs for flashing turn
indicators, front
W16W / 12 V / 16 W Install bulb
3in bulb socket 2.
Turn the bulb socket clockwise
to install it in the bulb housing.
Seat the bulb housing in the
mirror shell. Install screw
1.
Replacing rear turn
indicator bulbs
If it is not standing firmly,
the motorcycle could topple
in the course of the operations
described below.
Always make sure that the
motorcycle is stable and firmly
supported.
Make sure the ground is level
and firm and place the motor-
cycle on its stand.
Switch off the ignition.
8123zMaintenance
Page 126 of 166
Remove screw1.
Pull the glass out of the
turn-indicator housing at the
threaded-fastener side. Press bulb
2into fitting 3and
remove by turning it counter-
clockwise.
Replace the defective bulb.
Bulbs for flashing turn
indicators, rear
R10W / 12 V / 10 W Press bulb
2into socket 3and
turn it clockwise to install.
Seat the glass in the turn indic-
ator housing.
8124zMaintenance
Page 128 of 166

Allow both engines to idle for a
few minutes before disconnect-
ing the jump leads.
Disconnect the jump lead from
the negative terminals first,
then disconnect the second
lead from the positive termin-
als.
Install the battery-compartment
cover ( 128)BatteryMaintenance instructionsCorrect upkeep, recharging and
storage will prolong the life of
the battery and are essential if
warranty claims are to be con-
sidered.
Compliance with the points be-
low is important in order to max-
imise battery life:Keep the surface of the battery
clean and dry
Do not open the battery
Do not top up with water Be sure to read and comply
with the instructions for char-
ging the battery on the follow-
ing pages
Do not turn the battery upside
down
If the battery is not discon-
nected, the on-board elec-
tronics (e.g. clock, etc.) gradually
drain the battery. This can cause
the battery to run flat. If this hap-
pens, warranty claims will not be
accepted.
If the motorcycle is to be out of
use for more than four weeks,
disconnect the battery or con-
nect a suitable trickle charger to
the battery.
BMW Motorrad has de-
veloped a float charger spe-
cially designed for compatibility
with the electronics of your mo-
torcycle. Using this charger, you
can keep the battery charged
during long periods of disuse, without having to disconnect the
battery from the motorcycle's
on-board systems. You can ob-
tain additional information from
your authorised BMW Motorrad
dealer.
Charging battery when
connected
Charging the connected
battery directly at the bat-
tery terminals can damage the
vehicle electronics.
Always disconnect the battery
from the on-board circuits be-
fore recharging it with a charger
connected directly to the battery
posts.
If you switch on the igni-
tion and the multifunction
display and telltale lights fail to
light up, the battery is completely
flat. Attempting to charge a com-
pletely flat battery via the on-
8126zMaintenance