2006 SUZUKI SX4 cable
[x] Cancel search: cablePage 1516 of 1556
Downloaded from www.Manualslib.com manuals search engine 10C-14 Immobilizer Control System:
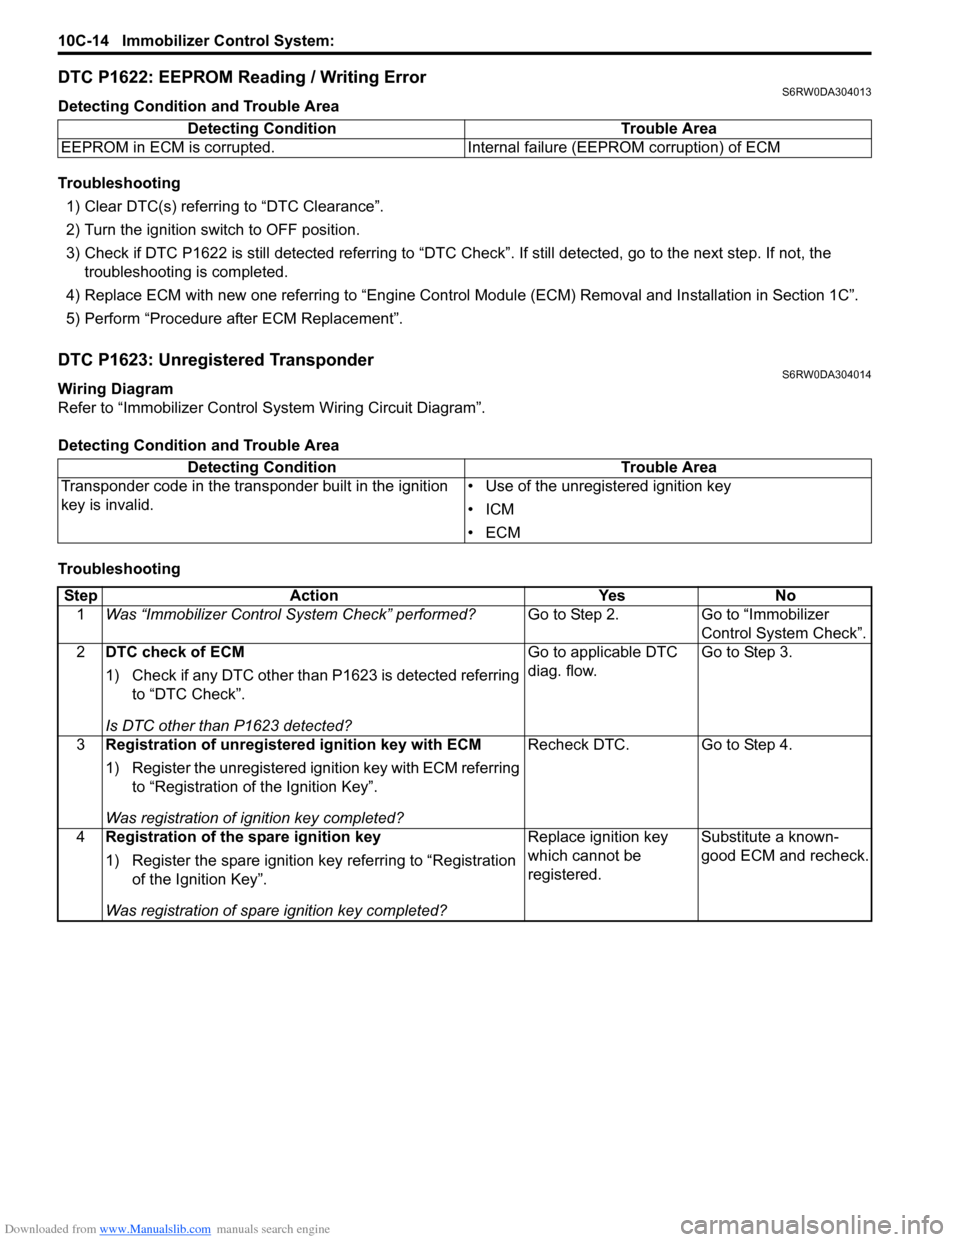
DTC P1622: EEPROM Reading / Writing ErrorS6RW0DA304013
Detecting Condition and Trouble Area
Troubleshooting
1) Clear DTC(s) referring to “DTC Clearance”.
2) Turn the ignition switch to OFF position.
3) Check if DTC P1622 is still detected referring to “DTC Check”. If still detected, go to the next step. If not, the
troubleshooting is completed.
4) Replace ECM with new one referring to “Engine Control Module (ECM) Removal and Installation in Section 1C”.
5) Perform “Procedure after ECM Replacement”.
DTC P1623: Unregistered TransponderS6RW0DA304014
Wiring Diagram
Refer to “Immobilizer Control System Wiring Circuit Diagram”.
Detecting Condition and Trouble Area
TroubleshootingDetecting Condition Trouble Area
EEPROM in ECM is corrupted. Internal failure (EEPROM corruption) of ECM
Detecting Condition Trouble Area
Transponder code in the transponder built in the ignition
key is invalid.• Use of the unregistered ignition key
•ICM
•ECM
Step Action Yes No
1Was “Immobilizer Control System Check” performed?Go to Step 2. Go to “Immobilizer
Control System Check”.
2DTC check of ECM
1) Check if any DTC other than P1623 is detected referring
to “DTC Check”.
Is DTC other than P1623 detected?Go to applicable DTC
diag. flow.Go to Step 3.
3Registration of unregistered ignition key with ECM
1) Register the unregistered ignition key with ECM referring
to “Registration of the Ignition Key”.
Was registration of ignition key completed?Recheck DTC. Go to Step 4.
4Registration of the spare ignition key
1) Register the spare ignition key referring to “Registration
of the Ignition Key”.
Was registration of spare ignition key completed?Replace ignition key
which cannot be
registered.Substitute a known-
good ECM and recheck.
Page 1517 of 1556
Downloaded from www.Manualslib.com manuals search engine Immobilizer Control System: 10C-15
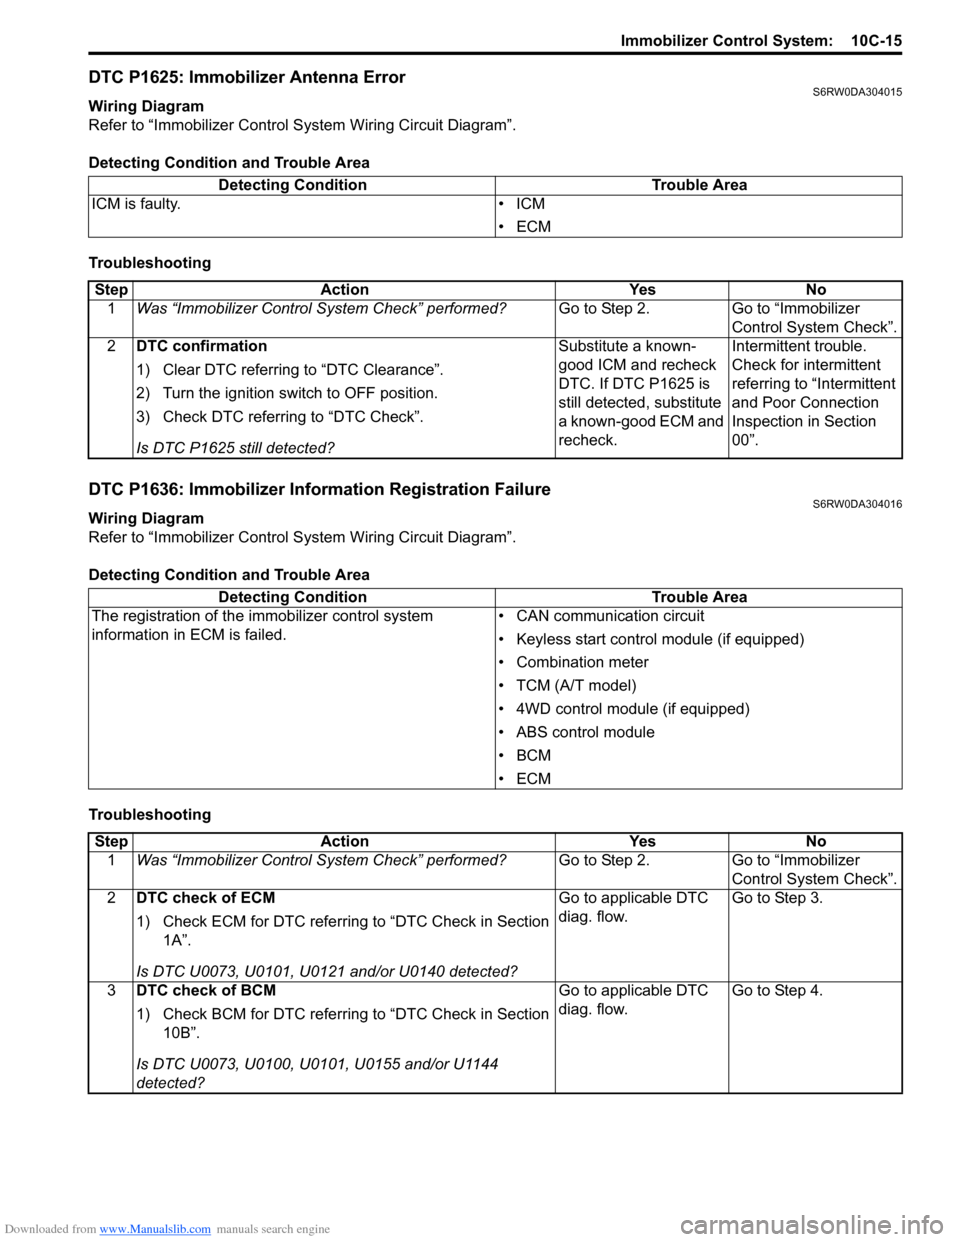
DTC P1625: Immobilizer Antenna ErrorS6RW0DA304015
Wiring Diagram
Refer to “Immobilizer Control System Wiring Circuit Diagram”.
Detecting Condition and Trouble Area
Troubleshooting
DTC P1636: Immobilizer Information Registration FailureS6RW0DA304016
Wiring Diagram
Refer to “Immobilizer Control System Wiring Circuit Diagram”.
Detecting Condition and Trouble Area
TroubleshootingDetecting Condition Trouble Area
ICM is faulty. • ICM
•ECM
Step Action Yes No
1Was “Immobilizer Control System Check” performed?Go to Step 2. Go to “Immobilizer
Control System Check”.
2DTC confirmation
1) Clear DTC referring to “DTC Clearance”.
2) Turn the ignition switch to OFF position.
3) Check DTC referring to “DTC Check”.
Is DTC P1625 still detected?Substitute a known-
good ICM and recheck
DTC. If DTC P1625 is
still detected, substitute
a known-good ECM and
recheck.Intermittent trouble.
Check for intermittent
referring to “Intermittent
and Poor Connection
Inspection in Section
00”.
Detecting Condition Trouble Area
The registration of the immobilizer control system
information in ECM is failed.• CAN communication circuit
• Keyless start control module (if equipped)
• Combination meter
• TCM (A/T model)
• 4WD control module (if equipped)
• ABS control module
•BCM
•ECM
Step Action Yes No
1Was “Immobilizer Control System Check” performed?Go to Step 2. Go to “Immobilizer
Control System Check”.
2DTC check of ECM
1) Check ECM for DTC referring to “DTC Check in Section
1A”.
Is DTC U0073, U0101, U0121 and/or U0140 detected?Go to applicable DTC
diag. flow.Go to Step 3.
3DTC check of BCM
1) Check BCM for DTC referring to “DTC Check in Section
10B”.
Is DTC U0073, U0100, U0101, U0155 and/or U1144
detected?Go to applicable DTC
diag. flow.Go to Step 4.
Page 1518 of 1556
Downloaded from www.Manualslib.com manuals search engine 10C-16 Immobilizer Control System:
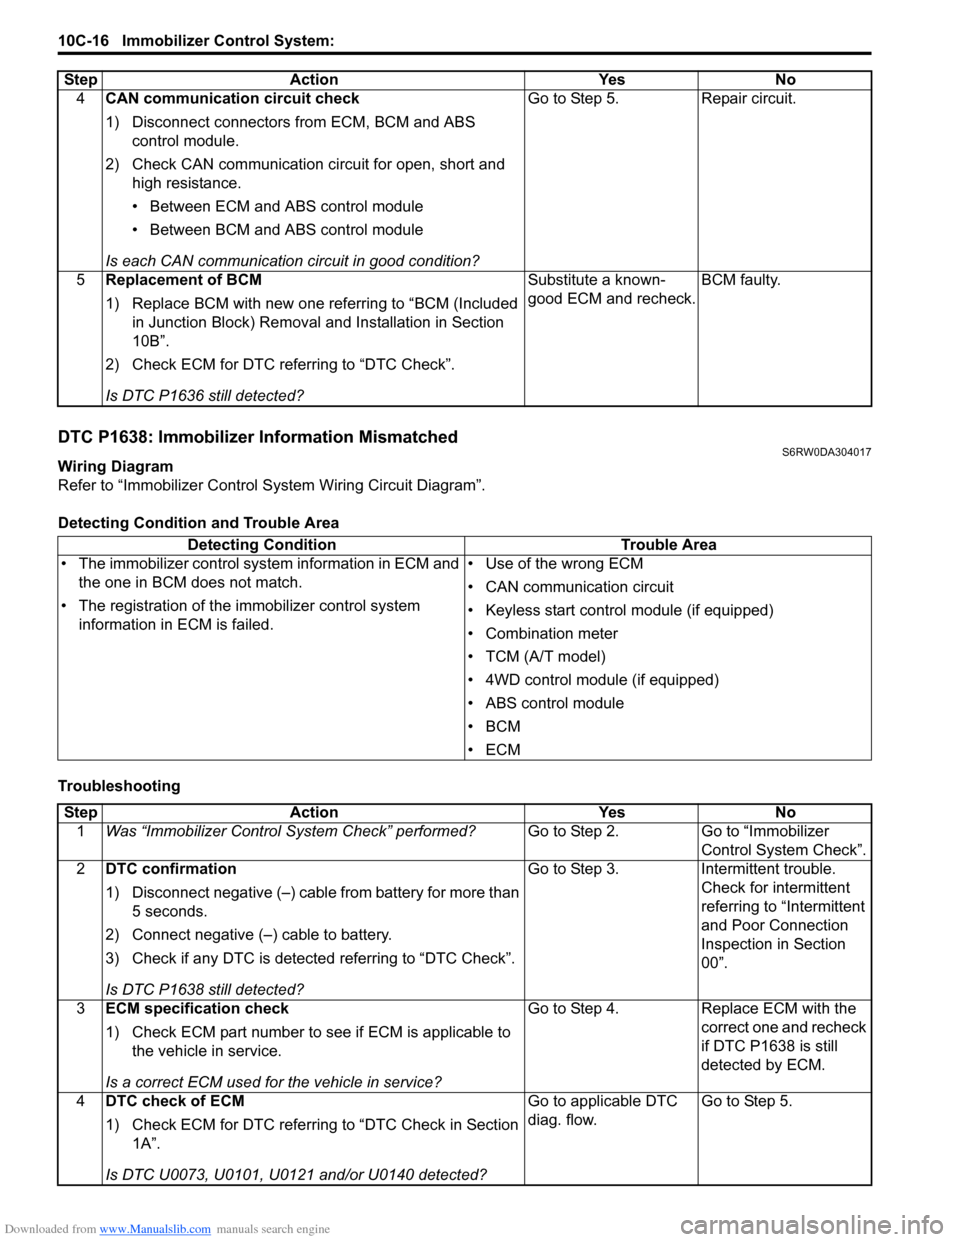
DTC P1638: Immobilizer Information MismatchedS6RW0DA304017
Wiring Diagram
Refer to “Immobilizer Control System Wiring Circuit Diagram”.
Detecting Condition and Trouble Area
Troubleshooting4CAN communication circuit check
1) Disconnect connectors from ECM, BCM and ABS
control module.
2) Check CAN communication circuit for open, short and
high resistance.
• Between ECM and ABS control module
• Between BCM and ABS control module
Is each CAN communication circuit in good condition?Go to Step 5. Repair circuit.
5Replacement of BCM
1) Replace BCM with new one referring to “BCM (Included
in Junction Block) Removal and Installation in Section
10B”.
2) Check ECM for DTC referring to “DTC Check”.
Is DTC P1636 still detected?Substitute a known-
good ECM and recheck.BCM faulty. Step Action Yes No
Detecting Condition Trouble Area
• The immobilizer control system information in ECM and
the one in BCM does not match.
• The registration of the immobilizer control system
information in ECM is failed.• Use of the wrong ECM
• CAN communication circuit
• Keyless start control module (if equipped)
• Combination meter
• TCM (A/T model)
• 4WD control module (if equipped)
• ABS control module
•BCM
•ECM
Step Action Yes No
1Was “Immobilizer Control System Check” performed?Go to Step 2. Go to “Immobilizer
Control System Check”.
2DTC confirmation
1) Disconnect negative (–) cable from battery for more than
5 seconds.
2) Connect negative (–) cable to battery.
3) Check if any DTC is detected referring to “DTC Check”.
Is DTC P1638 still detected?Go to Step 3. Intermittent trouble.
Check for intermittent
referring to “Intermittent
and Poor Connection
Inspection in Section
00”.
3ECM specification check
1) Check ECM part number to see if ECM is applicable to
the vehicle in service.
Is a correct ECM used for the vehicle in service?Go to Step 4. Replace ECM with the
correct one and recheck
if DTC P1638 is still
detected by ECM.
4DTC check of ECM
1) Check ECM for DTC referring to “DTC Check in Section
1A”.
Is DTC U0073, U0101, U0121 and/or U0140 detected?Go to applicable DTC
diag. flow.Go to Step 5.
Page 1519 of 1556
Downloaded from www.Manualslib.com manuals search engine Immobilizer Control System: 10C-17
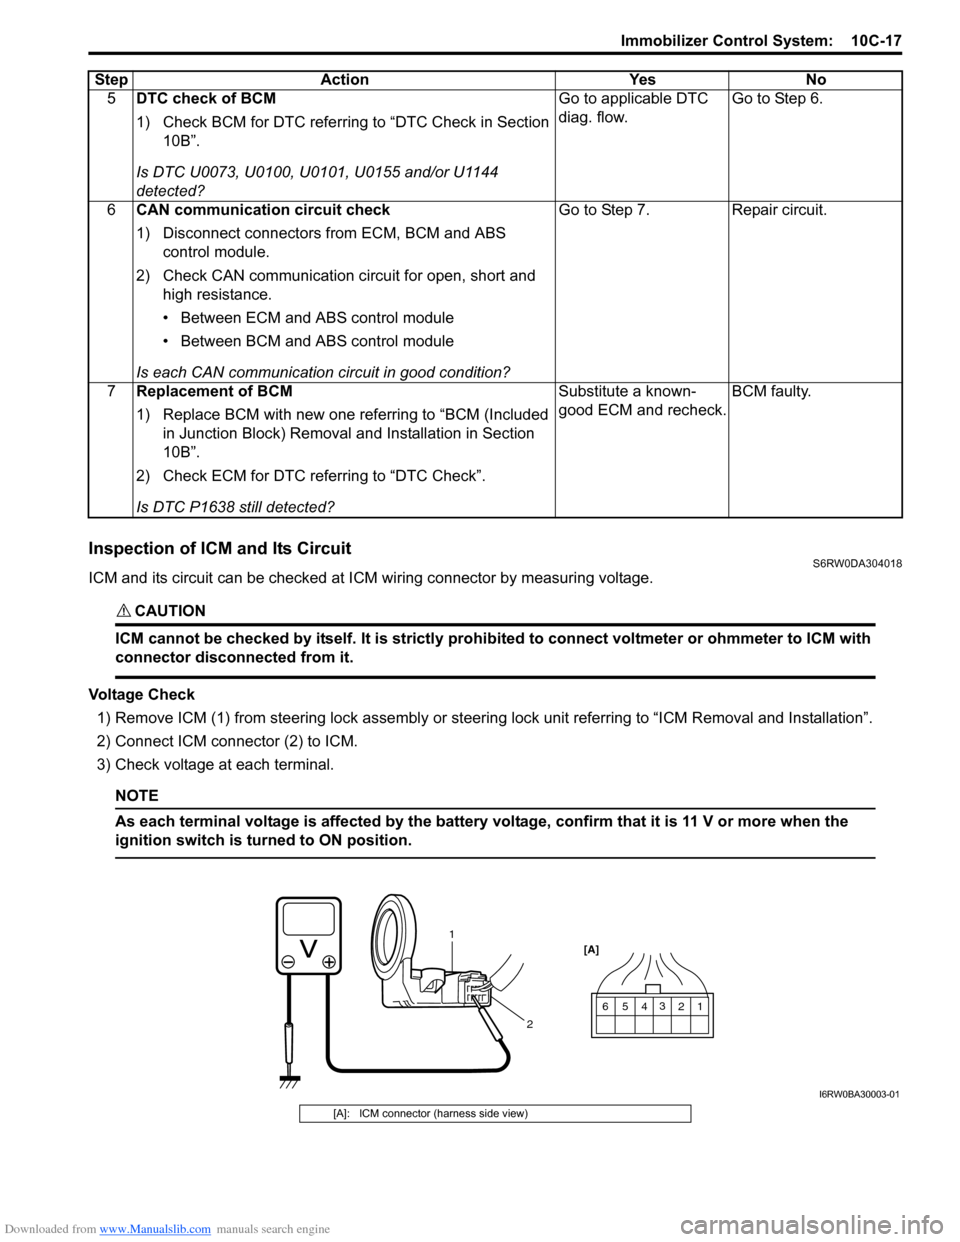
Inspection of ICM and Its CircuitS6RW0DA304018
ICM and its circuit can be checked at ICM wiring connector by measuring voltage.
CAUTION!
ICM cannot be checked by itself. It is strictly prohibited to connect voltmeter or ohmmeter to ICM with
connector disconnected from it.
Voltage Check
1) Remove ICM (1) from steering lock assembly or steering lock unit referring to “ICM Removal and Installation”.
2) Connect ICM connector (2) to ICM.
3) Check voltage at each terminal.
NOTE
As each terminal voltage is affected by the battery voltage, confirm that it is 11 V or more when the
ignition switch is turned to ON position.
5DTC check of BCM
1) Check BCM for DTC referring to “DTC Check in Section
10B”.
Is DTC U0073, U0100, U0101, U0155 and/or U1144
detected?Go to applicable DTC
diag. flow.Go to Step 6.
6CAN communication circuit check
1) Disconnect connectors from ECM, BCM and ABS
control module.
2) Check CAN communication circuit for open, short and
high resistance.
• Between ECM and ABS control module
• Between BCM and ABS control module
Is each CAN communication circuit in good condition?Go to Step 7. Repair circuit.
7Replacement of BCM
1) Replace BCM with new one referring to “BCM (Included
in Junction Block) Removal and Installation in Section
10B”.
2) Check ECM for DTC referring to “DTC Check”.
Is DTC P1638 still detected?Substitute a known-
good ECM and recheck.BCM faulty. Step Action Yes No
1 2 3
4
1
25
6 [A]
I6RW0BA30003-01
[A]: ICM connector (harness side view)
Page 1521 of 1556
Downloaded from www.Manualslib.com manuals search engine Immobilizer Control System: 10C-19
Repair Instructions
ICM Removal and InstallationS6RW0DA306001
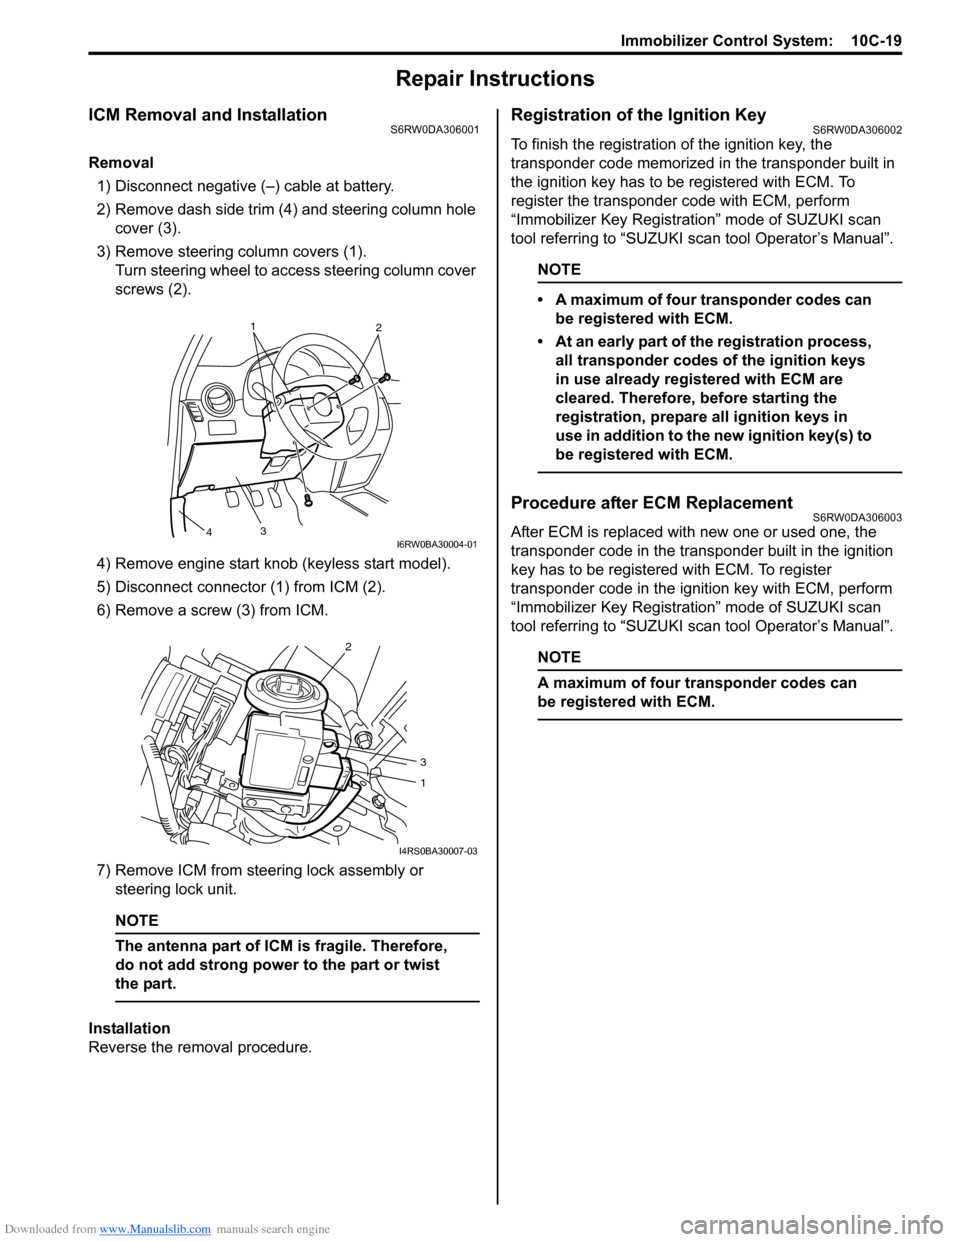
Removal
1) Disconnect negative (–) cable at battery.
2) Remove dash side trim (4) and steering column hole
cover (3).
3) Remove steering column covers (1).
Turn steering wheel to access steering column cover
screws (2).
4) Remove engine start knob (keyless start model).
5) Disconnect connector (1) from ICM (2).
6) Remove a screw (3) from ICM.
7) Remove ICM from steering lock assembly or
steering lock unit.
NOTE
The antenna part of ICM is fragile. Therefore,
do not add strong power to the part or twist
the part.
Installation
Reverse the removal procedure.
Registration of the Ignition KeyS6RW0DA306002
To finish the registration of the ignition key, the
transponder code memorized in the transponder built in
the ignition key has to be registered with ECM. To
register the transponder code with ECM, perform
“Immobilizer Key Registration” mode of SUZUKI scan
tool referring to “SUZUKI scan tool Operator’s Manual”.
NOTE
• A maximum of four transponder codes can
be registered with ECM.
• At an early part of the registration process,
all transponder codes of the ignition keys
in use already registered with ECM are
cleared. Therefore, before starting the
registration, prepare all ignition keys in
use in addition to the new ignition key(s) to
be registered with ECM.
Procedure after ECM ReplacementS6RW0DA306003
After ECM is replaced with new one or used one, the
transponder code in the transponder built in the ignition
key has to be registered with ECM. To register
transponder code in the ignition key with ECM, perform
“Immobilizer Key Registration” mode of SUZUKI scan
tool referring to “SUZUKI scan tool Operator’s Manual”.
NOTE
A maximum of four transponder codes can
be registered with ECM.
1
2
3
4I6RW0BA30004-01
2
3
1
I4RS0BA30007-03
Page 1522 of 1556
Downloaded from www.Manualslib.com manuals search engine 10C-20 Immobilizer Control System:
Special Tools and Equipment
Special ToolS6RW0DA308001
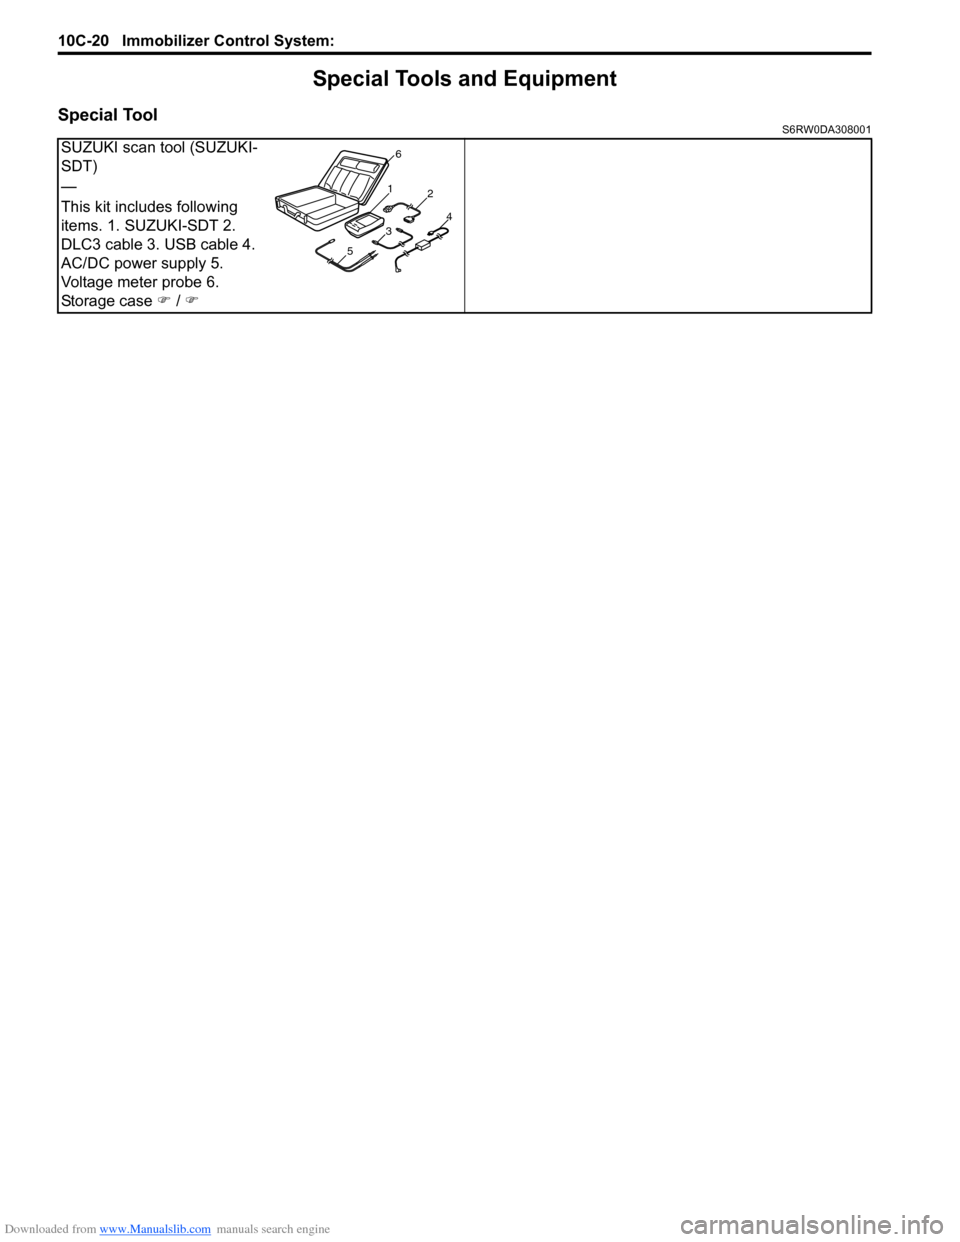
SUZUKI scan tool (SUZUKI-
SDT)
—
This kit includes following
items. 1. SUZUKI-SDT 2.
DLC3 cable 3. USB cable 4.
AC/DC power supply 5.
Voltage meter probe 6.
Storage case �) / �)
1
2
34
56
Page 1531 of 1556
Downloaded from www.Manualslib.com manuals search engine Keyless Start System: 10E-9
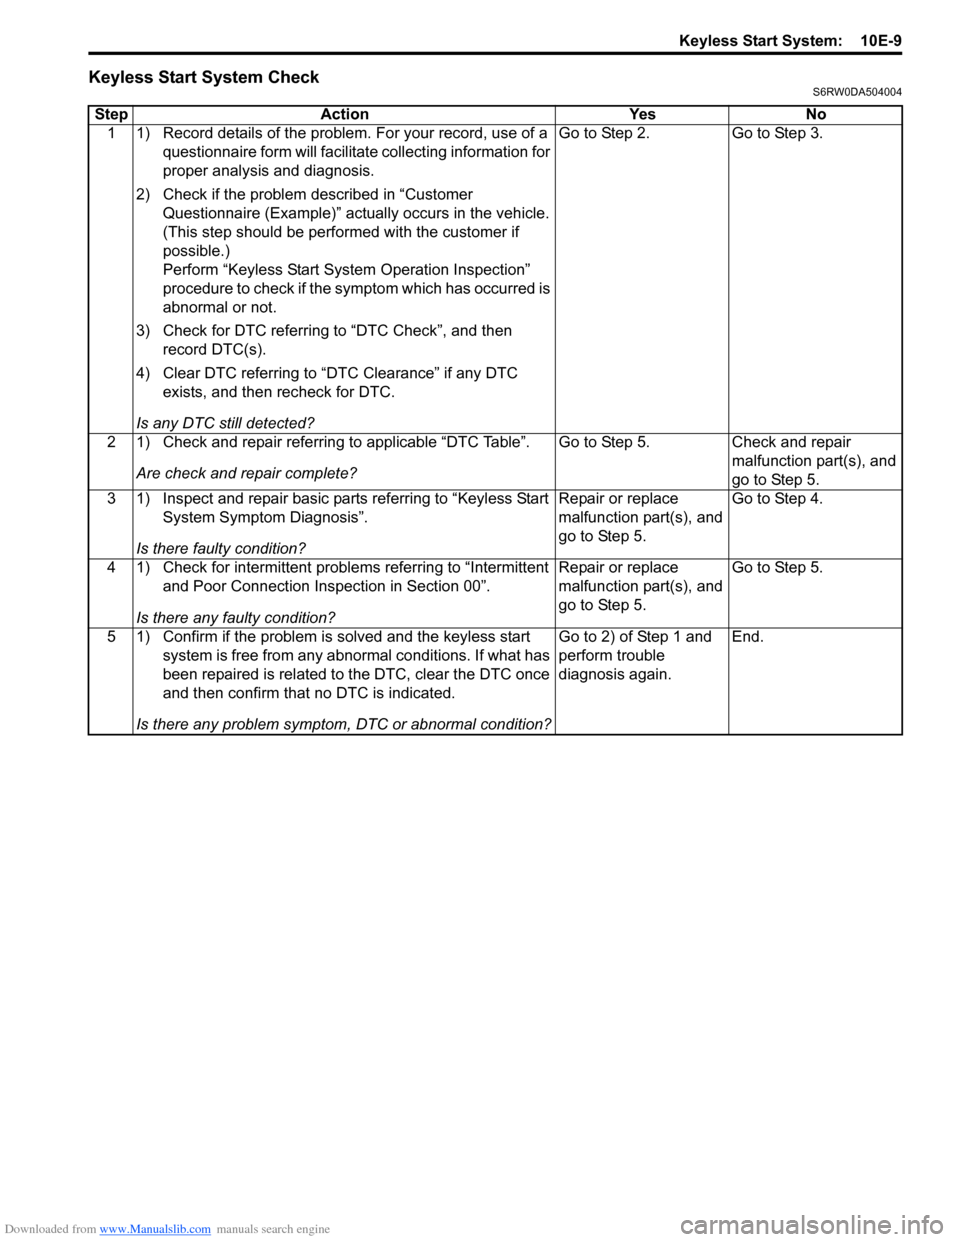
Keyless Start System CheckS6RW0DA504004
Step Action Yes No
1 1) Record details of the problem. For your record, use of a
questionnaire form will facilitate collecting information for
proper analysis and diagnosis.
2) Check if the problem described in “Customer
Questionnaire (Example)” actually occurs in the vehicle.
(This step should be performed with the customer if
possible.)
Perform “Keyless Start System Operation Inspection”
procedure to check if the symptom which has occurred is
abnormal or not.
3) Check for DTC referring to “DTC Check”, and then
record DTC(s).
4) Clear DTC referring to “DTC Clearance” if any DTC
exists, and then recheck for DTC.
Is any DTC still detected?Go to Step 2. Go to Step 3.
2 1) Check and repair referring to applicable “DTC Table”.
Are check and repair complete?Go to Step 5. Check and repair
malfunction part(s), and
go to Step 5.
3 1) Inspect and repair basic parts referring to “Keyless Start
System Symptom Diagnosis”.
Is there faulty condition?Repair or replace
malfunction part(s), and
go to Step 5.Go to Step 4.
4 1) Check for intermittent problems referring to “Intermittent
and Poor Connection Inspection in Section 00”.
Is there any faulty condition?Repair or replace
malfunction part(s), and
go to Step 5.Go to Step 5.
5 1) Confirm if the problem is solved and the keyless start
system is free from any abnormal conditions. If what has
been repaired is related to the DTC, clear the DTC once
and then confirm that no DTC is indicated.
Is there any problem symptom, DTC or abnormal condition?Go to 2) of Step 1 and
perform trouble
diagnosis again.End.
Page 1537 of 1556
Downloaded from www.Manualslib.com manuals search engine Keyless Start System: 10E-15
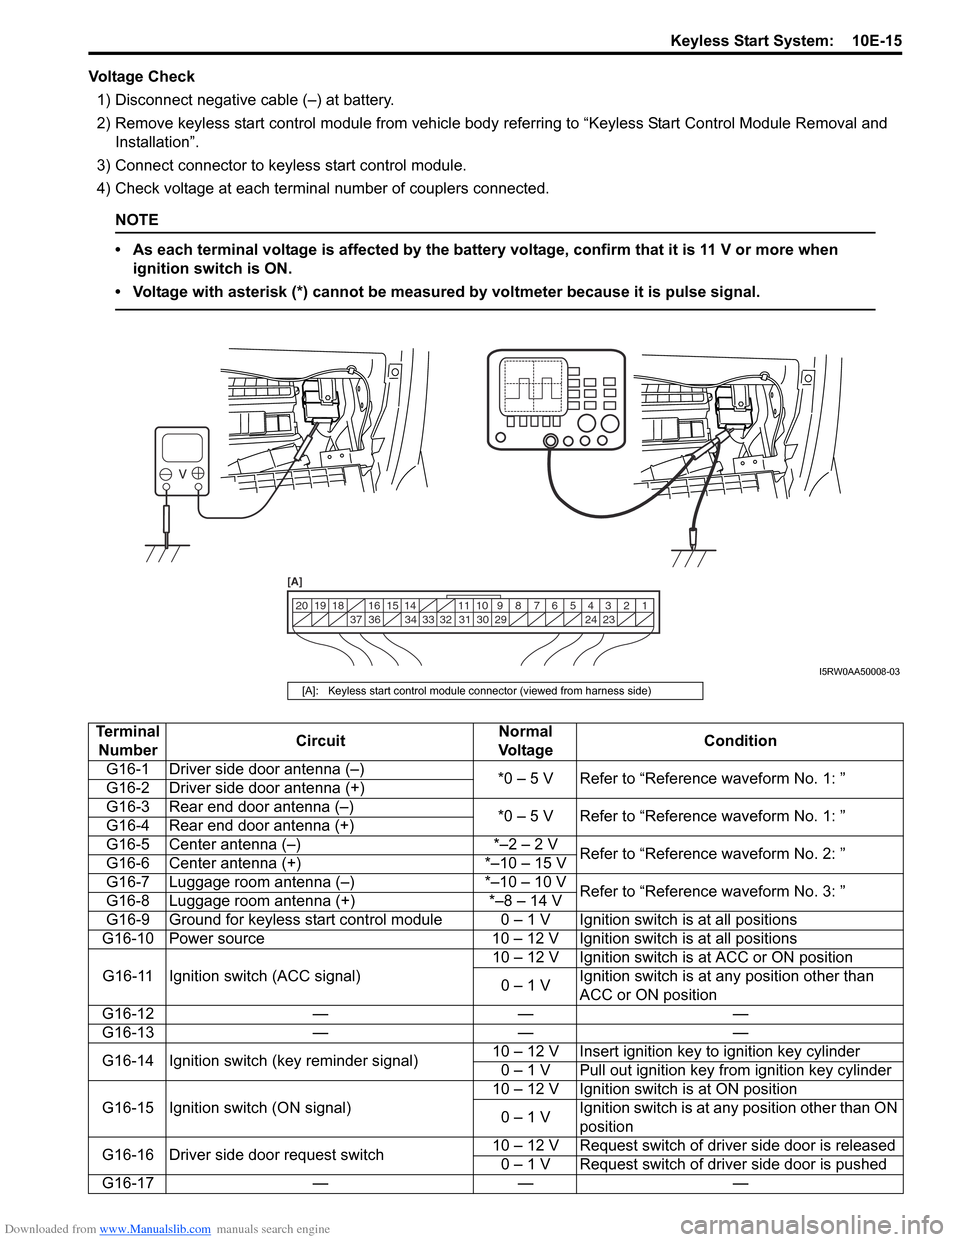
Voltage Check
1) Disconnect negative cable (–) at battery.
2) Remove keyless start control module from vehicle body referring to “Keyless Start Control Module Removal and
Installation”.
3) Connect connector to keyless start control module.
4) Check voltage at each terminal number of couplers connected.
NOTE
• As each terminal voltage is affected by the battery voltage, confirm that it is 11 V or more when
ignition switch is ON.
• Voltage with asterisk (*) cannot be measured by voltmeter because it is pulse signal.
1 2 3 4 5 6 7 8 9 10 11 14 15 16
36 34 33 32 31 30 29 24 23 37 18 19 20
[A]
I5RW0AA50008-03
[A]: Keyless start control module connector (viewed from harness side)
Terminal
NumberCircuitNormal
Vo l ta g eCondition
G16-1 Driver side door antenna (–)
*0 – 5 V Refer to “Reference waveform No. 1: ”
G16-2 Driver side door antenna (+)
G16-3 Rear end door antenna (–)
*0 – 5 V Refer to “Reference waveform No. 1: ”
G16-4 Rear end door antenna (+)
G16-5 Center antenna (–) *–2 – 2 V
Refer to “Reference waveform No. 2: ”
G16-6 Center antenna (+) *–10 – 15 V
G16-7 Luggage room antenna (–) *–10 – 10 V
Refer to “Reference waveform No. 3: ”
G16-8 Luggage room antenna (+) *–8 – 14 V
G16-9 Ground for keyless start control module 0 – 1 V Ignition switch is at all positions
G16-10 Power source 10 – 12 V Ignition switch is at all positions
G16-11 Ignition switch (ACC signal)10 – 12 V Ignition switch is at ACC or ON position
0 – 1 VIgnition switch is at any position other than
ACC or ON position
G16-12 — — —
G16-13 — — —
G16-14 Ignition switch (key reminder signal)10 – 12 V Insert ignition key to ignition key cylinder
0 – 1 V Pull out ignition key from ignition key cylinder
G16-15 Ignition switch (ON signal)10 – 12 V Ignition switch is at ON position
0 – 1 VIgnition switch is at any position other than ON
position
G16-16 Driver side door request switch10 – 12 V Request switch of driver side door is released
0 – 1 V Request switch of driver side door is pushed
G16-17 — — —