2006 SUZUKI SX4 cable
[x] Cancel search: cablePage 1333 of 1556
Downloaded from www.Manualslib.com manuals search engine Lighting Systems: 9B-14
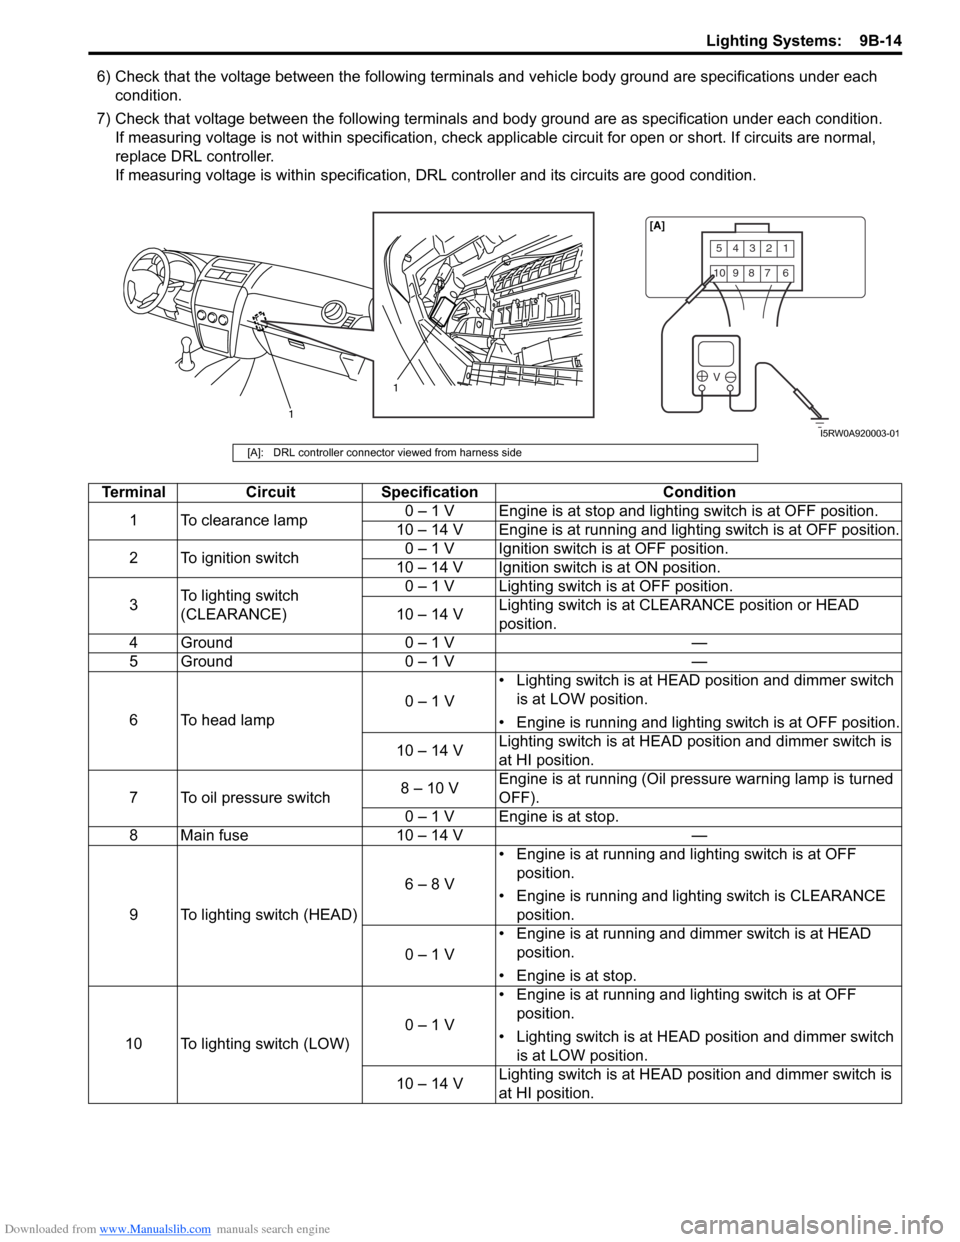
6) Check that the voltage between the following terminals and vehicle body ground are specifications under each
condition.
7) Check that voltage between the following terminals and body ground are as specification under each condition.
If measuring voltage is not within specification, check applicable circuit for open or short. If circuits are normal,
replace DRL controller.
If measuring voltage is within specification, DRL controller and its circuits are good condition.
54321
10987 6
V
1
1[A]
I5RW0A920003-01
[A]: DRL controller connector viewed from harness side
Terminal Circuit Specification Condition
1 To clearance lamp0 – 1 V Engine is at stop and lighting switch is at OFF position.
10 – 14 V Engine is at running and lighting switch is at OFF position.
2 To ignition switch0 – 1 V Ignition switch is at OFF position.
10 – 14 V Ignition switch is at ON position.
3To lighting switch
(CLEARANCE)0 – 1 V Lighting switch is at OFF position.
10 – 14 VLighting switch is at CLEARANCE position or HEAD
position.
4 Ground 0 – 1 V —
5 Ground 0 – 1 V —
6 To head lamp0 – 1 V• Lighting switch is at HEAD position and dimmer switch
is at LOW position.
• Engine is running and lighting switch is at OFF position.
10 – 14 VLighting switch is at HEAD position and dimmer switch is
at HI position.
7 To oil pressure switch8 – 10 VEngine is at running (Oil pressure warning lamp is turned
OFF).
0 – 1 V Engine is at stop.
8 Main fuse 10 – 14 V —
9 To lighting switch (HEAD)6 – 8 V• Engine is at running and lighting switch is at OFF
position.
• Engine is running and lighting switch is CLEARANCE
position.
0 – 1 V• Engine is at running and dimmer switch is at HEAD
position.
• Engine is at stop.
10 To lighting switch (LOW)0 – 1 V• Engine is at running and lighting switch is at OFF
position.
• Lighting switch is at HEAD position and dimmer switch
is at LOW position.
10 – 14 VLighting switch is at HEAD position and dimmer switch is
at HI position.
Page 1334 of 1556
Downloaded from www.Manualslib.com manuals search engine 9B-15 Lighting Systems:
Auto-On Headlight Operation Inspection (If
Equipped)
S6RW0D9204021
1) Turn ignition switch to ON position and then turn
lighting switch to “AUTO” position.
2) Check headlights for operation as follows. If
headlights do not turn ON or OFF, go to “Inspection
of Auto-On Headlight Controller and Its Circuit (If
Equipped)”.
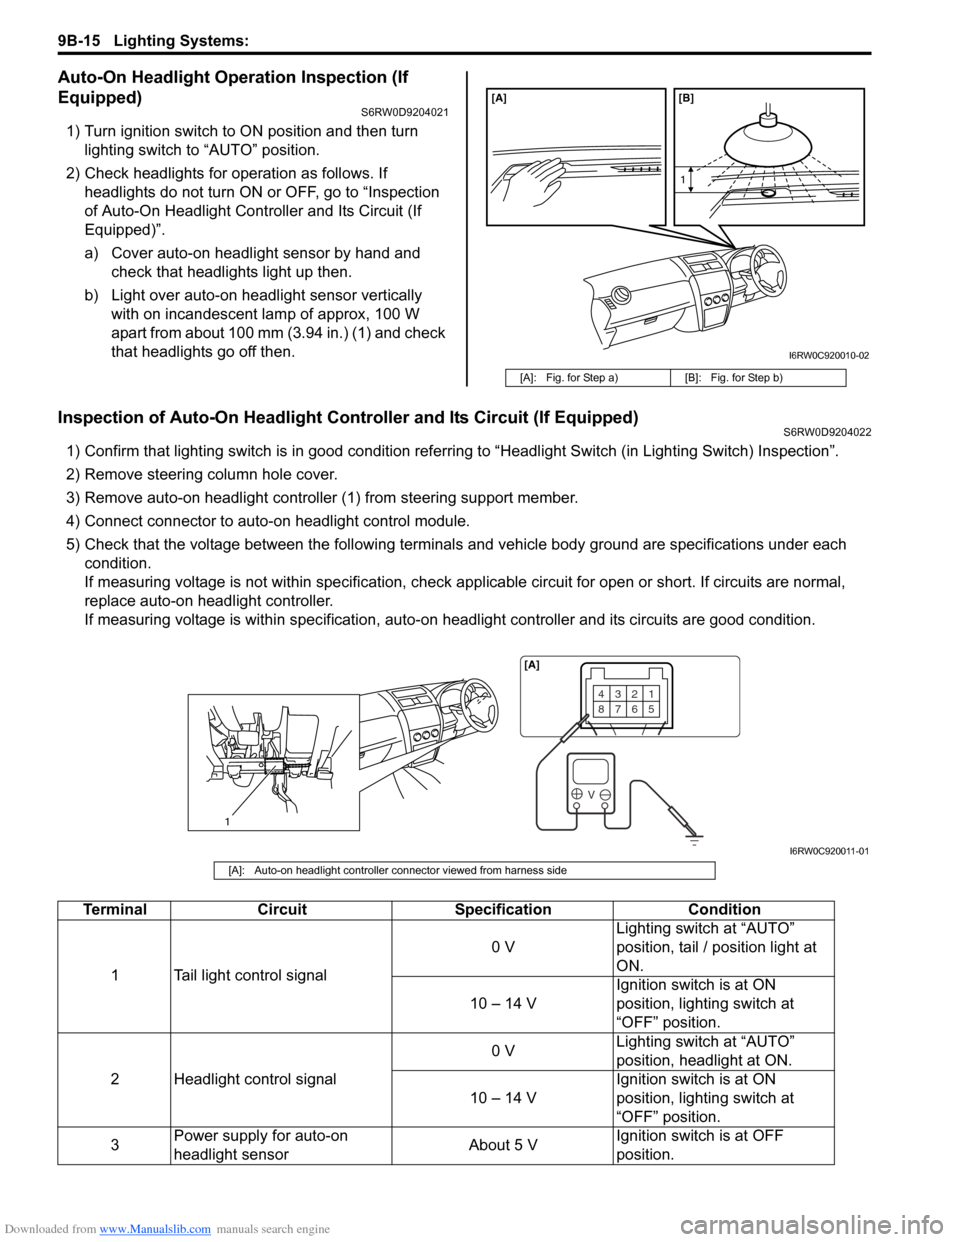
a) Cover auto-on headlight sensor by hand and
check that headlights light up then.
b) Light over auto-on headlight sensor vertically
with on incandescent lamp of approx, 100 W
apart from about 100 mm (3.94 in.) (1) and check
that headlights go off then.
Inspection of Auto-On Headlight Controller and Its Circuit (If Equipped)S6RW0D9204022
1) Confirm that lighting switch is in good condition referring to “Headlight Switch (in Lighting Switch) Inspection”.
2) Remove steering column hole cover.
3) Remove auto-on headlight controller (1) from steering support member.
4) Connect connector to auto-on headlight control module.
5) Check that the voltage between the following terminals and vehicle body ground are specifications under each
condition.
If measuring voltage is not within specification, check applicable circuit for open or short. If circuits are normal,
replace auto-on headlight controller.
If measuring voltage is within specification, auto-on headlight controller and its circuits are good condition.
[A]: Fig. for Step a) [B]: Fig. for Step b)
[A] [B]
1
I6RW0C920010-02
1
4321
8765
V
[A]
I6RW0C920011-01
[A]: Auto-on headlight controller connector viewed from harness side
Terminal Circuit Specification Condition
1 Tail light control signal0 VLighting switch at “AUTO”
position, tail / position light at
ON.
10 – 14 VIgnition switch is at ON
position, lighting switch at
“OFF” position.
2 Headlight control signal0 VLighting switch at “AUTO”
position, headlight at ON.
10 – 14 VIgnition switch is at ON
position, lighting switch at
“OFF” position.
3Power supply for auto-on
headlight sensorAbout 5 VIgnition switch is at OFF
position.
Page 1337 of 1556
Downloaded from www.Manualslib.com manuals search engine Lighting Systems: 9B-18
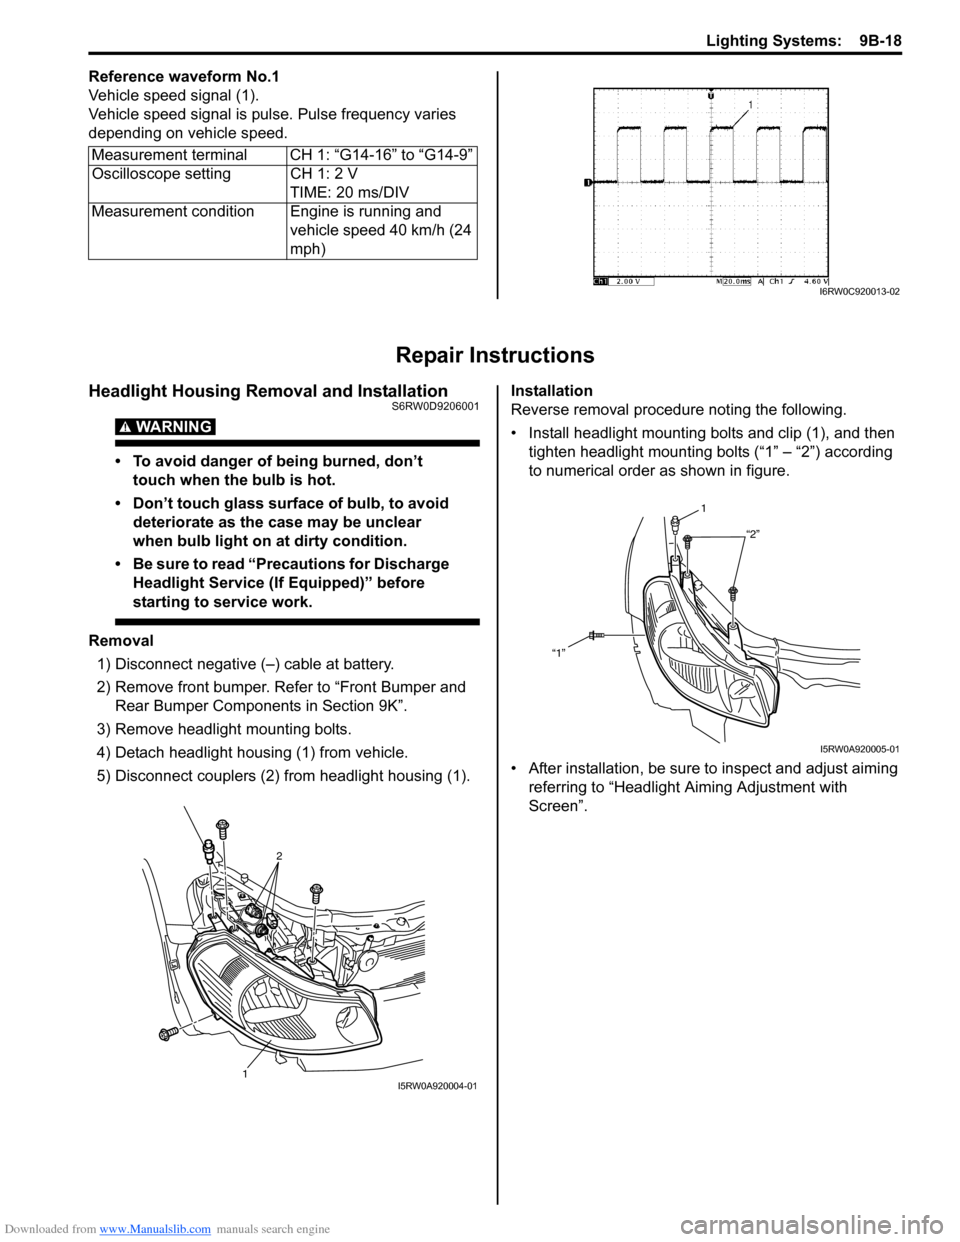
Reference waveform No.1
Vehicle speed signal (1).
Vehicle speed signal is pulse. Pulse frequency varies
depending on vehicle speed.
Repair Instructions
Headlight Housing Removal and InstallationS6RW0D9206001
WARNING!
• To avoid danger of being burned, don’t
touch when the bulb is hot.
• Don’t touch glass surface of bulb, to avoid
deteriorate as the case may be unclear
when bulb light on at dirty condition.
• Be sure to read “Precautions for Discharge
Headlight Service (If Equipped)” before
starting to service work.
Removal
1) Disconnect negative (–) cable at battery.
2) Remove front bumper. Refer to “Front Bumper and
Rear Bumper Components in Section 9K”.
3) Remove headlight mounting bolts.
4) Detach headlight housing (1) from vehicle.
5) Disconnect couplers (2) from headlight housing (1).Installation
Reverse removal procedure noting the following.
• Install headlight mounting bolts and clip (1), and then
tighten headlight mounting bolts (“1” – “2”) according
to numerical order as shown in figure.
• After installation, be sure to inspect and adjust aiming
referring to “Headlight Aiming Adjustment with
Screen”. Measurement terminal CH 1: “G14-16” to “G14-9”
Oscilloscope setting CH 1: 2 V
TIME: 20 ms/DIV
Measurement condition Engine is running and
vehicle speed 40 km/h (24
mph)
I6RW0C920013-02
2
1I5RW0A920004-01
1
“2”
“1”
I5RW0A920005-01
Page 1338 of 1556
Downloaded from www.Manualslib.com manuals search engine 9B-19 Lighting Systems:
Headlight Bulb Replacement (Discharge
Headlight Model)
S6RW0D9206002
WARNING!
• To avoid danger of being burned, don’t
touch when the bulb is hot.
• Don’t touch glass surface of bulb, to avoid
deteriorate as the case may be unclear
when bulb light on at dirty condition.
• Be sure to read “Precautions for Discharge
Headlight Service (If Equipped)” before
starting to service work.
1) Check to ensure that lighting switch is at OFF
position.
2) Disconnect negative (–) cable at battery.
3) Remove headlight housing referring to “Headlight
Housing Removal and Installation”.
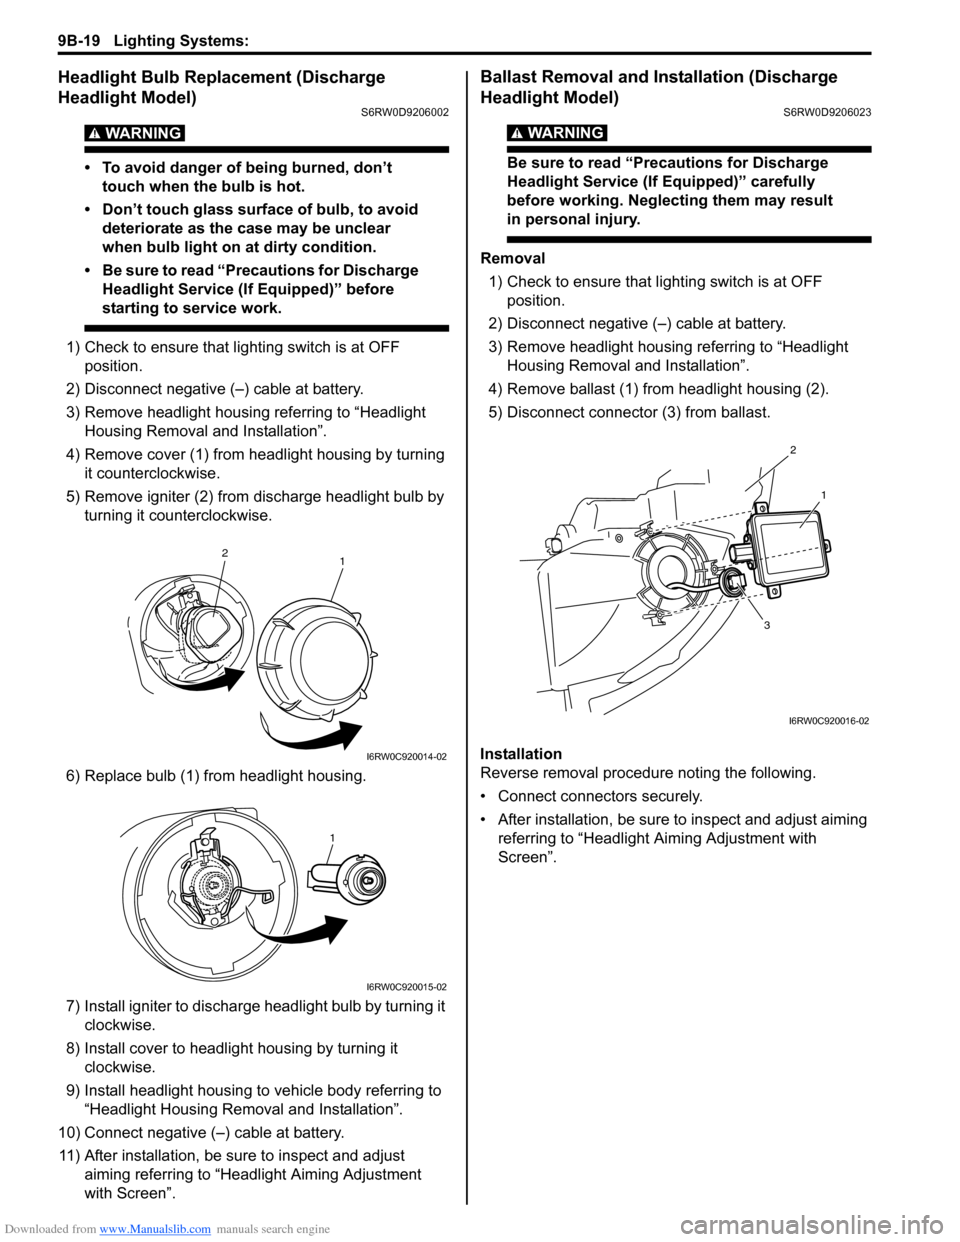
4) Remove cover (1) from headlight housing by turning
it counterclockwise.
5) Remove igniter (2) from discharge headlight bulb by
turning it counterclockwise.
6) Replace bulb (1) from headlight housing.
7) Install igniter to discharge headlight bulb by turning it
clockwise.
8) Install cover to headlight housing by turning it
clockwise.
9) Install headlight housing to vehicle body referring to
“Headlight Housing Removal and Installation”.
10) Connect negative (–) cable at battery.
11) After installation, be sure to inspect and adjust
aiming referring to “Headlight Aiming Adjustment
with Screen”.
Ballast Removal and Installation (Discharge
Headlight Model)
S6RW0D9206023
WARNING!
Be sure to read “Precautions for Discharge
Headlight Service (If Equipped)” carefully
before working. Neglecting them may result
in personal injury.
Removal
1) Check to ensure that lighting switch is at OFF
position.
2) Disconnect negative (–) cable at battery.
3) Remove headlight housing referring to “Headlight
Housing Removal and Installation”.
4) Remove ballast (1) from headlight housing (2).
5) Disconnect connector (3) from ballast.
Installation
Reverse removal procedure noting the following.
• Connect connectors securely.
• After installation, be sure to inspect and adjust aiming
referring to “Headlight Aiming Adjustment with
Screen”.
1 2
I6RW0C920014-02
1
I6RW0C920015-02
2
1
3
I6RW0C920016-02
Page 1341 of 1556
Downloaded from www.Manualslib.com manuals search engine Lighting Systems: 9B-22
Headlight Switch (in Lighting Switch) Removal
and Installation
S6RW0D9206004
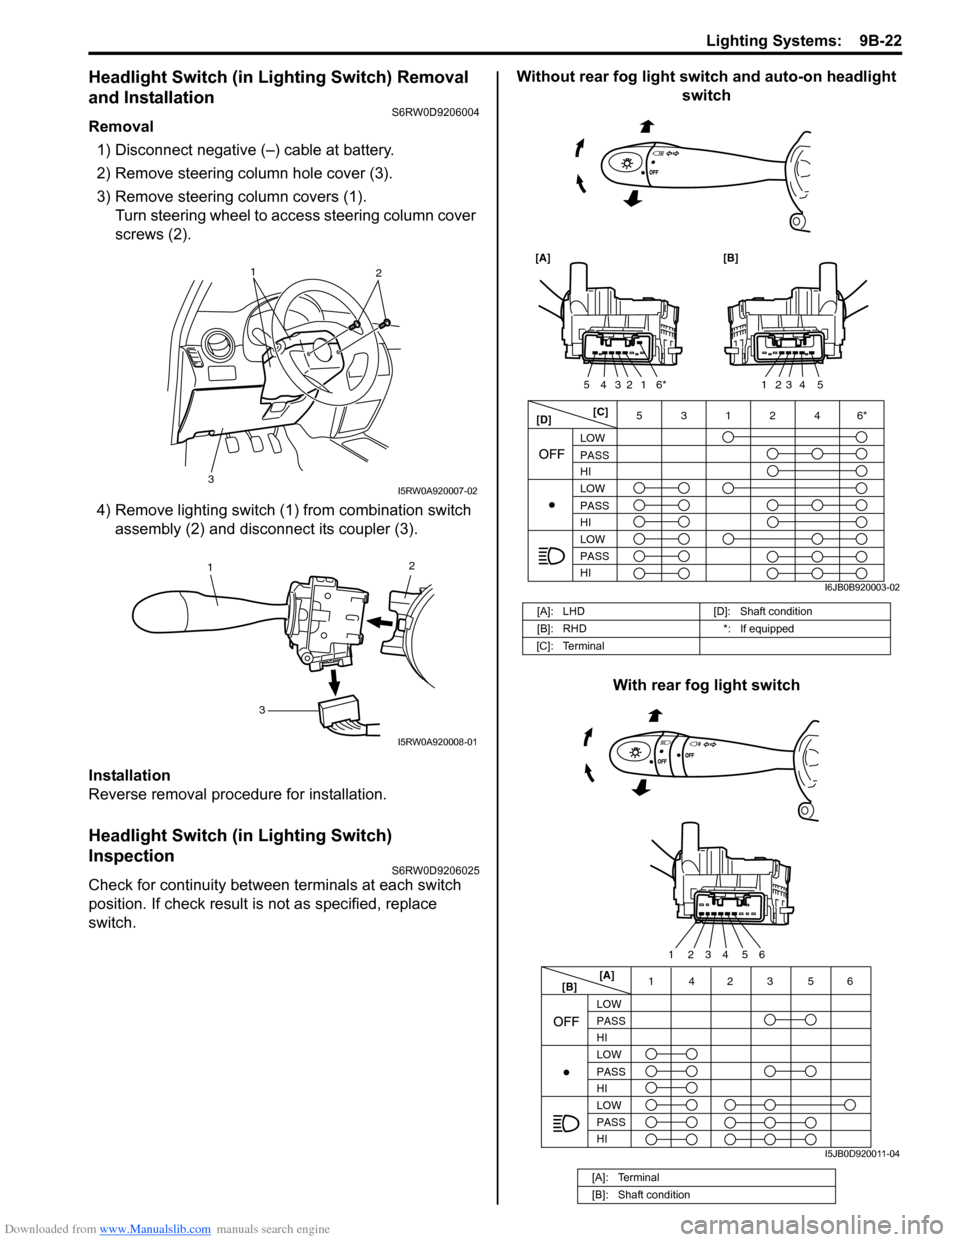
Removal
1) Disconnect negative (–) cable at battery.
2) Remove steering column hole cover (3).
3) Remove steering column covers (1).
Turn steering wheel to access steering column cover
screws (2).
4) Remove lighting switch (1) from combination switch
assembly (2) and disconnect its coupler (3).
Installation
Reverse removal procedure for installation.
Headlight Switch (in Lighting Switch)
Inspection
S6RW0D9206025
Check for continuity between terminals at each switch
position. If check result is not as specified, replace
switch.Without rear fog light switch and auto-on headlight
switch
With rear fog light switch
1
2
3
I5RW0A920007-02
2
1
3
I5RW0A920008-01
[A]: LHD [D]: Shaft condition
[B]: RHD *: If equipped
[C]: Terminal
[A]: Terminal
[B]: Shaft condition
[C]
[D]3 5
LOW
PASS
HI
LOW
PASS
HI LOW
PASS
HI
[A] [B]
1
6*2 3 4 5123 4 5
1246*
I6JB0B920003-02
[A]
[B]14 356
LOW
PASS
HI
LOW
PASS
HI LOW
PASS
HI
2
5 4 3 2 16
I5JB0D920011-04
Page 1342 of 1556
Downloaded from www.Manualslib.com manuals search engine 9B-23 Lighting Systems:
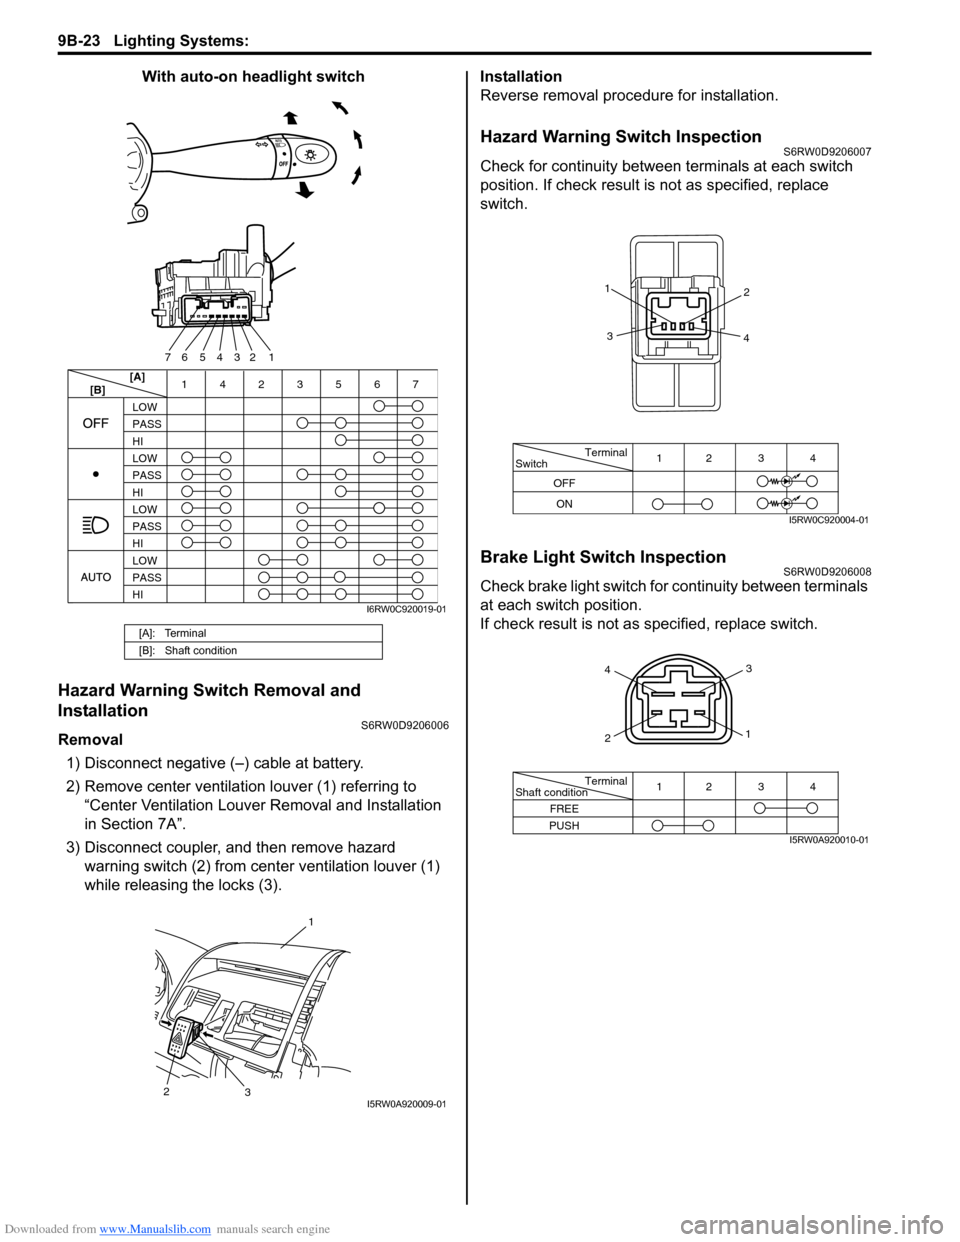
With auto-on headlight switch
Hazard Warning Switch Removal and
Installation
S6RW0D9206006
Removal
1) Disconnect negative (–) cable at battery.
2) Remove center ventilation louver (1) referring to
“Center Ventilation Louver Removal and Installation
in Section 7A”.
3) Disconnect coupler, and then remove hazard
warning switch (2) from center ventilation louver (1)
while releasing the locks (3).Installation
Reverse removal procedure for installation.
Hazard Warning Switch InspectionS6RW0D9206007
Check for continuity between terminals at each switch
position. If check result is not as specified, replace
switch.
Brake Light Switch InspectionS6RW0D9206008
Check brake light switch for continuity between terminals
at each switch position.
If check result is not as specified, replace switch.
[A]: Terminal
[B]: Shaft condition
5432 167
14 356
LOW
PASS
HI
LOW
PASS
HI
LOW
PASS
HI LOW
PASS
HI
27[A]
[B]
I6RW0C920019-01
1
3
2I5RW0A920009-01
Terminal
Switch
OFF
ON12 3 4
1
2
3
4
I5RW0C920004-01
Terminal
Shaft condition
FREE
PUSH12 3 4
4
23
1
I5RW0A920010-01
Page 1343 of 1556
Downloaded from www.Manualslib.com manuals search engine Lighting Systems: 9B-24
Turn Signal Light Switch (in Lighting Switch)
Removal and Installation
S6RW0D9206009
For removal and Installation, refer to “Headlight Switch
(in Lighting Switch) Removal and Installation”.
Turn Signal Light Switch (in Lighting Switch)
Inspection
S6RW0D9206010
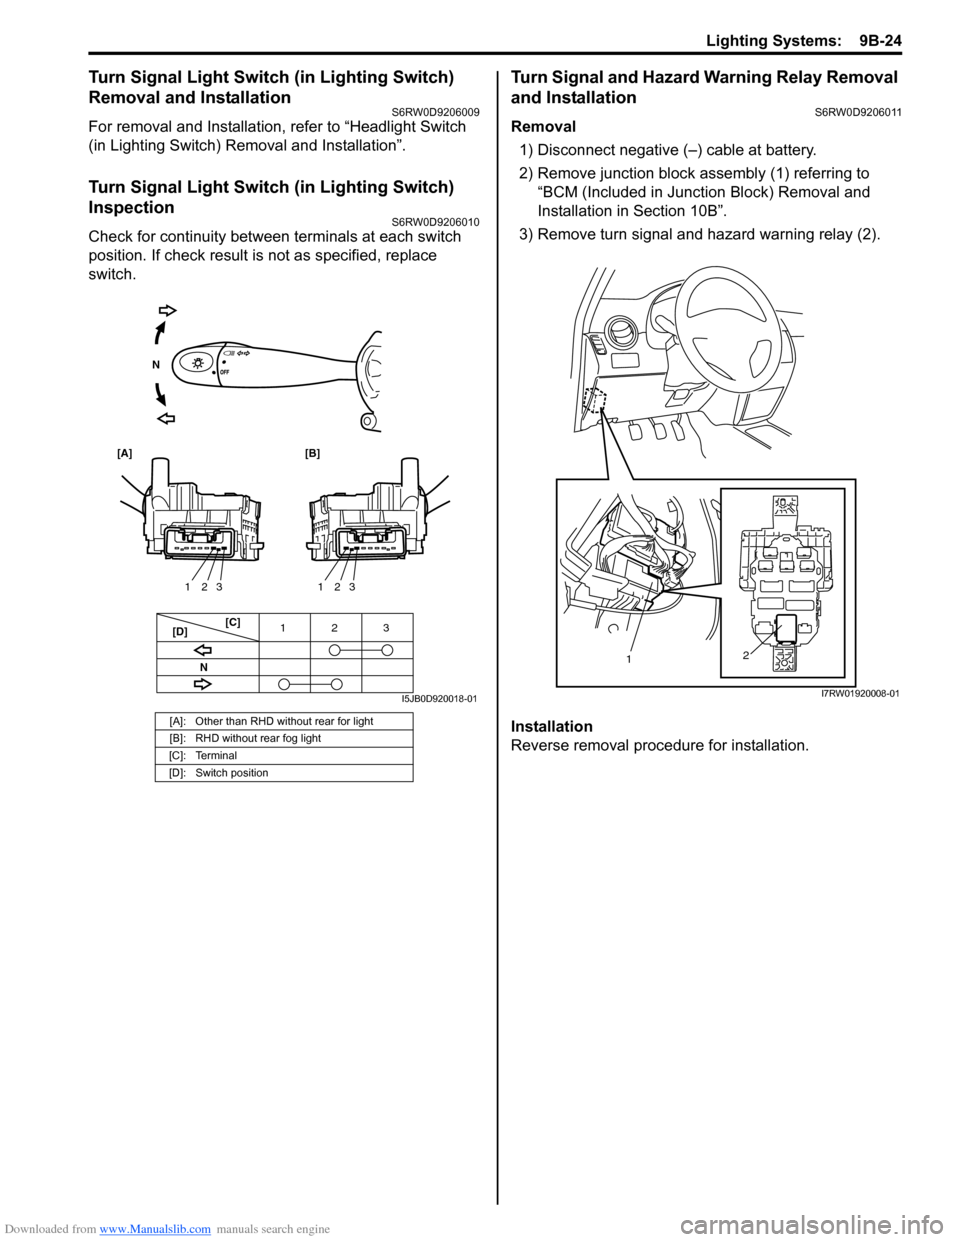
Check for continuity between terminals at each switch
position. If check result is not as specified, replace
switch.
Turn Signal and Hazard Warning Relay Removal
and Installation
S6RW0D9206011
Removal
1) Disconnect negative (–) cable at battery.
2) Remove junction block assembly (1) referring to
“BCM (Included in Junction Block) Removal and
Installation in Section 10B”.
3) Remove turn signal and hazard warning relay (2).
Installation
Reverse removal procedure for installation.
[A]: Other than RHD without rear for light
[B]: RHD without rear fog light
[C]: Terminal
[D]: Switch position
3 12
3 2 13 2 1
[C]
[D]
[A] [B]
N
N
I5JB0D920018-01
2
1
I7RW01920008-01
Page 1344 of 1556
Downloaded from www.Manualslib.com manuals search engine 9B-25 Lighting Systems:
Turn Signal and Hazard Warning Relay
Inspection
S6RW0D9206012
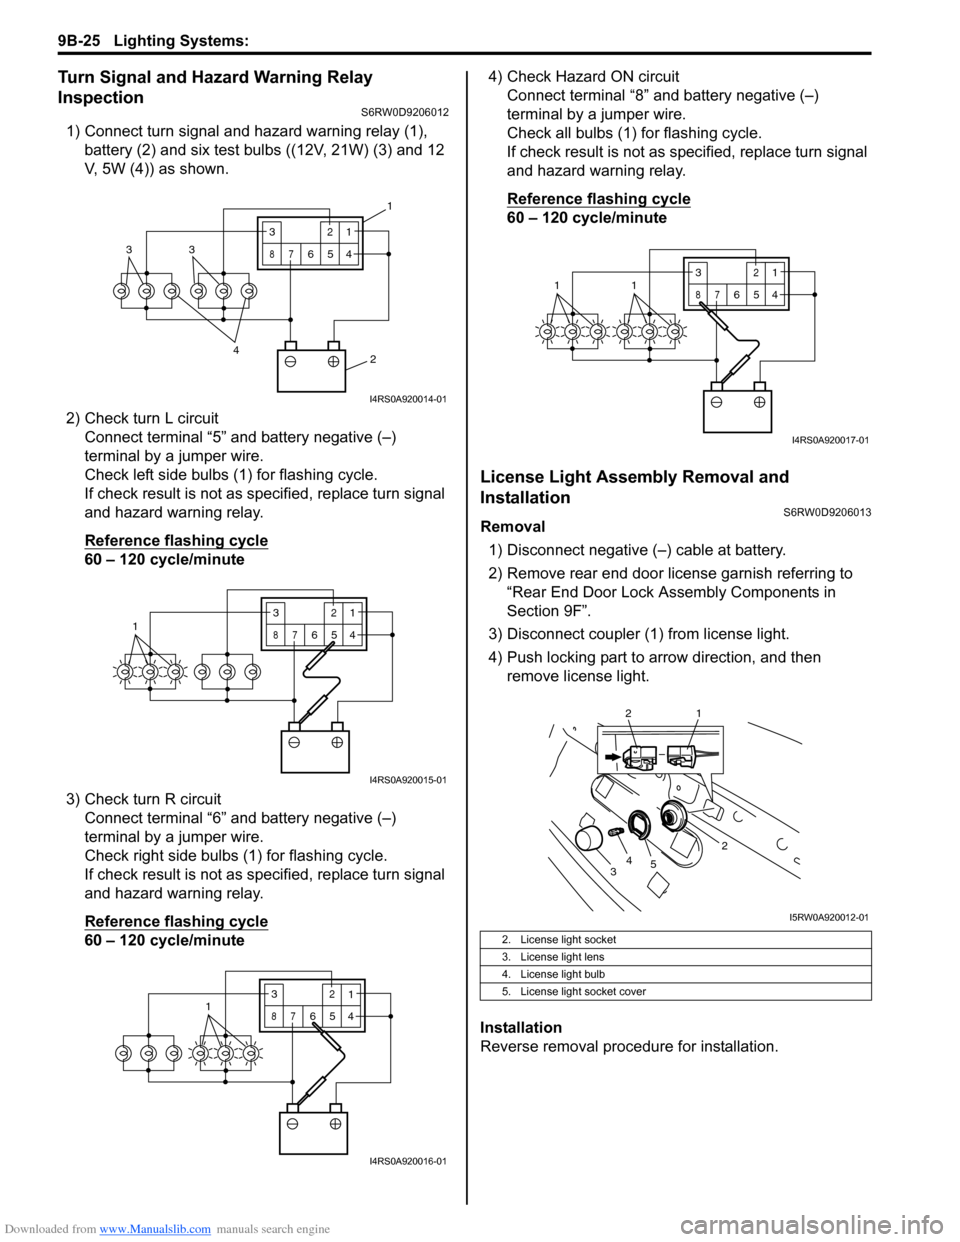
1) Connect turn signal and hazard warning relay (1),
battery (2) and six test bulbs ((12V, 21W) (3) and 12
V, 5W (4)) as shown.
2) Check turn L circuit
Connect terminal “5” and battery negative (–)
terminal by a jumper wire.
Check left side bulbs (1) for flashing cycle.
If check result is not as specified, replace turn signal
and hazard warning relay.
Reference flashing cycle
60 – 120 cycle/minute
3) Check turn R circuit
Connect terminal “6” and battery negative (–)
terminal by a jumper wire.
Check right side bulbs (1) for flashing cycle.
If check result is not as specified, replace turn signal
and hazard warning relay.
Reference flashing cycle
60 – 120 cycle/minute4) Check Hazard ON circuit
Connect terminal “8” and battery negative (–)
terminal by a jumper wire.
Check all bulbs (1) for flashing cycle.
If check result is not as specified, replace turn signal
and hazard warning relay.
Reference flashing cycle
60 – 120 cycle/minute
License Light Assembly Removal and
Installation
S6RW0D9206013
Removal
1) Disconnect negative (–) cable at battery.
2) Remove rear end door license garnish referring to
“Rear End Door Lock Assembly Components in
Section 9F”.
3) Disconnect coupler (1) from license light.
4) Push locking part to arrow direction, and then
remove license light.
Installation
Reverse removal procedure for installation.
2 4
33
3
87
12
654
1
I4RS0A920014-01
13
87
12
654
I4RS0A920015-01
3
87
12
6541
I4RS0A920016-01
2. License light socket
3. License light lens
4. License light bulb
5. License light socket cover
3
87
12
6
5411
I4RS0A920017-01
2
34
5
2 1
I5RW0A920012-01