Page 1403 of 1556
Downloaded from www.Manualslib.com manuals search engine Glass / Windows / Mirrors: 9E-18
Rear Door Window Regulator Removal and
Installation
S6RW0D9506015
Removal
1) Remove door glass referring to “Rear Door Glass
Removal and Installation”.
2) Disconnect power window motor lead wire at
coupler.
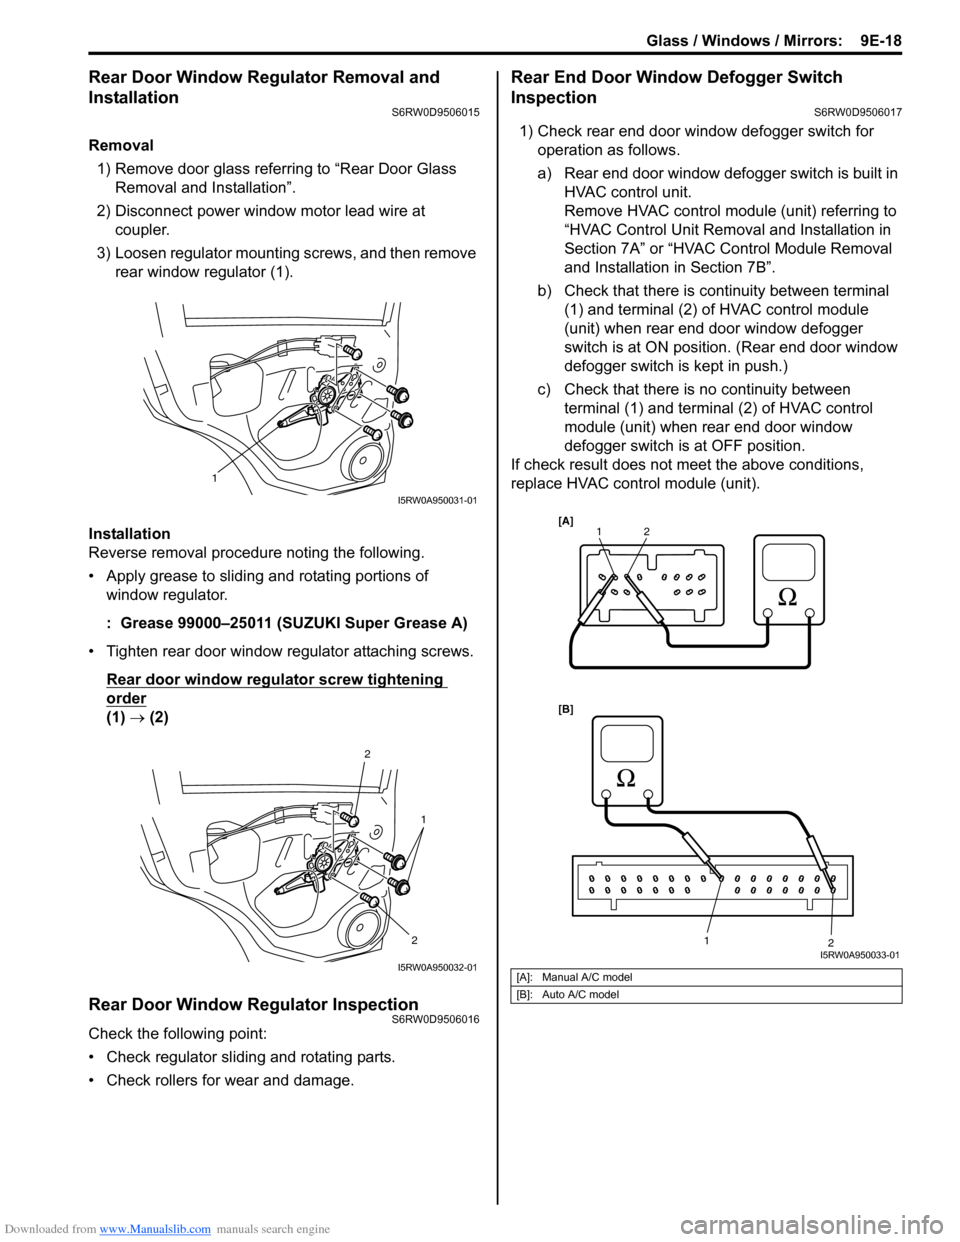
3) Loosen regulator mounting screws, and then remove
rear window regulator (1).
Installation
Reverse removal procedure noting the following.
• Apply grease to sliding and rotating portions of
window regulator.
: Grease 99000–25011 (SUZUKI Super Grease A)
• Tighten rear door window regulator attaching screws.
Rear door window regulator screw tightening
order
(1) → (2)
Rear Door Window Regulator InspectionS6RW0D9506016
Check the following point:
• Check regulator sliding and rotating parts.
• Check rollers for wear and damage.
Rear End Door Window Defogger Switch
Inspection
S6RW0D9506017
1) Check rear end door window defogger switch for
operation as follows.
a) Rear end door window defogger switch is built in
HVAC control unit.
Remove HVAC control module (unit) referring to
“HVAC Control Unit Removal and Installation in
Section 7A” or “HVAC Control Module Removal
and Installation in Section 7B”.
b) Check that there is continuity between terminal
(1) and terminal (2) of HVAC control module
(unit) when rear end door window defogger
switch is at ON position. (Rear end door window
defogger switch is kept in push.)
c) Check that there is no continuity between
terminal (1) and terminal (2) of HVAC control
module (unit) when rear end door window
defogger switch is at OFF position.
If check result does not meet the above conditions,
replace HVAC control module (unit).
1
I5RW0A950031-01
2
2
1
I5RW0A950032-01[A]: Manual A/C model
[B]: Auto A/C model
1
1 2
2[A]
[B]
I5RW0A950033-01
Page 1409 of 1556
Downloaded from www.Manualslib.com manuals search engine Glass / Windows / Mirrors: 9E-24
Power Window Main Switch Initialization
(Pinching Prevention Function Model)
S6RW0D9506030
CAUTION!
• After replacing or disconnecting the driver
side door window regulator (motor), power
window main switch, battery or fuse, be
sure to execute initial setting (to have door
glass completely closed position learned).
If initial setting is not executed, correct
automatic operation (including pinching
prevention operation) would not be
available.
• Make sure that no foreign matter is
pinched while executing initial setting.
1) Open driver side door glass fully.
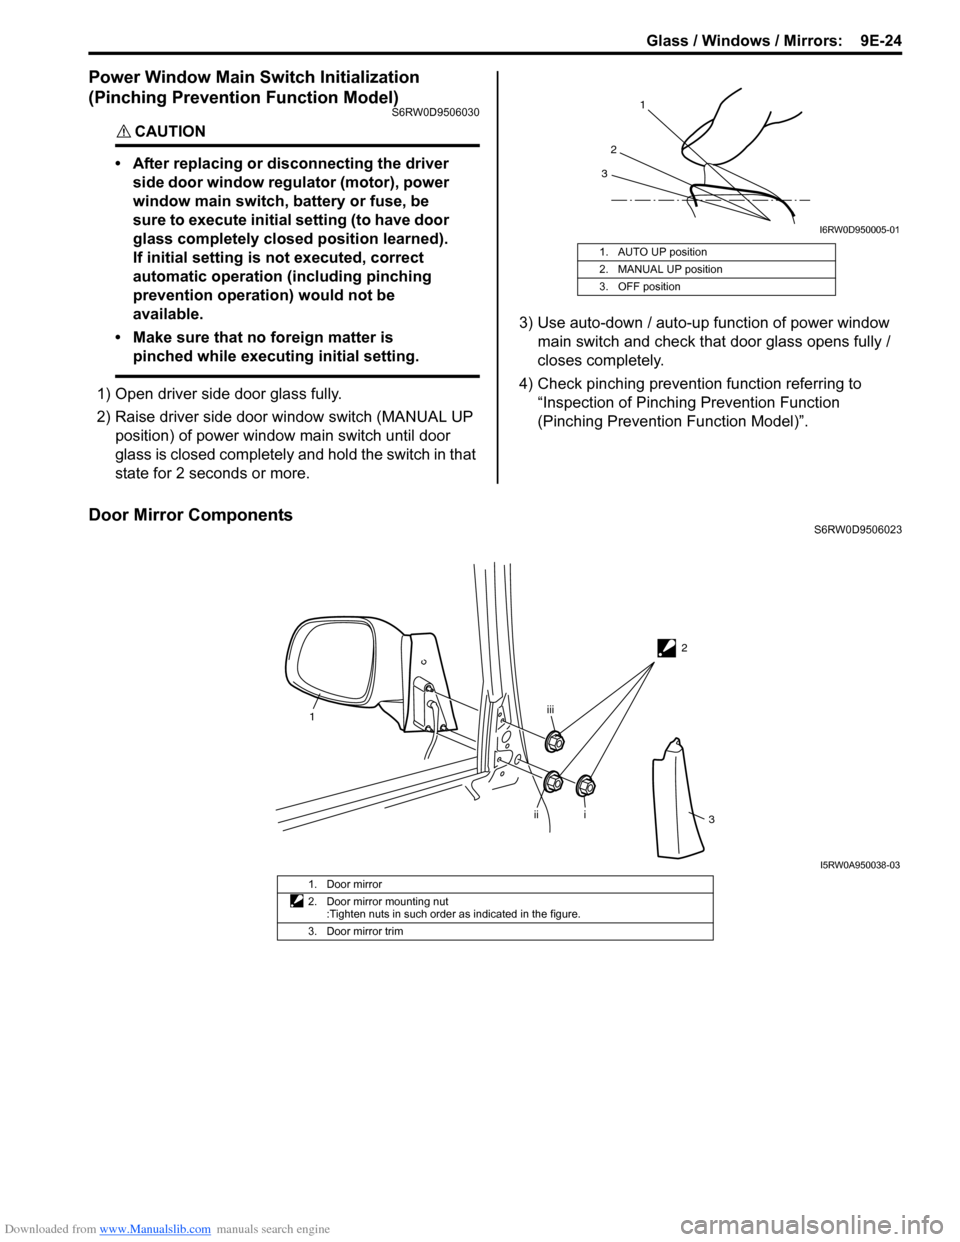
2) Raise driver side door window switch (MANUAL UP
position) of power window main switch until door
glass is closed completely and hold the switch in that
state for 2 seconds or more.3) Use auto-down / auto-up function of power window
main switch and check that door glass opens fully /
closes completely.
4) Check pinching prevention function referring to
“Inspection of Pinching Prevention Function
(Pinching Prevention Function Model)”.
Door Mirror ComponentsS6RW0D9506023 1. AUTO UP position
2. MANUAL UP position
3. OFF position
1
2
3
I6RW0D950005-01
2
1
i
iiiii
3
I5RW0A950038-03
1. Door mirror
2. Door mirror mounting nut
:Tighten nuts in such order as indicated in the figure.
3. Door mirror trim
Page 1417 of 1556
Downloaded from www.Manualslib.com manuals search engine Security and Locks: 9F-6
Repair Instructions
Front Door Lock Assembly ComponentsS6RW0D9606001
Front Door Lock Assembly Removal and
Installation
S6RW0D9606002
Removal
1) Remove door trim and door sealing cover referring to
step 1) to 6) of “Front Door Glass Removal and
Installation in Section 9E”.
2) Raise window all the way up.
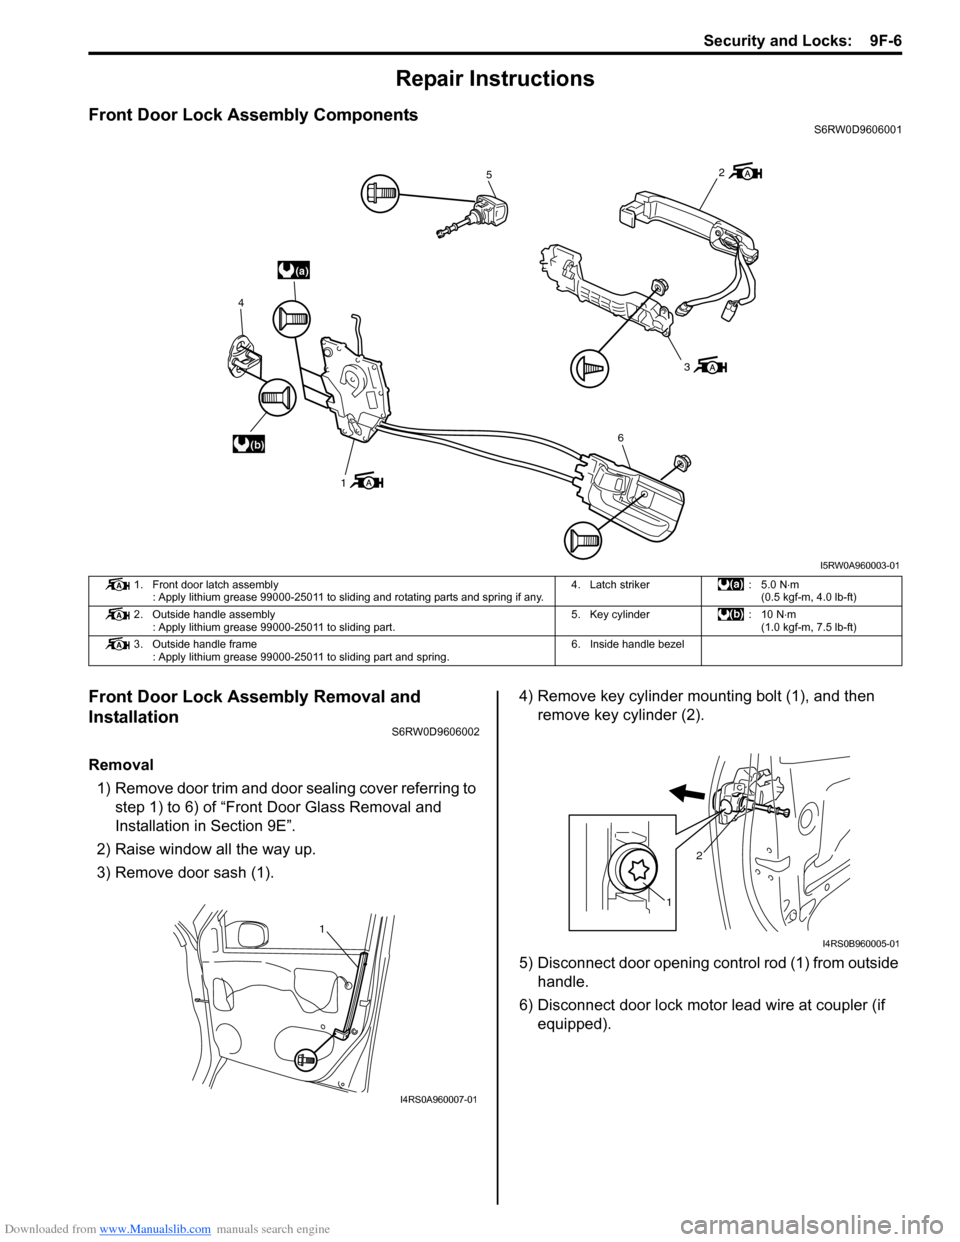
3) Remove door sash (1).4) Remove key cylinder mounting bolt (1), and then
remove key cylinder (2).
5) Disconnect door opening control rod (1) from outside
handle.
6) Disconnect door lock motor lead wire at coupler (if
equipped).
(a)
(b)
5
3
6
1 4
2
I5RW0A960003-01
1. Front door latch assembly
: Apply lithium grease 99000-25011 to sliding and rotating parts and spring if any.4. Latch striker : 5.0 N⋅m
(0.5 kgf-m, 4.0 lb-ft)
2. Outside handle assembly
: Apply lithium grease 99000-25011 to sliding part.5. Key cylinder : 10 N⋅m
(1.0 kgf-m, 7.5 lb-ft)
3. Outside handle frame
: Apply lithium grease 99000-25011 to sliding part and spring.6. Inside handle bezel
1
I4RS0A960007-01
12
I4RS0B960005-01
Page 1421 of 1556
Downloaded from www.Manualslib.com manuals search engine Security and Locks: 9F-10
Rear Door Lock Assembly ComponentsS6RW0D9606007
Rear Door Lock Assembly Removal and
Installation
S6RW0D9606008
Removal
1) Remove rear door glass referring to “Rear Door
Glass Removal and Installation in Section 9E”.
2) Disconnect door lock motor lead wire (If equipped).
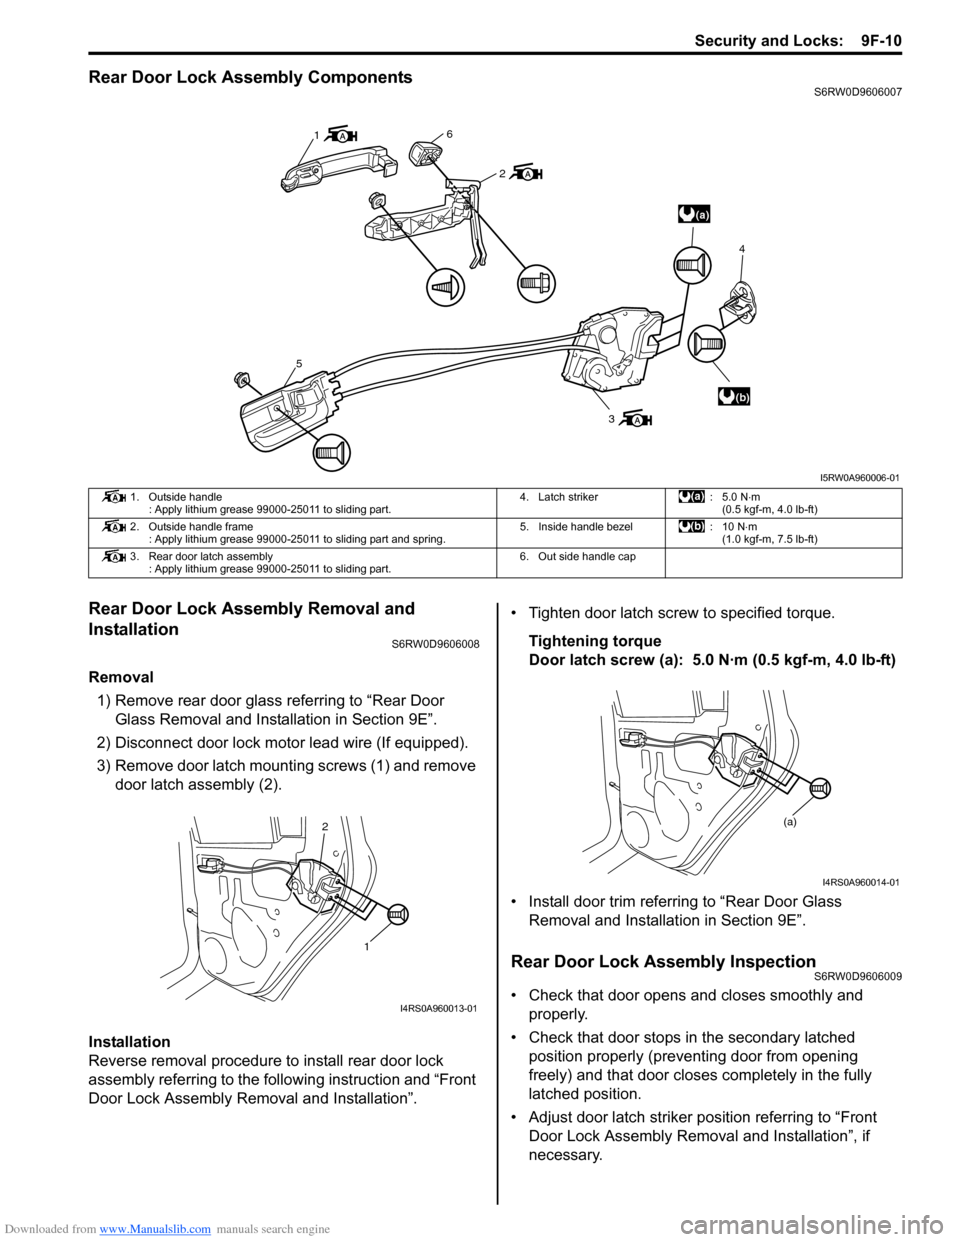
3) Remove door latch mounting screws (1) and remove
door latch assembly (2).
Installation
Reverse removal procedure to install rear door lock
assembly referring to the following instruction and “Front
Door Lock Assembly Removal and Installation”.• Tighten door latch screw to specified torque.
Tightening torque
Door latch screw (a): 5.0 N·m (0.5 kgf-m, 4.0 lb-ft)
• Install door trim referring to “Rear Door Glass
Removal and Installation in Section 9E”.
Rear Door Lock Assembly InspectionS6RW0D9606009
• Check that door opens and closes smoothly and
properly.
• Check that door stops in the secondary latched
position properly (preventing door from opening
freely) and that door closes completely in the fully
latched position.
• Adjust door latch striker position referring to “Front
Door Lock Assembly Removal and Installation”, if
necessary.
(a)
(b) 1
6
2
5
34
I5RW0A960006-01
1. Outside handle
: Apply lithium grease 99000-25011 to sliding part.4. Latch striker : 5.0 N⋅m
(0.5 kgf-m, 4.0 lb-ft)
2. Outside handle frame
: Apply lithium grease 99000-25011 to sliding part and spring.5. Inside handle bezel : 10 N⋅m
(1.0 kgf-m, 7.5 lb-ft)
3. Rear door latch assembly
: Apply lithium grease 99000-25011 to sliding part.6. Out side handle cap
1 2
I4RS0A960013-01
(a)
I4RS0A960014-01
Page 1422 of 1556
Downloaded from www.Manualslib.com manuals search engine 9F-11 Security and Locks:
Rear End Door Lock Assembly ComponentsS6RW0D9606010
1
3
(a)
(b)4
5
2
6
7
8
i
ii iv
iii
(c)
8
(c)
8(c)
I7RW01960007-04
1. Rear end door latch assembly
(rear end door switch is built in this assembly)5. Emergency lever
: Rear end door is unlocked by pushing emergency lever
with flat head driver if rear end door lock can not be
released by door opener switch.: 10 N⋅m (1.0 kgf-m, 7.5 lb-ft)
2. Rear end door opener switch 6. Rear end door request switch
(if equipped): 23 N⋅m (2.3 kgf-m, 17.0 lb-ft)
3. Latch striker 7. Rear end door license garnish : 6 N⋅m (0.6 kgf-m, 4.5 lb-ft)
4. Door handle 8. Rear end door license garnish mounting nut
: Tighten nuts in such order as indicated in figure.
Page 1429 of 1556
Downloaded from www.Manualslib.com manuals search engine Seats: 9G-2
Repair Instructions
Front Seat ComponentsS6RW0D9706001
3
2
8
7
a
c
4
d
b
1
5
5
4
6
64
a
b
c
d
(b)
(b)
(b)
(b)
(a)
(a)
(a)
(a)
A
A
A
(b)
(c)
BA
A
A
B
A
B
I6RW0C970001-01
1. Seat cushion7. Side air bag module (if equipped)
2. Seat back
: Apply lithium grease 99000-25011 to sliding part of reclining.8. Side air bag harness (if equipped)
3. Headrest: 23 N⋅m (2.3 kgf-m, 17.0 lb-ft)
4. Cover: 35 N⋅m (3.5 kgf-m, 25.5 lb-ft)
5. Seat adjuster
: Apply lithium grease 99000-25011 to seat adjuster inside.: 28 N⋅m (2.8 kgf-m, 20.5 lb-ft) (Seat lifter type)
35 N⋅m (3.5 kgf-m, 25.5 lb-ft) (Non seat lifter type)
6. Knoba, b, c, d: Seat back mounting bolt
Seat mounting bolt
Tightening order: a → b → c → d
Page 1430 of 1556
Downloaded from www.Manualslib.com manuals search engine 9G-3 Seats:
Front Seat Removal and InstallationS6RW0D9706002
Removal
1) Disable air bag system referring to “Disabling Air
Bag System in Section 8B”.
2) Disconnect seat harness coupler and side air bag
coupler, if equipped.
3) Remove 4 mounting bolts to remove seat assembly.
4) Disassemble and repair seat as necessary.
Installation
Reverse removal procedure to install front seat.
• Torque to specifications as shown in “Front Seat
Components”.
• Enable air bag system referring to “Enabling Air Bag
System in Section 8B”.
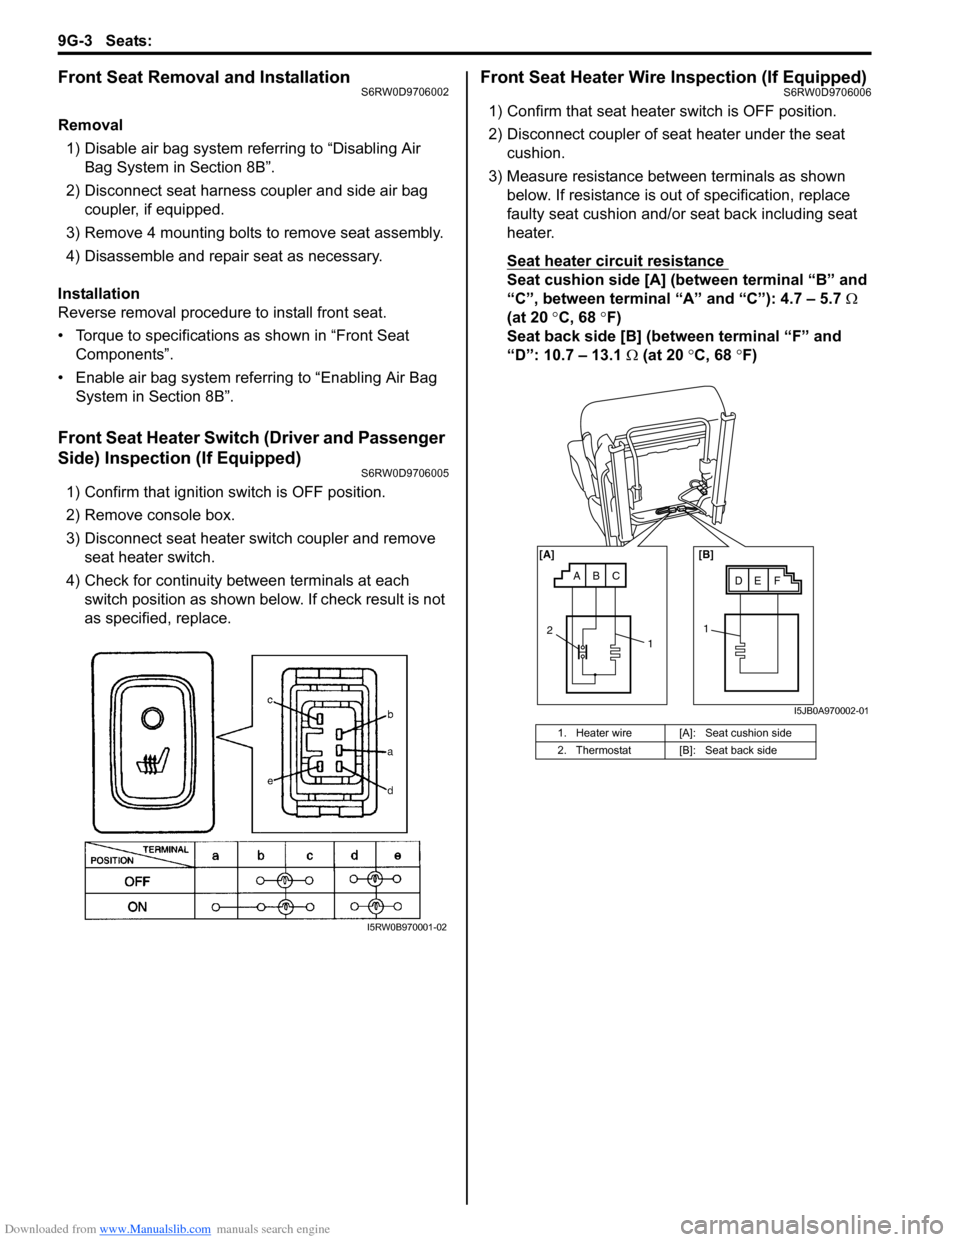
Front Seat Heater Switch (Driver and Passenger
Side) Inspection (If Equipped)
S6RW0D9706005
1) Confirm that ignition switch is OFF position.
2) Remove console box.
3) Disconnect seat heater switch coupler and remove
seat heater switch.
4) Check for continuity between terminals at each
switch position as shown below. If check result is not
as specified, replace.
Front Seat Heater Wire Inspection (If Equipped)S6RW0D9706006
1) Confirm that seat heater switch is OFF position.
2) Disconnect coupler of seat heater under the seat
cushion.
3) Measure resistance between terminals as shown
below. If resistance is out of specification, replace
faulty seat cushion and/or seat back including seat
heater.
Seat heater circuit resistance
Seat cushion side [A] (between terminal “B” and
“C”, between terminal “A” and “C”): 4.7 – 5.7 Ω
(at 20 °C, 68 °F)
Seat back side [B] (between terminal “F” and
“D”: 10.7 – 13.1 Ω (at 20 °C, 68 °F)
I5RW0B970001-02
1. Heater wire [A]: Seat cushion side
2. Thermostat [B]: Seat back side
ABCDE F [A] [B]
11
2
I5JB0A970002-01
Page 1431 of 1556
Downloaded from www.Manualslib.com manuals search engine Seats: 9G-4
Rear Seat ComponentsS6RW0D9706003
Rear Seat Removal and InstallationS6RW0D9706004
Removal
1) Fold rear seat back forward.
2) Remove seat mounting bolts and nuts to remove seat assembly.
3) Disassemble and repair seat as necessary.
Installation
Reverse removal procedure to install rear seat.
• Torque to specifications in “Rear Seat Components”.
3
5
4
4
4
7
4
2
6
b
c
a
(d)
(a)
(d)
(b)
(b)
(b)
(c)
A
7A
(b)
8
I6RW0C970002-01
1. Seat cushion:35 N⋅m (3.5 kgf-m, 25.5 lb-ft)
2. Seat back:23 N⋅m (2.3 kgf-m, 17.0 lb-ft)
3. Head rest (if equipped):25 N⋅m (2.5 kgf-m, 18.0 lb-ft)
4. Cover:45 N⋅m (4.5 kgf-m, 33.0 lb-ft)
5. Rear center seat belt (if equipped) a, b, c: Seat back striker mounting bolt
6. Seat back striker: Tightening order (Left side): a→b→c
7. Rear cushion leg
: Apply lithium grease to 99000-25011 to cushion leg.: Tightening order (Right side): b→a→c
8. Rear seat back lock