2006 SUZUKI SX4 steering
[x] Cancel search: steeringPage 1088 of 1556
Downloaded from www.Manualslib.com manuals search engine 8B-49 Air Bag System:
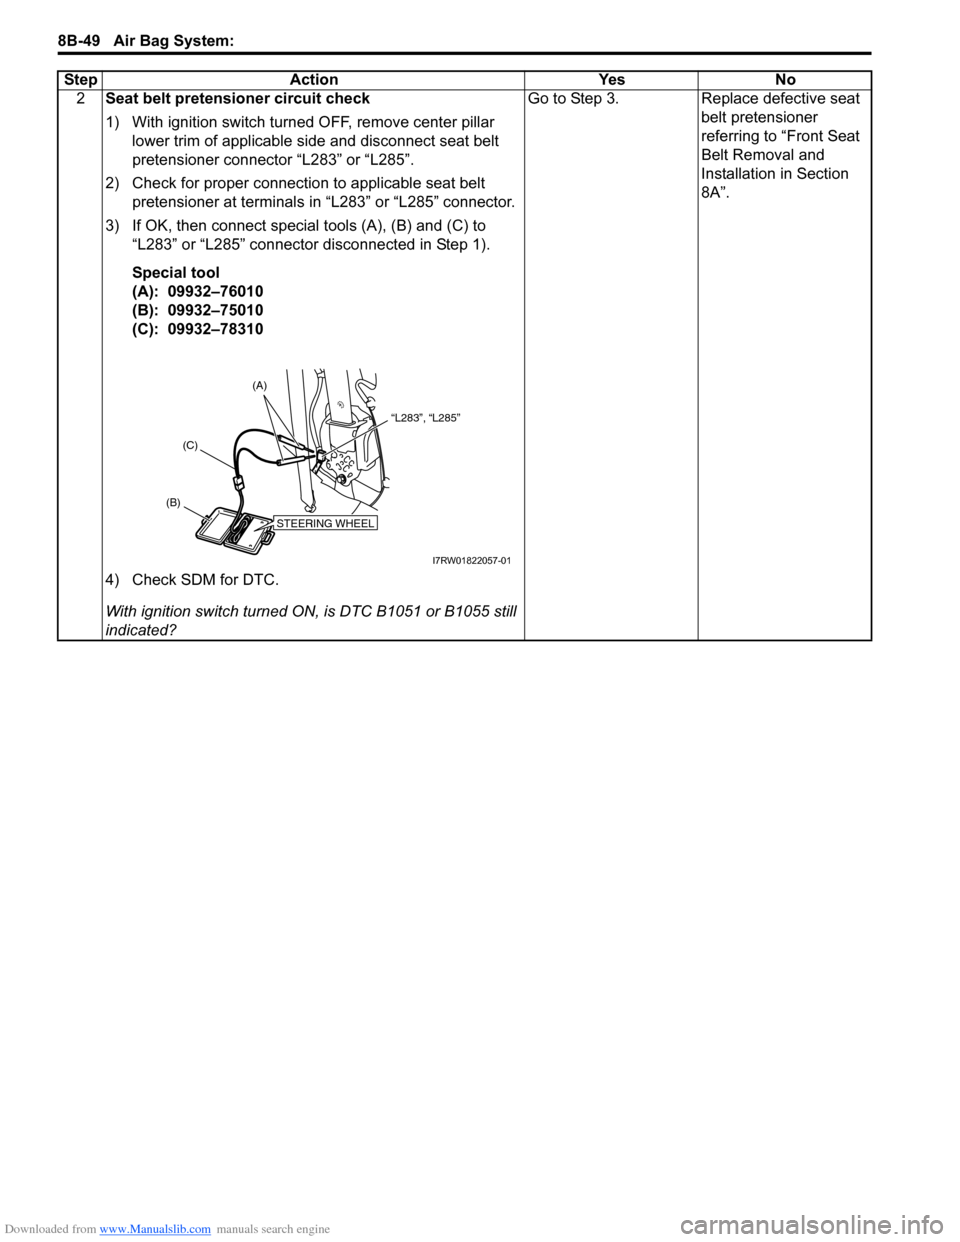
2Seat belt pretensioner circuit check
1) With ignition switch turned OFF, remove center pillar
lower trim of applicable side and disconnect seat belt
pretensioner connector “L283” or “L285”.
2) Check for proper connection to applicable seat belt
pretensioner at terminals in “L283” or “L285” connector.
3) If OK, then connect special tools (A), (B) and (C) to
“L283” or “L285” connector disconnected in Step 1).
Special tool
(A): 09932–76010
(B): 09932–75010
(C): 09932–78310
4) Check SDM for DTC.
With ignition switch turned ON, is DTC B1051 or B1055 still
indicated?Go to Step 3. Replace defective seat
belt pretensioner
referring to “Front Seat
Belt Removal and
Installation in Section
8A”. Step Action Yes No
STEERING WHEEL
(B)(C)(A)
“L283”, “L285”
I7RW01822057-01
Page 1090 of 1556
Downloaded from www.Manualslib.com manuals search engine 8B-51 Air Bag System:
DTC B1052 / B1056: Seat Belt Pretensioner Circuit Low ResistanceS6RW0D8204027
DTC B1052: Driver Seat Belt Pretensioner Circuit Low Resistance
DTC B1056: Passenger Seat Belt Pretensioner Circuit Low Resistance
Wiring Diagram
Refer to “DTC B1051 / B1055: Seat Belt Pretensioner Circuit High Resistance”.
DTC Detecting Condition and Trouble Area
DTC TroubleshootingDTC detecting condition Trouble area
DTC B1052:
Driver seat belt pretensioner circuit is less than 0.9 Ω for
more than 4 sec.
DTC B1056:
Passenger seat belt pretensioner circuit is less than 0.9 Ω
for more than 4 sec.• Driver / passenger seat belt pretensioner circuit
• Driver / passenger seat belt pretensioner
•SDM
Step Action Yes No
1Was “Air Bag Diagnostic System Check Flow” performed?Go to Step 2. Go to “Air Bag
Diagnostic System
Check Flow”.
2Seat belt pretensioner circuit check
1) With ignition switch turned OFF, remove center pillar
lower trim of applicable side and disconnect applicable
seat belt pretensioner connector “L283” or “L285”.
2) Check for proper connection to applicable seat belt
pretensioner at terminals in “L283” or “L285” connector.
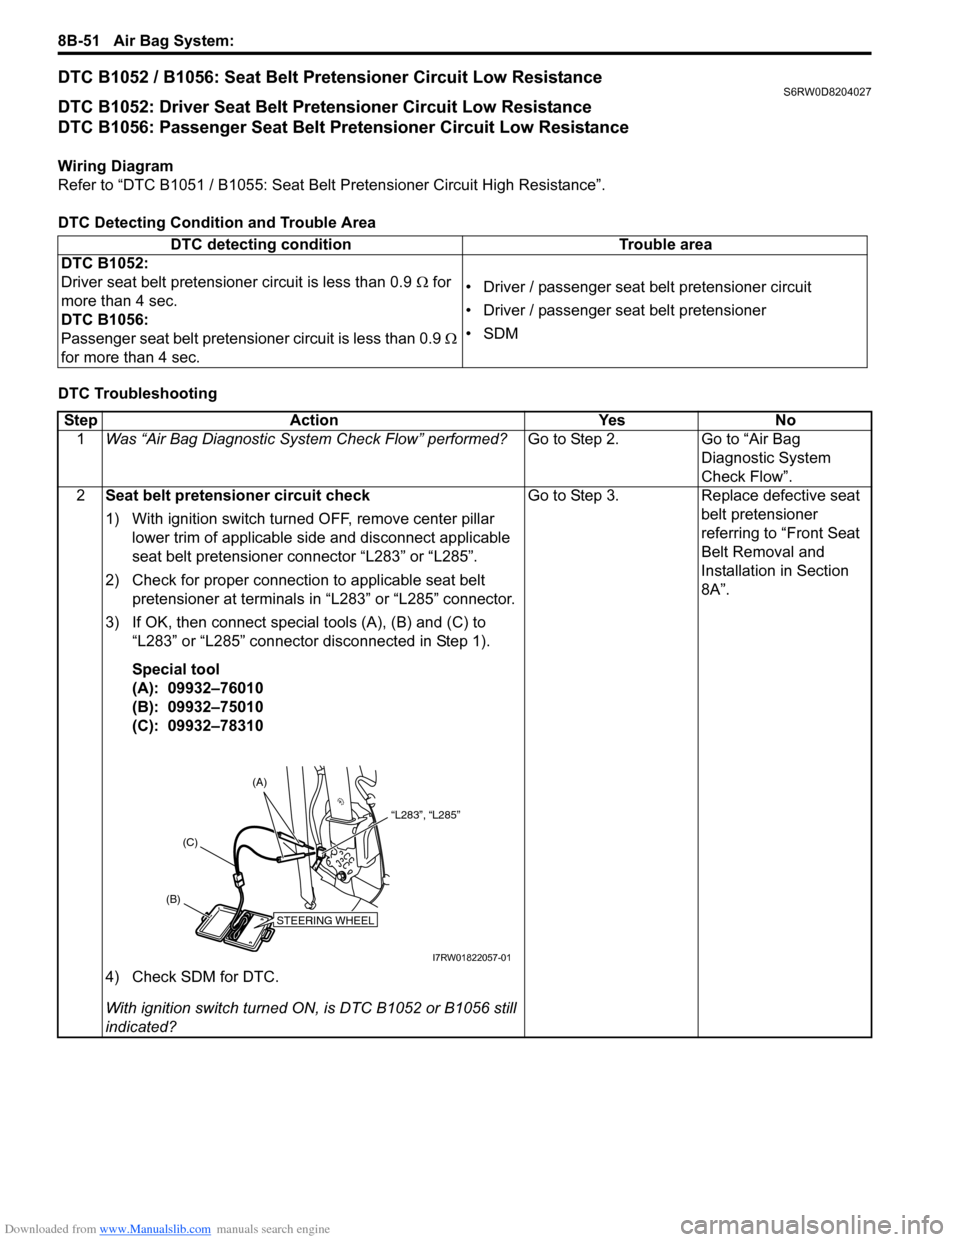
3) If OK, then connect special tools (A), (B) and (C) to
“L283” or “L285” connector disconnected in Step 1).
Special tool
(A): 09932–76010
(B): 09932–75010
(C): 09932–78310
4) Check SDM for DTC.
With ignition switch turned ON, is DTC B1052 or B1056 still
indicated?Go to Step 3. Replace defective seat
belt pretensioner
referring to “Front Seat
Belt Removal and
Installation in Section
8A”.
STEERING WHEEL
(B)(C)(A)
“L283”, “L285”
I7RW01822057-01
Page 1095 of 1556
Downloaded from www.Manualslib.com manuals search engine Air Bag System: 8B-56
DTC Troubleshooting
Step Action Yes No
1Was “Air Bag Diagnostic System Check Flow” performed?Go to Step 2. Go to “Air Bag
Diagnostic System
Check Flow”.
2Side-air bag circuit check
1) Remove applicable driver / passenger side-air bag
(inflator) module from seat back referring to “Side-Air
Bag (Inflator) Module Removal and Installation”.
2) Check for proper connection to applicable side-air bag
(inflator) module at terminal in connector “Q104” or
“Q105”.
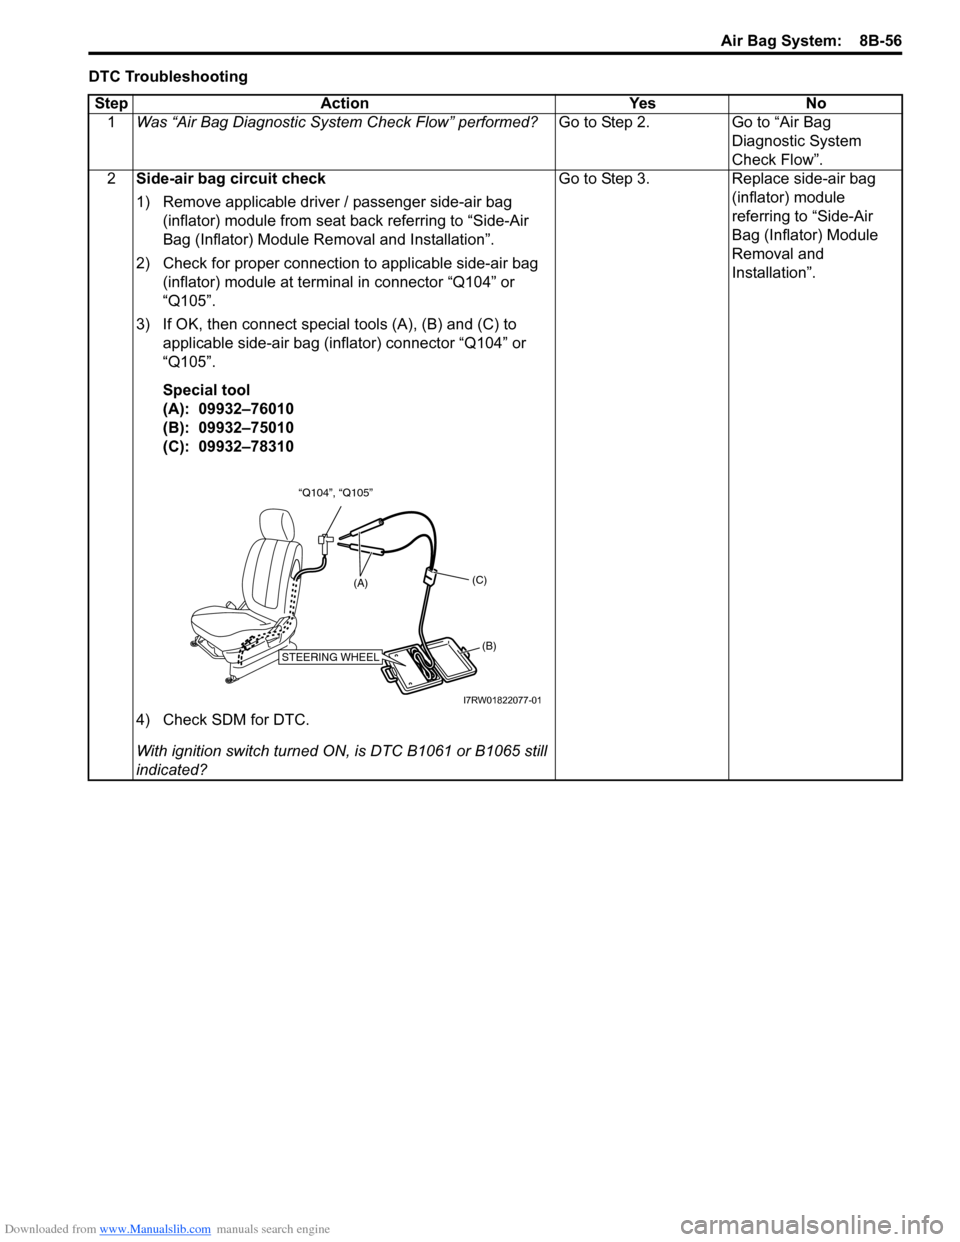
3) If OK, then connect special tools (A), (B) and (C) to
applicable side-air bag (inflator) connector “Q104” or
“Q105”.
Special tool
(A): 09932–76010
(B): 09932–75010
(C): 09932–78310
4) Check SDM for DTC.
With ignition switch turned ON, is DTC B1061 or B1065 still
indicated?Go to Step 3. Replace side-air bag
(inflator) module
referring to “Side-Air
Bag (Inflator) Module
Removal and
Installation”.
“Q104”, “Q105”
STEERING WHEEL(B) (C)
(A)
I7RW01822077-01
Page 1098 of 1556
Downloaded from www.Manualslib.com manuals search engine 8B-59 Air Bag System:
DTC B1062 / B1066: Side-Air Bag Circuit Low ResistanceS6RW0D8204054
DTC B1062: Driver Side-Air Bag Circuit Low Resistance
DTC B1066: Passenger Side-Air Bag Circuit Low Resistance
Wiring Diagram
Refer to “DTC B1061 / B1065: Side-Air Bag Circuit High Resistance”.
DTC Detecting Condition and Trouble Area
DTC TroubleshootingDTC detecting condition Trouble area
DTC B1062:
Driver side-air bag circuit is less than 1.0 Ω for more than
4 sec.
DTC B1066:
Passenger side-air bag circuit is less than 1.0 Ω for more
than 4 sec.• Driver / passenger side-air bag circuit
• Driver / passenger side-air bag module
•SDM
Step Action Yes No
1Was “Air Bag Diagnostic System Check Flow” performed?Go to Step 2. Go to “Air Bag
Diagnostic System
Check Flow”.
2Side-air bag circuit check
1) Remove applicable driver / passenger side-air bag
(inflator) module from seat back referring to “Side-Air
Bag (Inflator) Module Removal and Installation”.
2) Check for proper connection to applicable side-air bag
(inflator) module at terminal in connector “Q104” or
“Q105”.
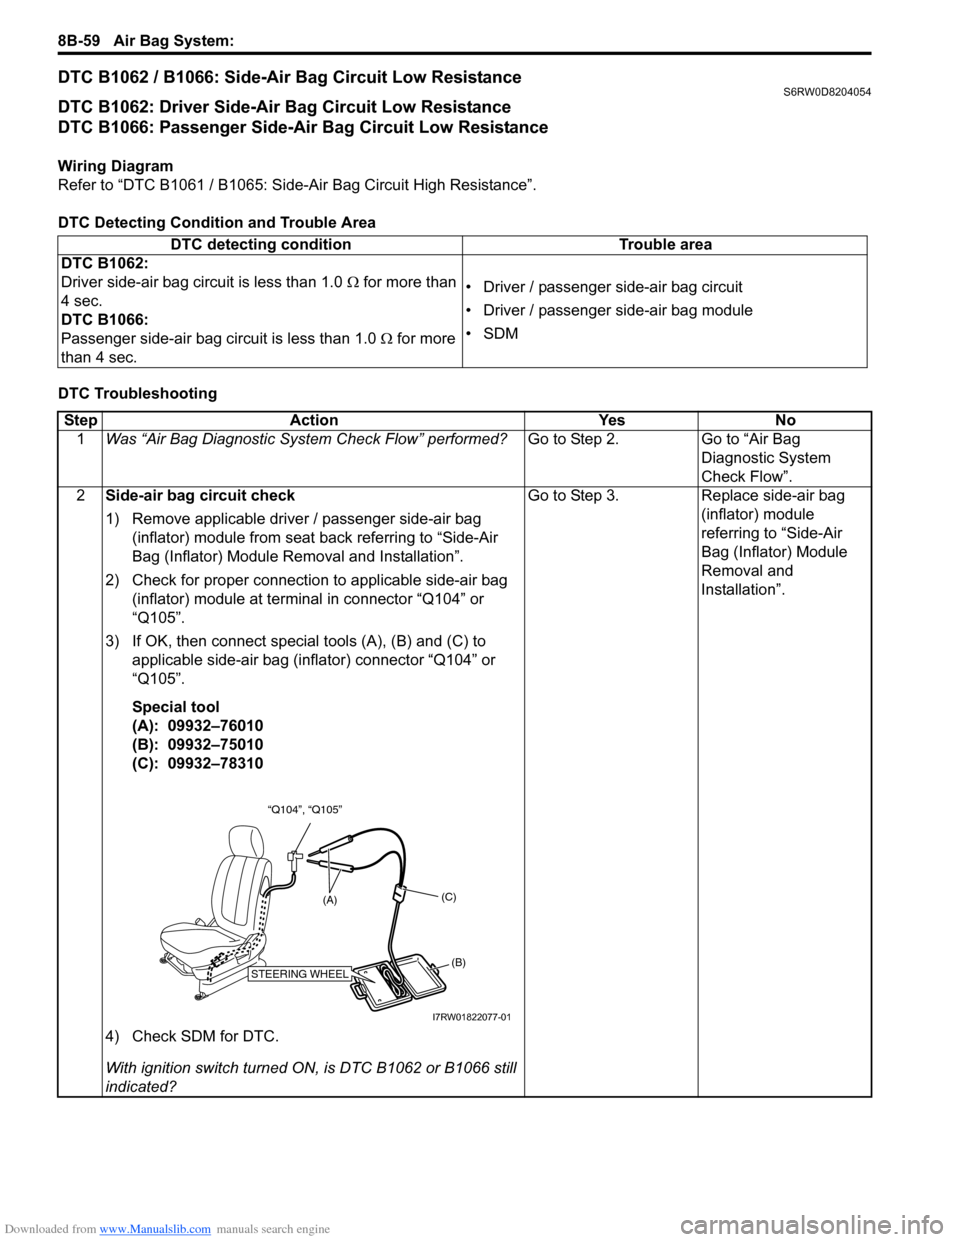
3) If OK, then connect special tools (A), (B) and (C) to
applicable side-air bag (inflator) connector “Q104” or
“Q105”.
Special tool
(A): 09932–76010
(B): 09932–75010
(C): 09932–78310
4) Check SDM for DTC.
With ignition switch turned ON, is DTC B1062 or B1066 still
indicated?Go to Step 3. Replace side-air bag
(inflator) module
referring to “Side-Air
Bag (Inflator) Module
Removal and
Installation”.
“Q104”, “Q105”
STEERING WHEEL(B) (C)
(A)
I7RW01822077-01
Page 1115 of 1556
Downloaded from www.Manualslib.com manuals search engine Air Bag System: 8B-76
DTC Troubleshooting
Step Action Yes No
1Was “Air Bag Diagnostic System Check Flow” performed?Go to Step 2. Go to “Air Bag
Diagnostic System
Check Flow”.
2Driver / passenger curtain-air bag circuit check
1) With ignition switch turned OFF, remove rear quarter
upper trim of applicable side and disconnect applicable
side curtain-air bag (inflator) module connector.
2) Check for proper connection to applicable side curtain-
air bag (inflator) module at terminals in “Q102” or “Q103”
connector.
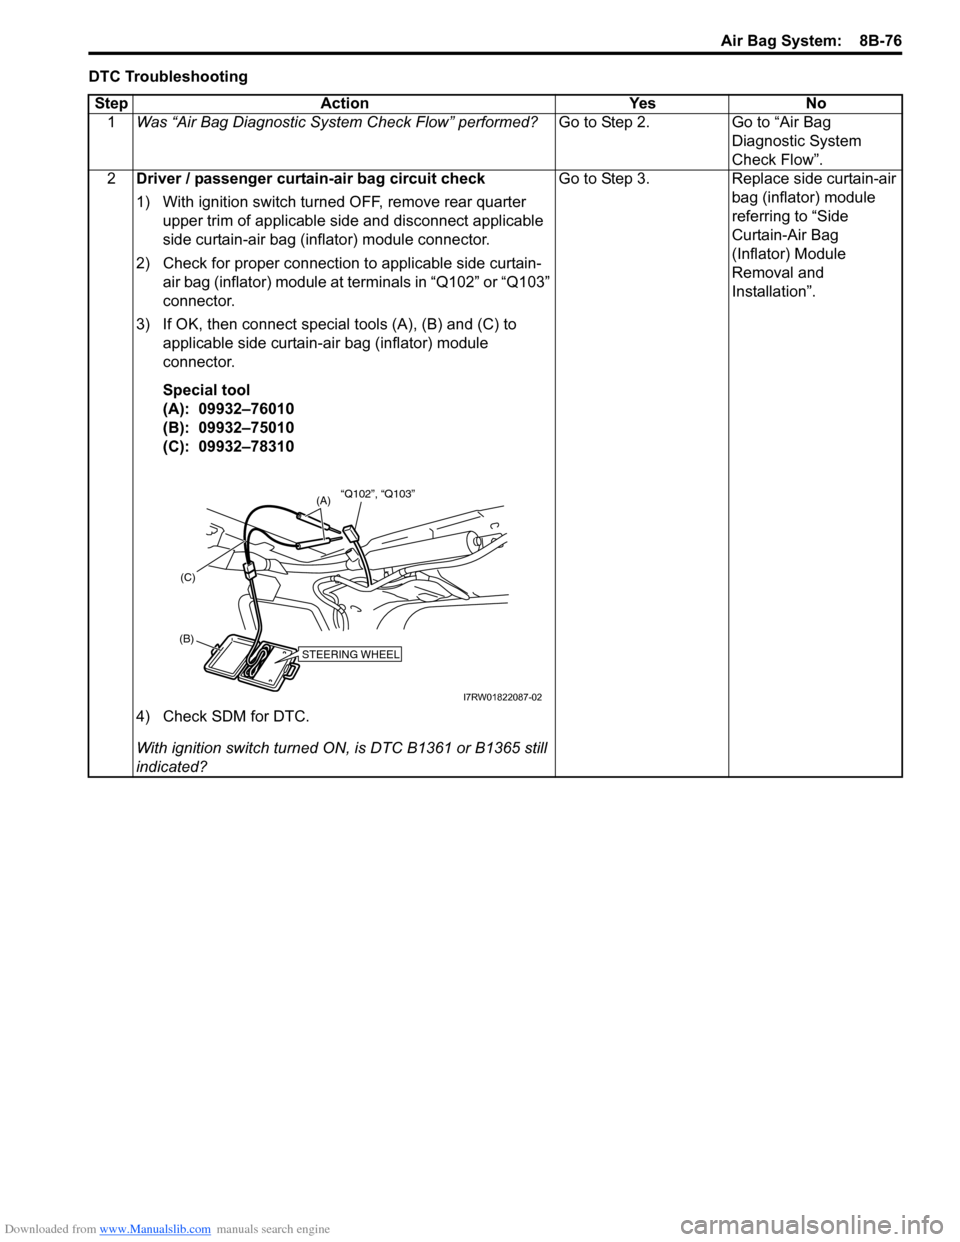
3) If OK, then connect special tools (A), (B) and (C) to
applicable side curtain-air bag (inflator) module
connector.
Special tool
(A): 09932–76010
(B): 09932–75010
(C): 09932–78310
4) Check SDM for DTC.
With ignition switch turned ON, is DTC B1361 or B1365 still
indicated?Go to Step 3. Replace side curtain-air
bag (inflator) module
referring to “Side
Curtain-Air Bag
(Inflator) Module
Removal and
Installation”.
STEERING WHEEL(B)(C)
(A)“Q102”, “Q103”
I7RW01822087-02
Page 1118 of 1556
Downloaded from www.Manualslib.com manuals search engine 8B-79 Air Bag System:
DTC B1362 / B1366: Curtain-Air Bag Circuit Low ResistanceS6RW0D8204063
DTC B1362: Driver Curtain-Air Bag Circuit Low Resistance
DTC B1366: Passenger Curtain-Air Bag Circuit Low Resistance
Wiring Diagram
Refer to “DTC B1361 / B1365: Curtain-Air Bag Circuit High Resistance”.
DTC Detecting Condition and Trouble Area
DTC TroubleshootingDTC detecting condition Trouble area
DTC B1362:
Driver curtain-air bag circuit is less than 1.0 Ω for more
than 4 sec.
DTC B1366:
Passenger curtain-air bag circuit is less than 1.0 Ω for
more than 4 sec.• Driver / passenger curtain-air bag circuit
• Driver / passenger curtain-air bag module
•SDM
Step Action Yes No
1Was “Air Bag Diagnostic System Check Flow” performed?Go to Step 2. Go to “Air Bag
Diagnostic System
Check Flow”.
2Driver / passenger curtain-air bag circuit check
1) With ignition switch turned OFF, remove rear quarter
upper trim of applicable side and disconnect applicable
side curtain-air bag (inflator) module connector.
2) Check for proper connection to applicable side curtain-
air bag (inflator) module at terminals in “Q102” or “Q103”
connector.
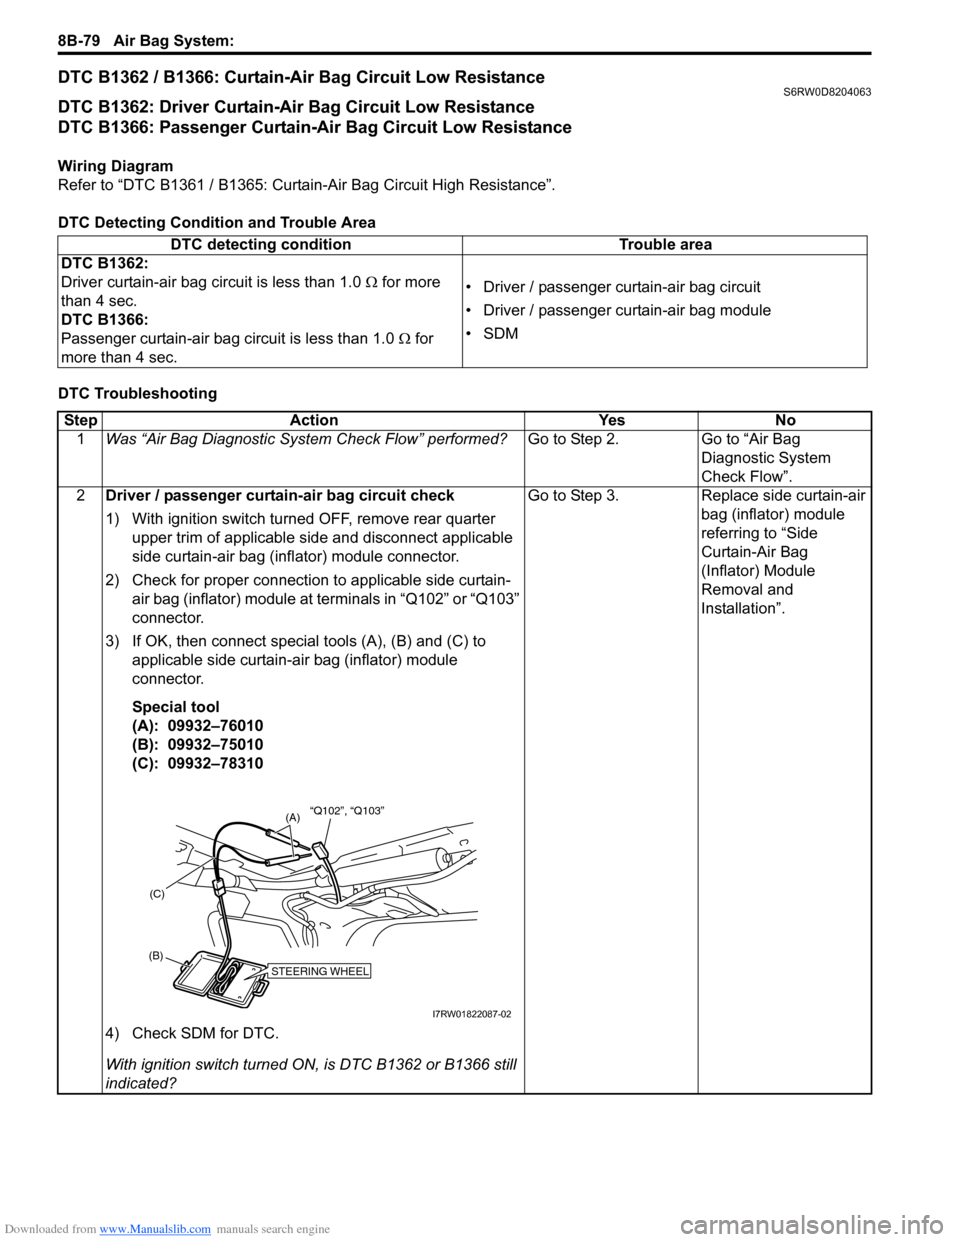
3) If OK, then connect special tools (A), (B) and (C) to
applicable side curtain-air bag (inflator) module
connector.
Special tool
(A): 09932–76010
(B): 09932–75010
(C): 09932–78310
4) Check SDM for DTC.
With ignition switch turned ON, is DTC B1362 or B1366 still
indicated?Go to Step 3. Replace side curtain-air
bag (inflator) module
referring to “Side
Curtain-Air Bag
(Inflator) Module
Removal and
Installation”.
STEERING WHEEL(B)(C)
(A)“Q102”, “Q103”
I7RW01822087-02
Page 1130 of 1556
Downloaded from www.Manualslib.com manuals search engine 8B-91 Air Bag System:
CAUTION!
After detecting one time of such collision as
to meet deployment conditions, the SDM
must not be used.
Refer to “Air Bag Diagnostic System Check”
when checking the SDM.
Accident with Deployment / Activation – Component
Replacement
When driver and passenger air bags are deployed, the
following components must be replaced.
• Driver and passenger air bag (inflator) modules
• Driver and passenger seat belt pretensioners
• SDM after detecting such collision as to meet
deployment conditions
• Forward impact-sensor
• Instrument panel
When side-air bag and side curtain-air bag are deployed,
the following components must be replaced.
• Deployed side-air bag (inflator) module
• Deployed side curtain-air bag (inflator) module
• Side impact-sensor
•SDM
Accident with or without Deployment / Activation –
Component Inspections
Certain air bag and restraint system components must
be inspected after any crash, whether the air bag system
activated or not. If any faulty condition is found in the
following checks, replace faulty part.
Those components are:
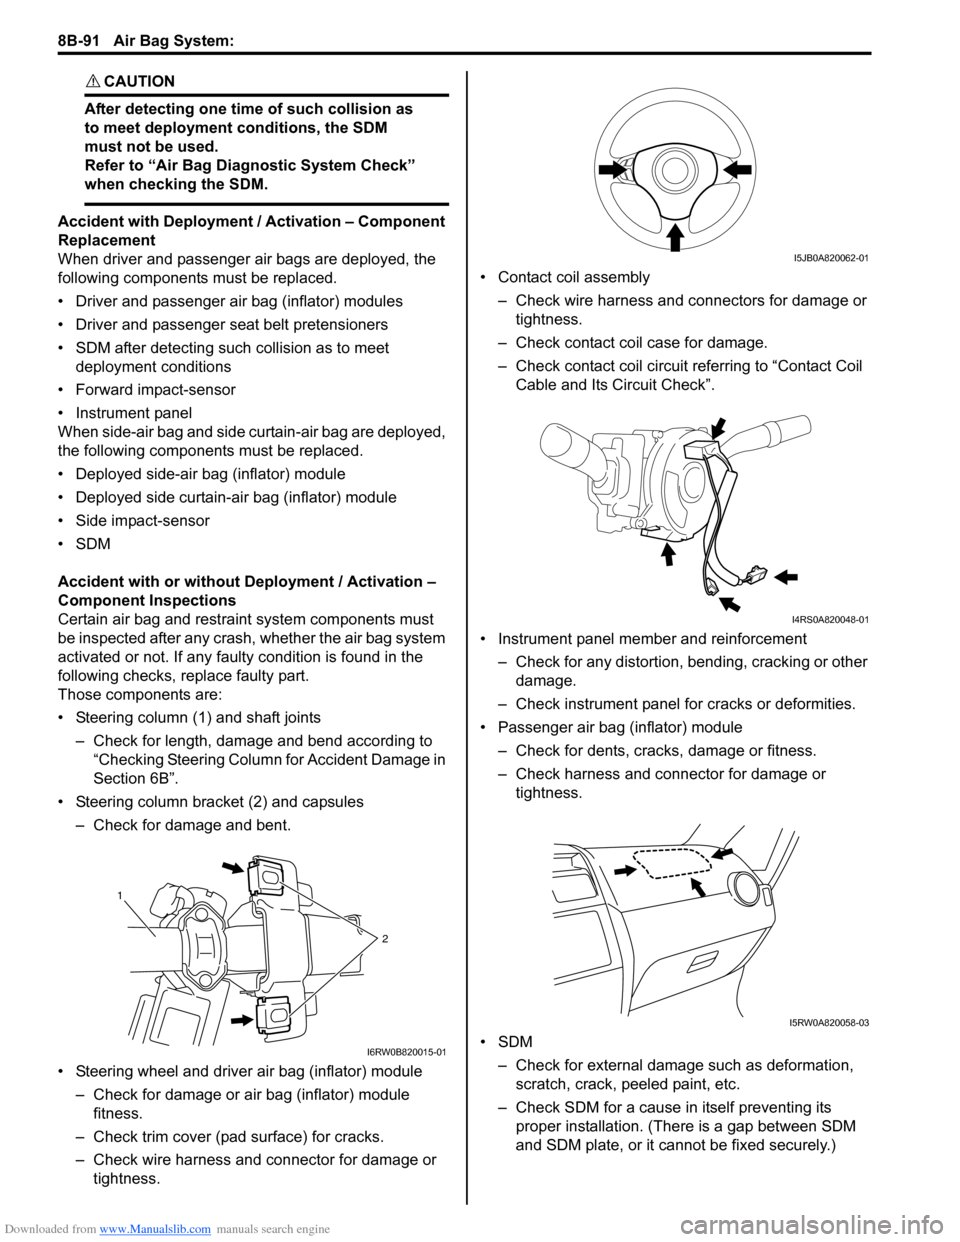
• Steering column (1) and shaft joints
– Check for length, damage and bend according to
“Checking Steering Column for Accident Damage in
Section 6B”.
• Steering column bracket (2) and capsules
– Check for damage and bent.
• Steering wheel and driver air bag (inflator) module
– Check for damage or air bag (inflator) module
fitness.
– Check trim cover (pad surface) for cracks.
– Check wire harness and connector for damage or
tightness.• Contact coil assembly
– Check wire harness and connectors for damage or
tightness.
– Check contact coil case for damage.
– Check contact coil circuit referring to “Contact Coil
Cable and Its Circuit Check”.
• Instrument panel member and reinforcement
– Check for any distortion, bending, cracking or other
damage.
– Check instrument panel for cracks or deformities.
• Passenger air bag (inflator) module
– Check for dents, cracks, damage or fitness.
– Check harness and connector for damage or
tightness.
•SDM
– Check for external damage such as deformation,
scratch, crack, peeled paint, etc.
– Check SDM for a cause in itself preventing its
proper installation. (There is a gap between SDM
and SDM plate, or it cannot be fixed securely.)
1
2
I6RW0B820015-01
I5JB0A820062-01
I4RS0A820048-01
I5RW0A820058-03
Page 1132 of 1556
Downloaded from www.Manualslib.com manuals search engine 8B-93 Air Bag System:
Repair Instructions
Disabling Air Bag SystemS6RW0D8206001
1) Turn steering wheel so that vehicle’s wheels (front
tires) are pointing straight ahead.
2) Disconnect negative (–) cable at battery.
3) Turn ignition switch to “LOCK” position and remove
key.
4) Remove “A/B” fuse from junction block assembly.
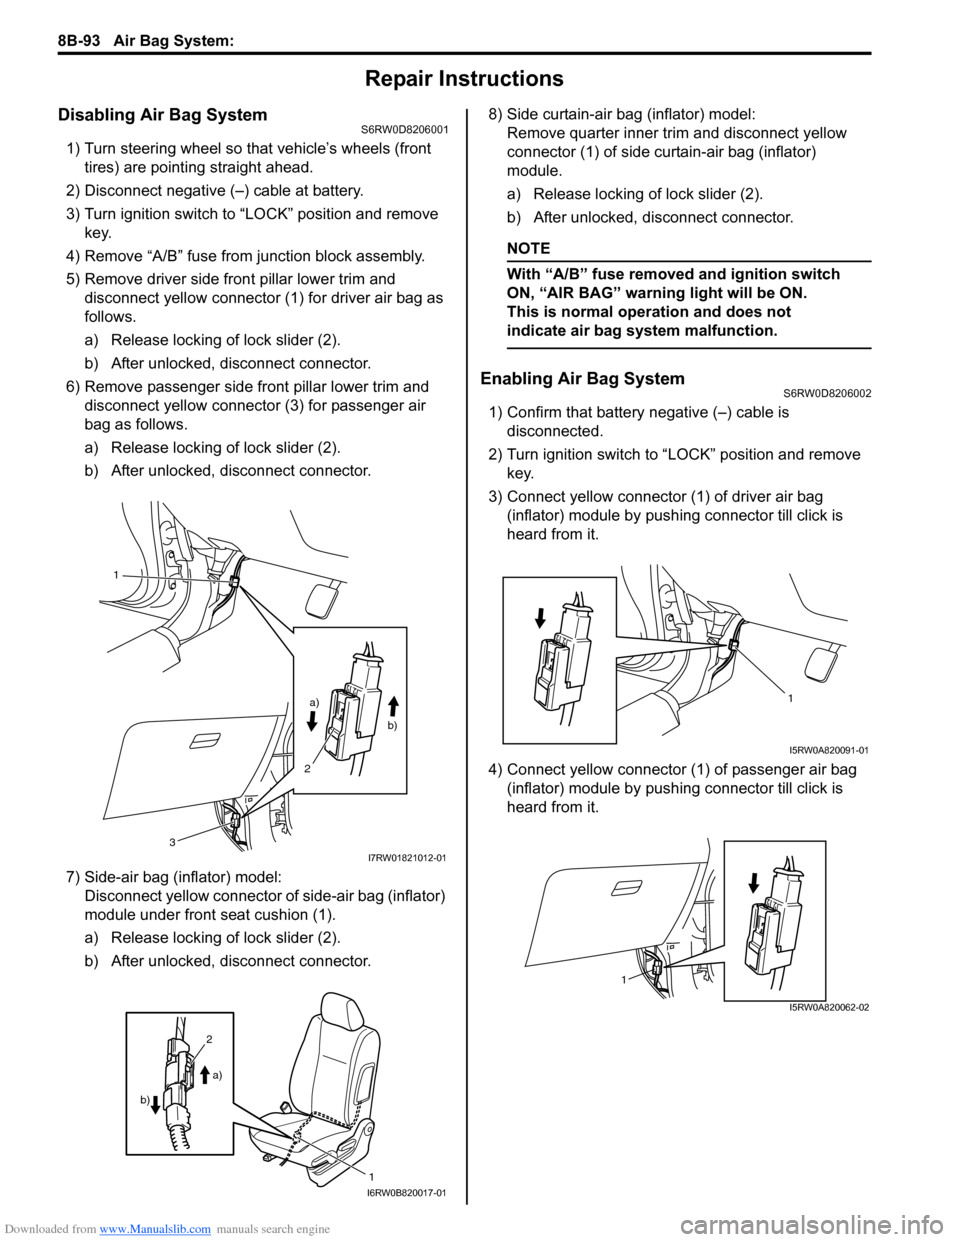
5) Remove driver side front pillar lower trim and
disconnect yellow connector (1) for driver air bag as
follows.
a) Release locking of lock slider (2).
b) After unlocked, disconnect connector.
6) Remove passenger side front pillar lower trim and
disconnect yellow connector (3) for passenger air
bag as follows.
a) Release locking of lock slider (2).
b) After unlocked, disconnect connector.
7) Side-air bag (inflator) model:
Disconnect yellow connector of side-air bag (inflator)
module under front seat cushion (1).
a) Release locking of lock slider (2).
b) After unlocked, disconnect connector.8) Side curtain-air bag (inflator) model:
Remove quarter inner trim and disconnect yellow
connector (1) of side curtain-air bag (inflator)
module.
a) Release locking of lock slider (2).
b) After unlocked, disconnect connector.
NOTE
With “A/B” fuse removed and ignition switch
ON, “AIR BAG” warning light will be ON.
This is normal operation and does not
indicate air bag system malfunction.
Enabling Air Bag SystemS6RW0D8206002
1) Confirm that battery negative (–) cable is
disconnected.
2) Turn ignition switch to “LOCK” position and remove
key.
3) Connect yellow connector (1) of driver air bag
(inflator) module by pushing connector till click is
heard from it.
4) Connect yellow connector (1) of passenger air bag
(inflator) module by pushing connector till click is
heard from it.
1
a)
b)
2
3
I7RW01821012-01
1
2
a)
b)
I6RW0B820017-01
1
I5RW0A820091-01
1
I5RW0A820062-02