2006 SUBARU IMPREZA parking brake
[x] Cancel search: parking brakePage 15 of 365
12
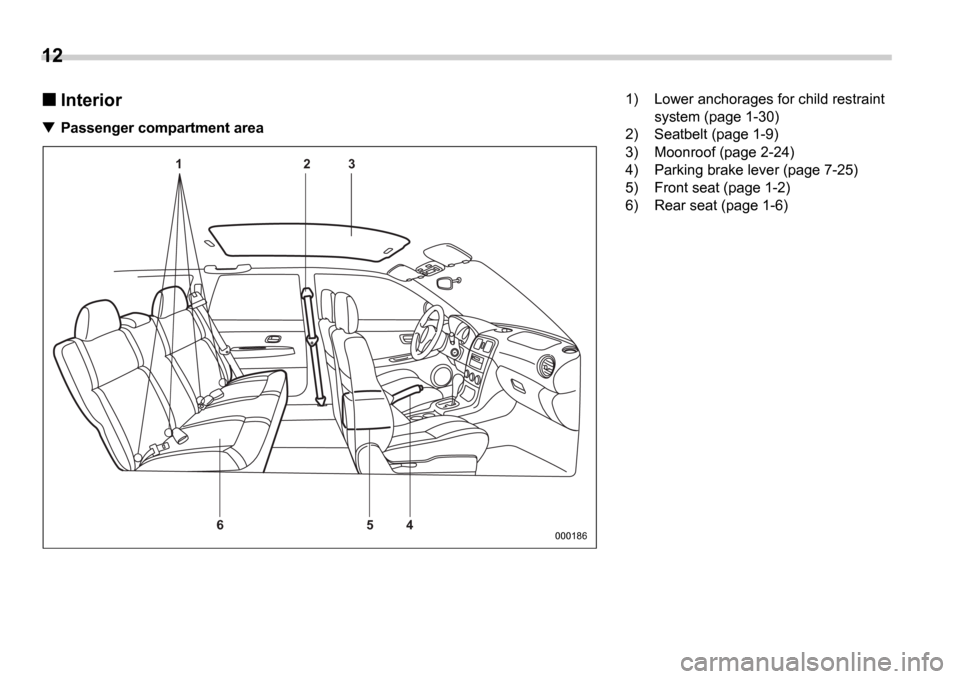
Interior
Passenger compartment area
1 2 34
5
6
000186
1) Lower anchorages for child restraint
system (page 1-30)
2) Seatbelt (page 1-9)
3) Moonroof (page 2-24)
4) Parking brake lever (page 7-25)
5) Front seat (page 1-2)
6) Rear seat (page 1-6)
Page 127 of 365
3-14 Instruments and controls
Warning and indicator lights
Several of the warning and indicator lights
come on momentarily and then go out
when the ignition switch is initially turned
to the ON position. This permits check-
ing the operation of the bulbs.
Apply the parking brake and turn the igni-
tion switch to the ON position. The fol-
lowing lights come on:
Seatbelt warning light
SRS airbag system warning light
Front passenger s frontal airbag ON in-
dicator light
Front passenger s frontal airbag OFF
indicator light
CHECK ENGINE warning light/Mal-
function indicator lamp
Charge warning light
Oil pressure warning light
AT OIL temperature warning light (AT
vehicles)
ABS warning light
Brake system warning light
All-Wheel Drive warning light (AT vehi-
cles)
Cruise control indicator light (if
equipped)
Cruise control set indicator light (if
equipped)
If any lights fail to come on, it indicates a burned-out bulb or a malfunction of the
corresponding system.
Consult your authorized SUBARU dealer
for repair.
Seatbelt warning light
and chime
Your vehicle is equipped with a seatbelt
warning device at the driver
s seat, as re-
quired by current safety standards. There
is a seatbelt warning light in the combina-
tion meter.
If the driver has not yet fastened the seat-
belt when the ignition switch is turned to
the ON position, the seatbelt warning
light will flash for 6 seconds, to warn that
the seatbelt is unfastened. If the driver s
seatbelt is not fastened, a chime will also
sound simultaneously.
If the driver s seatbelt is still not fastened
6 seconds later, the warning light will re-
main lit for 15 seconds. If the driver s seat-
belt is still not fastened even 15 seconds
later (21 seconds after turning ON the ig-
nition switch), the warning lights will alter-
nate between flashing and steady illumi-
nation at 15-second intervals, and the
chime will sound while the warning light is
flashing.
Alternate flashing and steady illumination
of the warning lights and sounding of the chime will continue until the driver fastens
the seatbelt.
NOTE
If the driver unfastens the seatbelt af-
ter fastening, the seatbelt warning de-
vice operates as follows according to
the vehicle speed.
At speeds lower than approximate-
ly 9 mph (15 km/h)
The warning light will alternate be-
tween flashing and steady illumina-
tion at 15-second intervals. The
chime will not sound.
At speeds higher than approxi-
mately 9 mph (15 km/h)
The warning light will alternate be-
tween flashing and steady illumina-
tion at 15-second intervals and the
chime will sound while the warning
light is flashing.
It is possible to cancel the warning
operation that follows the 6-second
warning after turning ON the ignition
switch by unfastening and refastening
the driver s seatbelt. When the ignition
switch is turned ON next time, howev-
er, the complete sequence of the warn-
ing operation resumes. For further de-
tails about canceling the warning oper-
ation, please contact your SUBARU
dealer.
Page 131 of 365
3-18 Instruments and controls
With a vehicle equipped with an EBD sys-
tem, the ABS warning light comes on to-
gether with the brake system warning light
if the EBD system becomes faulty. For fur-
ther details of the EBD system fault warn-
ing, refer to Brake system warning light .
NOTE
If the warning light behavior is as de-
scribed in the following, the ABS sys-
tem may be considered normal.
The warning light comes on right af-
ter the engine is started but goes out
immediately, remaining off.
The warning light remains on after the engine has been started, but it goes
out when the vehicle speed reaches
approximately 8 mph (12 km/h).
The warning light comes on during
driving, but it goes out immediately
and remains off.
When driving with an insufficient battery
voltage such as when the engine is jump
started, the ABS warning light may come
on. This is due to the low battery voltage
and does not indicate a malfunction.
When the battery becomes fully charged,
the light will go out.
Brake system
warning light
This light has the following three func-
tions:
Parking brake warning
The light comes on with the parking brake
applied while the ignition switch is in the ON position. It goes out when the park-
ing brake is fully released.
Brake fluid level warning
This light comes on when the brake fluid
level has dropped to near the MIN level
of the brake fluid reservoir with the ignition
switch in the ON position and with the
parking brake fully released.
If the brake system warning light should
come on while driving (with the parking
brake fully released and with the ignition
switch positioned in ON ), it could be an
indication of leaking of brake fluid or worn
brake pads. If this occurs, immediately
stop the vehicle at the nearest safe place
and check the brake fluid level. If the fluid
level is below the MIN mark in the reser-
voir, do not drive the vehicle. Have the ve-
hicle towed to the nearest SUBARU deal-
er for repair.
Electronic Brake Force Distribution
(EBD) system warning (vehicles
with ABS)
The brake system warning light also illu-
The warning light does not come
on when the ignition switch is
turned to the ON position.
The warning light comes on when
the ignition switch is turned to the ON position, but it does not go
out even when the vehicle speed
exceeds approximately 8 mph (12
km/h).
The warning light comes on dur-
ing driving.
If any of these conditions occur,
have the ABS system repaired at the
first available opportunity by your
SUBARU dealer.
Driving with the brake system
warning light on is dangerous.
This indicates your brake system
may not be working properly. If
the light remains on, have the
brakes inspected by a SUBARU
dealer immediately.
If at all in doubt about whether the
brakes are operating properly, do
not drive the vehicle. Have your
vehicle towed to the nearest
SUBARU dealer for repair.
(U.S.)
(Canada)
Page 132 of 365
Instruments and controls 3-19
CONTINUED
minates if a malfunction occurs in the EBD
system. In that event, it comes on together
with the ABS warning light.
The EBD system may be malfunctioning if
the brake system warning light and ABS
warning light illuminate simultaneously
during driving.
Even if the EBD system fails, the conven-
tional braking system will still function.
However, the rear wheels will be more
prone to locking when the brakes are ap-
plied harder than usual and the vehicle
s
motion may therefore become somewhat
harder to control.
If the brake system warning light and ABS
warning light illuminate simultaneously,
take the following steps:
1. Stop the vehicle in the nearest safe, flat
place.
2. Shut down the engine, then restart it.
3. Release the parking brake. If both
warning lights go out, the EBD system
may be faulty. Drive carefully to the near-
est SUBARU dealer and have the system
inspected.
4. If both warning lights come on again
and stay illuminated after the engine has
been restarted, shut down the engine
again, apply the parking brake, and check
the brake fluid level.
5. If the brake fluid level is not below the MIN mark, the EBD system may be faulty. Drive carefully to the nearest
SUBARU dealer and have the system in-
spected.
6. If the brake fluid level is below the
MIN mark, DO NOT drive the vehicle. In-
stead, have the vehicle towed to the near-
est SUBARU dealer for repair.
Door open warning light
The door open warning light comes on if
any door or the rear gate is not fully
closed.
Always make sure this light is out before
you start to drive.
All-Wheel Drive warn-
ing light (AWD AT vehi-
cles if equipped)
The All-Wheel Drive warning light comes
on when the ignition switch is turned to the ON position and goes out after approxi-
mately two seconds.
This light comes on when All-Wheel Drive
is disengaged and the drive mechanism is
switched to Front Wheel Drive for mainte-
nance or similar purposes (Non-turbo ve-
hicles).
It flashes if the vehicle is driven with tires
of differing diameters fitted on the wheels
or with an excessively low air pressure in any of the tires.
Intercooler water
spray warning light
(WRX-STI)
This light comes on when the water level
in the intercooler water spray tank falls to
the lower limit (approximately 0.4 US qt,
0.4 liter, 0.4 Imp qt).
Continuing to drive with the AWD
warning light flashing can damage
the powertrain. If the AWD warning
light starts to flash, promptly park in
a safe place and check whether the
tires have differing diameters and
whether any of the tires has an ex-
cessively low inflation pressure.
Page 136 of 365
Instruments and controls 3-23
CONTINUED
High/low beam change (dim-
mer)
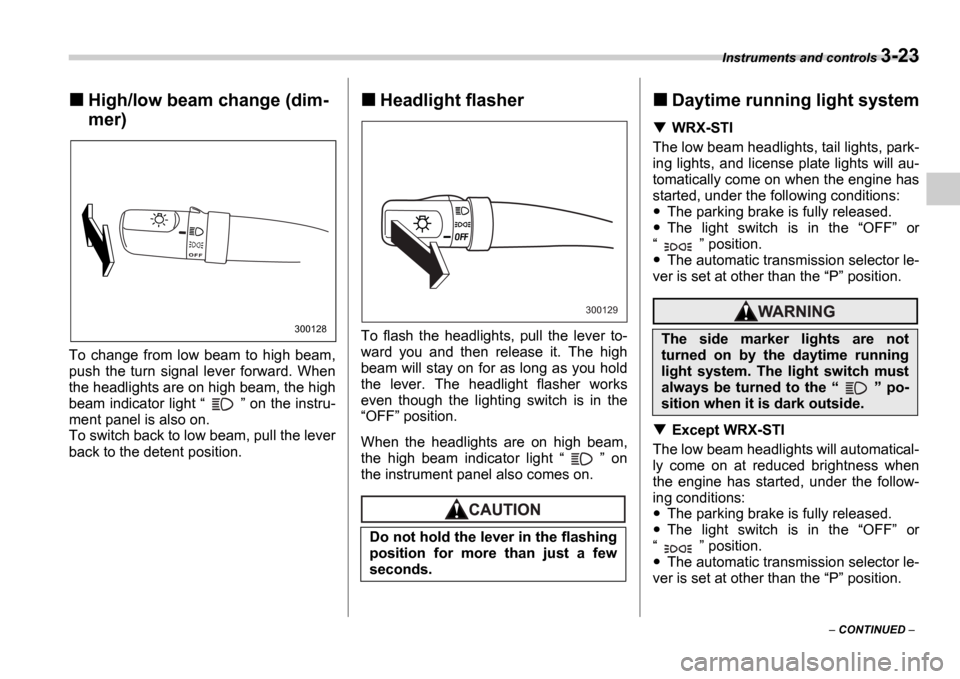
To change from low beam to high beam,
push the turn signal lever forward. When
the headlights are on high beam, the high
beam indicator light on the instru-
ment panel is also on.
To switch back to low beam, pull the lever
back to the detent position.
Headlight flasher
To flash the headlights, pull the lever to-
ward you and then release it. The high
beam will stay on for as long as you hold
the lever. The headlight flasher works
even though the lighting switch is in the OFF position.
When the headlights are on high beam,
the high beam indicator light on
the instrument panel also comes on.
Daytime running light system
WRX-STI
The low beam headlights, tail lights, park-
ing lights, and license plate lights will au-
tomatically come on when the engine has
started, under the following conditions:
The parking brake is fully released.
The light switch is in the OFF or
position.
The automatic transmission selector le-
ver is set at other than the P position.
Except WRX-STI
The low beam headlights will automatical-
ly come on at reduced brightness when
the engine has started, under the follow-
ing conditions:
The parking brake is fully released.
The light switch is in the OFF or
position.
The automatic transmission selector le-
ver is set at other than the P position.
300128
Do not hold the lever in the flashing
position for more than just a few
seconds.
300129
The side marker lights are not
turned on by the daytime running
light system. The light switch must
always be turned to the po-
sition when it is dark outside.
Page 190 of 365
Interior equipment 6-5
CONTINUED
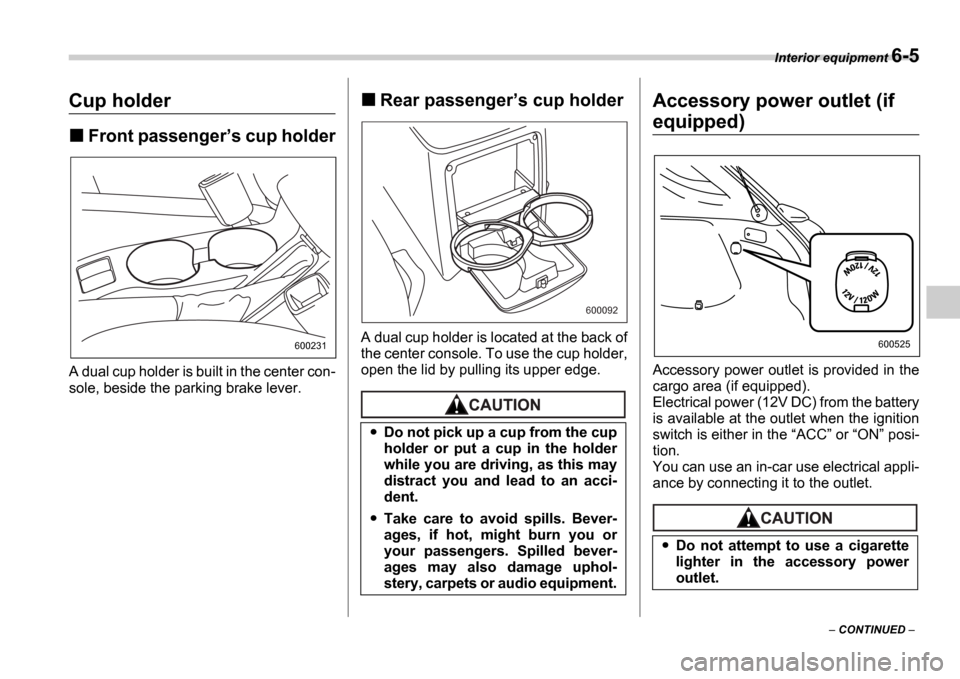
Cup holder
Front passenger s cup holder
A dual cup holder is built in the center con-
sole, beside the parking brake lever.
Rear passenger s cup holder
A dual cup holder is located at the back of
the center console. To use the cup holder,
open the lid by pulling its upper edge.
Accessory power outlet (if
equipped)
Accessory power outlet is provided in the
cargo area (if equipped).
Electrical power (12V DC) from the battery
is available at the outlet when the ignition
switch is either in the ACC or ON posi-
tion.
You can use an in-car use electrical appli-
ance by connecting it to the outlet.
600231
Do not pick up a cup from the cup
holder or put a cup in the holder
while you are driving, as this may
distract you and lead to an acci-
dent.
Take care to avoid spills. Bever-
ages, if hot, might burn you or
your passengers. Spilled bever-
ages may also damage uphol-
stery, carpets or audio equipment.
600092
Do not attempt to use a cigarette
lighter in the accessory power
outlet.
600525
Page 198 of 365

7
Starting and operating
Fuel ...................................................................... 7-2
Fuel requirements ................................. ................. 7-2
Fuel filler lid and cap ........................... ................... 7-4
State emission testing (U.S. only) ................ .... 7-5
Preparing to drive ................................ .............. 7-6
Starting the engine ............................... .............. 7-7
Manual transmission vehicle ....................... .......... 7-7
Automatic transmission vehicle .................... ........ 7-7
Stopping the engine ............................... ............ 7-8
Manual transmission 6 speeds (WRX-STI) ... 7-9
Selecting reverse gear ............................ ............... 7-9
Shifting speeds ................................... .................... 7-9
Driving tips ...................................... ........................ 7-10
Manual transmission 5 speeds (except
WRX-STI) .......................................... ................ 7-11
Shifting speeds ................................... .................... 7-11
Driving tips ...................................... ........................ 7-12
Driver s Control Center Differential (DCCD)
(WRX-STI) ......................................... ............... 7-12
Auto mode ......................................... ...................... 7-13
Manual mode ....................................... .................... 7-13
Temporary release ................................. ................. 7-15
Automatic transmission ............................ ........ 7-16
Selector lever for automatic transmission ......... .. 7-16
Shift lock release ................................ .................... 7-19
Limited slip differential (LSD) (if equipped) ..... 7-20
Power steering .................................... ............... 7-21Braking ...........................................
..................... 7-21
Braking tips ...................................... ....................... 7-21
Brake system ...................................... .................... 7-21
Disc brake pad wear warning indicators ............ .. 7-22
ABS (Anti-lock Brake System) ...................... .... 7-22
ABS system self-check ............................. ............. 7-22
ABS warning light ................................. .................. 7-23
Electronic Brake Force Distribution (EBD) system ............................................ .................. 7-24
Steps to take if EBD system fails ................. ......... 7-24
Parking your vehicle .............................. ............ 7-25
Parking brake ..................................... ..................... 7-25
Parking tips ...................................... ....................... 7-25
Cruise control .................................... ................. 7-27
To set cruise control ............................. ................. 7-27
To temporarily cancel the cruise control .......... ... 7-28
To turn off the cruise control .................... ............. 7-28
To change the cruising speed ...................... ......... 7-28
Page 204 of 365
Starting and operating 7-7
CONTINUED
Starting the engine
Manual transmission vehicle
1. Apply the parking brake.
2. Turn off unnecessary lights and acces-
sories.
3. Press the clutch pedal to the floor and
shift the shift lever into neutral. Hold the
clutch pedal to the floor while starting the
engine.
The starter motor will only operate when
the clutch pedal is pressed fully to the
floor.
4. Turn the ignition switch to the ON po-
sition and check the operation of the warn-
ing and indicator lights. Refer to the Warning and indicator lights section
(chapter 3).
5. Turn the ignition switch to the START
position without depressing the accelera-
tor pedal. Release the key immediately af-
ter the engine has started. If the engine does not start, try the follow-
ing.
1) Turn the ignition switch to the OFF
position and wait for at least 10 sec-
onds. After checking that the parking
brake is firmly set, turn the ignition
switch to the START position while de-
pressing the accelerator pedal slightly
(approximately a quarter of the full
stroke). Release the accelerator pedal
as soon as the engine starts.
2) If this fails to start the engine, turn the
ignition switch back to the OFF posi-
tion and wait for at least 10 seconds.
Then fully depress the accelerator ped-
al and turn the ignition switch to the START position. If the engine starts,
quickly release the accelerator pedal.
3) If this fails to start the engine, turn the
ignition switch again to the OFF posi-
tion. After waiting for 10 seconds or
longer, turn the ignition switch to the START position without depressing
the accelerator pedal.
4) If the engine still refuses to start, con-
tact your nearest SUBARU dealer for
assistance.
6. Confirm that all warning and indicator
lights have gone off after the engine has
started. The fuel injection system auto-
matically lowers the idle speed as the en-
gine warms up.
NOTE
The engine may be difficult to start
when the battery has been disconnect-
ed and reconnected (for maintenance
or other purposes). This difficulty is
caused by the electronically controlled
throttle s self-diagnosis function. To
overcome it, keep the ignition switch in
the ON position for approximately 10
seconds before starting the engine.
Automatic transmission vehi-
cle
1. Apply the parking brake.
2. Turn off unnecessary lights and acces-
sories.
3. Shift the selector lever to the P or N
position (preferably P position).
The starter motor will only operate when
the select lever is at the P or N position.
4. Turn the ignition switch to the ON po-
sition and check the operation of the warn-
ing and indicator lights. Refer to the Warning and indicator lights section
(chapter 3).
5. Turn the ignition switch to the START
position without depressing the accelera-
tor pedal. Release the key immediately af-
ter the engine has started.
If the engine does not start, try the follow-
Do not operate the starter motor
continuously for more than ten sec-
onds. If the engine fails to start after
operating the starter for five to ten
seconds, wait for ten seconds or
more before trying again.