2006 SUBARU IMPREZA parking brake
[x] Cancel search: parking brakePage 205 of 365
7-8 Starting and operating
ing.
1) Turn the ignition switch to the OFF
position and wait for at least 10 sec-
onds. After checking that the parking
brake is firmly set, turn the ignition
switch to the START position while de-
pressing the accelerator pedal slightly
(approximately a quarter of the full
stroke). Release the accelerator pedal
as soon as the engine starts.
2) If this fails to start the engine, turn the
ignition switch back to the OFF posi-
tion and wait for at least 10 seconds.
Then fully depress the accelerator ped-
al and turn the ignition switch to the START position. If the engine starts,
quickly release the accelerator pedal.
3) If this fails to start the engine, turn the
ignition switch again to the OFF posi-
tion. After waiting for 10 seconds or
longer, turn the ignition switch to the START position without depressing
the accelerator pedal.
4) If the engine still refuses to start, con-
tact your nearest SUBARU dealer for
assistance.
6. Confirm that all warning and indicator
lights have gone out after the engine has
started. The fuel injection system auto-
matically lowers the idle speed as the en-
gine warms up.
While the engine is warming up, make sure that the selector lever is at the
P or
N position and that the parking brake is
applied.
NOTE
The engine may be difficult to start
when the battery has been disconnect-
ed and reconnected (for maintenance
or other purposes). This difficulty is
caused by the electronically controlled
throttle s self-diagnosis function. To
overcome it, keep the ignition switch in
the ON position for approximately 10
seconds before starting the engine.
Stopping the engine
The ignition switch should be turned off
only when the vehicle is stopped and the
engine is idling.
If you restart the engine while the
vehicle is moving, shift the selector
lever into the N position. Do not
attempt to place the selector lever of
a moving vehicle into the P posi-
tion.
Do not stop the engine when the ve-
hicle is moving. This will cause loss
of power to the power steering and
the brake booster, making steering
and braking more difficult. It could
also result in accidental activation
of the LOCK position on the igni-
tion switch, causing the steering
wheel to lock.
Page 212 of 365
Starting and operating 7-15
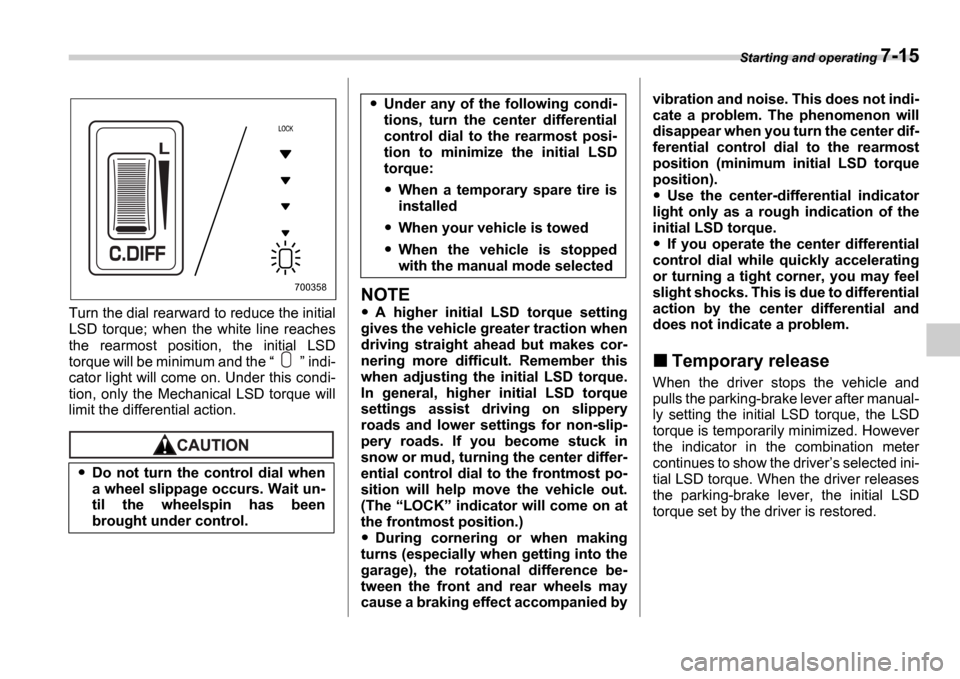
Turn the dial rearward to reduce the initial
LSD torque; when the white line reaches
the rearmost position, the initial LSD
torque will be minimum and the indi-
cator light will come on. Under this condi-
tion, only the Mechanical LSD torque will
limit the differential action.
NOTE
A higher initial LSD torque setting
gives the vehicle greater traction when
driving straight ahead but makes cor-
nering more difficult. Remember this
when adjusting the initial LSD torque.
In general, higher initial LSD torque
settings assist driving on slippery
roads and lower settings for non-slip-
pery roads. If you become stuck in
snow or mud, turning the center differ-
ential control dial to the frontmost po-
sition will help move the vehicle out.
(The LOCK indicator will come on at
the frontmost position.)
During cornering or when making
turns (especially when getting into the
garage), the rotational difference be-
tween the front and rear wheels may
cause a braking effect accompanied by vibration and noise. This does not indi-
cate a problem. The phenomenon will
disappear when you turn the center dif-
ferential control dial to the rearmost
position (minimum initial LSD torque
position).
Use the center-differential indicator
light only as a rough indication of the
initial LSD torque.
If you operate the center differential
control dial while quickly accelerating
or turning a tight corner, you may feel
slight shocks. This is due to differential
action by the center differential and
does not indicate a problem.
Temporary release
When the driver stops the vehicle and
pulls the parking-brake lever after manual-
ly setting the initial LSD torque, the LSD
torque is temporarily minimized. However
the indicator in the combination meter
continues to show the driver s selected ini-
tial LSD torque. When the driver releases
the parking-brake lever, the initial LSD
torque set by the driver is restored.
Do not turn the control dial when
a wheel slippage occurs. Wait un-
til the wheelspin has been
brought under control.
700358
Under any of the following condi-
tions, turn the center differential
control dial to the rearmost posi-
tion to minimize the initial LSD
torque:
When a temporary spare tire is
installed
When your vehicle is towed
When the vehicle is stopped
with the manual mode selected
Page 213 of 365
7-16 Starting and operating
Automatic transmission
The automatic transmission is electroni-
cally controlled with 4-forward speeds and
1-reverse speed.
NOTE
When the engine coolant tempera-
ture is still low, your vehicle s automat-
ic transmission will up-shift at higher
engine speeds than when the coolant
temperature is sufficiently high in or-
der to shorten the warm-up time and
improve driveability. The gearshift tim-
ing will automatically shift to the nor-
mal timing after the engine has warmed
up.
Immediately after ATF (automatic
transmission fluid) is replaced, you
may feel that the automatic transmis-
sion operation is somewhat unusual.
This results from invalidation of data
the on-board computer has collected
and stored in memory to allow the
transmission to shift at the most ap-
propriate times for the current condi-
tion of your vehicle. Optimized shifting
will be restored as the vehicle contin-
ues to be driven for a while.
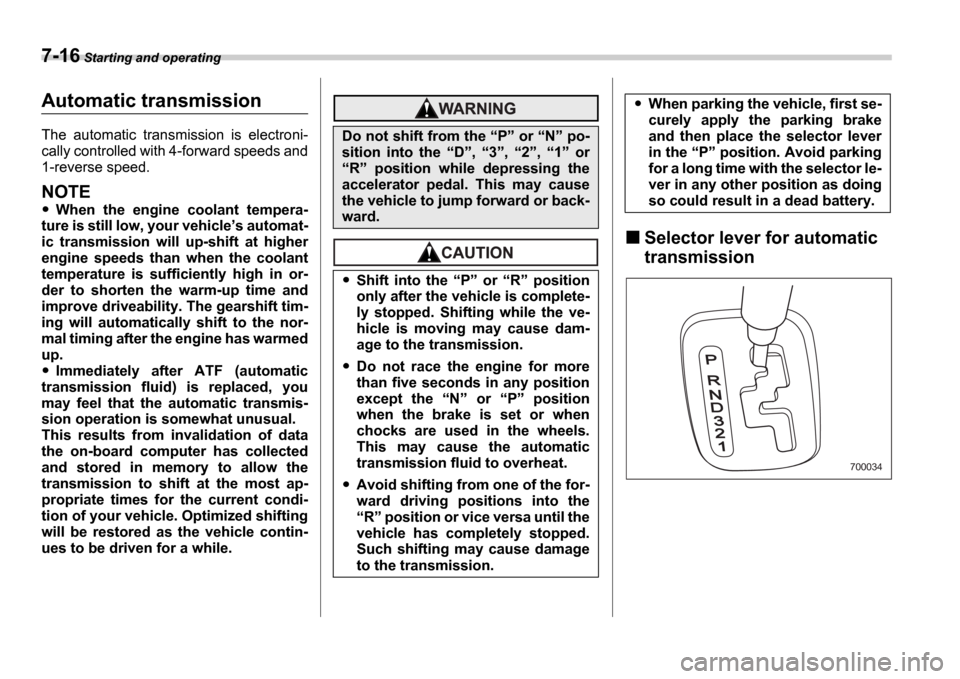
Selector lever for automatic
transmission
Do not shift from the P or N po-
sition into the D , 3 , 2 , 1 or
R position while depressing the
accelerator pedal. This may cause
the vehicle to jump forward or back-
ward.
Shift into the P or R position
only after the vehicle is complete-
ly stopped. Shifting while the ve-
hicle is moving may cause dam-
age to the transmission.
Do not race the engine for more
than five seconds in any position
except the N or P position
when the brake is set or when
chocks are used in the wheels.
This may cause the automatic
transmission fluid to overheat.
Avoid shifting from one of the for-
ward driving positions into the R position or vice versa until the
vehicle has completely stopped.
Such shifting may cause damage
to the transmission.
When parking the vehicle, first se-
curely apply the parking brake
and then place the selector lever
in the P position. Avoid parking
for a long time with the selector le-
ver in any other position as doing
so could result in a dead battery.
700034
Page 214 of 365
Starting and operating 7-17
CONTINUED
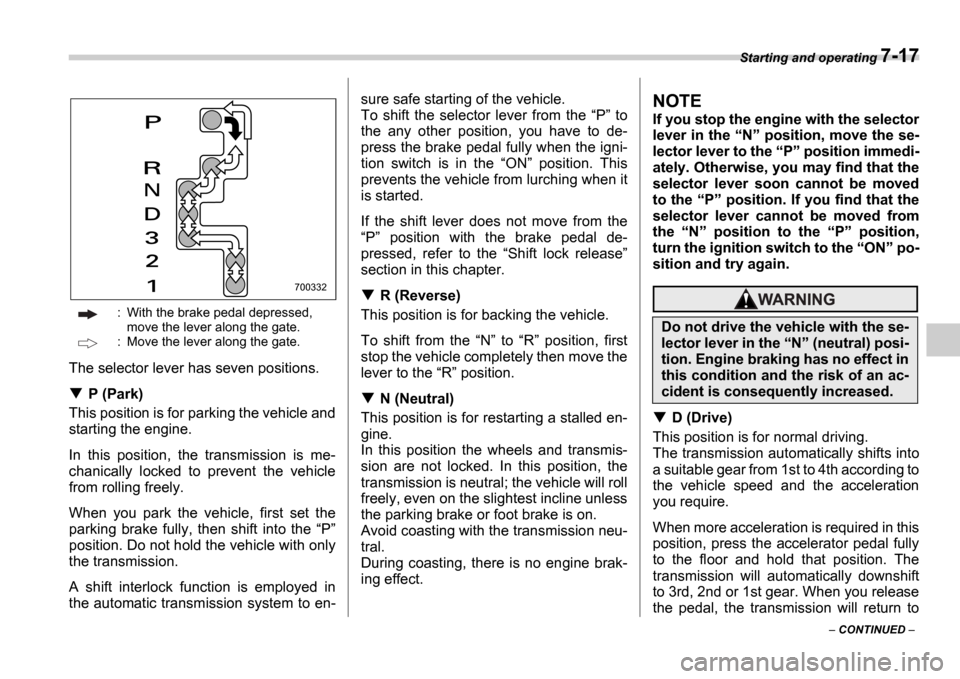
: With the brake pedal depressed,
move the lever along the gate.
: Move the lever along the gate.
The selector lever has seven positions.
P (Park)
This position is for parking the vehicle and
starting the engine.
In this position, the transmission is me-
chanically locked to prevent the vehicle
from rolling freely.
When you park the vehicle, first set the
parking brake fully, then shift into the P
position. Do not hold the vehicle with only
the transmission.
A shift interlock function is employed in
the automatic transmission system to en- sure safe starting of the vehicle.
To shift the selector lever from the
P to
the any other position, you have to de-
press the brake pedal fully when the igni-
tion switch is in the ON position. This
prevents the vehicle from lurching when it
is started.
If the shift lever does not move from the P position with the brake pedal de-
pressed, refer to the Shift lock release
section in this chapter.
R (Reverse)
This position is for backing the vehicle.
To shift from the N to R position, first
stop the vehicle completely then move the
lever to the R position.
N (Neutral)
This position is for restarting a stalled en-
gine.
In this position the wheels and transmis-
sion are not locked. In this position, the
transmission is neutral; the vehicle will roll
freely, even on the slightest incline unless
the parking brake or foot brake is on.
Avoid coasting with the transmission neu-
tral.
During coasting, there is no engine brak-
ing effect.
NOTE
If you stop the engine with the selector
lever in the N position, move the se-
lector lever to the P position immedi-
ately. Otherwise, you may find that the
selector lever soon cannot be moved
to the P position. If you find that the
selector lever cannot be moved from
the N position to the P position,
turn the ignition switch to the ON po-
sition and try again.
D (Drive)
This position is for normal driving.
The transmission automatically shifts into
a suitable gear from 1st to 4th according to
the vehicle speed and the acceleration
you require.
When more acceleration is required in this
position, press the accelerator pedal fully
to the floor and hold that position. The
transmission will automatically downshift
to 3rd, 2nd or 1st gear. When you release
the pedal, the transmission will return to
700332
Do not drive the vehicle with the se-
lector lever in the N (neutral) posi-
tion. Engine braking has no effect in
this condition and the risk of an ac-
cident is consequently increased.
Page 216 of 365
Starting and operating 7-19
CONTINUED
NOTE
In order to prevent over-revving during
deceleration of the vehicle, the trans-
mission will remain in the current gear
if the speed of the vehicle is in excess
of the Maximum Allowable Speed for
the gear to which the selector lever has
been moved.
Driving tips
Always apply the foot or parking brake
when the vehicle is stopped in the D , 3 ,
2 , 1 or R position.
Always set the parking brake when parking your vehicle. Do not hold the vehi-
cle with only the transmission.
Do not keep the vehicle in a stationary
position on an uphill grade by using the D , 3 , 2 , or 1 position. Use the brake
instead.
The engine may, on rare occasions, knock
when the vehicle rapidly accelerates or
rapidly pulls away from a standstill. This
phenomenon is not an indication of a
problem in your vehicle.
Shift lock release
If the selector lever does not move from
the P position with the brake pedal de-
pressed and the ignition switch in the ON
position, perform the following steps:
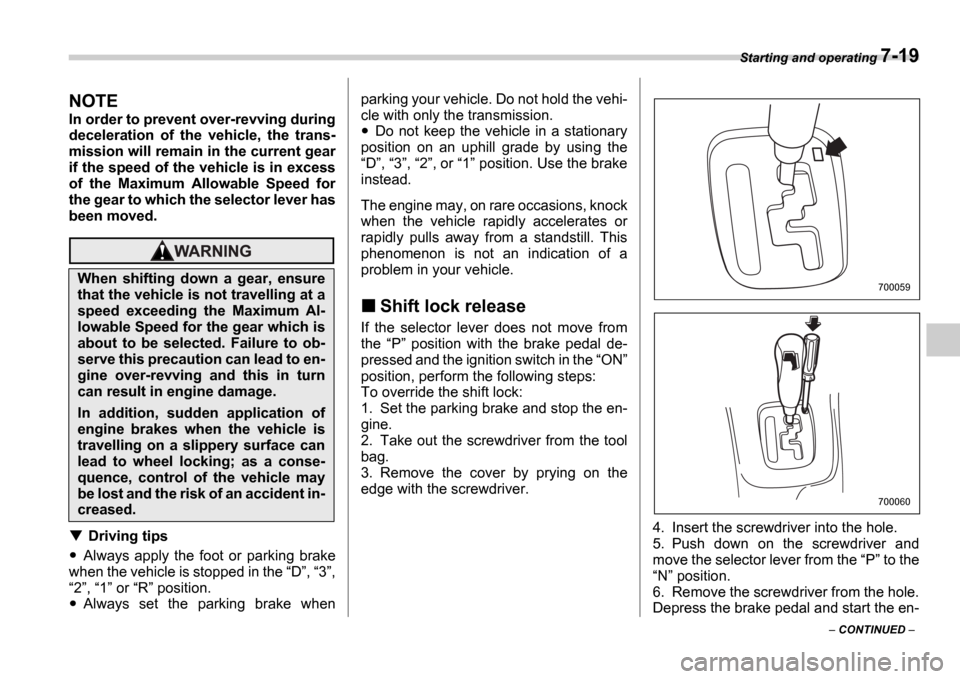
To override the shift lock:
1. Set the parking brake and stop the en-
gine.
2. Take out the screwdriver from the tool
bag.
3. Remove the cover by prying on the
edge with the screwdriver.
4. Insert the screwdriver into the hole.
5. Push down on the screwdriver and
move the selector lever from the P to the
N position.
6. Remove the screwdriver from the hole.
Depress the brake pedal and start the en-
When shifting down a gear, ensure
that the vehicle is not travelling at a
speed exceeding the Maximum Al-
lowable Speed for the gear which is
about to be selected. Failure to ob-
serve this precaution can lead to en-
gine over-revving and this in turn
can result in engine damage.
In addition, sudden application of
engine brakes when the vehicle is
travelling on a slippery surface can
lead to wheel locking; as a conse-
quence, control of the vehicle may
be lost and the risk of an accident in-
creased.
700059
700060
Page 221 of 365
7-24 Starting and operating
Electronic Brake Force Dis-
tribution (EBD) system
The EBD system maximizes the effective-
ness of the brakes by allowing the rear
brakes to supply a greater proportion of
the braking force. It functions by adjusting
the distribution of braking force to the rear
wheels in accordance with the vehicle s
loading condition and speed.
The EBD system is an integral part of the
ABS system and uses some of the ABS
system s components to perform its func-
tion of optimizing the distribution of brak-
ing force. If any of the ABS components
used by the EBD function fails, the EBD
system also stops working.
When the EBD system is operating, you
may hear a chattering noise or feel a slight
vibration in the brake pedal. This is normal
and does not indicate a malfunction.
Steps to take if EBD system
fails
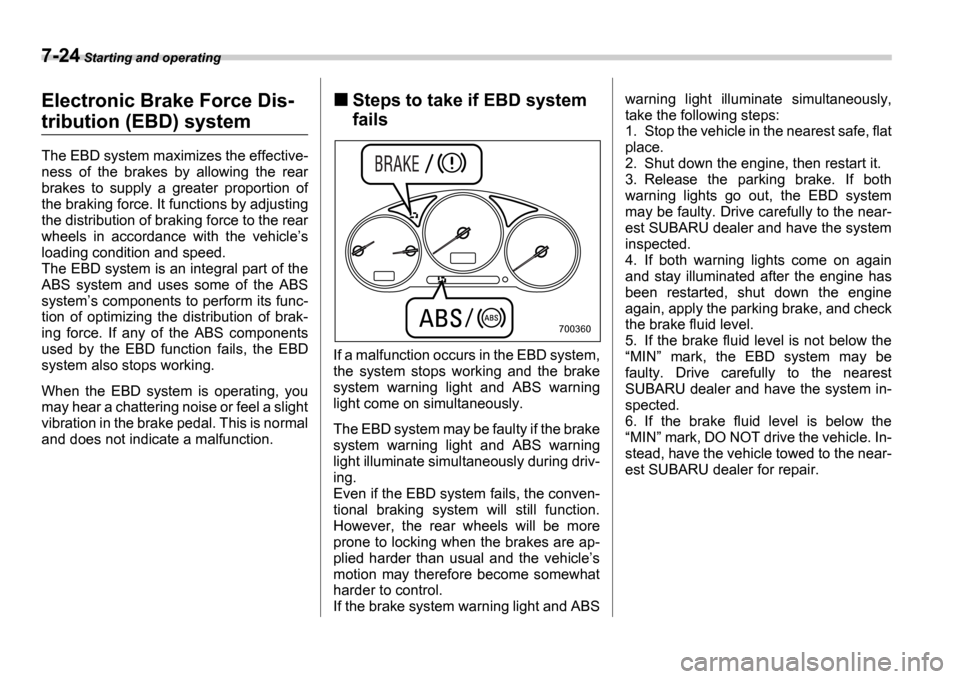
If a malfunction occurs in the EBD system,
the system stops working and the brake
system warning light and ABS warning
light come on simultaneously.
The EBD system may be faulty if the brake
system warning light and ABS warning
light illuminate simultaneously during driv-
ing.
Even if the EBD system fails, the conven-
tional braking system will still function.
However, the rear wheels will be more
prone to locking when the brakes are ap-
plied harder than usual and the vehicle s
motion may therefore become somewhat
harder to control.
If the brake system warning light and ABS warning light illuminate simultaneously,
take the following steps:
1. Stop the vehicle in the nearest safe, flat
place.
2. Shut down the engine, then restart it.
3. Release the parking brake. If both
warning lights go out, the EBD system
may be faulty. Drive carefully to the near-
est SUBARU dealer and have the system
inspected.
4. If both warning lights come on again
and stay illuminated after the engine has
been restarted, shut down the engine
again, apply the parking brake, and check
the brake fluid level.
5. If the brake fluid level is not below the
MIN mark, the EBD system may be
faulty. Drive carefully to the nearest
SUBARU dealer and have the system in-
spected.
6. If the brake fluid level is below the MIN mark, DO NOT drive the vehicle. In-
stead, have the vehicle towed to the near-
est SUBARU dealer for repair.
700360
Page 222 of 365
Starting and operating 7-25
CONTINUED
Parking your vehicle
Parking brake
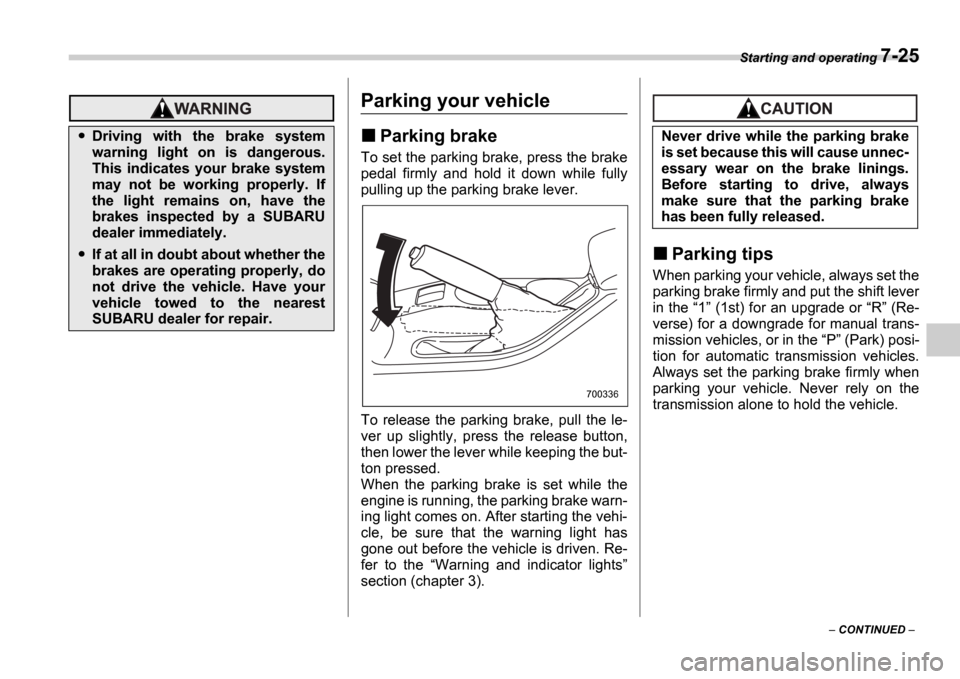
To set the parking brake, press the brake
pedal firmly and hold it down while fully
pulling up the parking brake lever.
To release the parking brake, pull the le-
ver up slightly, press the release button,
then lower the lever while keeping the but-
ton pressed.
When the parking brake is set while the
engine is running, the parking brake warn-
ing light comes on. After starting the vehi-
cle, be sure that the warning light has
gone out before the vehicle is driven. Re-
fer to the Warning and indicator lights
section (chapter 3).
Parking tips
When parking your vehicle, always set the
parking brake firmly and put the shift lever
in the 1 (1st) for an upgrade or R (Re-
verse) for a downgrade for manual trans-
mission vehicles, or in the P (Park) posi-
tion for automatic transmission vehicles.
Always set the parking brake firmly when
parking your vehicle. Never rely on the
transmission alone to hold the vehicle.
Driving with the brake system
warning light on is dangerous.
This indicates your brake system
may not be working properly. If
the light remains on, have the
brakes inspected by a SUBARU
dealer immediately.
If at all in doubt about whether the
brakes are operating properly, do
not drive the vehicle. Have your
vehicle towed to the nearest
SUBARU dealer for repair.
700336
Never drive while the parking brake
is set because this will cause unnec-
essary wear on the brake linings.
Before starting to drive, always
make sure that the parking brake
has been fully released.
Page 236 of 365
Driving tips 8-9
CONTINUED
do so and check under the fenders period-
ically.
Parking in cold weather
Do not use the parking brake when park-
ing for long periods in cold weather since
it could freeze in that position. Instead, ob-
serve the following.
1. Place the shift lever in 1 or R for
manual transmission vehicles, and in P
for automatic transmission vehicles.
2. Use tire stops under the tires to prevent
the vehicle from moving.
When the vehicle is parked in snow or
when it snows, raise the wiper blades off
the glass to prevent damage to them.
When the vehicle has been left parked af-
ter use on roads heavily covered with
snow, or has been left parked during a
snowstorm, icing may develop on the
brake system, which could cause poor
braking action. Check for snow or ice
buildup on the suspension, disc brakes
and brake hoses underneath the vehicle.
If there is caked snow or ice, remove it,
being careful not to damage the disc
brakes and brake hoses and ABS har-
ness.
Refueling in cold weather
To help prevent moisture from forming in
the fuel system and the risk of its freezing,
use of an antifreeze additive in the fuel
tank is recommended during cold weath-
er.
Use only additives that are specifically de-
signed for this purpose. When an anti-
freeze additive is used, its effect lasts
longer if the tank is refilled whenever the
fuel level reaches half empty.
If your SUBARU is not going to be used for
an extended period, it is best to have the
fuel tank filled to capacity.
Driving on snowy and icy
roads
To prevent skidding and slipping, avoid
sudden braking, abrupt acceleration, high-
speed driving, and sharp turning when
driving on snowy or icy roads.
Always maintain ample distance between your vehicle and the vehicle ahead of you
to avoid the need for sudden braking.
To supplement the foot brake, use the en-
gine brake effectively to control the vehi-
cle speed. (Shift into a lower gear when
necessary.)
Avoid shifting down abruptly. Such behav-
ior can cause the wheels to lock, possibly
leading to loss of vehicle control.
An anti-lock brake system (ABS) enhanc-
es your vehicle
s braking performance on
snowy and icy roads. Refer to the ABS
(Anti-lock Brake System) section in chap-
ter 7 for information on braking on slippery
surfaces.
NOTE
The following tires are summer tires.
Compared with winter and all-season
tires, summer tires give significantly
less grip on snowy and icy road surfac-
es. Avoid driving on snowy and icy
road surface with summer tires.
225/45R17 tires for WRX-STI
Snow can trap dangerous exhaust
gases under your vehicle. Keep
snow clear of the exhaust pipe and
from around your vehicle if you park
the vehicle in snow with the engine
running.
Do not use the cruise control on
slippery roads such as snowy or icy
roads. This may cause loss of vehi-
cle control.