2006 SUBARU IMPREZA fuel door
[x] Cancel search: fuel doorPage 6 of 365
3
CONTINUED
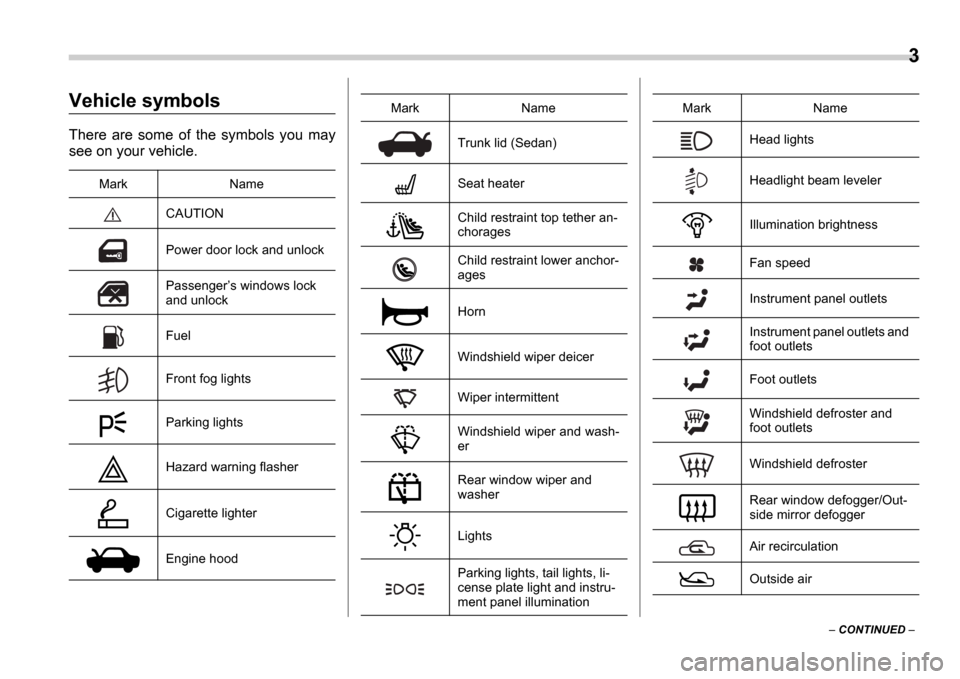
Vehicle symbols
There are some of the symbols you may
see on your vehicle.
Mark Name
CAUTION
Power door lock and unlock
Passengers windows lock
and unlock
Fuel
Front fog lights
Parking lights
Hazard warning flasher
Cigarette lighter
Engine hood
Trunk lid (Sedan)
Seat heater
Child restraint top tether an-
chorages
Child restraint lower anchor-
ages
Horn
Windshield wiper deicer
Wiper intermittent
Windshield wiper and wash-
er
Rear window wiper and
washer
Lights
Parking lights, tail lights, li-
cense plate light and instru-
ment panel illumination
Mark NameHead lights
Headlight beam leveler
Illumination brightness
Fan speed
Instrument panel outlets
Instrument panel outlets and
foot outlets
Foot outlets
Windshield defroster and
foot outlets
Windshield defroster
Rear window defogger/Out-
side mirror defogger
Air recirculation
Outside air
Mark Name
Page 114 of 365
3
Instruments and controls
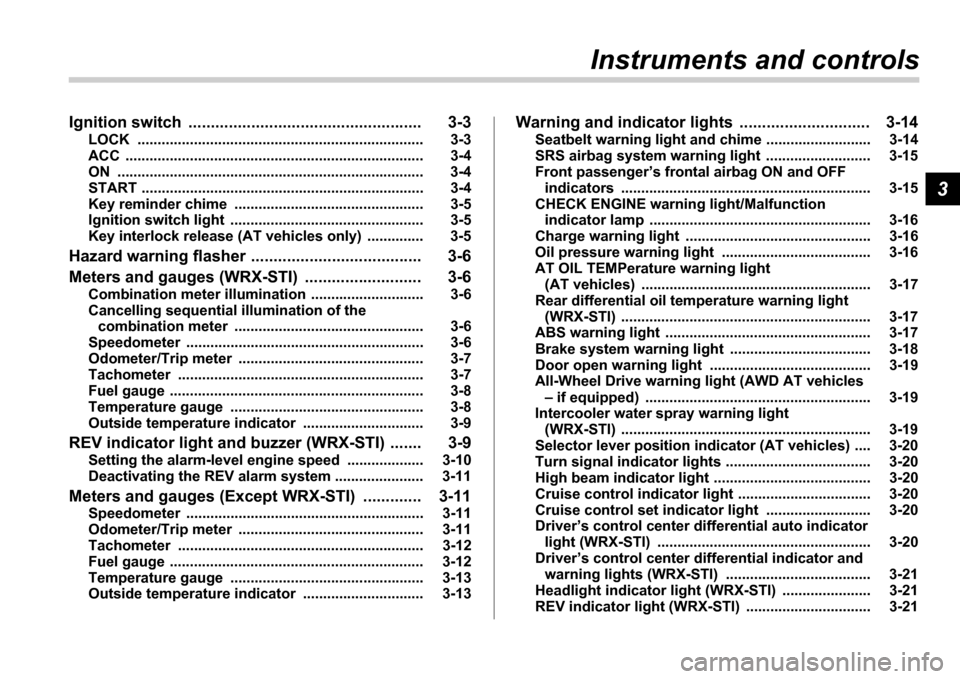
Ignition switch .................................................... 3-3
LOCK .............................................. ......................... 3-3
ACC ............................................... ........................... 3-4
ON ................................................ ............................ 3-4
START ............................................. ......................... 3-4
Key reminder chime ................................ ............... 3-5
Ignition switch light ............................. ................... 3-5
Key interlock release (AT vehicles only) .......... .... 3-5
Hazard warning flasher ............................ .......... 3-6
Meters and gauges (WRX-STI) ....................... ... 3-6
Combination meter illumination .................... ........ 3-6
Cancelling sequential illumination of the combination meter ................................. .............. 3-6
Speedometer ....................................... .................... 3-6
Odometer/Trip meter ............................... ............... 3-7
Tachometer ........................................ ..................... 3-7
Fuel gauge ........................................ ....................... 3-8
Temperature gauge ................................. ............... 3-8
Outside temperature indicator ..................... ......... 3-9
REV indicator light and buzzer (WRX-STI) ....... 3-9 Setting the alarm-level engine speed .............. ..... 3-10
Deactivating the REV alarm system ................. ..... 3-11
Meters and gauges (Except WRX-STI) ............. 3-1 1
Speedometer ....................................... .................... 3-11
Odometer/Trip meter ............................... ............... 3-11
Tachometer ........................................ ..................... 3-12
Fuel gauge ........................................ ....................... 3-12
Temperature gauge ................................. ............... 3-13
Outside temperature indicator ..................... ......... 3-13Warning and indicator lights ......................
....... 3-14
Seatbelt warning light and chime .................. ........ 3-14
SRS airbag system warning light ................... ....... 3-15
Front passenger s frontal airbag ON and OFF
indicators ........................................ ...................... 3-15
CHECK ENGINE warning light/Malfunction indicator lamp .................................... ................... 3-16
Charge warning light .............................. ................ 3-16
Oil pressure warning light ........................ ............. 3-16
AT OIL TEMPerature warning light (AT vehicles) ..................................... .................... 3-17
Rear differential oil temperature warning light (WRX-STI) ......................................... ..................... 3-17
ABS warning light ................................. .................. 3-17
Brake system warning light ........................ ........... 3-18
Door open warning light ........................... ............. 3-19
All-Wheel Drive warning light (AWD AT vehicles
if equipped) ..................................... ................... 3-19
Intercooler water spray warning light (WRX-STI) ......................................... ..................... 3-19
Selector lever position indicator (AT vehicles) ... . 3-20
Turn signal indicator lights ...................... .............. 3-20
High beam indicator light ......................... .............. 3-20
Cruise control indicator light .................... ............. 3-20
Cruise control set indicator light ................ .......... 3-20
Driver s control center differential auto indicator
light (WRX-STI) ................................... .................. 3-20
Driver s control center differential indicator and
warning lights (WRX-STI) .......................... .......... 3-21
Headlight indicator light (WRX-STI) ............... ....... 3-21
REV indicator light (WRX-STI) ..................... .......... 3-21
Page 121 of 365
3-8 Instruments and controls
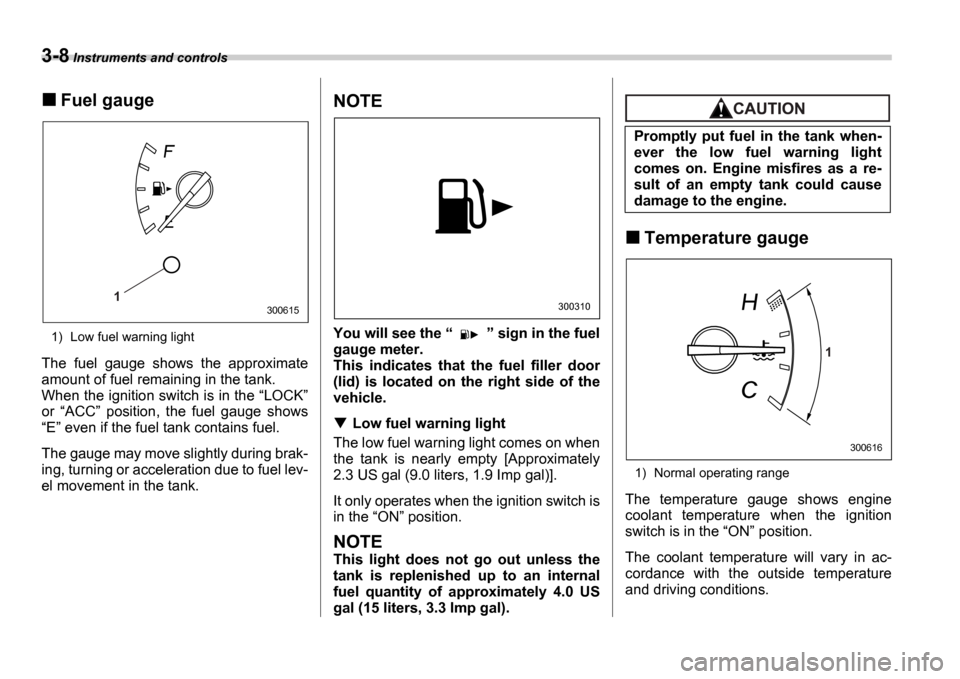
Fuel gauge
1) Low fuel warning light
The fuel gauge shows the approximate
amount of fuel remaining in the tank.
When the ignition switch is in the LOCK
or ACC position, the fuel gauge shows
E even if the fuel tank contains fuel.
The gauge may move slightly during brak-
ing, turning or acceleration due to fuel lev-
el movement in the tank.
NOTE
You will see the sign in the fuel
gauge meter.
This indicates that the fuel filler door
(lid) is located on the right side of the
vehicle.
Low fuel warning light
The low fuel warning light comes on when
the tank is nearly empty [Approximately
2.3 US gal (9.0 liters, 1.9 Imp gal)].
It only operates when the ignition switch is
in the ON position.
NOTE
This light does not go out unless the
tank is replenished up to an internal
fuel quantity of approximately 4.0 US
gal (15 liters, 3.3 Imp gal).
Temperature gauge
1) Normal operating range
The temperature gauge shows engine
coolant temperature when the ignition
switch is in the ON position.
The coolant temperature will vary in ac-
cordance with the outside temperature
and driving conditions.
1300615300310
Promptly put fuel in the tank when-
ever the low fuel warning light
comes on. Engine misfires as a re-
sult of an empty tank could cause
damage to the engine.
1
300616
Page 125 of 365
3-12 Instruments and controls
NOTE
If the connection between the combi-
nation meter and battery is broken for
any reason such as vehicle mainte-
nance or fuse replacement, the data re-
corded on the trip meter will be lost.
Tachometer
The tachometer shows the engine speed
in thousands of revolutions per minute.
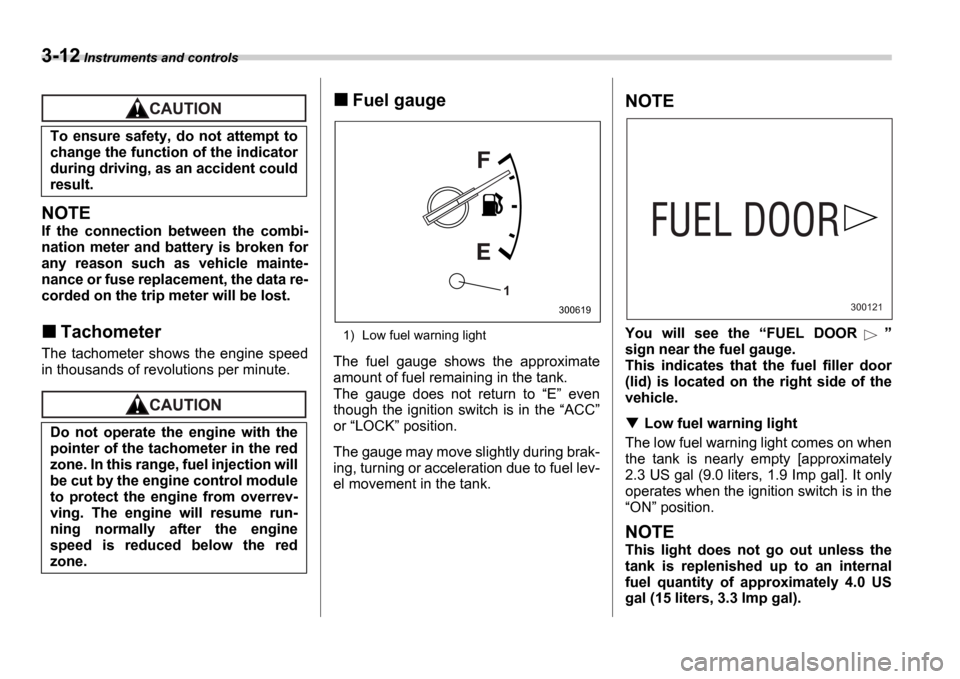
Fuel gauge
1) Low fuel warning light
The fuel gauge shows the approximate
amount of fuel remaining in the tank.
The gauge does not return to E even
though the ignition switch is in the ACC
or LOCK position.
The gauge may move slightly during brak-
ing, turning or acceleration due to fuel lev-
el movement in the tank.
NOTE
You will see the FUEL DOOR
sign near the fuel gauge.
This indicates that the fuel filler door
(lid) is located on the right side of the
vehicle.
Low fuel warning light
The low fuel warning light comes on when
the tank is nearly empty [approximately
2.3 US gal (9.0 liters, 1.9 Imp gal]. It only
operates when the ignition switch is in the ON position.
NOTE
This light does not go out unless the
tank is replenished up to an internal
fuel quantity of approximately 4.0 US
gal (15 liters, 3.3 Imp gal).
To ensure safety, do not attempt to
change the function of the indicator
during driving, as an accident could
result.
Do not operate the engine with the
pointer of the tachometer in the red
zone. In this range, fuel injection will
be cut by the engine control module
to protect the engine from overrev-
ving. The engine will resume run-
ning normally after the engine
speed is reduced below the red
zone.
1
300619300121
Page 194 of 365
Interior equipment 6-9
Floor mat (if equipped)
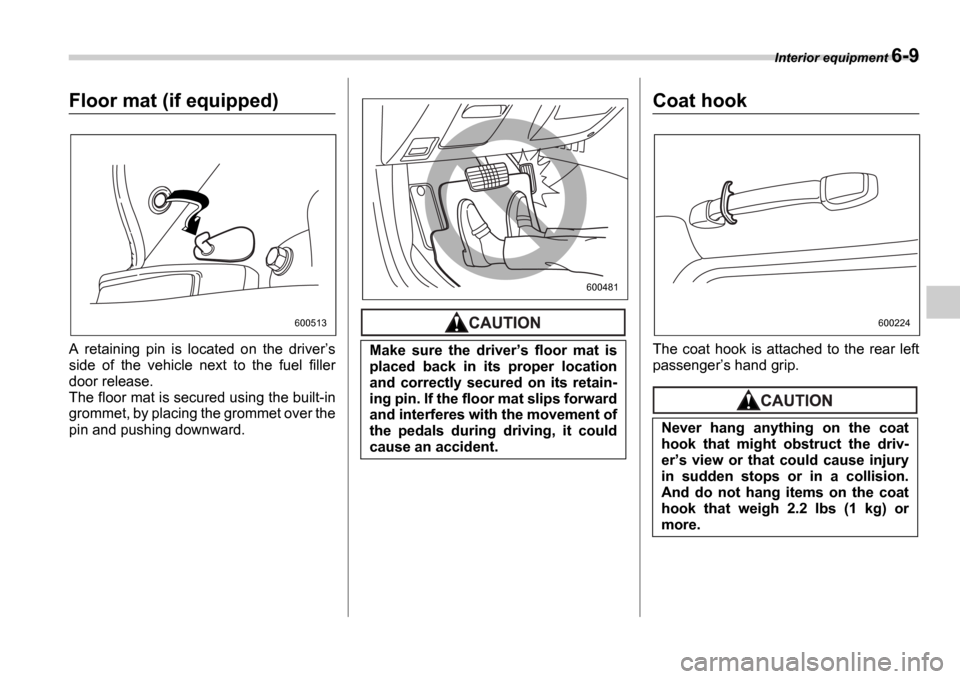
A retaining pin is located on the driver s
side of the vehicle next to the fuel filler
door release.
The floor mat is secured using the built-in
grommet, by placing the grommet over the
pin and pushing downward.
Coat hook
The coat hook is attached to the rear left
passenger s hand grip.
600513
Make sure the driver s floor mat is
placed back in its proper location
and correctly secured on its retain-
ing pin. If the floor mat slips forward
and interferes with the movement of
the pedals during driving, it could
cause an accident.
600481
Never hang anything on the coat
hook that might obstruct the driv-
er s view or that could cause injury
in sudden stops or in a collision.
And do not hang items on the coat
hook that weigh 2.2 lbs (1 kg) or
more.
600224
Page 201 of 365
7-4 Starting and operating
Fuel filler lid and cap
Refueling0
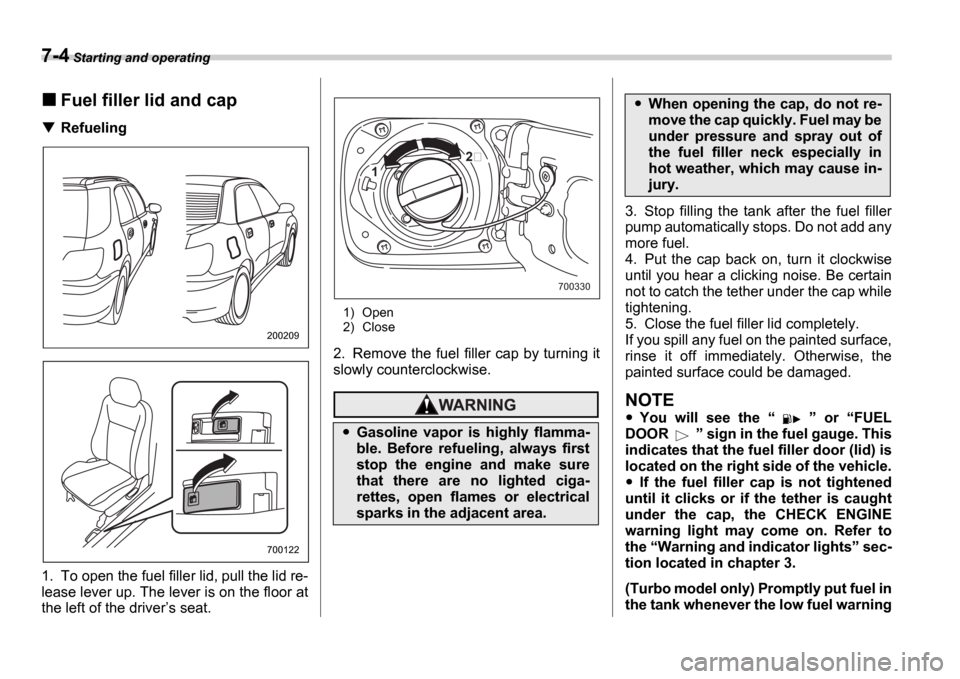
1. To open the fuel filler lid, pull the lid re-
lease lever up. The lever is on the floor at
the left of the driver s seat.
1) Open
2) Close
2. Remove the fuel filler cap by turning it
slowly counterclockwise.
3. Stop filling the tank after the fuel filler
pump automatically stops. Do not add any
more fuel.
4. Put the cap back on, turn it clockwise
until you hear a clicking noise. Be certain
not to catch the tether under the cap while
tightening.
5. Close the fuel filler lid completely.
If you spill any fuel on the painted surface,
rinse it off immediately. Otherwise, the
painted surface could be damaged.
NOTE
You will see the or FUEL
DOOR sign in the fuel gauge. This
indicates that the fuel filler door (lid) is
located on the right side of the vehicle.
If the fuel filler cap is not tightened
until it clicks or if the tether is caught
under the cap, the CHECK ENGINE
warning light may come on. Refer to
the Warning and indicator lights sec-
tion located in chapter 3.
(Turbo model only) Promptly put fuel in
the tank whenever the low fuel warning
200209
700122
Gasoline vapor is highly flamma-
ble. Before refueling, always first
stop the engine and make sure
that there are no lighted ciga-
rettes, open flames or electrical
sparks in the adjacent area.
1
700330
When opening the cap, do not re-
move the cap quickly. Fuel may be
under pressure and spray out of
the fuel filler neck especially in
hot weather, which may cause in-
jury.
Page 229 of 365
8-2 Driving tips
Driving tipsNew vehicle break-in driving the first 1,000 miles (1,600
km)
The performance and long life of your ve-
hicle are dependent on how you handle
and care for your vehicle while it is new.
Follow these instructions during the first
1,000 miles (1,600 km):
Do not race the engine. And do not al-
low engine speed to exceed 4,000 rpm ex-
cept in an emergency.
Do not drive at one constant engine or
vehicle speed for a long time, either fast or
slow.
Avoid starting suddenly and rapid accel-
eration, except in an emergency.
Avoid hard braking, except in an emer-
gency.
The same break-in procedures should be
applied to an overhauled engine, newly
mounted engine or when brake pads or
brake linings are replaced with new ones.
Fuel economy hints
The following suggestions will help to
save your fuel.
Select the proper gear position for the
speed and road conditions.
Avoid sudden acceleration or decelera-
tion. Always accelerate gently until you
reach the desired speed. Then try to main-
tain that speed for as long as possible.
Do not pump the accelerator and avoid
racing the engine.
Avoid unnecessary engine idling.
Keep the engine properly tuned.
Keep the tires inflated to the correct
pressure shown on the tire placard, which
is located under the door latch on the driv-
er s side. Low pressure will increase tire
wear and fuel consumption.
Use the air conditioner only when nec-
essary.
Keep the front and rear wheels in prop-
er alignment.
Avoid carrying unnecessary luggage or
cargo.
Engine exhaust gas (Carbon
monoxide)
Never inhale engine exhaust gas.
Engine exhaust gas contains car-
bon monoxide, a colorless and
odorless gas which is dangerous,
or even lethal, if inhaled.
Always properly maintain the en-
gine exhaust system to prevent
engine exhaust gas from entering
the vehicle.
Never run the engine in a closed
space, such as a garage, except
for the brief time needed to drive
the vehicle in or out of it.
Avoid remaining in a parked vehi-
cle for a lengthy time while the en-
gine is running. If that is unavoid-
able, then use the ventilation fan
to force fresh air into the vehicle.
Always keep the front ventilator
inlet grille free from snow, leaves
or other obstructions to ensure
that the ventilation system always
works properly.
Page 310 of 365
Maintenance and service 11-31
CONTINUED
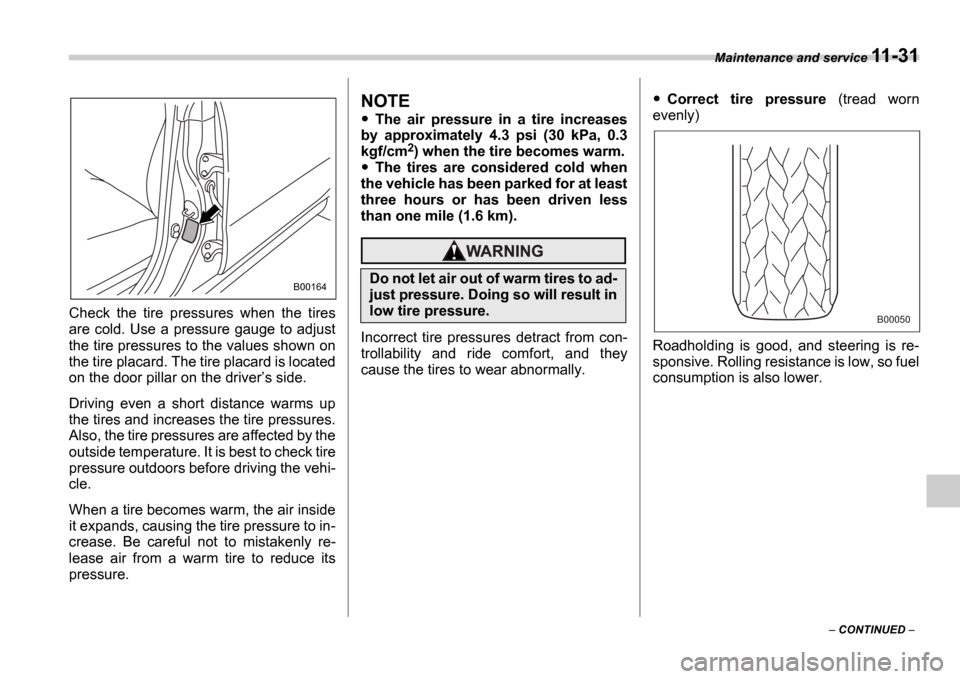
Check the tire pressures when the tires
are cold. Use a pressure gauge to adjust
the tire pressures to the values shown on
the tire placard. The tire placard is located
on the door pillar on the driver
s side.
Driving even a short distance warms up
the tires and increases the tire pressures.
Also, the tire pressures are affected by the
outside temperature. It is best to check tire
pressure outdoors before driving the vehi-
cle.
When a tire becomes warm, the air inside
it expands, causing the tire pressure to in-
crease. Be careful not to mistakenly re-
lease air from a warm tire to reduce its
pressure.
NOTE
The air pressure in a tire increases
by approximately 4.3 psi (30 kPa, 0.3
kgf/cm
2) when the tire becomes warm.
The tires are considered cold when
the vehicle has been parked for at least
three hours or has been driven less
than one mile (1.6 km).
Incorrect tire pressures detract from con-
trollability and ride comfort, and they
cause the tires to wear abnormally.
Correct tire pressure (tread worn
evenly)
Roadholding is good, and steering is re-
sponsive. Rolling resistance is low, so fuel
consumption is also lower.
B00164Do not let air out of warm tires to ad-
just pressure. Doing so will result in
low tire pressure.
B00050