2006 SUBARU IMPREZA CD player
[x] Cancel search: CD playerPage 164 of 365

5
Audio
Antenna system .................................................. 5-2
Printed antenna ................................... .................... 5-2
FM reception ...................................... ..................... 5-2
Installation of accessories ....................... ......... 5-2
Audio set ......................................... .................... 5-3
Type A audio set .................................. ................... 5-3
Type B audio set .................................. ................... 5-3
In-dash 6 CD auto changer 1 (Optional audio unit if equipped) ..................................... ........... 5-3
Type A audio set (if equipped) .................... ...... 5-4
Radio operation ................................... ................... 5-4
Compact disc player operation ..................... ........ 5-7
CD changer control (if optional in-dash CD changer is connected) ............................. ............ 5-9
Type B audio set (if equipped) .................... ...... 5-11
Radio operation ................................... ................... 5-11
Built in CD changer operation ..................... .......... 5-15
In-dash 6 CD auto changer 1 (if equipped) ...... 5-1 9
Loading and unloading compact discs ............... . 5-19
Precautions to observe when handling a compact disc ...................................... ............. 5-21
Page 166 of 365

Audio 5-3
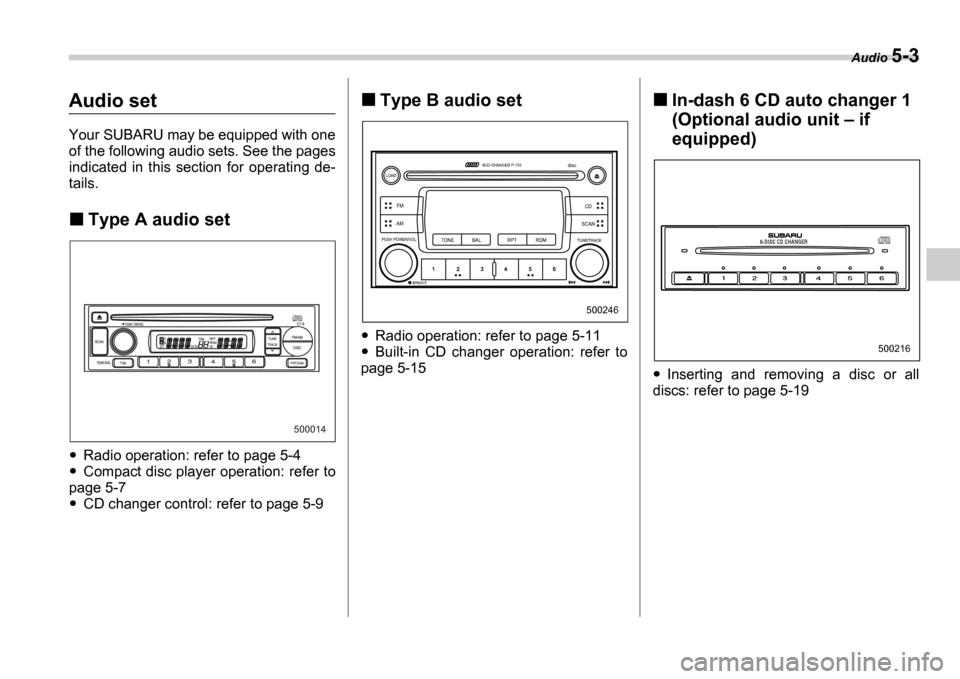
Audio set
Your SUBARU may be equipped with one
of the following audio sets. See the pages
indicated in this section for operating de-
tails.
Type A audio set
Radio operation: refer to page 5-4
Compact disc player operation: refer to
page 5-7
CD changer control: refer to page 5-9
Type B audio set
Radio operation: refer to page 5-11
Built-in CD changer operation: refer to
page 5-15
In-dash 6 CD auto changer 1
(Optional audio unit if
equipped)
Inserting and removing a disc or all
discs: refer to page 5-19
500014
500246
500216
Page 170 of 365

Audio 5-7
CONTINUED
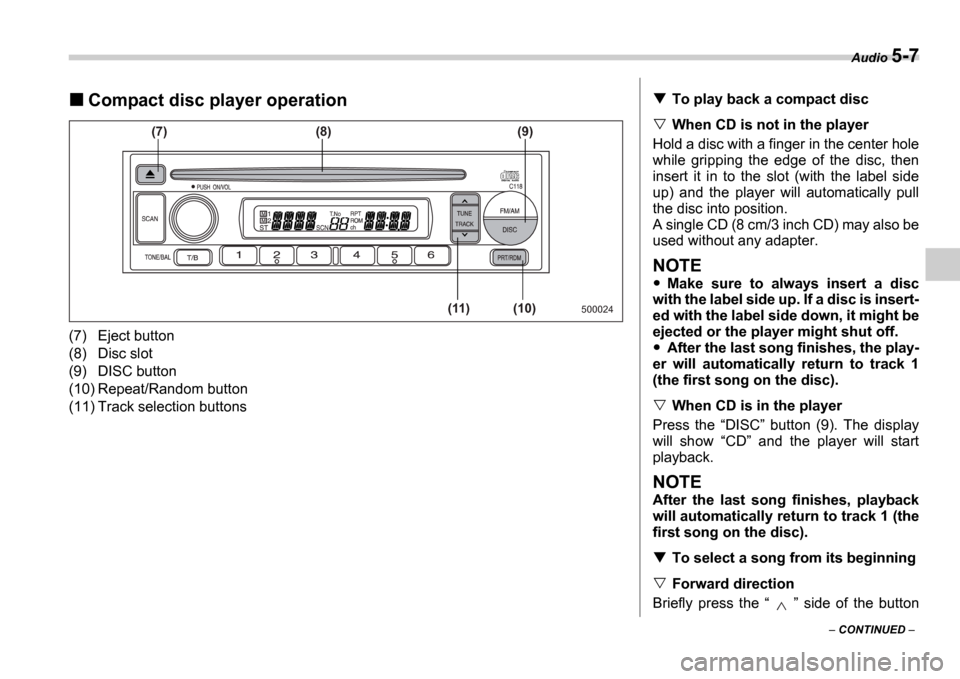
Compact disc player operation
(7) Eject button
(8) Disc slot
(9) DISC button
(10) Repeat/Random button
(11) Track selection buttons
500024
(7) (8)
(11) (10)(9)
To play back a compact disc
When CD is not in the player
Hold a disc with a finger in the center hole
while gripping the edge of the disc, then
insert it in to the slot (with the label side
up) and the player will automatically pull
the disc into position.
A single CD (8 cm/3 inch CD) may also be
used without any adapter.
NOTE
Make sure to always insert a disc
with the label side up. If a disc is insert-
ed with the label side down, it might be
ejected or the player might shut off.
After the last song finishes, the play-
er will automatically return to track 1
(the first song on the disc).
When CD is in the player
Press the DISC button (9). The display
will show CD and the player will start
playback.
NOTE
After the last song finishes, playback
will automatically return to track 1 (the
first song on the disc).
To select a song from its beginning
Forward direction
Briefly press the side of the button
Page 171 of 365

5-8 Audio
(11) to skip to the beginning of the next
track. Each time this side of the button is
pressed, the indicated track number will
increase.
Backward direction
Briefly press the side of the button
(11) to skip to the beginning of the current
track. Each time this side of the button is
pressed, the indicated track number will
decrease.
Fast-forwarding and fast-reversing
Fast-forwarding
Press the side of the button (11)
continuously to fast-forward the disc.
Release the button to stop fast-forward-
ing.
Fast-reversing
Press the side of the button (11)
continuously to fast-reverse the disc.
Release the button to stop fast-reversing.
Repeat playback
Press the RPT/RDM button (10) and re-
lease it in less than 2 seconds while a
song is playing to play the song repeated-
ly. The RPT indicator will come on and
the song will be played continuously. To
cancel the repeat mode, press the button
again. Then the RPT indicator goes out, and normal playback mode is restored.
Random playback
Press the RPT/RDM button (10) and
hold it in for more than 2 seconds while a
disc is being played back to play all songs
on the disc in a random order. The RDM
indicator will come on and all songs on the
disc will be played in a random order.
To cancel the random mode, press the
button again. Then the RDM indicator
goes out, and normal playback mode is
restored.
To eject a disc from the player
When a disc is being played back or when
a disc is in the player, press the Eject
button (7). The disc will be ejected.
The disc may be removed even when the
ignition switch is in the LOCK position.
NOTE
Avoid driving the vehicle with a CD
sticking out, because vibration might
make it fall out.
Page 172 of 365

Audio 5-9
CONTINUED
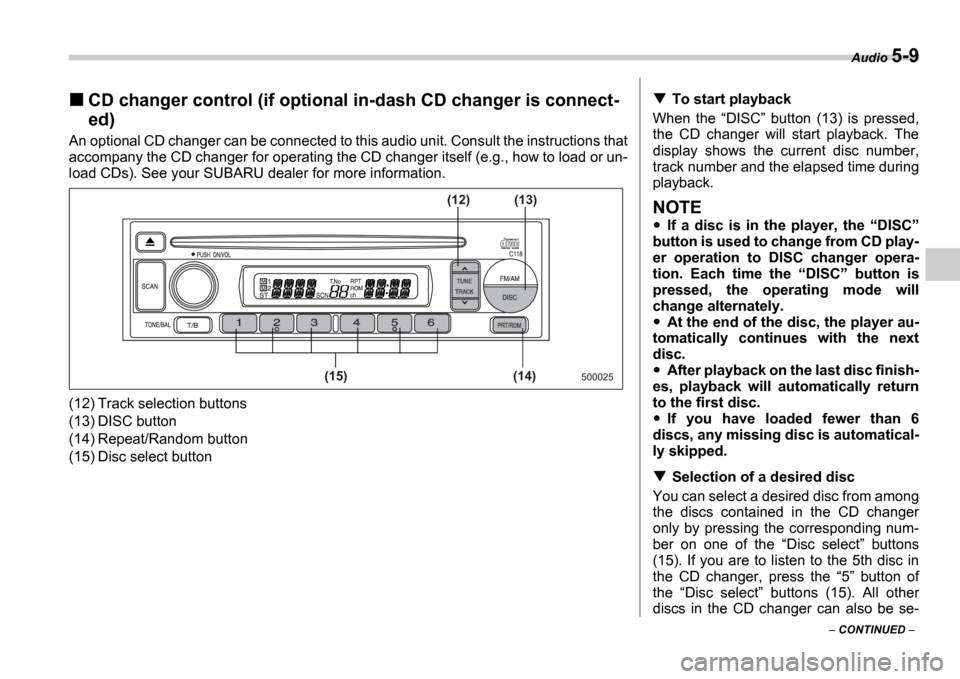
CD changer control (if optional in-dash CD changer is connect-
ed)
An optional CD changer can be connected to this audio un it. Consult the instructions that
accompany the CD changer for operating the CD changer i tself (e.g., how to load or un-
load CDs). See your SUBARU dealer for more informatio n.
(12) Track selection buttons
(13) DISC button
(14) Repeat/Random button
(15) Disc select button
500025(14)
(15) (13)
(12)
To start playback
When the DISC button (13) is pressed,
the CD changer will start playback. The
display shows the current disc number,
track number and the elapsed time during
playback.
NOTE
If a disc is in the player, the DISC
button is used to change from CD play-
er operation to DISC changer opera-
tion. Each time the DISC button is
pressed, the operating mode will
change alternately.
At the end of the disc, the player au-
tomatically continues with the next
disc.
After playback on the last disc finish-
es, playback will automatically return
to the first disc.
If you have loaded fewer than 6
discs, any missing disc is automatical-
ly skipped.
Selection of a desired disc
You can select a desired disc from among
the discs contained in the CD changer
only by pressing the corresponding num-
ber on one of the Disc select buttons
(15). If you are to listen to the 5th disc in
the CD changer, press the 5 button of
the Disc select buttons (15). All other
discs in the CD changer can also be se-
Page 178 of 365

Audio 5-15
CONTINUED
Built in CD changer operation
(9)
(17) (16)(12)
(11)
(10) (13) (14) (15)
500249
(9) LOAD button
(10) Disc slot
(11) Repeat button
(12) Random button
(13) SCAN button
(14) CD button
(15) Eject button
(16) Fast-forwarding/Fast-reversing and
track UP/DOWN knob
(17) Disc select button
NOTE
Make sure to always insert a disc with
the label side up. If a disc is inserted
with the label side down, it might be
ejected or the player might shut off.
How to insert a CD(s)
Inserting a CD
1. Press LOAD button (9). If the maga-
zine in the player has an idle position
where you can insert a disc, the DISC in-
dicator associated with the idle position
will blink.
If no indicator blinks, it means that there is
no idle position in the magazine.
2. As soon as the DISC indicator begins
to blink, the LOAD will appear on display
for a period of 15 seconds. Insert a disc
during the period. The disc will be then au-
tomatically drawn in, and the player will
Page 179 of 365

5-16 Audio
begin to play back the first track of the
disc.
To insert more discs in succession, re-
peat Steps 1 and 2. The magazine will be
loaded with discs in the ascending order
of position number.
If you do not insert any disc in 15 seconds
after you have pressed the LOAD but-
ton, the player will begin to play back the
first track of the last disc you have insert-
ed.
The disc indicator steadily lights up if a
disc is already inserted in the correspond-
ing position of the magazine.
While the player is in the loading mode,
if you press any of the other mode buttons FM (1), AM (2), the player will enter the
standby mode. Press the CD button (14)
to start playback.
Inserting a disc in a desired position
1. Press the LOAD button (9). If the
magazine in the player has an idle posi-
tion where you can insert a disc, the DISC indicator associated with the idle
position will blink.
The positions in the magazine the indica-
tor of which steadily lights up are already
loaded with discs.
2. Press the Disc select button (17) at
the position where you want to insert a
disc. The associated DISC indicator will blink, and the
LOAD will be displayed.
3. If you insert a disc during the 15-sec-
ond period while the LOAD is on display,
the disc will be automatically drawn in,
and the player will start playback of the
disc, beginning with the first track.
To insert more discs in succession, re-
peat Steps 1 and 2.
While the player is in the loading mode,
if you press any of the other mode buttons FM (1), AM (2), the player will enter
standby mode. Press the CD button (14)
to start playback.
Loading all the magazine (Full disc
loading mode)
1. If you continue to press the LOAD
button (9) for more than 1.5 seconds, the
player will produce beep sound and will
enter the full disc loading mode.
2. A DISC indicator will blink, and the
ALL LOAD will be on display for a period
of 15 seconds. If a disc is successfully
loaded during this period, the DISC indi-
cator will stop blinking and will steadily
light.
3. When the loading of a disc is complete,
the next DISC indicator will blink. Then
repeat Step 2.
4. When the magazine is filled with discs
by repeating Steps 2 and 3, the player will
start playback of the discs, beginning with the one inserted first.
If you fail to insert any disc during each 15
seconds interval, the full disc loading
mode will be canceled, and the player will
start playback of the disc inserted first.
How to play back a CD or make a
pause
When there is no CD inserted:
Insert a CD by referring to How to Insert
a CD(s) .
When a CD is loaded, the player will start
playback of the CD, beginning with the
first track.
When there are CDs loaded:
Press a desired one of the Disc select
buttons (17) the DISC indicator of which
steadily lights up. The player will then start
playback of the selected CD, beginning
with the first track.
Page 180 of 365

Audio 5-17
CONTINUED
Selecting a desired track (TRACK)
: Skipping forward
: Skipping backward
: Fast-forwarding
: Fast-reversing
Skipping forward
Turn the TRACK knob (16) clockwise
and release it immediately to skip to the
beginning of the next track. Each time the
knob is turned and released, the indicated
track number will increase.
Skipping backward
Turn the TRACK knob (16) counter-
clockwise and release it immediately to
skip to the beginning of the current track.
If you continue to turn and release the
knob, the indicated track number will de- crease.
Fast-forwarding
Turn the TRACK knob (16) clockwise
and hold it continuously to fast-forward the
disc.
Release the knob to stop fast-forwarding.
Fast-reversing
Turn the TRACK knob (16) counter-
clockwise and hold it continuously to fast-
reverse the disc.
Release the knob to stop fast-reversing.
Repeat playback
Press the RPT button (11) while a song
is playing to play the song repeatedly. The RPT indicator will come on and the song
will be played continuously. To cancel the
repeat mode, press the button again.
Then the RPT indicator goes out, and
normal playback mode is restored.
Random playback
Press the RDM button (12) while a disc
is being played back to play all songs on
the disc in a random order. The RDM in-
dicator will come on and all songs on the
disc will be played in a random order.
To cancel the random mode, press the
button again. Then the RDM indicator
goes out, and normal playback mode is
restored.
Scan
When the SCAN button (13) is pressed
while the disc is being played back, you
can hear the first 10 seconds of each track
to search for the desired program. To con-
tinue listening to the program, press the SCAN button again. After all tracks on
the disc have been scanned, normal play-
back mode is restored.
How to unload CDs from the player
Ejecting a CD from the player
Of the discs loaded, you can select and re-
move only one disc.
1. Press the Disc select button (17) of
the disc whose DISC indicator is ON.
2. Press the Eject button (15). Then the
DISC indicator associated with the disc
you have selected will blink, and the disc
will be ejected.
To remove more discs in succession, re-
peat Steps 1 and 2.
Ejecting all discs from the player
(All disc ejection mode)
1. If you continue to press the Eject but-
ton (15), the player will produce beep
sound and will enter the all disc ejection
mode.
2. Remove the disc that has been eject-
ed. The other discs loaded will then be
ejected one after another. If you do not re-
500248