2006 SUBARU IMPREZA center console
[x] Cancel search: center consolePage 16 of 365

13
CONTINUED
1
2 3
4 5
000187
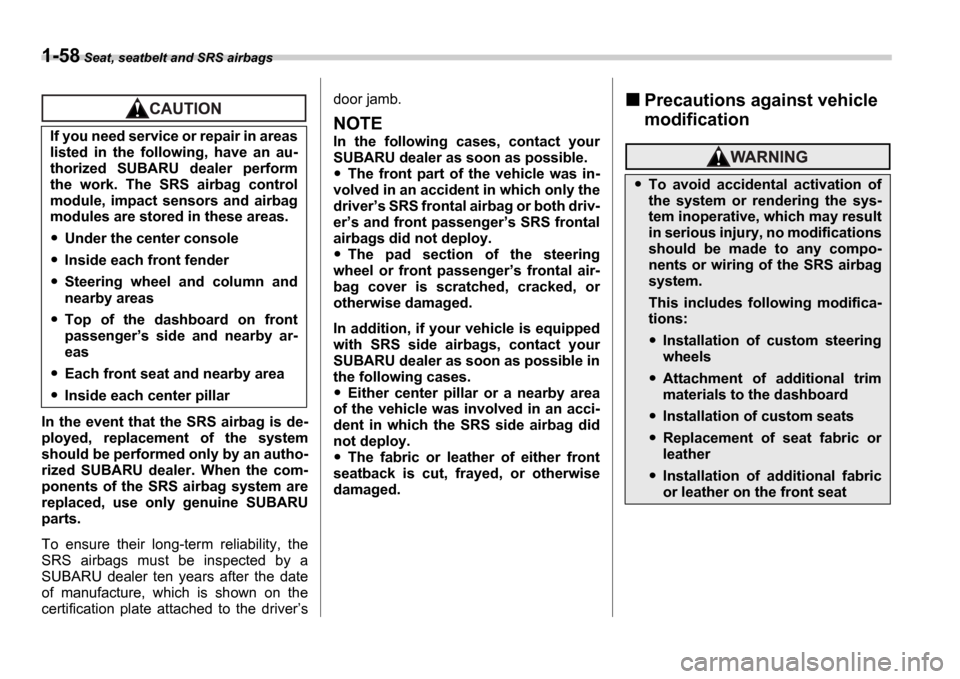
1) Cup holder (page 6-5)
2) Center console (page 6-4)
3) Glove box (page 6-4)
4) Cigarette lighter (page 6-6)
5) Ashtray (page 6-8)
Page 49 of 365

1-22 Seat, seatbelt and SRS airbags
System servicing
NOTE
If the front part of the vehicle is dam-
aged in an accident to the extent that
the seatbelt pretensioner does not op-
erate, contact your SUBARU dealer as
soon as possible.
Precautions against vehicle
modification
Always consult your SUBARU dealer if
you want to install any accessory parts to
your vehicle.
When discarding a seatbelt retrac-
tor assembly or scrapping the en-
tire vehicle damaged by a colli-
sion, consult your SUBARU deal-
er.
Tampering with or disconnecting
the system s wiring could result in
accidental activation of the seat-
belt pretensioner and/or SRS air-
bag or could make the system in-
operative, which may result in se-
rious injury. The wiring harnesses
of the seatbelt pretensioner and
SRS airbag systems are covered
with yellow insulation and the
connectors of the system are yel-
low for easy identification. Do not
use electrical test equipment on
any circuit related to the seatbelt
pretensioner and SRS airbag sys-
tems. For required servicing of
the seatbelt pretensioner, see
your nearest SUBARU dealer.
The front sub sensors are located in
both front fenders and the SRS air-
bag control module including the
impact sensors is located under the
center console. If you need service
or repair in those areas or near the
front seatbelt retractors, we recom-
mend that you have an authorized
SUBARU dealer perform the work.
Do not perform any of the following
modifications. Such modifications
can interfere with proper operation
of the seatbelt pretensioners.
Attachment of any equipment
(bush bar, winches, snow plow,
skid plate, etc.) other than genu-
ine SUBARU accessory parts to
the front end.
Modification of the suspension
system or front end structure.
Installation of a tire of different
size and construction from the
tires specified on the vehicle plac-
ard attached to the driver s door
pillar or specified for individual
vehicle models in this Owner s
Manual.
Page 72 of 365

Seat, seatbelt and SRS airbags 1-45
CONTINUED
When a heavy article is placed on the
seat.
When the front passenger s seat is occu-
pied by an adult, observe the following
precautions. Failure to do so may lessen
the load on the front passenger s seat, de-
activating the front passenger s SRS fron-
tal airbag despite the fact that the seat is
occupied by an adult.
Do not allow the rear seat occupant to
lift the front passenger s seat cushion us-
ing his/her feet.
Do not place any article under the front
passenger s seat, or squeeze any article
from behind and under the seat. This may
lift the seat cushion.
Do not squeeze any article between the
front passenger s seat and side trim/pillar,
door or center console box. This may lift
the seat cushion.
If the passenger s frontal airbag
OFF indicator illuminates and the
ON indicator extinguishes even
when the front passenger s seat is
occupied by an adult
This can be caused by the adult incorrect-
ly sitting in the front passenger s seat.
Turn the ignition switch to the OFF posi-
tion. Ask the front passenger to set the
seatback to the upright position, sit up
straight in the center of the seat cushion, correctly fasten the seatbelt, position his/
her legs out forward, and adjust the seat
to the rearmost position. Turn the ignition
switch to the
ON position. If the OFF in-
dicator remains illuminated while the ON
indicator remains extinguished, take the
following actions.
Turn the ignition switch to the OFF po-
sition.
Ensure that there is no article, book,
shoe, or other object trapped under the
seat, at the rear of the seat, or on the side
of the seat.
Ensure that the backward-forward posi-
tion and seatback of front passenger s
seat are locked into place securely by
moving the seat back and forth.
Next, turn the ignition switch to the ON
position and wait 6 seconds to allow the
system to complete self-checking. Follow-
ing the system check, both indicators ex-
tinguish for 2 seconds. Now, the ON indi-
cator should illuminate while the OFF indi-
cator remains extinguished.
If the OFF indicator still illuminates while
the ON indicator remains extinguished,
ask the occupant to move to the rear seat
and immediately contact your SUBARU
dealer for an inspection.
Effect vehicle modifications made
for persons with disabilities may
have on Subaru advanced frontal
airbag system operation (U.S. only)
Changing or moving any parts of the front
seats, seat belts, front bumper, front side
frame, instrument panel, combination
meter, steering wheel, steering column,
tire, suspension or floor panel can affect
the operation of the Subaru advanced air-
bag system. If you have any questions,
you may contact the following Subaru dis-
tributors:
Subaru of America, Inc.
Customer Dealer Services Department
P.O. Box 6000
Cherry Hill, NJ 08034-6000
1-800-SUBARU3 (1-800-782-2783)
Schuman Carriage Motors, Inc.
1234 South Beretania Street, Honolulu, HI
96814
808-592-4497
Triple J Enterprises, Inc.
P.O. Box 6066, Tamuning, Guam 96931
671-646-9126
Page 85 of 365

1-58 Seat, seatbelt and SRS airbags
In the event that the SRS airbag is de-
ployed, replacement of the system
should be performed only by an autho-
rized SUBARU dealer. When the com-
ponents of the SRS airbag system are
replaced, use only genuine SUBARU
parts.
To ensure their long-term reliability, the
SRS airbags must be inspected by a
SUBARU dealer ten years after the date
of manufacture, which is shown on the
certification plate attached to the driver s door jamb.
NOTE
In the following cases, contact your
SUBARU dealer as soon as possible.
The front part of the vehicle was in-
volved in an accident in which only the
driver s SRS frontal airbag or both driv-
er s and front passenger s SRS frontal
airbags did not deploy.
The pad section of the steering
wheel or front passenger s frontal air-
bag cover is scratched, cracked, or
otherwise damaged.
In addition, if your vehicle is equipped
with SRS side airbags, contact your
SUBARU dealer as soon as possible in
the following cases.
Either center pillar or a nearby area
of the vehicle was involved in an acci-
dent in which the SRS side airbag did
not deploy.
The fabric or leather of either front
seatback is cut, frayed, or otherwise
damaged.
Precautions against vehicle
modification
If you need service or repair in areas
listed in the following, have an au-
thorized SUBARU dealer perform
the work. The SRS airbag control
module, impact sensors and airbag
modules are stored in these areas.
Under the center console
Inside each front fender
Steering wheel and column and
nearby areas
Top of the dashboard on front
passenger s side and nearby ar-
eas
Each front seat and nearby area
Inside each center pillar
To avoid accidental activation of
the system or rendering the sys-
tem inoperative, which may result
in serious injury, no modifications
should be made to any compo-
nents or wiring of the SRS airbag
system.
This includes following modifica-
tions:
Installation of custom steering
wheels
Attachment of additional trim
materials to the dashboard
Installation of custom seats
Replacement of seat fabric or
leather
Installation of additional fabric
or leather on the front seat
Page 186 of 365

6
Interior equipment
Interior light ........................................................ 6-2
Dome light ........................................ ....................... 6-2
Cargo area light (if equipped) .................... ............ 6-2
Map light (if equipped) ........................... ............ 6-2
Sun visors ........................................ ................... 6-3
Vanity mirror (if equipped) ....................... .............. 6-3
Storage compartments .............................. ........ 6-4
Glove box ......................................... ....................... 6-4
Center console .................................... .................... 6-4
Coin tray ......................................... ......................... 6-4
Cup holder ........................................ .................. 6-5
Front passenger s cup holder ............................... 6-5
Rear passenger s cup holder ................................ 6-5
Accessory power outlet (if equipped) .............. 6-5
Cigarette lighter socket .......................... ........... 6-6
Use with a cigarette lighter ...................... .............. 6-7
Using as an accessory power outlet ................ ..... 6-7
Ashtray ........................................... ..................... 6-8
Floor mat (if equipped) ........................... ........... 6-9
Coat hook ......................................... ................... 6-9
Cargo area cover (Wagon if equipped) ......... 6-10
Using the cover ................................... .................... 6-10
To remove the cover ............................... ............... 6-10
Stowage of the cover .............................. ............... 6-10
To install the cover housing ...................... ............ 6-11
Cargo tie-down hooks (Wagon if equipped) .................................... 6 -11Cargo area bars ...................................
............... 6-12
Under-floor storage compartment (if equipped) ..................................... ................ 6-12
Page 189 of 365

6-4 Interior equipment
Storage compartments
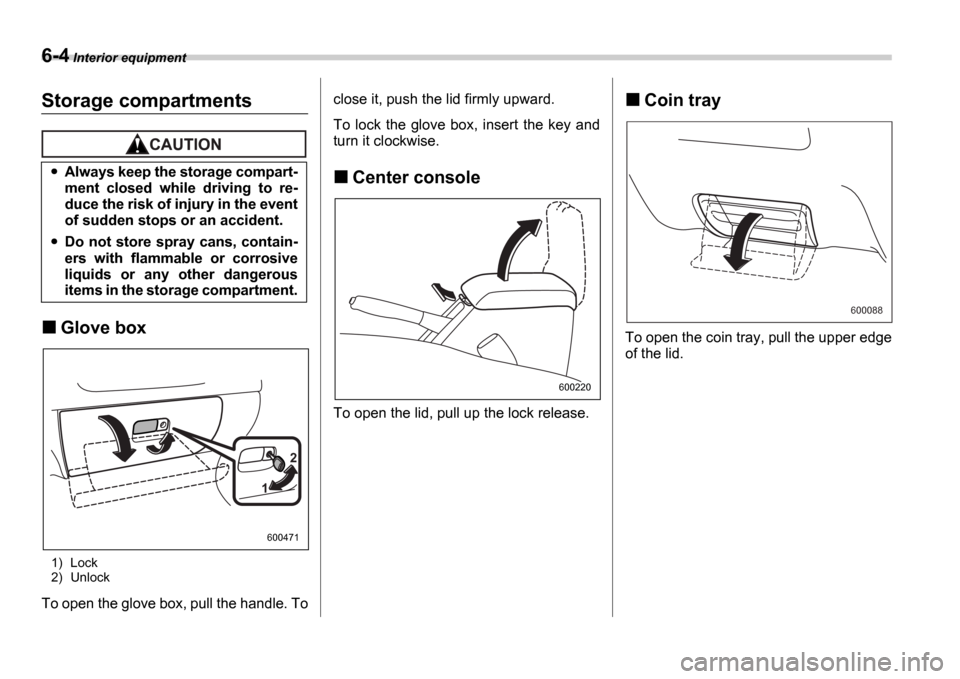
Glove box
1) Lock
2) Unlock
To open the glove box, pull the handle. To close it, push the lid firmly upward.
To lock the glove box, insert the key and
turn it clockwise.
Center console
To open the lid, pull up the lock release.
Coin tray
To open the coin tray, pull the upper edge
of the lid.
Always keep the storage compart-
ment closed while driving to re-
duce the risk of injury in the event
of sudden stops or an accident.
Do not store spray cans, contain-
ers with flammable or corrosive
liquids or any other dangerous
items in the storage compartment.
1
2
600471
600220
600088
Page 190 of 365

Interior equipment 6-5
CONTINUED
Cup holder
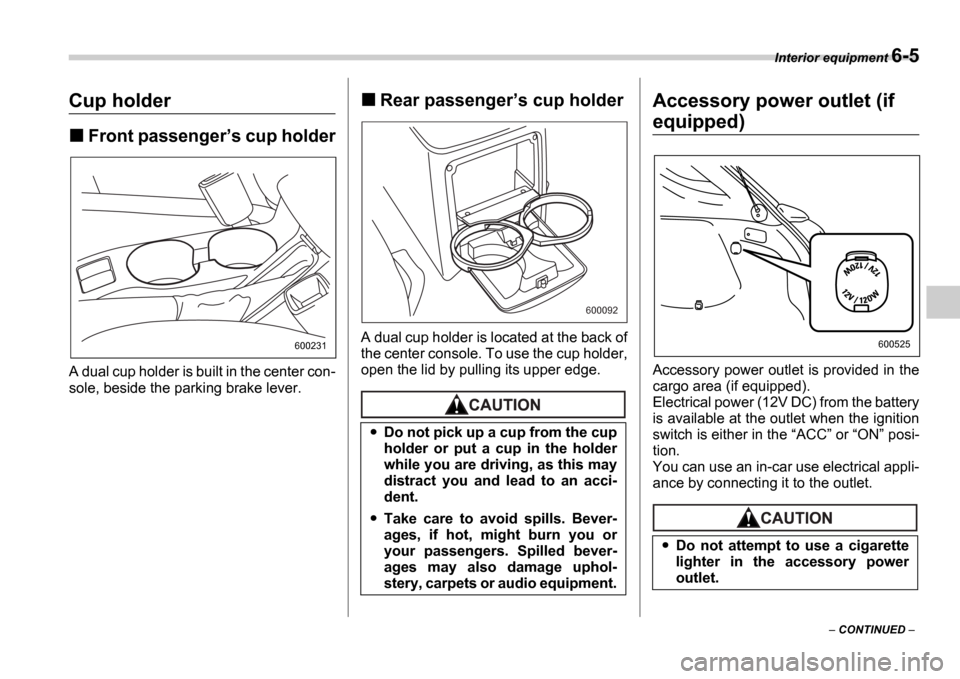
Front passenger s cup holder
A dual cup holder is built in the center con-
sole, beside the parking brake lever.
Rear passenger s cup holder
A dual cup holder is located at the back of
the center console. To use the cup holder,
open the lid by pulling its upper edge.
Accessory power outlet (if
equipped)
Accessory power outlet is provided in the
cargo area (if equipped).
Electrical power (12V DC) from the battery
is available at the outlet when the ignition
switch is either in the ACC or ON posi-
tion.
You can use an in-car use electrical appli-
ance by connecting it to the outlet.
600231
Do not pick up a cup from the cup
holder or put a cup in the holder
while you are driving, as this may
distract you and lead to an acci-
dent.
Take care to avoid spills. Bever-
ages, if hot, might burn you or
your passengers. Spilled bever-
ages may also damage uphol-
stery, carpets or audio equipment.
600092
Do not attempt to use a cigarette
lighter in the accessory power
outlet.
600525
Page 211 of 365

7-14 Starting and operating
tial LSD torque as desired. When this
mode is selected, the AUTO indicator
light in the combination meter goes off.
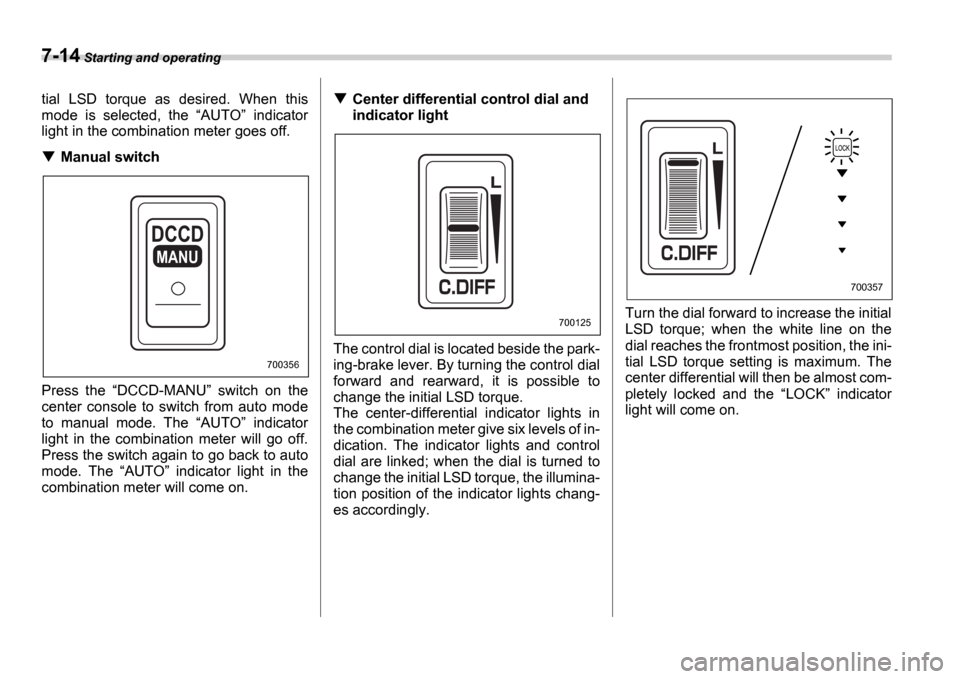
Manual switch
Press the DCCD-MANU switch on the
center console to switch from auto mode
to manual mode. The AUTO indicator
light in the combination meter will go off.
Press the switch again to go back to auto
mode. The AUTO indicator light in the
combination meter will come on.
Center differential control dial and
indicator light
The control dial is located beside the park-
ing-brake lever. By turning the control dial
forward and rearward, it is possible to
change the initial LSD torque.
The center-differential indicator lights in
the combination meter give six levels of in-
dication. The indicator lights and control
dial are linked; when the dial is turned to
change the initial LSD torque, the illumina-
tion position of the indicator lights chang-
es accordingly. Turn the dial forward to increase the initial
LSD torque; when the white line on the
dial reaches the frontmost position, the ini-
tial LSD torque setting is maximum. The
center differential will then be almost com-
pletely locked and the
LOCK indicator
light will come on.
MANU
700356
700125
700357