2006 SUBARU IMPREZA CD changer
[x] Cancel search: CD changerPage 164 of 365
5
Audio
Antenna system .................................................. 5-2
Printed antenna ................................... .................... 5-2
FM reception ...................................... ..................... 5-2
Installation of accessories ....................... ......... 5-2
Audio set ......................................... .................... 5-3
Type A audio set .................................. ................... 5-3
Type B audio set .................................. ................... 5-3
In-dash 6 CD auto changer 1 (Optional audio unit if equipped) ..................................... ........... 5-3
Type A audio set (if equipped) .................... ...... 5-4
Radio operation ................................... ................... 5-4
Compact disc player operation ..................... ........ 5-7
CD changer control (if optional in-dash CD changer is connected) ............................. ............ 5-9
Type B audio set (if equipped) .................... ...... 5-11
Radio operation ................................... ................... 5-11
Built in CD changer operation ..................... .......... 5-15
In-dash 6 CD auto changer 1 (if equipped) ...... 5-1 9
Loading and unloading compact discs ............... . 5-19
Precautions to observe when handling a compact disc ...................................... ............. 5-21
Page 166 of 365
Audio 5-3
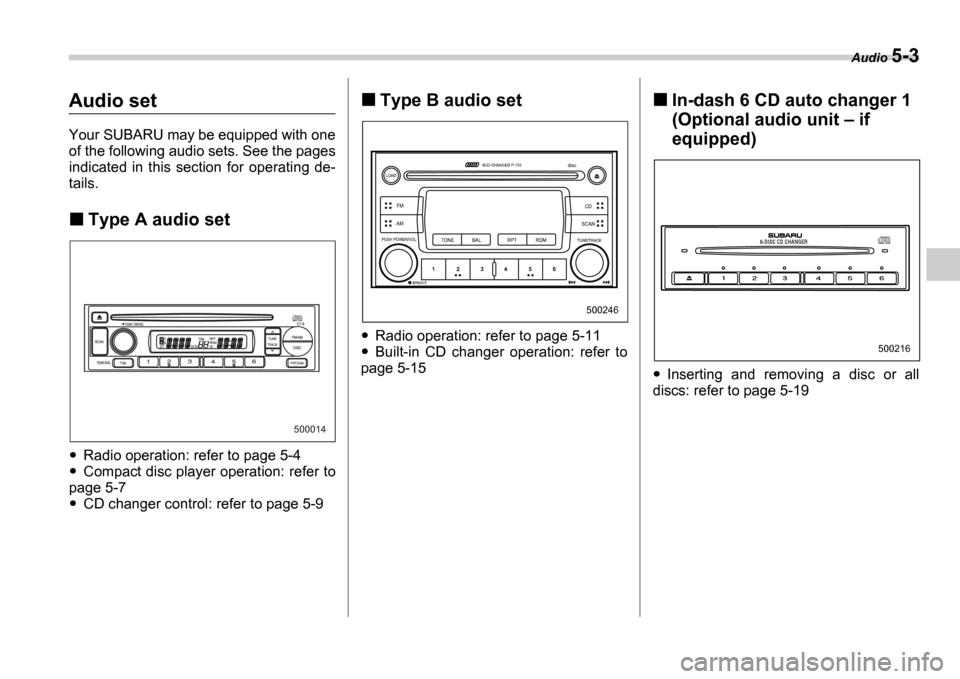
Audio set
Your SUBARU may be equipped with one
of the following audio sets. See the pages
indicated in this section for operating de-
tails.
Type A audio set
Radio operation: refer to page 5-4
Compact disc player operation: refer to
page 5-7
CD changer control: refer to page 5-9
Type B audio set
Radio operation: refer to page 5-11
Built-in CD changer operation: refer to
page 5-15
In-dash 6 CD auto changer 1
(Optional audio unit if
equipped)
Inserting and removing a disc or all
discs: refer to page 5-19
500014
500246
500216
Page 172 of 365
Audio 5-9
CONTINUED
CD changer control (if optional in-dash CD changer is connect-
ed)
An optional CD changer can be connected to this audio un it. Consult the instructions that
accompany the CD changer for operating the CD changer i tself (e.g., how to load or un-
load CDs). See your SUBARU dealer for more informatio n.
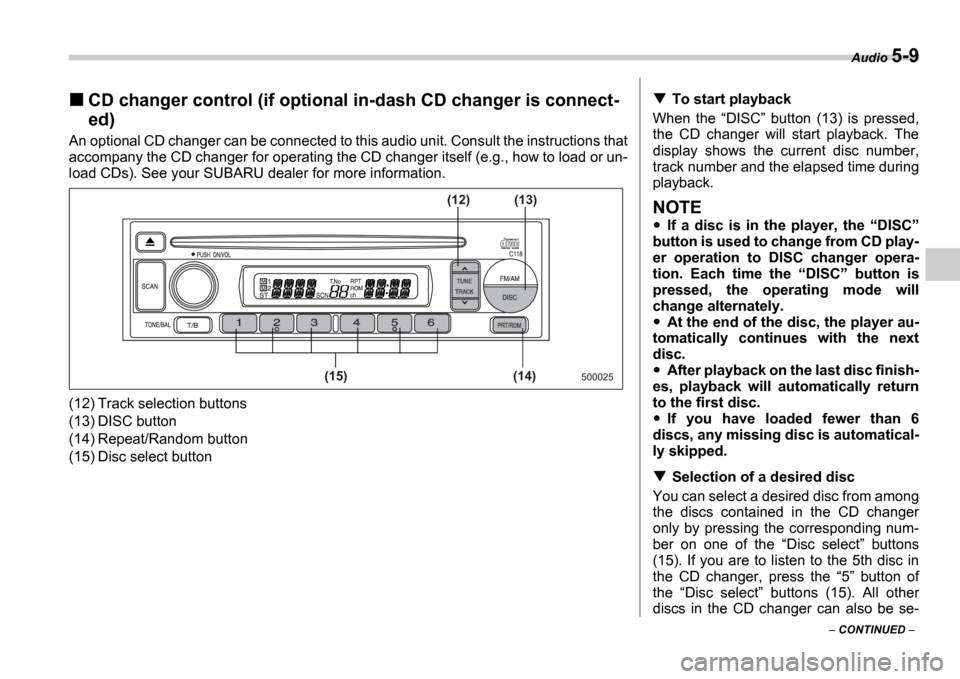
(12) Track selection buttons
(13) DISC button
(14) Repeat/Random button
(15) Disc select button
500025(14)
(15) (13)
(12)
To start playback
When the DISC button (13) is pressed,
the CD changer will start playback. The
display shows the current disc number,
track number and the elapsed time during
playback.
NOTE
If a disc is in the player, the DISC
button is used to change from CD play-
er operation to DISC changer opera-
tion. Each time the DISC button is
pressed, the operating mode will
change alternately.
At the end of the disc, the player au-
tomatically continues with the next
disc.
After playback on the last disc finish-
es, playback will automatically return
to the first disc.
If you have loaded fewer than 6
discs, any missing disc is automatical-
ly skipped.
Selection of a desired disc
You can select a desired disc from among
the discs contained in the CD changer
only by pressing the corresponding num-
ber on one of the Disc select buttons
(15). If you are to listen to the 5th disc in
the CD changer, press the 5 button of
the Disc select buttons (15). All other
discs in the CD changer can also be se-
Page 173 of 365
5-10 Audio
lected in a similar way.
NOTE
No disc change takes place if the
button corresponding to the storage
tray in which no disc is loaded is
pressed.
If the disc select button correspond-
ing to the disc now in playback is
pressed again, the disc will be replayed
from its beginning.
To select a song from its beginning
Forward direction
Briefly press the side of the button
(12) to skip to the beginning of the next
track. Each time this side of the button is
pressed, the indicated track number will
increase.
Backward direction
Briefly press the side of the button
(12) to skip to the beginning of the current
track. Each time this side of the button is
pressed, the indicated track number will
decrease.
Fast-forwarding and fast-reversing
Fast-forwarding
Press the side of the button (12)
continuously to fast-forward the disc.
Release the button to stop fast-forward- ing.
If you continue fast-forwarding to the end
of the disc, the CD changer will automati-
cally stop fast-forwarding and start play-
back beginning with the first track on the
current disc.
Fast-reversing
Press the side of the button (12)
continuously to fast-reverse the disc.
Release the button to stop fast-reversing.
If you continue fast-reverse to the begin-
ning of the disc, the CD changer will auto-
matically stop fast-reverse and start play-
back beginning with the first track on the
current disc.
Repeat playback
Use this to play a certain track repeatedly.
During playback, press the RPT/RDM
button (14) and release it in less than 2
seconds. The RPT indicator will come on
and the song will be played continuously.
To cancel the repeat mode, press the but-
ton again. Then the RPT indicator goes
out, and normal playback mode is re-
stored.
Random playback
Use this to play the tracks on the disc in
random order. During playback, press the RPT/RDM button (14) and hold it in for
more than 2 seconds. The RDM indica- tor will come on and all songs on the disc
will be played in a random order.
To cancel the random mode, press the
button again. Then the
RDM indicator
goes out, and normal playback mode is
restored.
Page 178 of 365

Audio 5-15
CONTINUED
Built in CD changer operation
(9)
(17) (16)(12)
(11)
(10) (13) (14) (15)
500249
(9) LOAD button
(10) Disc slot
(11) Repeat button
(12) Random button
(13) SCAN button
(14) CD button
(15) Eject button
(16) Fast-forwarding/Fast-reversing and
track UP/DOWN knob
(17) Disc select button
NOTE
Make sure to always insert a disc with
the label side up. If a disc is inserted
with the label side down, it might be
ejected or the player might shut off.
How to insert a CD(s)
Inserting a CD
1. Press LOAD button (9). If the maga-
zine in the player has an idle position
where you can insert a disc, the DISC in-
dicator associated with the idle position
will blink.
If no indicator blinks, it means that there is
no idle position in the magazine.
2. As soon as the DISC indicator begins
to blink, the LOAD will appear on display
for a period of 15 seconds. Insert a disc
during the period. The disc will be then au-
tomatically drawn in, and the player will
Page 182 of 365
Audio 5-19
CONTINUED
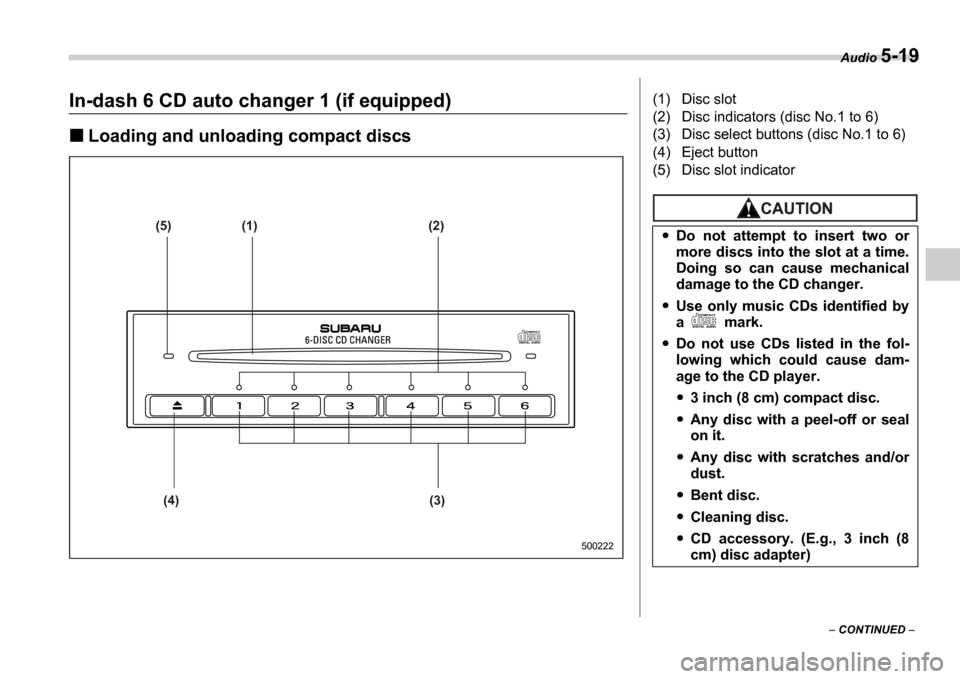
In-dash 6 CD auto changer 1 (if equipped)
Loading and unloading compact discs
(5) (1) (2)
(4) (3)
500222
(1) Disc slot
(2) Disc indicators (disc No.1 to 6)
(3) Disc select buttons (disc No.1 to 6)
(4) Eject button
(5) Disc slot indicator
Do not attempt to insert two or
more discs into the slot at a time.
Doing so can cause mechanical
damage to the CD changer.
Use only music CDs identified by
a mark.
Do not use CDs listed in the fol-
lowing which could cause dam-
age to the CD player.
3 inch (8 cm) compact disc.
Any disc with a peel-off or seal
on it.
Any disc with scratches and/or
dust.
Bent disc.
Cleaning disc.
CD accessory. (E.g., 3 inch (8
cm) disc adapter)
Page 183 of 365
5-20 Audio
To insert a disc
1. Press one of the Disc select buttons
(3) (numbered from 1 to 6) for which the
disc indicator light (2) is OFF .
The disc indicator lights are located direct-
ly above the corresponding Disc select
buttons.
2. The indicator will begin blinking. The
blinking will last for 15 seconds.
During this period, insert a desired disc,
and the disc will begin to play. (If any disc
is not inserted during this period, the Disc
slot (1) door will close. Repeat Step 1.)
Be sure to hold a disc with the label side
(the side where titles are printed) up.
3. To insert another disc, repeat Steps 1
and 2 choosing a different disc select but-
ton.
To insert six discs at a time
1. Press and hold the Disc select button
number 1 until all disc indicators begin
blinking (approximately 1.5 seconds). 2. The indicators will blink for 15 seconds.
During this period, insert desired six discs.
3. When all discs are loaded, the first disc
will begin to play. (If no disc is inserted
within this 15 seconds, the entire disc load
sequence will be canceled.)
To remove a disc
1. Press the desired one of the Disc se-
lect buttons (3) (numbered from 1 to 6) for
which the disc indicator light is on.
2. Press the Eject button (4). The select-
ed disc will be ejected and the indicator
light will begin blinking.
3. To remove another disc, repeat Steps
1 and 2 choosing a different Disc select
button.
(To remove discs when the ignition switch
is in the Lock position, press the Eject
button, and the first disc will be ejected.
Press the Eject button again, and the
next disc will be ejected and so on. At this
time, the Disc select buttons are dis-
abled.)
To remove all discs at one time
1. Press and hold the Eject button (4)
until all Disc indicators begin blinking
(approximately 1.5 seconds), and the first
disc will be ejected.
2. When the disc is removed, the next
one will be ejected, and so on.
To replace a playing disc with an-
other
Simply press the desired one of Disc se-
lect buttons (3) (numbered from 1 to 6) or
press the Disc select button on the radio
unit to select the desired disc, and the disc
will begin to play.
Disc indicators
Lit: when the corresponding storage tray
is occupied by a disc.
Blinking: Disc player is either in loading,
eject or changing mode.
OFF: No disc is loaded or the ignition
switch is in the LOCK position.
Open/Closed disc slot indicator
When the disc slot is open, the disc indica-
tors on both sides of the slot illuminate.
Function control
Refer to CD changer control operating in-
structions described in the Type B audio
set (if equipped) section.
Do not insert or remove any disc
when the automatic transmission
selector lever is in the park posi-
tion; the selector lever in that po-
sition can interfere with disc in-
sertion or removal, causing
scratches on the disc surface (for
AT vehicles).