2006 SUBARU IMPREZA Trans
[x] Cancel search: TransPage 215 of 365
7-18 Starting and operating
the original gear position.
While climbing a grade
When driving up hill, undesired upshift to
4th gear is prevented from taking place
when the accelerator pedal is released.
This minimizes the chances of subse-
quent downshifting to a lower gear when
accelerating again. This prevents repeat-
ed upshifting and downshifting resulting in
a smoother operation of the vehicle.
NOTE
The transmission may downshift to
2nd or 1st gear, depending on the way
the accelerator pedal is pressed to ac-
celerate the vehicle again.
While going down a hill
When descending a steep hill, depressing
the brake pedal will cause the transmis-
sion to downshift to 3rd gear, thus apply-
ing engine braking. Reacceleration for a
short time will cause the transmission to
upshift normally.
NOTE
In some cases, depressing the brake
pedal on a downhill grade does not re-
sult in an automatic downshift to 3rd
gear. This can happen when the auto-
matic transmission fluid temperature is
very low, for example, during driving shortly after the vehicle has been
parked for an extended period of time.
When the ATF temperature has risen to
a certain level, automatic downshift
normally takes place. In the meantime,
downshift manually for engine braking
as required.
Also, downshifting when braking
downhill will not occur at speeds
above approximately 48 mph (78 km/h).
3 (Third)
This position is for using engine braking
when going down a hill or for climbing a
grade.
The transmission automatically shifts into
a suitable gear from 1st to 3rd according
to the vehicle speed and the acceleration
you require.
When more acceleration is required in this
position, press the accelerator pedal fully
to the floor and hold that position. The
transmission will automatically downshift
to 2nd or 1st gear. When you release the
pedal, the transmission will return to the
original gear position.
2 (Second)
This position is for using engine braking
when going down a hill or for climbing a
steep grade.
In this position, the transmission holds in the 2nd gear.
Use this position when starting off from a
standstill on slippery road surfaces such
as mud or snow. It will ensure greater trac-
tion.
1 (First)
This position is for driving up or down very
steep grades, or driving through mud or
sand, or on slippery surfaces. In this posi-
tion, the transmission holds in the 1st
gear.
Maximum speeds
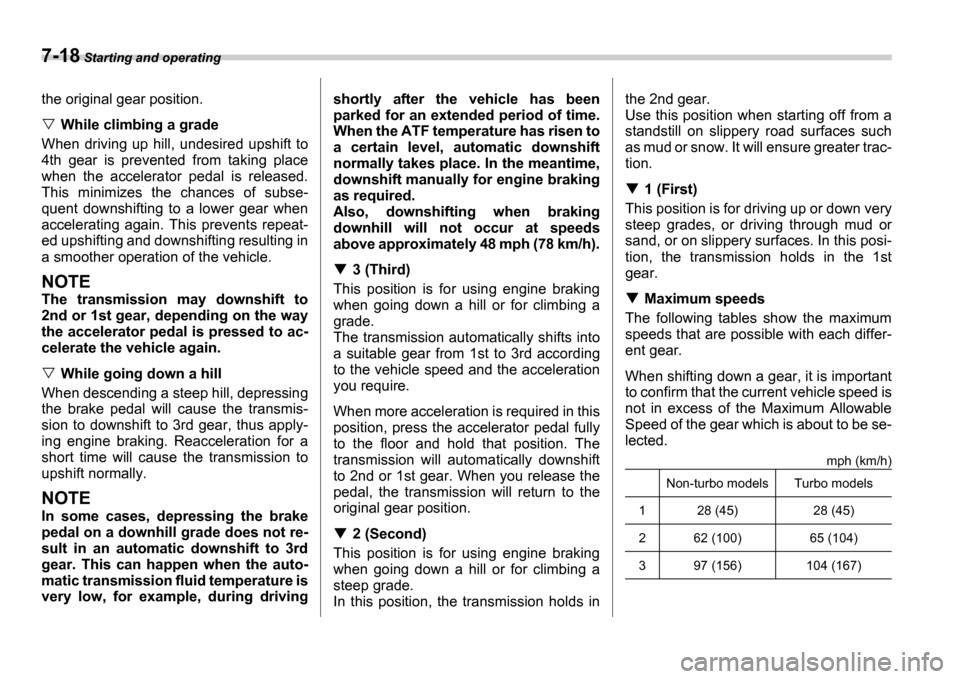
The following tables show the maximum
speeds that are possible with each differ-
ent gear.
When shifting down a gear, it is important
to confirm that the current vehicle speed is
not in excess of the Maximum Allowable
Speed of the gear which is about to be se-
lected.
mph (km/h)
Non-turbo models Turbo models
1 28 (45) 28 (45)
2 62 (100) 65 (104)
3 97 (156) 104 (167)
Page 216 of 365
Starting and operating 7-19
CONTINUED
NOTE
In order to prevent over-revving during
deceleration of the vehicle, the trans-
mission will remain in the current gear
if the speed of the vehicle is in excess
of the Maximum Allowable Speed for
the gear to which the selector lever has
been moved.
Driving tips
Always apply the foot or parking brake
when the vehicle is stopped in the D , 3 ,
2 , 1 or R position.
Always set the parking brake when parking your vehicle. Do not hold the vehi-
cle with only the transmission.
Do not keep the vehicle in a stationary
position on an uphill grade by using the D , 3 , 2 , or 1 position. Use the brake
instead.
The engine may, on rare occasions, knock
when the vehicle rapidly accelerates or
rapidly pulls away from a standstill. This
phenomenon is not an indication of a
problem in your vehicle.
Shift lock release
If the selector lever does not move from
the P position with the brake pedal de-
pressed and the ignition switch in the ON
position, perform the following steps:
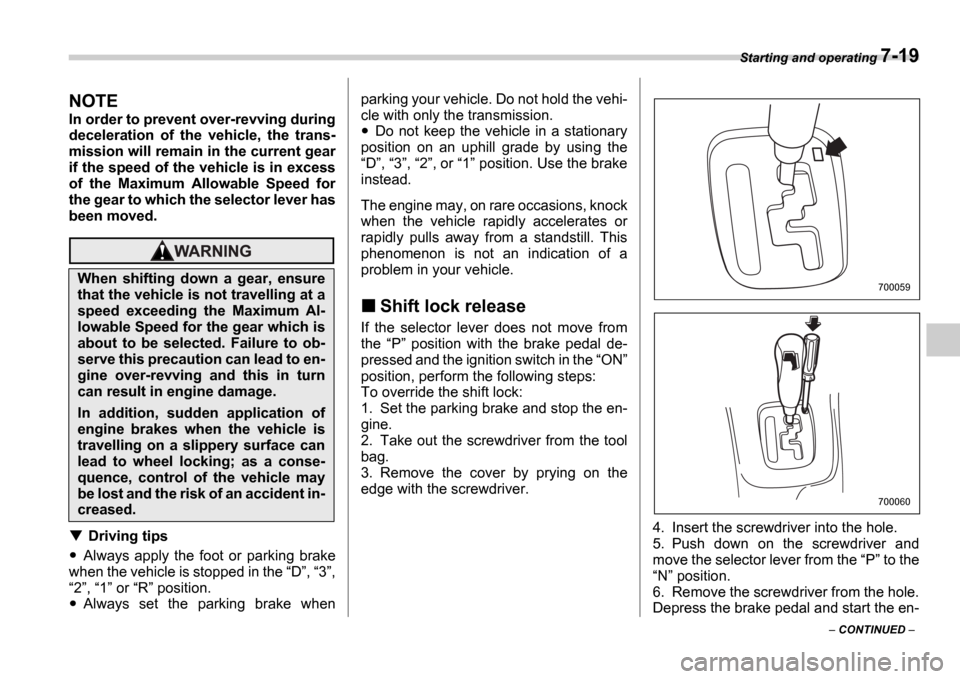
To override the shift lock:
1. Set the parking brake and stop the en-
gine.
2. Take out the screwdriver from the tool
bag.
3. Remove the cover by prying on the
edge with the screwdriver.
4. Insert the screwdriver into the hole.
5. Push down on the screwdriver and
move the selector lever from the P to the
N position.
6. Remove the screwdriver from the hole.
Depress the brake pedal and start the en-
When shifting down a gear, ensure
that the vehicle is not travelling at a
speed exceeding the Maximum Al-
lowable Speed for the gear which is
about to be selected. Failure to ob-
serve this precaution can lead to en-
gine over-revving and this in turn
can result in engine damage.
In addition, sudden application of
engine brakes when the vehicle is
travelling on a slippery surface can
lead to wheel locking; as a conse-
quence, control of the vehicle may
be lost and the risk of an accident in-
creased.
700059
700060
Page 222 of 365
Starting and operating 7-25
CONTINUED
Parking your vehicle
Parking brake
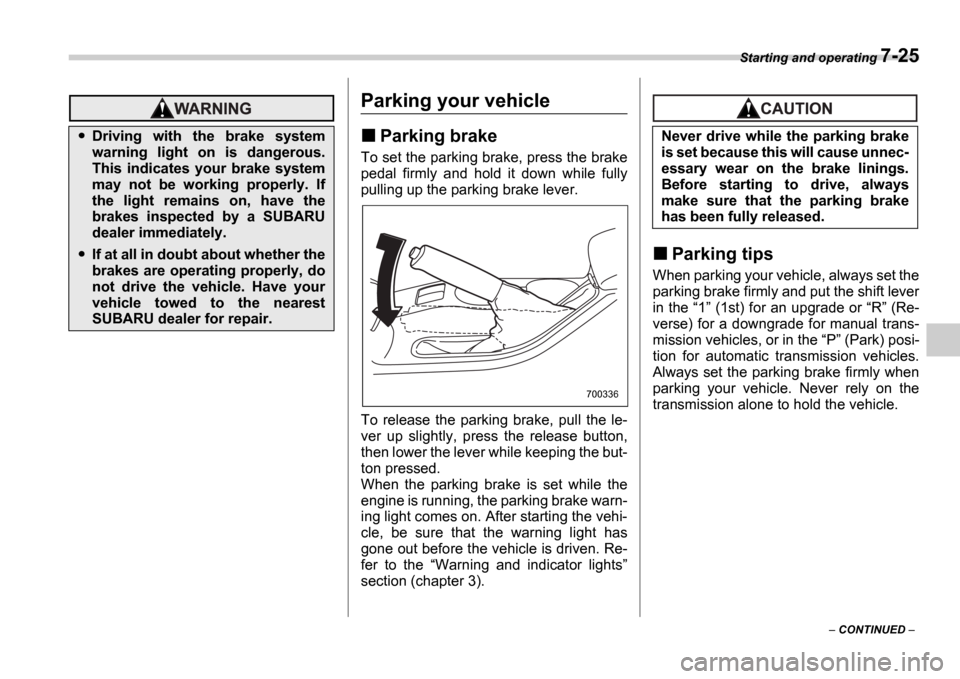
To set the parking brake, press the brake
pedal firmly and hold it down while fully
pulling up the parking brake lever.
To release the parking brake, pull the le-
ver up slightly, press the release button,
then lower the lever while keeping the but-
ton pressed.
When the parking brake is set while the
engine is running, the parking brake warn-
ing light comes on. After starting the vehi-
cle, be sure that the warning light has
gone out before the vehicle is driven. Re-
fer to the Warning and indicator lights
section (chapter 3).
Parking tips
When parking your vehicle, always set the
parking brake firmly and put the shift lever
in the 1 (1st) for an upgrade or R (Re-
verse) for a downgrade for manual trans-
mission vehicles, or in the P (Park) posi-
tion for automatic transmission vehicles.
Always set the parking brake firmly when
parking your vehicle. Never rely on the
transmission alone to hold the vehicle.
Driving with the brake system
warning light on is dangerous.
This indicates your brake system
may not be working properly. If
the light remains on, have the
brakes inspected by a SUBARU
dealer immediately.
If at all in doubt about whether the
brakes are operating properly, do
not drive the vehicle. Have your
vehicle towed to the nearest
SUBARU dealer for repair.
700336
Never drive while the parking brake
is set because this will cause unnec-
essary wear on the brake linings.
Before starting to drive, always
make sure that the parking brake
has been fully released.
Page 225 of 365
7-28 Starting and operating
The vehicle will maintain the desired
speed.
Vehicle speed can be temporarily in-
creased while driving with the cruise con-
trol activated. Simply depress the acceler-
ator pedal to accelerate the vehicle. When
the accelerator pedal is released, the ve-
hicle will return to and maintain the previ-
ous cruising speed.
To temporarily cancel the
cruise control
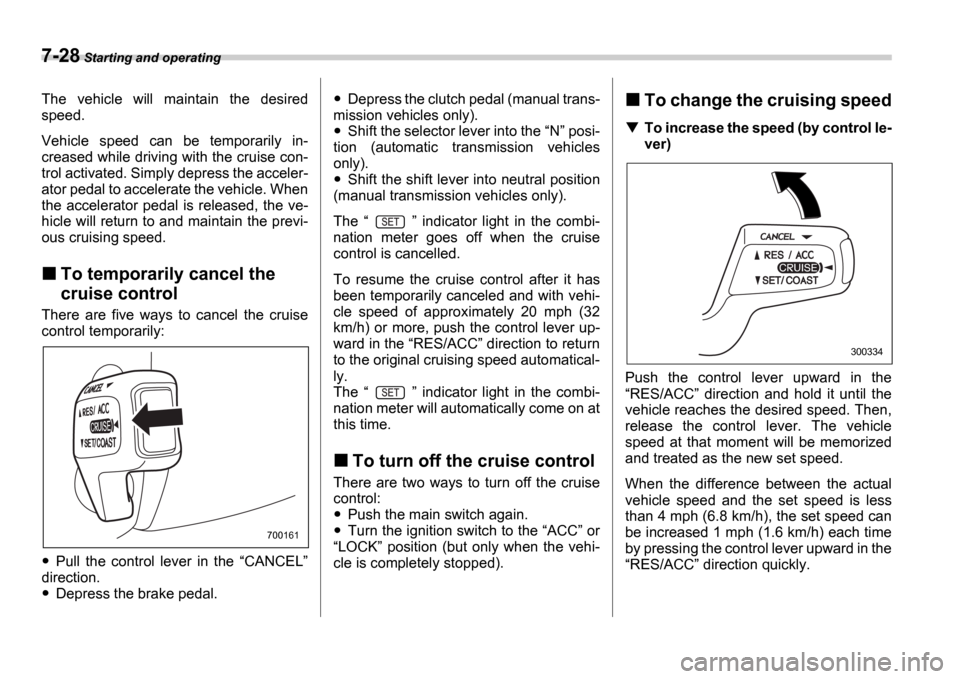
There are five ways to cancel the cruise
control temporarily:
Pull the control lever in the CANCEL
direction.
Depress the brake pedal.
Depress the clutch pedal (manual trans-
mission vehicles only).
Shift the selector lever into the N posi-
tion (automatic transmission vehicles
only).
Shift the shift lever into neutral position
(manual transmission vehicles only).
The indicator light in the combi-
nation meter goes off when the cruise
control is cancelled.
To resume the cruise control after it has
been temporarily canceled and with vehi-
cle speed of approximately 20 mph (32
km/h) or more, push the control lever up-
ward in the RES/ACC direction to return
to the original cruising speed automatical-
ly.
The indicator light in the combi-
nation meter will automatically come on at
this time.
To turn off the cruise control
There are two ways to turn off the cruise
control:
Push the main switch again.
Turn the ignition switch to the ACC or
LOCK position (but only when the vehi-
cle is completely stopped).
To change the cruising speed
To increase the speed (by control le-
ver)
Push the control lever upward in the RES/ACC direction and hold it until the
vehicle reaches the desired speed. Then,
release the control lever. The vehicle
speed at that moment will be memorized
and treated as the new set speed.
When the difference between the actual
vehicle speed and the set speed is less
than 4 mph (6.8 km/h), the set speed can
be increased 1 mph (1.6 km/h) each time
by pressing the control lever upward in the RES/ACC direction quickly.
700161
300334
Page 234 of 365

Driving tips 8-7
with your fingers and thumbs on the out-
side of the rim.
If driving through water, such as when
crossing shallow streams, first check the
depth of the water and the bottom of the
stream bed for firmness and ensure that
the bed of the stream is flat. Drive slowly
and completely through the stream. The
water should be shallow enough that it
does not reach the vehicle s undercar-
riage. Water entering the engine air intake
or the exhaust pipe or water splashing
onto electrical parts may damage your ve-
hicle and may cause it to stall. Never at-
tempt to drive through rushing water; re-
gardless of its depth, it can wash away the
ground from under your tires, resulting in
possible loss of traction and even vehicle
rollover.
Always check your brakes for effective-
ness immediately after driving in sand,
mud or water. Do this by driving slowly
and stepping on the brake pedal. Repeat
that process several times to dry out the
brake discs and brake pads.
Do not drive or park over or near flam-
mable materials such as dry grass or fall-
en leaves, as they may burn easily. The
exhaust system is very hot while the en-
gine is running and right after the engine
stops. This could create a fire hazard.
After driving through tall grass, mud, rocks, sand, rivers, etc., check that there
is no grass, bush, paper, rags, stones,
sand, etc. adhering to or trapped on the
underbody. Clear off any such matter from
the underbody. If the vehicle is used with
these materials trapped or adhering to the
underbody, a mechanical breakdown or
fire could occur.
Secure all cargo carried inside the vehi-
cle and make certain that it is not piled
higher than the seatbacks. During sudden
stops or jolts, unsecured cargo could be
thrown around in the vehicle and cause in-
jury. Do not pile heavy loads on the roof.
Those loads raise the vehicle s center of
gravity and make it more prone to tip over.
If you must rock the vehicle to free it
from sand or mud, depress the accelera-
tor pedal slightly and move the selector le-
ver back and forth between D and R re-
peatedly. Do not race the engine. For the
best possible traction, avoid spinning the
wheels when trying to free the vehicle.
When the road surface is extremely slip-
pery, you can obtain better traction by
starting the vehicle with the transmission
in 2nd than 1st (both for MT and AT).
Never equip your vehicle with tires larg-
er than those specified in this manual.
Frequent driving of an AWD vehicle un-
der hard-driving conditions such as rough
roads or off roads will necessitate more frequent replacement of engine oil, brake
fluid and transmission oil than that speci-
fied in the maintenance schedule de-
scribed in the
Warranty and Maintenance
Booklet .
Remember that damage done to your
Subaru while operating it off-road and not
using common sense precautions such as
those listed above is not eligible for war-
ranty coverage.
Wash the vehicle s underbody after off-
road driving. Suspension components are
particularly prone to dirt buildup, so they
need to be washed thoroughly.
Page 236 of 365
Driving tips 8-9
CONTINUED
do so and check under the fenders period-
ically.
Parking in cold weather
Do not use the parking brake when park-
ing for long periods in cold weather since
it could freeze in that position. Instead, ob-
serve the following.
1. Place the shift lever in 1 or R for
manual transmission vehicles, and in P
for automatic transmission vehicles.
2. Use tire stops under the tires to prevent
the vehicle from moving.
When the vehicle is parked in snow or
when it snows, raise the wiper blades off
the glass to prevent damage to them.
When the vehicle has been left parked af-
ter use on roads heavily covered with
snow, or has been left parked during a
snowstorm, icing may develop on the
brake system, which could cause poor
braking action. Check for snow or ice
buildup on the suspension, disc brakes
and brake hoses underneath the vehicle.
If there is caked snow or ice, remove it,
being careful not to damage the disc
brakes and brake hoses and ABS har-
ness.
Refueling in cold weather
To help prevent moisture from forming in
the fuel system and the risk of its freezing,
use of an antifreeze additive in the fuel
tank is recommended during cold weath-
er.
Use only additives that are specifically de-
signed for this purpose. When an anti-
freeze additive is used, its effect lasts
longer if the tank is refilled whenever the
fuel level reaches half empty.
If your SUBARU is not going to be used for
an extended period, it is best to have the
fuel tank filled to capacity.
Driving on snowy and icy
roads
To prevent skidding and slipping, avoid
sudden braking, abrupt acceleration, high-
speed driving, and sharp turning when
driving on snowy or icy roads.
Always maintain ample distance between your vehicle and the vehicle ahead of you
to avoid the need for sudden braking.
To supplement the foot brake, use the en-
gine brake effectively to control the vehi-
cle speed. (Shift into a lower gear when
necessary.)
Avoid shifting down abruptly. Such behav-
ior can cause the wheels to lock, possibly
leading to loss of vehicle control.
An anti-lock brake system (ABS) enhanc-
es your vehicle
s braking performance on
snowy and icy roads. Refer to the ABS
(Anti-lock Brake System) section in chap-
ter 7 for information on braking on slippery
surfaces.
NOTE
The following tires are summer tires.
Compared with winter and all-season
tires, summer tires give significantly
less grip on snowy and icy road surfac-
es. Avoid driving on snowy and icy
road surface with summer tires.
225/45R17 tires for WRX-STI
Snow can trap dangerous exhaust
gases under your vehicle. Keep
snow clear of the exhaust pipe and
from around your vehicle if you park
the vehicle in snow with the engine
running.
Do not use the cruise control on
slippery roads such as snowy or icy
roads. This may cause loss of vehi-
cle control.
Page 239 of 365
8-12 Driving tips
pension.
When driving with tire chains, drive at
speeds below 19 mph (30 km/h).
When a temporary spare tire is on a front
wheel, replace the temporary spare tire
with the rear tire on the same side of the
vehicle, and then fit chains on the front
tires.
Always use the utmost care when driving
with tire chains overconfidence be-
cause you are driving with tire chains
could easily lead to a serious accident.
Rocking the vehicle
If you must rock the vehicle to free it from
snow, sand, or mud, depress the acceler-
ator pedal slightly and move the selector
lever back and forth between D and R
repeatedly. Do not race the engine. For
the best possible traction, avoid spinning
the wheels when trying to free the vehicle. When the road surface is extremely slip-
pery, you can obtain better traction by
starting the vehicle with the transmission
in 2nd than 1st (both for MT and AT).
Refer to the
Automatic transmission sec-
tion in chapter 7 for information on holding
the transmission in 2nd position.
Loading your vehicle
Tire chains cannot be used on tires
listed in the following because of
lack of clearance between the tires
and vehicle body.
225/45R17 tires for WRX-STI
215/45R17 tires for WRX
Never allow passengers to ride on
a folded rear seatback, in the
trunk or in the cargo area. Doing
so may result in serious injury.
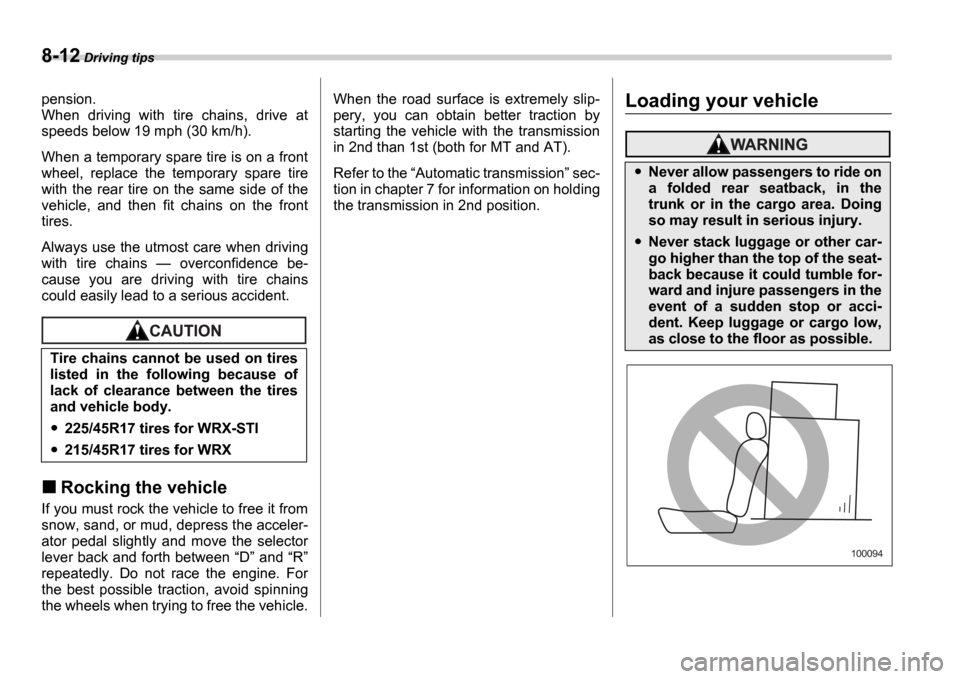
Never stack luggage or other car-
go higher than the top of the seat-
back because it could tumble for-
ward and injure passengers in the
event of a sudden stop or acci-
dent. Keep luggage or cargo low,
as close to the floor as possible.
100094
Page 247 of 365
8-20 Driving tips
required due to the additional load. (Refer
to Maintenance schedule under severe
driving conditions in the Warranty and
Maintenance Booklet .)
Under no circumstances should a trailer
be towed with a new vehicle or a vehicle
with any new powertrain component (en-
gine, transmission, differential, wheel
bearings, etc.) for the first 1,000 miles
(1,600 km) of driving.
Maximum load limits
Total trailer weight
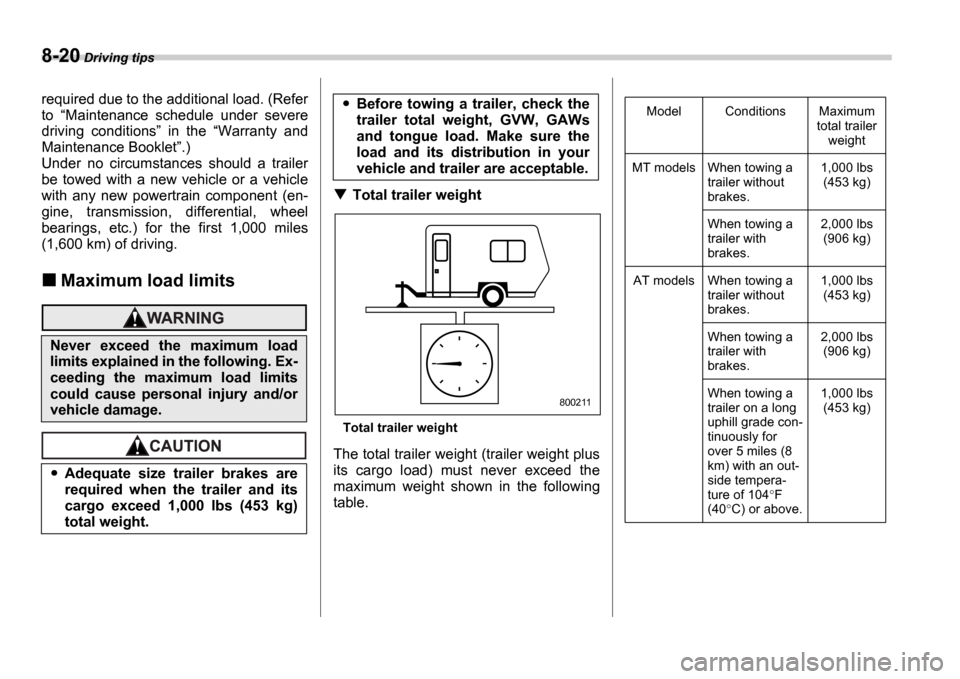
Total trailer weight
The total trailer weight (trailer weight plus
its cargo load) must never exceed the
maximum weight shown in the following
table.
Never exceed the maximum load
limits explained in the following. Ex-
ceeding the maximum load limits
could cause personal injury and/or
vehicle damage.
Adequate size trailer brakes are
required when the trailer and its
cargo exceed 1,000 lbs (453 kg)
total weight.
Before towing a trailer, check the
trailer total weight, GVW, GAWs
and tongue load. Make sure the
load and its distribution in your
vehicle and trailer are acceptable.
800211
Model Conditions Maximum total trailer weight
MT models When towing a trailer without
brakes. 1,000 lbs
(453 kg)
When towing a
trailer with
brakes. 2,000 lbs
(906 kg)
AT models When towing a trailer without
brakes. 1,000 lbs
(453 kg)
When towing a
trailer with
brakes. 2,000 lbs
(906 kg)
When towing a
trailer on a long
uphill grade con-
tinuously for
over 5 miles (8
km) with an out-
side tempera-
ture of 104 F
(40 C) or above. 1,000 lbs
(453 kg)