2006 SUBARU IMPREZA Trans
[x] Cancel search: TransPage 130 of 365
Instruments and controls 3-17
CONTINUED
is at the proper level but the light remains
on, contact your nearest SUBARU dealer
immediately.
AT OIL TEMPerature
warning light (AT vehi-
cles)
The AT oil temperature warning light
comes on when the ignition switch is
turned to the
ON position and goes out
after approximately two seconds.
If this light comes on when the engine is
running, it may indicate that the automatic
transmission fluid temperature is too hot.
If the light comes on while driving, it is un-
necessary to stop the vehicle, but avoid
driving up steep grades or in stop and go
traffic.
Automatic transmission control
system warning
If the light flashes after the engine starts,
it may indicate that the automatic trans-
mission control system is not working
properly. Contact your nearest SUBARU dealer for service immediately.
Rear differential oil tem-
perature warning light
(WRX-STI)
If this light comes on when the engine is
running, it may indicate that the rear differ-
ential oil temperature is too hot.
At this time, the driver
s control center dif-
ferential will automatically cancel the cur-
rent torque-distribution ratio setting and
adopts its minimum ratio.
If the light comes on while driving, reduce
vehicle speed and stop the vehicle at the
nearest safe place.
Park the vehicle for several minutes. After
the light goes out, you can start driving.
If the light does not go out, contact the
nearest SUBARU dealer for service.
NOTE
If the tire pressures are not correct
and/or the tires are not all the same
size and brand, the rear differential will
be heavily loaded when the vehicle is
driven, resulting in an abnormally high
oil temperature.
The rear differential oil will deterio-
rate if its temperature increases
enough for the rear differential oil tem-
perature warning light to come on. It is
advisable to have the rear differential
oil replaced as soon as possible.
ABS warning light
The ABS warning light comes on when the
ignition switch is turned to the ON posi-
tion and goes out after approximately two
seconds.
This is an indication that the ABS system
is working properly.
Do not operate the engine with the
oil pressure warning light on. This
may cause serious engine damage.
Reduce vehicle speed and park the
vehicle in a safe place as soon as
possible if the R.DIFF TEMP light
comes on. Continued driving with
this light on can damage the rear dif-
ferential and other parts of the pow-
ertrain.
If the warning light behaves as fol-
lows, the ABS system may not work
properly.
When the warning light is on, the
ABS function shuts down; however,
the conventional brake system con-
tinues to operate normally.
(U.S.)
(Canada)
Page 136 of 365
Instruments and controls 3-23
CONTINUED
High/low beam change (dim-
mer)
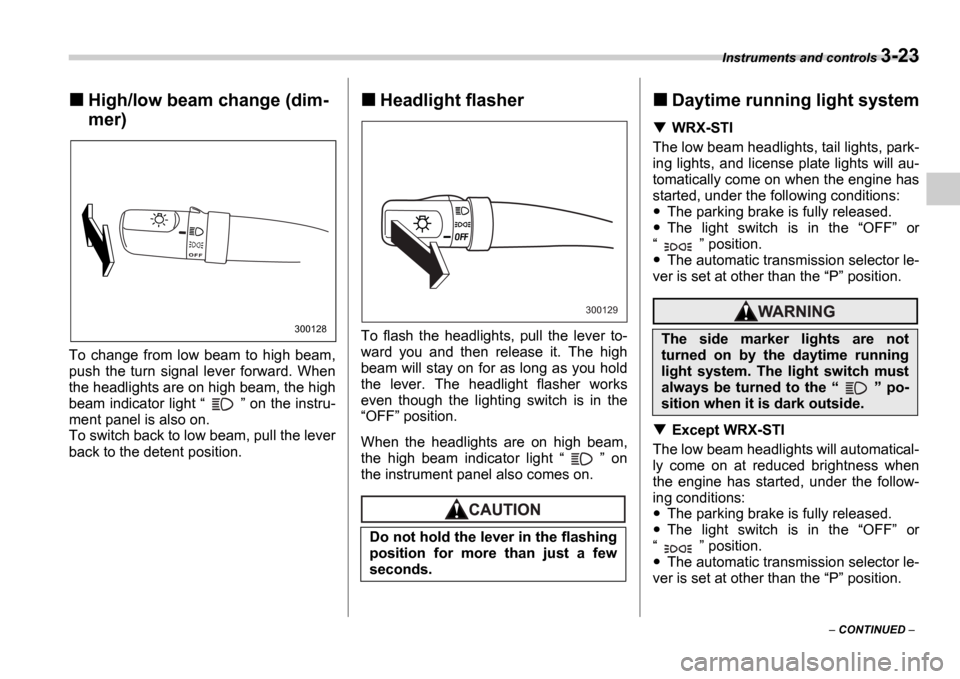
To change from low beam to high beam,
push the turn signal lever forward. When
the headlights are on high beam, the high
beam indicator light on the instru-
ment panel is also on.
To switch back to low beam, pull the lever
back to the detent position.
Headlight flasher
To flash the headlights, pull the lever to-
ward you and then release it. The high
beam will stay on for as long as you hold
the lever. The headlight flasher works
even though the lighting switch is in the OFF position.
When the headlights are on high beam,
the high beam indicator light on
the instrument panel also comes on.
Daytime running light system
WRX-STI
The low beam headlights, tail lights, park-
ing lights, and license plate lights will au-
tomatically come on when the engine has
started, under the following conditions:
The parking brake is fully released.
The light switch is in the OFF or
position.
The automatic transmission selector le-
ver is set at other than the P position.
Except WRX-STI
The low beam headlights will automatical-
ly come on at reduced brightness when
the engine has started, under the follow-
ing conditions:
The parking brake is fully released.
The light switch is in the OFF or
position.
The automatic transmission selector le-
ver is set at other than the P position.
300128
Do not hold the lever in the flashing
position for more than just a few
seconds.
300129
The side marker lights are not
turned on by the daytime running
light system. The light switch must
always be turned to the po-
sition when it is dark outside.
Page 145 of 365
3-32 Instruments and controls
Mirrors
Always check that the inside and outside
mirrors are properly adjusted before you
start driving.
Inside mirror
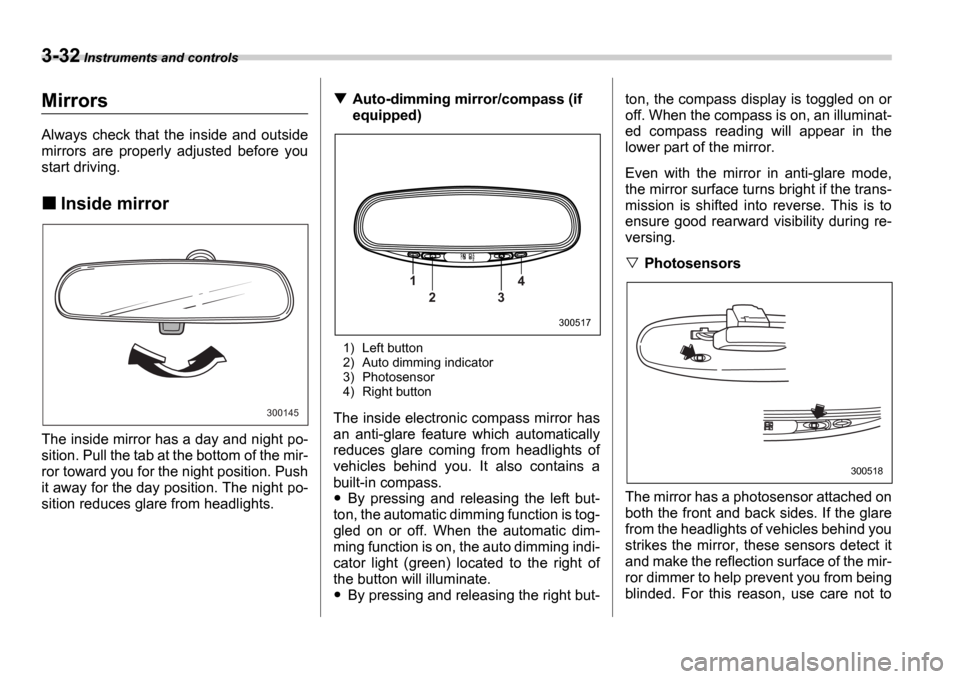
The inside mirror has a day and night po-
sition. Pull the tab at the bottom of the mir-
ror toward you for the night position. Push
it away for the day position. The night po-
sition reduces glare from headlights.
Auto-dimming mirror/compass (if
equipped)
1) Left button
2) Auto dimming indicator
3) Photosensor
4) Right button
The inside electronic compass mirror has
an anti-glare feature which automatically
reduces glare coming from headlights of
vehicles behind you. It also contains a
built-in compass.
By pressing and releasing the left but-
ton, the automatic dimming function is tog-
gled on or off. When the automatic dim-
ming function is on, the auto dimming indi-
cator light (green) located to the right of
the button will illuminate.
By pressing and releasing the right but- ton, the compass display is toggled on or
off. When the compass is on, an illuminat-
ed compass reading will appear in the
lower part of the mirror.
Even with the mirror in anti-glare mode,
the mirror surface turns bright if the trans-
mission is shifted into reverse. This is to
ensure good rearward visibility during re-
versing.
Photosensors
The mirror has a photosensor attached on
both the front and back sides. If the glare
from the headlights of vehicles behind you
strikes the mirror, these sensors detect it
and make the reflection surface of the mir-
ror dimmer to help prevent you from being
blinded. For this reason, use care not to
300145
1 2 3 4
300517
300518
Page 165 of 365
5-2 Audio
AudioAntenna system
Printed antenna
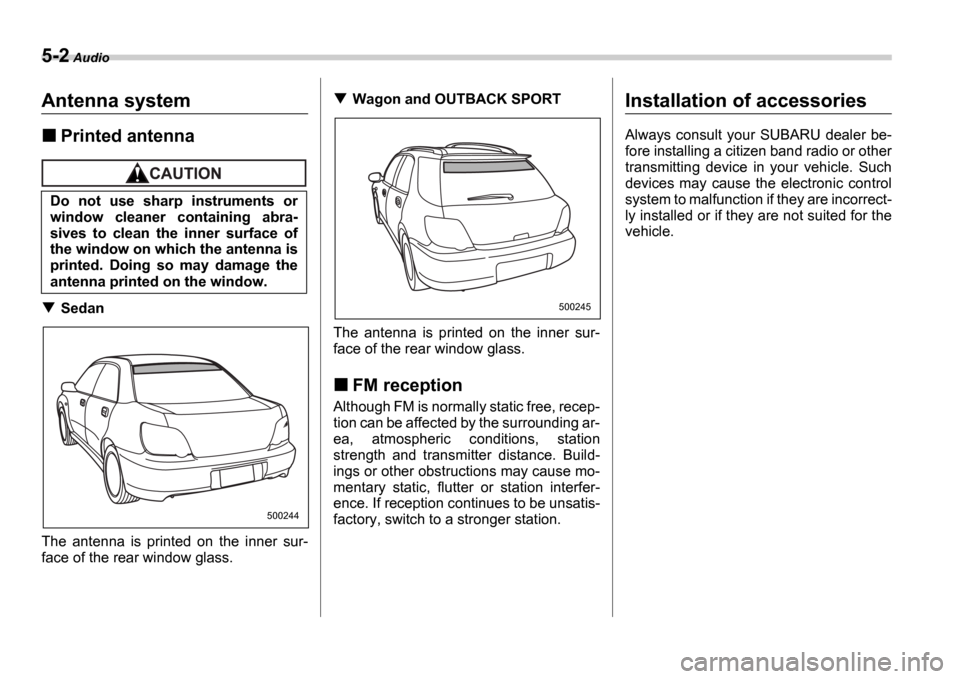
Sedan
The antenna is printed on the inner sur-
face of the rear window glass.
Wagon and OUTBACK SPORT
The antenna is printed on the inner sur-
face of the rear window glass.
FM reception
Although FM is normally static free, recep-
tion can be affected by the surrounding ar-
ea, atmospheric conditions, station
strength and transmitter distance. Build-
ings or other obstructions may cause mo-
mentary static, flutter or station interfer-
ence. If reception continues to be unsatis-
factory, switch to a stronger station.
Installation of accessories
Always consult your SUBARU dealer be-
fore installing a citizen band radio or other
transmitting device in your vehicle. Such
devices may cause the electronic control
system to malfunction if they are incorrect-
ly installed or if they are not suited for the
vehicle.
Do not use sharp instruments or
window cleaner containing abra-
sives to clean the inner surface of
the window on which the antenna is
printed. Doing so may damage the
antenna printed on the window.
500244
500245
Page 183 of 365
5-20 Audio
To insert a disc
1. Press one of the Disc select buttons
(3) (numbered from 1 to 6) for which the
disc indicator light (2) is OFF .
The disc indicator lights are located direct-
ly above the corresponding Disc select
buttons.
2. The indicator will begin blinking. The
blinking will last for 15 seconds.
During this period, insert a desired disc,
and the disc will begin to play. (If any disc
is not inserted during this period, the Disc
slot (1) door will close. Repeat Step 1.)
Be sure to hold a disc with the label side
(the side where titles are printed) up.
3. To insert another disc, repeat Steps 1
and 2 choosing a different disc select but-
ton.
To insert six discs at a time
1. Press and hold the Disc select button
number 1 until all disc indicators begin
blinking (approximately 1.5 seconds). 2. The indicators will blink for 15 seconds.
During this period, insert desired six discs.
3. When all discs are loaded, the first disc
will begin to play. (If no disc is inserted
within this 15 seconds, the entire disc load
sequence will be canceled.)
To remove a disc
1. Press the desired one of the Disc se-
lect buttons (3) (numbered from 1 to 6) for
which the disc indicator light is on.
2. Press the Eject button (4). The select-
ed disc will be ejected and the indicator
light will begin blinking.
3. To remove another disc, repeat Steps
1 and 2 choosing a different Disc select
button.
(To remove discs when the ignition switch
is in the Lock position, press the Eject
button, and the first disc will be ejected.
Press the Eject button again, and the
next disc will be ejected and so on. At this
time, the Disc select buttons are dis-
abled.)
To remove all discs at one time
1. Press and hold the Eject button (4)
until all Disc indicators begin blinking
(approximately 1.5 seconds), and the first
disc will be ejected.
2. When the disc is removed, the next
one will be ejected, and so on.
To replace a playing disc with an-
other
Simply press the desired one of Disc se-
lect buttons (3) (numbered from 1 to 6) or
press the Disc select button on the radio
unit to select the desired disc, and the disc
will begin to play.
Disc indicators
Lit: when the corresponding storage tray
is occupied by a disc.
Blinking: Disc player is either in loading,
eject or changing mode.
OFF: No disc is loaded or the ignition
switch is in the LOCK position.
Open/Closed disc slot indicator
When the disc slot is open, the disc indica-
tors on both sides of the slot illuminate.
Function control
Refer to CD changer control operating in-
structions described in the Type B audio
set (if equipped) section.
Do not insert or remove any disc
when the automatic transmission
selector lever is in the park posi-
tion; the selector lever in that po-
sition can interfere with disc in-
sertion or removal, causing
scratches on the disc surface (for
AT vehicles).
Page 187 of 365
6-2 Interior equipment
Interior equipm entInterior light
When leaving your vehicle, make sure the
light goes out to avoid battery discharge.
Dome light
The dome light switch has three positions:
ON: The light stays on continuously.
DOOR (middle position): The dome light
comes on when any of the doors (or the
rear gate on wagon) is opened. The light
remains on for several seconds and grad-
ually goes out after all doors (and the rear
gate on the wagon) are closed or if the key
is inserted in the ignition switch.
The light also can be turned on by use of
the remote keyless entry transmitter. See the
Remote keyless entry system sec-
tion in chapter 2 for detailed information.
OFF: The light stays off.
Cargo area light (if equipped)
DOOR: The light comes on only when the
rear gate is opened.
OFF: The light stays off.
Map light (if equipped)
Vehicle with moonroof
Vehicle without moonroof
ON
DOOR OFF
600078
OFF
DOOR
400333
600524
600217
Page 198 of 365

7
Starting and operating
Fuel ...................................................................... 7-2
Fuel requirements ................................. ................. 7-2
Fuel filler lid and cap ........................... ................... 7-4
State emission testing (U.S. only) ................ .... 7-5
Preparing to drive ................................ .............. 7-6
Starting the engine ............................... .............. 7-7
Manual transmission vehicle ....................... .......... 7-7
Automatic transmission vehicle .................... ........ 7-7
Stopping the engine ............................... ............ 7-8
Manual transmission 6 speeds (WRX-STI) ... 7-9
Selecting reverse gear ............................ ............... 7-9
Shifting speeds ................................... .................... 7-9
Driving tips ...................................... ........................ 7-10
Manual transmission 5 speeds (except
WRX-STI) .......................................... ................ 7-11
Shifting speeds ................................... .................... 7-11
Driving tips ...................................... ........................ 7-12
Driver s Control Center Differential (DCCD)
(WRX-STI) ......................................... ............... 7-12
Auto mode ......................................... ...................... 7-13
Manual mode ....................................... .................... 7-13
Temporary release ................................. ................. 7-15
Automatic transmission ............................ ........ 7-16
Selector lever for automatic transmission ......... .. 7-16
Shift lock release ................................ .................... 7-19
Limited slip differential (LSD) (if equipped) ..... 7-20
Power steering .................................... ............... 7-21Braking ...........................................
..................... 7-21
Braking tips ...................................... ....................... 7-21
Brake system ...................................... .................... 7-21
Disc brake pad wear warning indicators ............ .. 7-22
ABS (Anti-lock Brake System) ...................... .... 7-22
ABS system self-check ............................. ............. 7-22
ABS warning light ................................. .................. 7-23
Electronic Brake Force Distribution (EBD) system ............................................ .................. 7-24
Steps to take if EBD system fails ................. ......... 7-24
Parking your vehicle .............................. ............ 7-25
Parking brake ..................................... ..................... 7-25
Parking tips ...................................... ....................... 7-25
Cruise control .................................... ................. 7-27
To set cruise control ............................. ................. 7-27
To temporarily cancel the cruise control .......... ... 7-28
To turn off the cruise control .................... ............. 7-28
To change the cruising speed ...................... ......... 7-28
Page 202 of 365
Starting and operating 7-5
CONTINUED
light comes on. Engine misfires as a re-
sult of an empty tank could cause dam-
age to the engine.
State emission testing (U.S.
only)
At state inspection time, remember to
tell your inspection or service station
in advance not to place your Subaru
AWD vehicle on a two-wheel dyna-
mometer. Otherwise, serious transmis-
sion damage will result.
Some states have started using dyna-
mometers in their state inspection pro-
grams in order to meet their obligation un-
der federal law to implement stricter vehi-
cle emission standards to reduce air pollu-
tion from vehicles. A dynamometer is a
treadmill or roller-like testing device that
allows your vehicle
s wheels to turn while
the vehicle remains in one place. Depend-
ing on the severity of a state s air pollution
problems, the states must adopt either a basic or enhanced vehicle emission in-
spection test. Normally, a portion of the
basic emission test consists of an emis-
sion inspector inserting an analyzer probe
into the exhaust pipe of an idling vehicle
for a short period of time. States with more
severe air pollution problems are required
to adopt an enhanced vehicle emission
test. This test simulates actual driving
conditions on a dynamometer and permits
more accurate measurement of tailpipe emitted pollution than the basic emission
test.
The U.S. Environmental Protection Agen-
cy (EPA) and states using two-wheel dy-
namometers in their emission testing pro-
grams have
EXEMPTED Subaru AWD
vehicles from the portion of the testing
program that involves a two-wheel dyna-
mometer.
There are some states that use four-wheel
dynamometers in their testing programs.
When properly used, that equipment will
not damage an AWD Subaru vehicle.
Under no circumstances should the rear
wheels be jacked off the ground, nor
should the driveshaft be disconnected for
state emission testing.
Never add any cleaning agents to
the fuel tank. The addition of a
cleaning agent may cause dam-
age to the fuel system.
Make sure that the cap is tight-
ened until it clicks to prevent fuel
spillage in the event of an acci-
dent.
Do not let fuel spill on the exterior
surfaces of the vehicle.
Fuels may cause paint damage,
which is not covered under the
SUBARU Limited Warranty.
Always use a genuine SUBARU
fuel filler cap. If you use the wrong
cap, it may not fit or have proper
venting, and your fuel tank and
emission control system might be
damaged.
Testing of an All-Wheel Drive vehi-
cle must NEVER be performed on a
single two-wheel dynamometer. At-
tempting to do so will result in un-
controlled vehicle movement and
may cause an accident or injuries to
persons nearby.