2006 SUBARU IMPREZA transmission
[x] Cancel search: transmissionPage 268 of 365
In case of emergency 9-13
CONTINUED
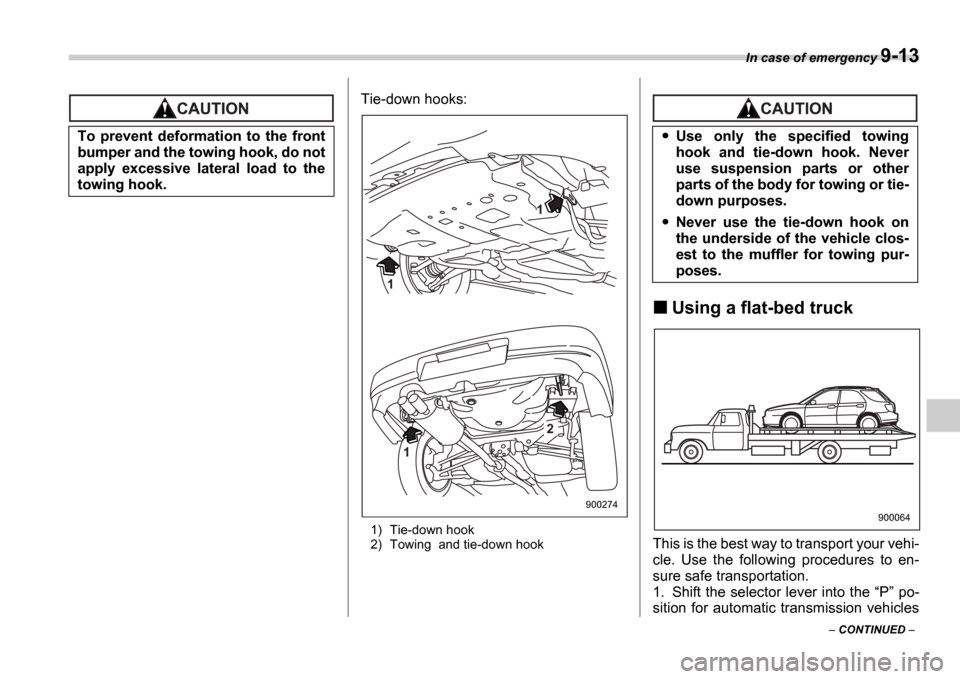
Tie-down hooks:
1) Tie-down hook
2) Towing and tie-down hook
Using a flat-bed truck
This is the best way to transport your vehi-
cle. Use the following procedures to en-
sure safe transportation.
1. Shift the selector lever into the P po-
sition for automatic transmission vehicles
To prevent deformation to the front
bumper and the towing hook, do not
apply excessive lateral load to the
towing hook.
1
1
1
2
900274
Use only the specified towing
hook and tie-down hook. Never
use suspension parts or other
parts of the body for towing or tie-
down purposes.
Never use the tie-down hook on
the underside of the vehicle clos-
est to the muffler for towing pur-
poses.
900064
Page 269 of 365
9-14 In case of emergency
or 1st for manual transmission vehicles.
2. Pull up the parking brake lever firmly.
3. Secure the vehicle onto the carrier
properly with safety chains. Each safety
chain should be equally tightened and
care must be taken not to pull the chains
so tightly that the suspension bottoms out.
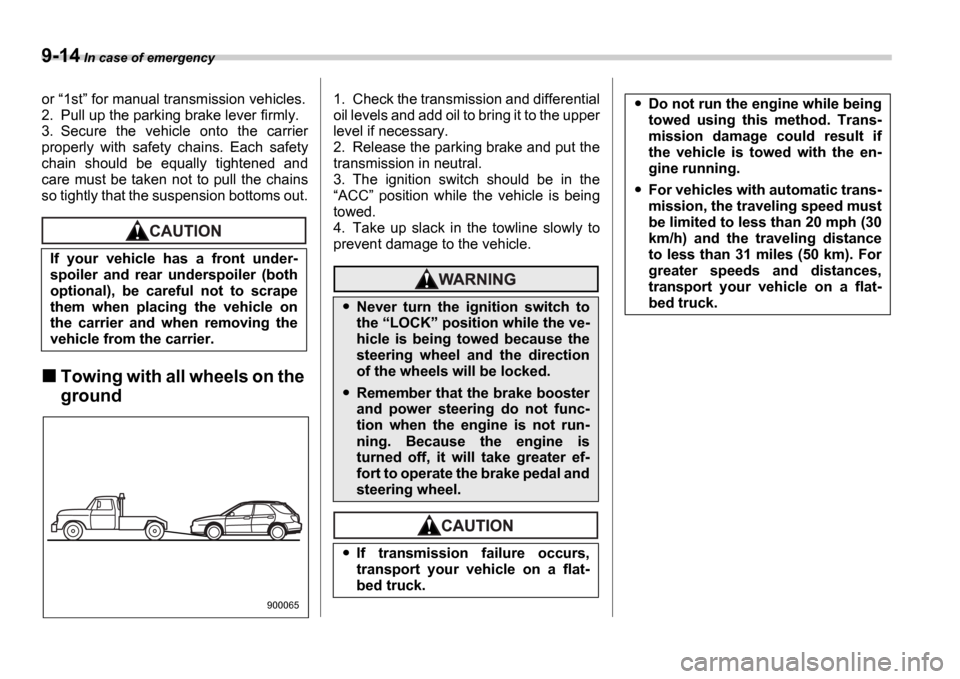
Towing with all wheels on the
ground
1. Check the transmission and differential
oil levels and add oil to bring it to the upper
level if necessary.
2. Release the parking brake and put the
transmission in neutral.
3. The ignition switch should be in the ACC position while the vehicle is being
towed.
4. Take up slack in the towline slowly to
prevent damage to the vehicle.
If your vehicle has a front under-
spoiler and rear underspoiler (both
optional), be careful not to scrape
them when placing the vehicle on
the carrier and when removing the
vehicle from the carrier.
900065
Never turn the ignition switch to
the LOCK position while the ve-
hicle is being towed because the
steering wheel and the direction
of the wheels will be locked.
Remember that the brake booster
and power steering do not func-
tion when the engine is not run-
ning. Because the engine is
turned off, it will take greater ef-
fort to operate the brake pedal and
steering wheel.
If transmission failure occurs,
transport your vehicle on a flat-
bed truck.
Do not run the engine while being
towed using this method. Trans-
mission damage could result if
the vehicle is towed with the en-
gine running.
For vehicles with automatic trans-
mission, the traveling speed must
be limited to less than 20 mph (30
km/h) and the traveling distance
to less than 31 miles (50 km). For
greater speeds and distances,
transport your vehicle on a flat-
bed truck.
Page 280 of 365

11
Maintenance and service
Maintenance schedule ....................................... 11-3
Maintenance precautions ........................... ....... 11-3
Before checking or servicing in the engine compartment ....................................... ................. 11-4
When you do checking or servicing in the engine
compartment while the engine is running ......... 11 -4
Engine hood ....................................... ................ 11-4
Engine compartment overview ....................... .. 11-6
Non-turbo models .................................. ................. 11-6
Turbo models ...................................... .................... 11-7
Engine oil ........................................ .................... 11-8
Checking the oil level ............................ ................. 11-8
Changing the oil and oil filter ................... ............. 11-8
Recommended grade and viscosity ................... .. 11-10
Recommended grade and viscosity under severe driving conditions ......................... ........... 11-11
Synthetic oil ..................................... ....................... 11-11
Cooling system .................................... .............. 11-12
Cooling fan, hose and connections ................. ..... 11-12
Engine coolant .................................... .................... 11-12
Air cleaner element ............................... ............. 11-15
Replacing the air cleaner element ................. ........ 11-15
Spark plugs ....................................... .................. 11-17
Recommended spark plugs ........................... ........ 11-17
Drive belts ....................................... .................... 11-18
Manual transmission oil ........................... ......... 11-18
Checking the oil level ............................ ................. 11-18
Recommended grade and viscosity ................... .. 11-19Automatic transmission fluid ......................
...... 11-20
Checking the fluid level .......................... ................ 11-20
Recommended fluid ................................. .............. 11-21
Front differential gear oil (AT vehicles) ......... ... 11-21
Checking the oil level ............................ ................. 11-21
Recommended grade and viscosity ................... .. 11-22
Rear differential gear oil ........................ ............ 11-22
Checking the gear oil level ....................... ............. 11-22
Recommended grade and viscosity ................... .. 11-23
Power steering fluid .............................. ............. 11-24
Checking the fluid level .......................... ................ 11-24
Recommended fluid ................................. .............. 11-24
Brake fluid ....................................... .................... 11-25
Checking the fluid level .......................... ................ 11-25
Recommended brake fluid ........................... .......... 11-25
Clutch fluid (MT vehicles) ........................ .......... 11-26
Checking the fluid level .......................... ................ 11-26
Recommended clutch fluid .......................... .......... 11-26
Brake booster ..................................... ................ 11-27
Brake pedal ....................................... .................. 11-27
Checking the brake pedal free play ................ ...... 11-27
Checking the brake pedal reserve distance ......... 11-27
Clutch pedal (MT vehicles) ........................ ........ 11-28
Checking the clutch function ...................... .......... 11-28
Checking the clutch pedal free play ............... ...... 11-28
Replacement of brake pad and lining ............... 11-28
Breaking-in of new brake pads and linings ......... . 11-29
Parking brake stroke .............................. ............ 11-29
Page 285 of 365

11-6 Maintenance and service
Engine compartment overview
Non-turbo models
1 2 3 4 5 6
7
8
9
10
11
13 12
B00464
1) Air cleaner element (page 11-15)
2) Manual transmission oil level gauge
(MT) (page 11-18) or Differential gear
oil level gauge (AT) (page 11-21)
3) Clutch fluid reservoir (page 11-26)
4) Automatic transmission fluid level gauge (page 11-20)
5) Brake fluid reservoir (page 11-25)
6) Fuse box (page 11-41)
7) Battery (page 11-40)
8) Windshield washer tank (page 11-36)
9) Engine coolant reservoir (page 11-
12)
10) Engine oil level gauge (page 11-8)
11) Engine oil filler cap (page 11-8)
12) Radiator cap (page 11-12)
13) Power steering fluid reservoir (page
11-24)
Page 286 of 365

Maintenance and service 11-7
Turbo models
1 2 3 4 5 6
7
8
9
10
11
12
13
B00466
1) Air cleaner element (page 11-15)
2) Manual transmission oil level gauge
(MT) (page 11-18) or Differential gear
oil level gauge (AT) (page 11-21)
3) Automatic transmission fluid level gauge (page 11-20)
4) Clutch fluid reservoir (page 11-26)
5) Brake fluid reservoir (page 11-25)
6) Fuse box (page 11-41)
7) Battery (page 11-40)
8) Windshield washer tank (page 11-36)
9) Engine oil filler cap (page 11-8)
10) Engine coolant reservoir (page 11- 12)
11) Engine oil level gauge (page 11-8)
12) Radiator cap (page 11-12)
13) Power steering fluid reservoir (page
11-24)
Page 297 of 365
11-18 Maintenance and service
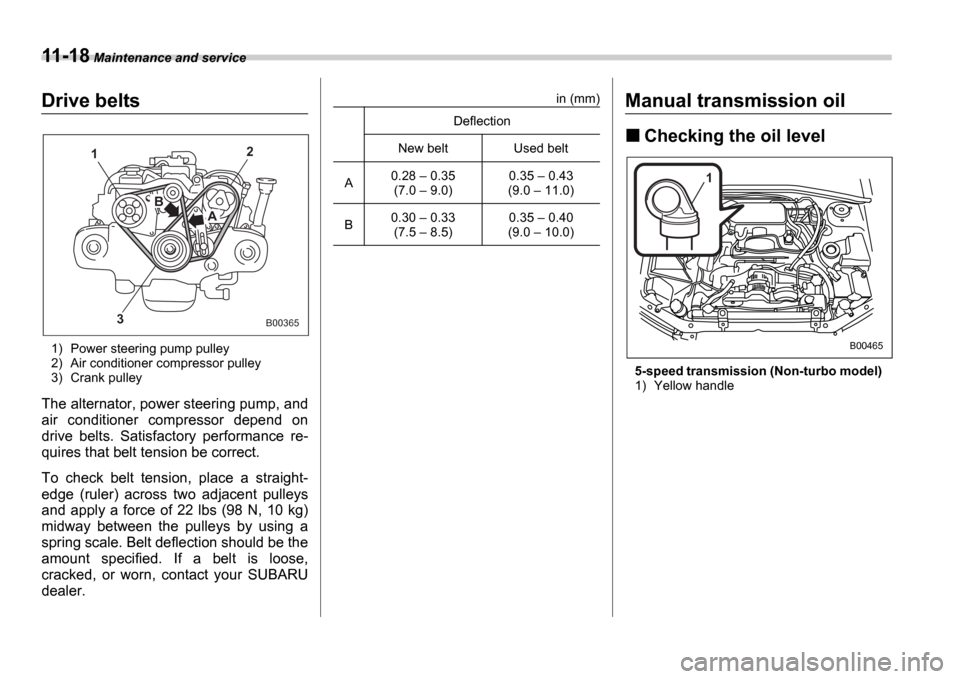
Drive belts
1) Power steering pump pulley
2) Air conditioner compressor pulley
3) Crank pulley
The alternator, power steering pump, and
air conditioner compressor depend on
drive belts. Satisfactory performance re-
quires that belt tension be correct.
To check belt tension, place a straight-
edge (ruler) across two adjacent pulleys
and apply a force of 22 lbs (98 N, 10 kg)
midway between the pulleys by using a
spring scale. Belt deflection should be the
amount specified. If a belt is loose,
cracked, or worn, contact your SUBARU
dealer.
in (mm)Manual transmission oil
Checking the oil level
5-speed transmission (Non-turbo model)
1) Yellow handle
A
B
2
3
1
B00365
Deflection
New belt Used belt
A 0.28
0.35
(7.0 9.0) 0.35
0.43
(9.0 11.0)
B 0.30
0.33
(7.5 8.5) 0.35
0.40
(9.0 10.0)
1
B00465
Page 298 of 365
Maintenance and service 11-19
5-speed transmission (Turbo model)
6-speed transmission
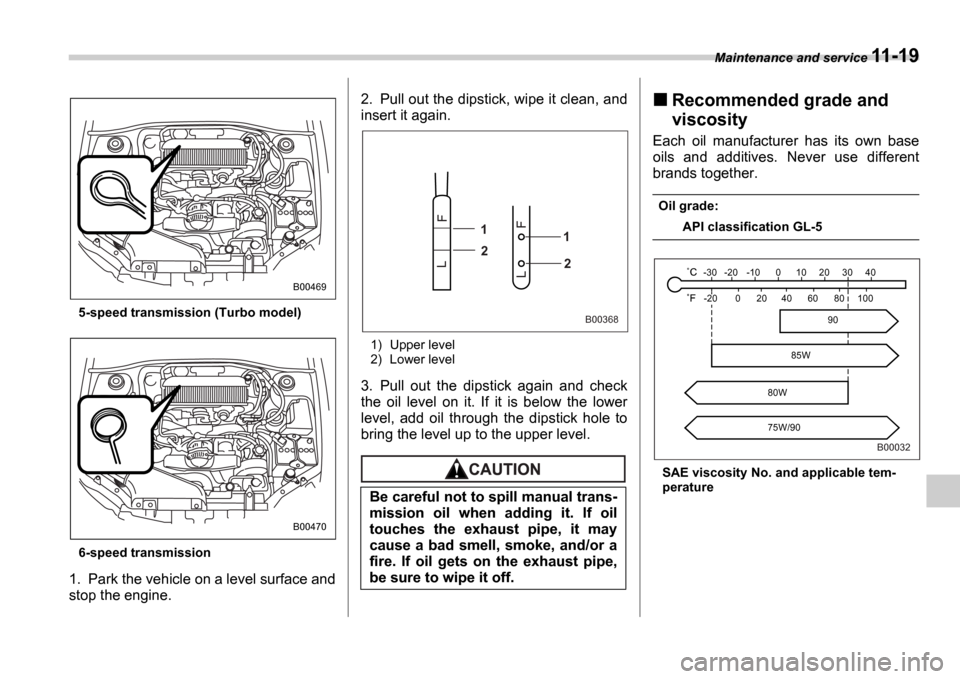
1. Park the vehicle on a level surface and
stop the engine. 2. Pull out the dipstick, wipe it clean, and
insert it again.
1) Upper level
2) Lower level
3. Pull out the dipstick again and check
the oil level on it. If it is below the lower
level, add oil through the dipstick hole to
bring the level up to the upper level.
Recommended grade and
viscosity
Each oil manufacturer has its own base
oils and additives. Never use different
brands together.
Oil grade:
API classification GL-5
SAE viscosity No. and applicable tem-
perature
B00469
B00470
Be careful not to spill manual trans-
mission oil when adding it. If oil
touches the exhaust pipe, it may
cause a bad smell, smoke, and/or a
fire. If oil gets on the exhaust pipe,
be sure to wipe it off.
L F
F
L1
2 1
2
B00368
-30 -20 -10 0 10 20 30 40-20 0 60 20
80W
75W/90 80 100
40
85W 90
B00032
Page 299 of 365
11-20 Maintenance and service
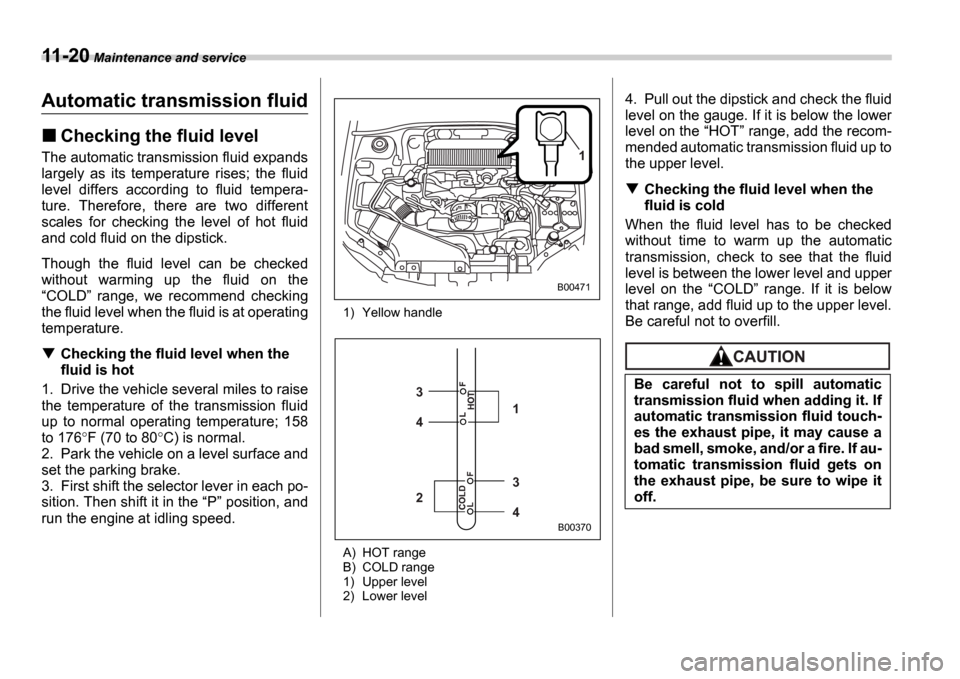
Automatic transmission fluid
Checking the fluid level
The automatic transmission fluid expands
largely as its temperature rises; the fluid
level differs according to fluid tempera-
ture. Therefore, there are two different
scales for checking the level of hot fluid
and cold fluid on the dipstick.
Though the fluid level can be checked
without warming up the fluid on theCOLD range, we recommend checking
the fluid level when the fluid is at operating
temperature.
Checking the fluid level when the
fluid is hot
1. Drive the vehicle several miles to raise
the temperature of the transmission fluid
up to normal operating temperature; 158
to 176 F (70 to 80 C) is normal.
2. Park the vehicle on a level surface and
set the parking brake.
3. First shift the selector lever in each po-
sition. Then shift it in the P position, and
run the engine at idling speed.
1) Yellow handle
A) HOT range
B) COLD range
1) Upper level
2) Lower level
4. Pull out the dipstick and check the fluid
level on the gauge. If it is below the lower
level on the HOT range, add the recom-
mended automatic transmission fluid up to
the upper level.
Checking the fluid level when the
fluid is cold
When the fluid level has to be checked
without time to warm up the automatic
transmission, check to see that the fluid
level is between the lower level and upper
level on the COLD range. If it is below
that range, add fluid up to the upper level.
Be careful not to overfill.
1
B00471
3 4
34 2
1
B00370
Be careful not to spill automatic
transmission fluid when adding it. If
automatic transmission fluid touch-
es the exhaust pipe, it may cause a
bad smell, smoke, and/or a fire. If au-
tomatic transmission fluid gets on
the exhaust pipe, be sure to wipe it
off.