2006 SUBARU IMPREZA ECO mode
[x] Cancel search: ECO modePage 158 of 365
Climate control 4-9
CONTINUED
AUTO position and the air flow control
dial in the
, , or po-
sition, the fan does not operate during
engine warmup until the engine cool-
ant temperature exceeds approx. 122 F
(50 C).
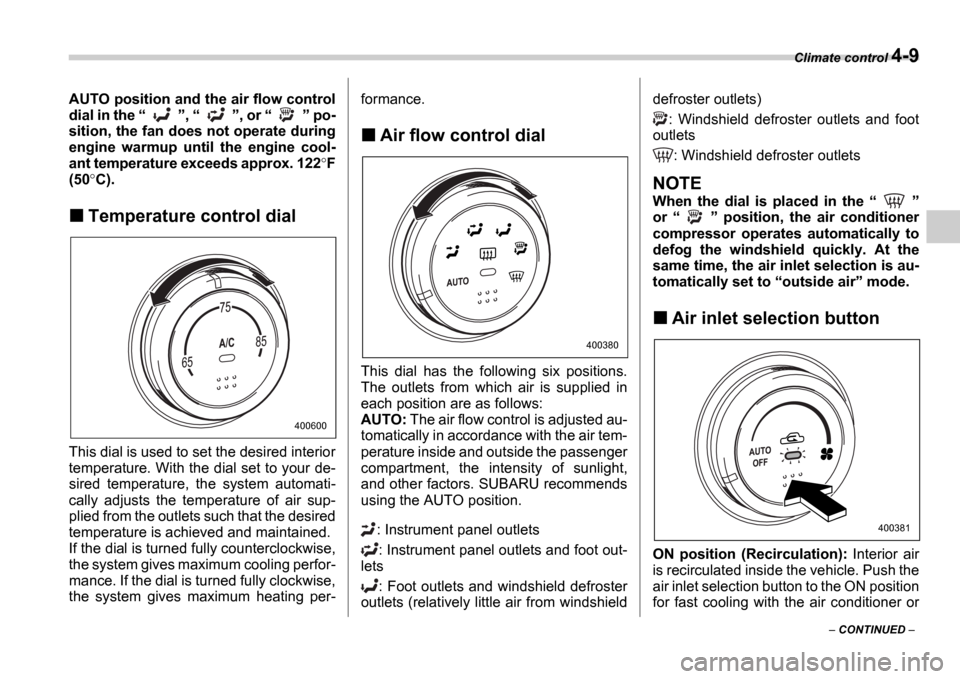
Temperature control dial
This dial is used to set the desired interior
temperature. With the dial set to your de-
sired temperature, the system automati-
cally adjusts the temperature of air sup-
plied from the outlets such that the desired
temperature is achieved and maintained.
If the dial is turned fully counterclockwise,
the system gives maximum cooling perfor-
mance. If the dial is turned fully clockwise,
the system gives maximum heating per- formance.
Air flow control dial
This dial has the following six positions.
The outlets from which air is supplied in
each position are as follows:
AUTO:
The air flow control is adjusted au-
tomatically in accordance with the air tem-
perature inside and outside the passenger
compartment, the intensity of sunlight,
and other factors. SUBARU recommends
using the AUTO position.
: Instrument panel outlets: Instrument panel outlets and foot out-
lets
: Foot outlets and windshield defroster
outlets (relatively little air from windshield defroster outlets)
: Windshield defroster outlets and foot
outlets
: Windshield defroster outlets
NOTE
When the dial is placed in the
or position, the air conditioner
compressor operates automatically to
defog the windshield quickly. At the
same time, the air inlet selection is au-
tomatically set to outside air mode.
Air inlet selection button
ON position (Recirculation): Interior air
is recirculated inside the vehicle. Push the
air inlet selection button to the ON position
for fast cooling with the air conditioner or
400600
400380
400381
Page 159 of 365
4-10 Climate control
when driving on a dusty road. The indica-
tor light will come on.
OFF position (Outside Air): Outside air
is drawn into the passenger compartment.
Push the air inlet selection button to the
OFF position when the interior has cooled
to a comfortable temperature and the road
is no longer dusty. The indicator light will
go off.
AUTO: When the air inlet selection button
is pressed for at least one second, the in-
dicator flashes twice. The air inlet control
is then adjusted automatically in accor-
dance with the air temperature inside and
outside the passenger compartment, the
intensity of sunlight, and other factors.
Pressing the air inlet selection button can-
cels the AUTO mode. SUBARU recom-
mends using the AUTO position.Air conditioner button
The button s positions and their functions
are as follows:
ON: The air conditioner operates while the
fan is running.
Push the button to select this position. The
indicator light will illuminate.
OFF: The air conditioner does not operate.
Push the button a second time to select
this position. The indicator light will go off.
AUTO: When the button is pressed for at
least one second, the indicator flashes
twice. The air conditioner compressor op-
eration is then adjusted automatically in
accordance with the air temperature in-
side and outside the passenger compart-
ment, the intensity of sunlight, and other
factors. Pressing the button cancels the
AUTO mode. SUBARU recommends us-
ing the AUTO position.
NOTE
The air conditioner s compressor does
not operate with an outside tempera-
ture of 32 F (0 C) or lower.
Temperature sensors
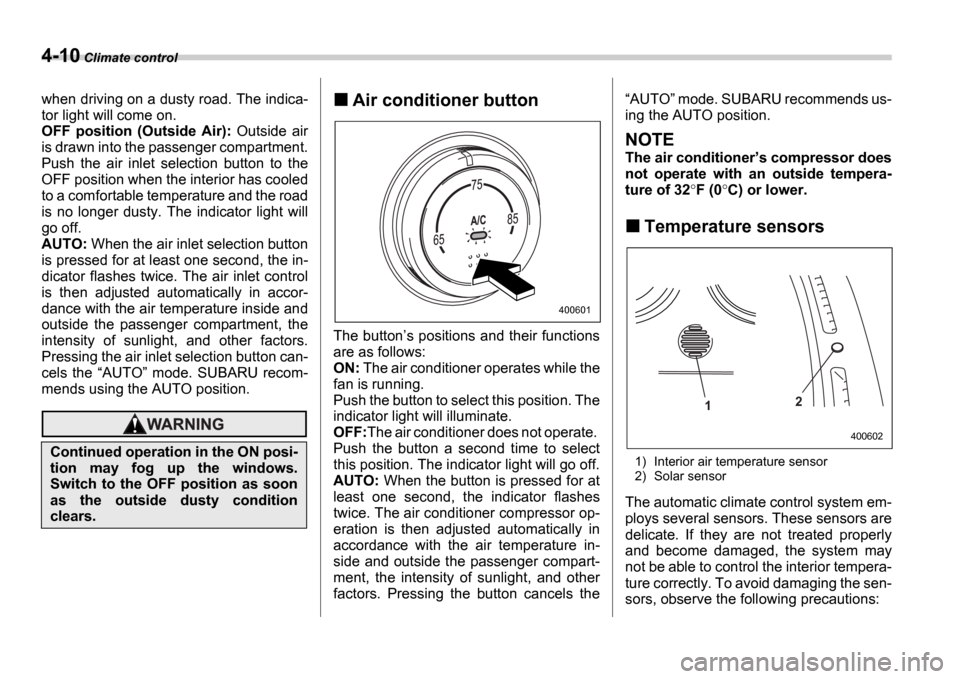
1) Interior air temperature sensor
2) Solar sensor
The automatic climate control system em-
ploys several sensors. These sensors are
delicate. If they are not treated properly
and become damaged, the system may
not be able to control the interior tempera-
ture correctly. To avoid damaging the sen-
sors, observe the following precautions:
Continued operation in the ON posi-
tion may fog up the windows.
Switch to the OFF position as soon
as the outside dusty condition
clears.
400601
2
1
400602
Page 167 of 365
5-4 Audio
Type A audio set (if equipped)
The radio will operate only when the ignition switch i s in the ACC or ON position.
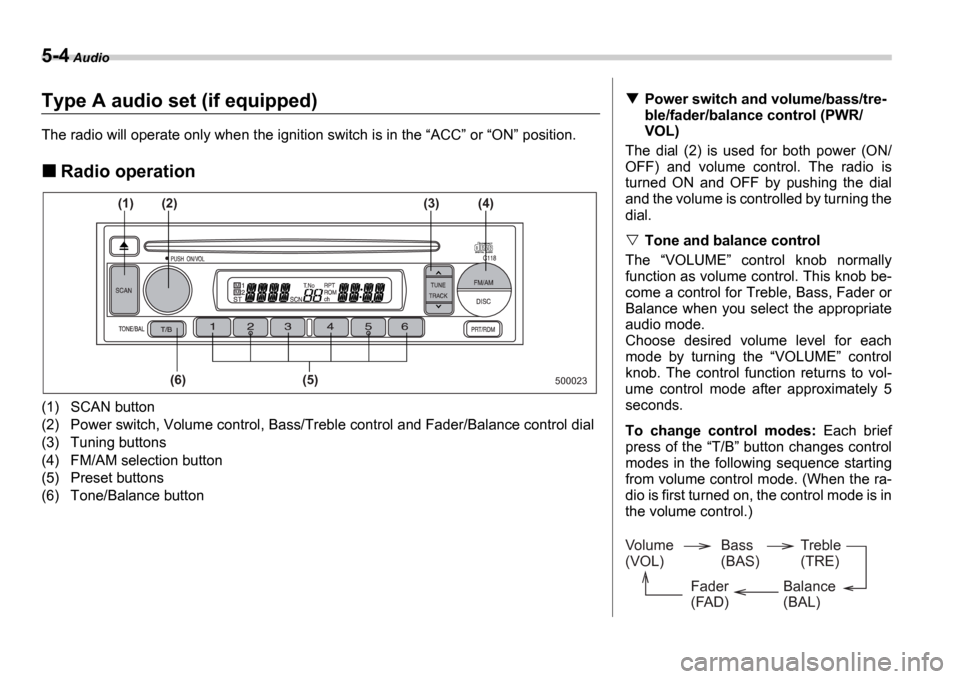
Radio operation
(1) SCAN button
(2) Power switch, Volume control, Bass/Treble control a nd Fader/Balance control dial
(3) Tuning buttons
(4) FM/AM selection button
(5) Preset buttons
(6) Tone/Balance button
500023
(1)
(6) (5)
(2)
(3) (4)
Power switch and volume/bass/tre-
ble/fader/balance control (PWR/
VOL)
The dial (2) is used for both power (ON/
OFF) and volume control. The radio is
turned ON and OFF by pushing the dial
and the volume is controlled by turning the
dial.
Tone and balance control
The VOLUME control knob normally
function as volume control. This knob be-
come a control for Treble, Bass, Fader or
Balance when you select the appropriate
audio mode.
Choose desired volume level for each
mode by turning the VOLUME control
knob. The control function returns to vol-
ume control mode after approximately 5
seconds.
To change control modes: Each brief
press of the T/B button changes control
modes in the following sequence starting
from volume control mode. (When the ra-
dio is first turned on, the control mode is in
the volume control.)
Volume
(VOL) Bass
(BAS)Treble
(TRE)
Balance
(BAL)
Fader
(FAD)
Page 169 of 365
5-6 Audio
Manual tuning (TUNE)
Push the side of the tuning button
(3) to increase the tuning frequency and
press the side of the button to de-
crease it.
Each time the button is pressed, the fre-
quency changes 10 KHz in the AM wave-
band and 0.2 MHz in the FM waveband.
Constant pressure on the button causes a
continuous change in the frequency.
Automatic tuning (SCAN)
Press the SCAN button (1) to change the
radio to the SCAN mode. In this mode, the
radio scans through the radio band until a
station is found. The radio will stop at the
station for five seconds while displaying
the frequency, after which scanning will
continue until the entire band has been
scanned from the low end to the high end.
Press the SCAN button again to cancel
the SCAN mode and to stop on any dis-
played frequency.
When the SCAN button is pressed for
automatic tuning, stations are scanned in
the direction of low frequencies to high fre-
quencies only.
Automatic tuning may not function proper-
ly if the station reception is weakened by
distance from the station or proximity to
tall buildings and hills.
Selecting preset stations
Presetting a station with a Preset button
(5) allows you to select that station in a
single operation. Up to six AM, FM1 and
FM2 stations each may be preset.
How to preset stations
1. Press the FM/AM selection button to
select AM, FM1 or FM2 reception.
2. Press the SCAN button (1) or tune
the radio manually until the desired station
frequency is displayed.
3. Press one of the Preset buttons (5)
for at least 2 seconds to store the fre-
quency. The frequency of the station will
flash once on the display at this time. If the
button is pressed for less than 2 seconds,
the preceding selection will remain in
memory.
NOTE
If the connection between the radio
and battery is broken for any reason
such as vehicle maintenance or radio
removal, all stations stored in the pre-
set buttons are cleared. If this occurs,
it is necessary to reset the preset but-
tons.
If a cell phone is placed near the ra-
dio, it may cause the radio to emit
noise when it receives calls. This noise
does not indicate a radio fault.
Page 171 of 365

5-8 Audio
(11) to skip to the beginning of the next
track. Each time this side of the button is
pressed, the indicated track number will
increase.
Backward direction
Briefly press the side of the button
(11) to skip to the beginning of the current
track. Each time this side of the button is
pressed, the indicated track number will
decrease.
Fast-forwarding and fast-reversing
Fast-forwarding
Press the side of the button (11)
continuously to fast-forward the disc.
Release the button to stop fast-forward-
ing.
Fast-reversing
Press the side of the button (11)
continuously to fast-reverse the disc.
Release the button to stop fast-reversing.
Repeat playback
Press the RPT/RDM button (10) and re-
lease it in less than 2 seconds while a
song is playing to play the song repeated-
ly. The RPT indicator will come on and
the song will be played continuously. To
cancel the repeat mode, press the button
again. Then the RPT indicator goes out, and normal playback mode is restored.
Random playback
Press the RPT/RDM button (10) and
hold it in for more than 2 seconds while a
disc is being played back to play all songs
on the disc in a random order. The RDM
indicator will come on and all songs on the
disc will be played in a random order.
To cancel the random mode, press the
button again. Then the RDM indicator
goes out, and normal playback mode is
restored.
To eject a disc from the player
When a disc is being played back or when
a disc is in the player, press the Eject
button (7). The disc will be ejected.
The disc may be removed even when the
ignition switch is in the LOCK position.
NOTE
Avoid driving the vehicle with a CD
sticking out, because vibration might
make it fall out.
Page 173 of 365
5-10 Audio
lected in a similar way.
NOTE
No disc change takes place if the
button corresponding to the storage
tray in which no disc is loaded is
pressed.
If the disc select button correspond-
ing to the disc now in playback is
pressed again, the disc will be replayed
from its beginning.
To select a song from its beginning
Forward direction
Briefly press the side of the button
(12) to skip to the beginning of the next
track. Each time this side of the button is
pressed, the indicated track number will
increase.
Backward direction
Briefly press the side of the button
(12) to skip to the beginning of the current
track. Each time this side of the button is
pressed, the indicated track number will
decrease.
Fast-forwarding and fast-reversing
Fast-forwarding
Press the side of the button (12)
continuously to fast-forward the disc.
Release the button to stop fast-forward- ing.
If you continue fast-forwarding to the end
of the disc, the CD changer will automati-
cally stop fast-forwarding and start play-
back beginning with the first track on the
current disc.
Fast-reversing
Press the side of the button (12)
continuously to fast-reverse the disc.
Release the button to stop fast-reversing.
If you continue fast-reverse to the begin-
ning of the disc, the CD changer will auto-
matically stop fast-reverse and start play-
back beginning with the first track on the
current disc.
Repeat playback
Use this to play a certain track repeatedly.
During playback, press the RPT/RDM
button (14) and release it in less than 2
seconds. The RPT indicator will come on
and the song will be played continuously.
To cancel the repeat mode, press the but-
ton again. Then the RPT indicator goes
out, and normal playback mode is re-
stored.
Random playback
Use this to play the tracks on the disc in
random order. During playback, press the RPT/RDM button (14) and hold it in for
more than 2 seconds. The RDM indica- tor will come on and all songs on the disc
will be played in a random order.
To cancel the random mode, press the
button again. Then the
RDM indicator
goes out, and normal playback mode is
restored.
Page 175 of 365
5-12 Audio
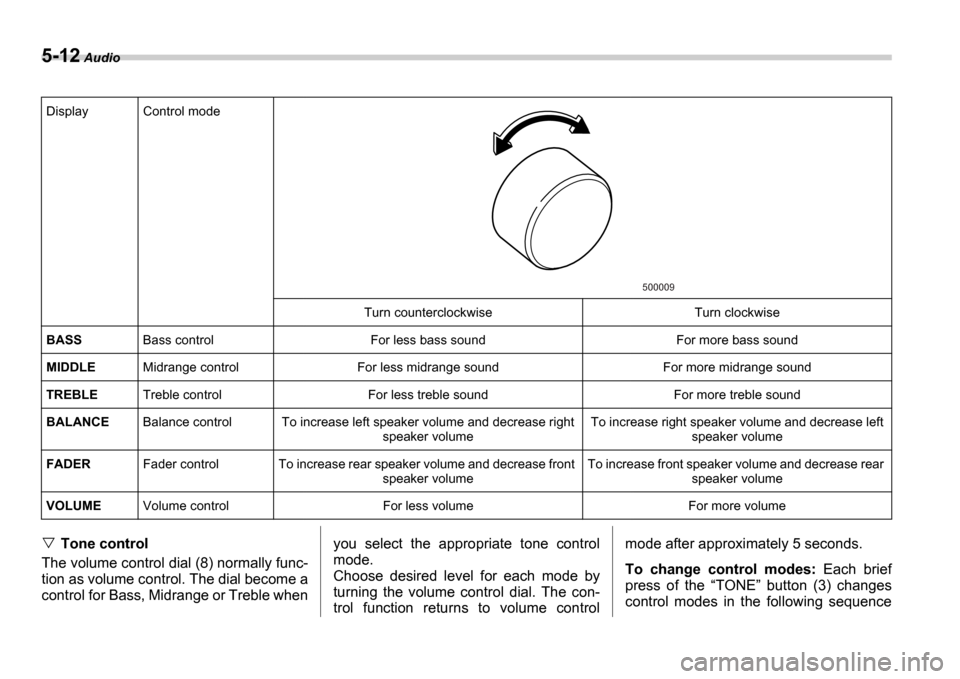
Tone control
The volume control dial (8) normally func-
tion as volume control. The dial become a
control for Bass, Midrange or Treble when you select the appropriate tone control
mode.
Choose desired level for each mode by
turning the volume control dial. The con-
trol function returns to volume controlmode after approximately 5 seconds.
To change control modes:
Each brief
press of the TONE button (3) changes
control modes in the following sequence
Display Control mode
Turn counterclockwise Turn clockwise
BASS Bass control For less bass sound For more bass sound
MIDDLE Midrange control For less midrange sound For more mid range sound
TREBLE Treble control For less treble sound For more treble sound
BALANCE Balance control To increase left speaker volume and decrease right
speaker volume To increase right speaker volume and decrease left
speaker volume
FADER Fader control To increase rear speaker volume and de crease front
speaker volume To increase front speaker volume and decrease rear
speaker volume
VOLUME Volume control For less volume For more volume
500009
Page 176 of 365
Audio 5-13
CONTINUED
starting from bass control mode. (When
the radio is first turned on, the control
mode is in the volume control.)
Fader and balance control
The volume control dial (8) normally func-
tion as volume control. The dial become
the controls for Fader or Balance when
you select the appropriate fader and bal-
ance control mode.
Choose desired setting for each mode by
turning the volume control dial. The con-
trol function returns to volume control
mode after approximately 5 seconds.
To change control modes: Each brief
press of the BAL button (4) changes
control modes in the following sequence
starting from fader control mode. (When
the radio is turned on, the control mode is
in the volume control.)
Display illumination dimness can-
cellation (BRIGHT)
The brightness of the radio display dims
when the light switch is in the or
positions. If this makes the display
difficult to read, press the volume dial for
more than 1.5 seconds to return the dis-
play to original brightness.
Subsequently pressing the volume dial
again for more than 1.5 seconds or if you
can safely do so, turning the light switch to
the OFF position and back to the
or position makes the radio display
dim again.
FM/AM selection button
Push the FM (1) or AM (2) button when
the radio is off to turn on the radio.
Push the FM or AM button when the ra-
dio is on to select FM1, FM2 or AM recep-
tion.
Stereo indicator
The stereo indicator ST will come on
when an FM stereo broadcast is received.
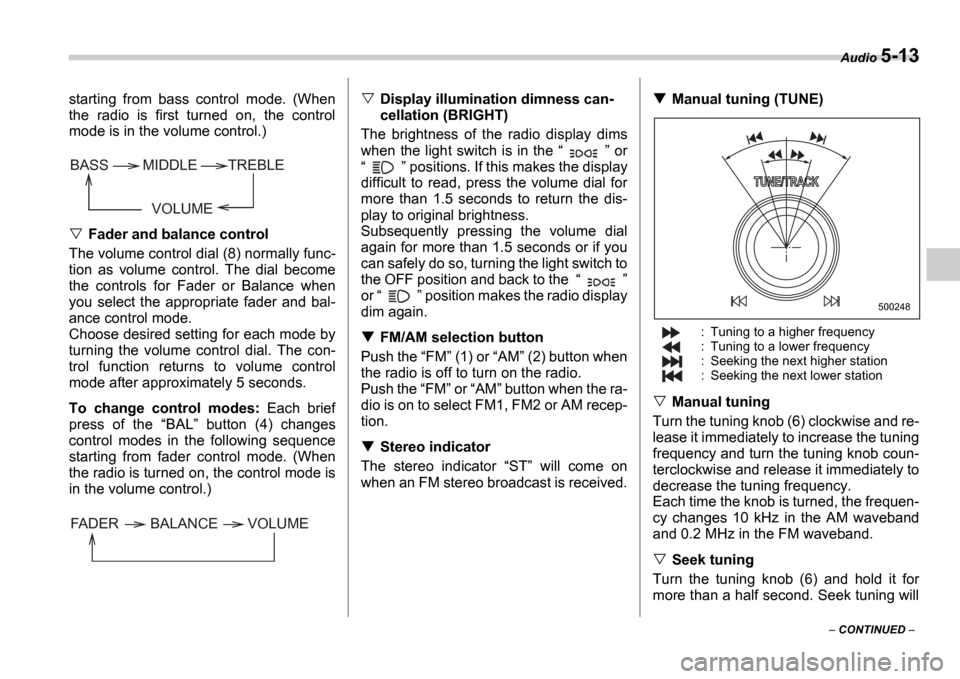
Manual tuning (TUNE)
: Tuning to a higher frequency
: Tuning to a lower frequency
: Seeking the next higher station
: Seeking the next lower station
Manual tuning
Turn the tuning knob (6) clockwise and re-
lease it immediately to increase the tuning
frequency and turn the tuning knob coun-
terclockwise and release it immediately to
decrease the tuning frequency.
Each time the knob is turned, the frequen-
cy changes 10 kHz in the AM waveband
and 0.2 MHz in the FM waveband.
Seek tuning
Turn the tuning knob (6) and hold it for
more than a half second. Seek tuning will
VOLUME
BASS TREBLE
MIDDLE
FADER BALANCE VOLUME
500248